


Transform your cluttered shed into an organized storage powerhouse by maximizing vertical space with adjustable shelving systems, installing pegboard walls for tool organization, and utilizing clear bins with detailed labels. Mount heavy-duty ceiling tracks to create overhead storage zones for seasonal items and bulky equipment, while keeping frequently used tools at eye level. To organize a shed effectively, implement modular storage units along the walls and create designated zones for gardening supplies, power tools, and maintenance equipment. Strategic placement of mobile storage carts and fold-down workbenches doubles your usable space while maintaining easy access to essential items. These smart storage solutions transform even the most modest shed into a well-organized, efficient workspace that protects your investments and streamlines your outdoor projects.
Vertical Storage Solutions
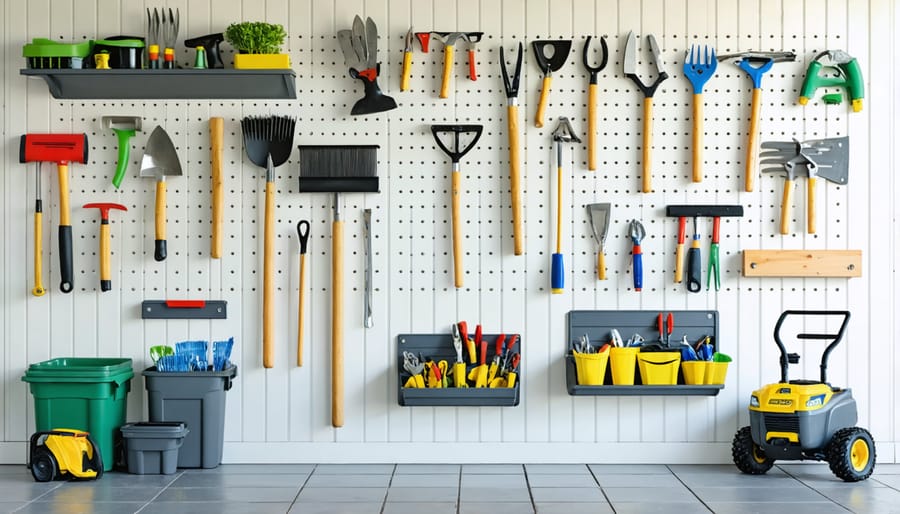
Wall-Mounted Systems
Wall-mounted storage systems are game-changers when it comes to maximizing your shed’s vertical space while keeping tools and supplies easily accessible. Pegboards are perhaps the most versatile option, offering a customizable grid of holes where you can insert hooks, shelves, and specially designed accessories. They’re perfect for hanging frequently used tools and creating visual organization systems with outlined tool shapes or color-coded zones.
Slatwall systems take organization to the next level with their horizontal groove design. These modern solutions can handle heavier items than pegboards and offer a sleeker look. The grooves accept various brackets, hooks, and shelving units that can be easily repositioned without tools. Many gardeners love using slatwall systems for storing long-handled tools, bins of supplies, and even mounting storage cabinets.
Adjustable wall tracks offer the most heavy-duty solution of the three. These systems typically consist of vertical rails with multiple mounting points for brackets and shelves. What makes them particularly smart is their ability to adapt as your storage needs change – you can adjust shelf heights and configurations without having to drill new holes in your shed walls.
Pro tip: Before installing any wall-mounted system, ensure your shed walls can support the weight, and consider adding backing boards for extra stability. Remember to leave some wall space free for larger items that might need to lean against the wall.
Door Space Optimization
One of the most underutilized storage spaces in your shed is right in front of you – the door! By making smart use of this often-overlooked area, you can significantly expand your storage capacity without taking up valuable floor space.
Consider installing an over-the-door organizer with multiple pockets, perfect for storing smaller items like gardening gloves, hand tools, and spray bottles. These organizers are typically designed for closet doors but work wonderfully in shed applications. For a more robust solution, mount a pegboard or slat wall system on the door’s interior surface. This creates a customizable storage wall that can hold frequently used tools within easy reach.
Door-mounted basket systems are another excellent option, providing deep storage for bulkier items while keeping them organized and visible. Install magnetic strips to keep metal tools like pruning shears and trowels readily accessible. For wider shed doors, consider adding slim shelving units that won’t interfere with the door’s operation.
Remember to check your door’s weight capacity before installation and use appropriate mounting hardware. If you have double doors, you can double your storage potential by utilizing both surfaces. A simple trick is to add hooks at varying heights for hanging long-handled tools like rakes and brooms, making them easy to grab when needed.
Pro tip: Use clear storage solutions on your door whenever possible to quickly identify items without having to dig through opaque containers.
Overhead Storage Innovations
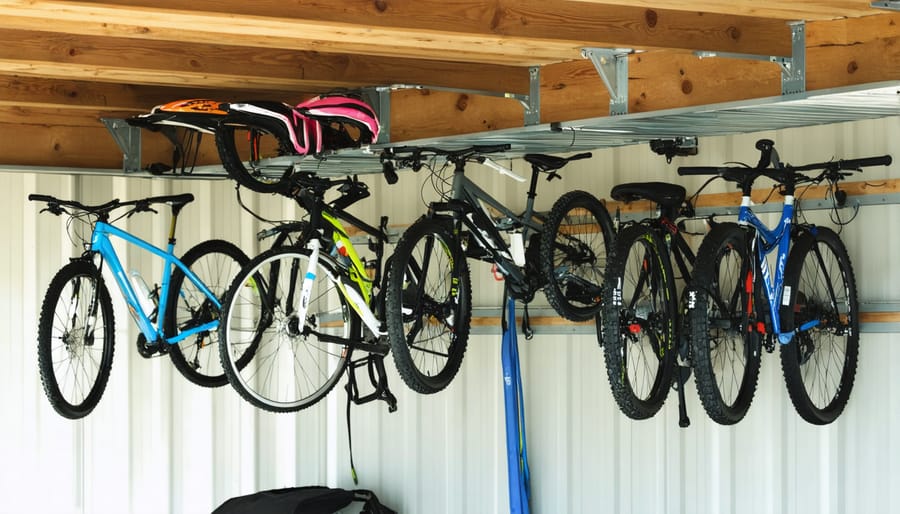
Ceiling-Mounted Racks
Looking to maximize every inch of your shed? The often-overlooked ceiling space offers an excellent opportunity to transform your cluttered storage space into an organized haven. Ceiling-mounted racks are perfect for storing seasonal items, sports equipment, and those bulky items that eat up valuable floor space.
Installation is straightforward with the right tools and planning. Start by locating your ceiling joists using a stud finder – these will be your anchor points. Most systems come with heavy-duty brackets that can support up to 250 pounds when properly installed. Consider installing multiple racks at different heights to create a tiered storage system.
For maximum efficiency, use clear storage bins that allow you to see contents from below. Label everything clearly and keep frequently used items on lower racks for easy access. A simple pulley system can make retrieving heavier items safer and more manageable.
Pro tip: Leave at least 6-8 inches of clearance between stored items and any lighting fixtures to prevent safety hazards. Also, consider installing hooks between racks for hanging lighter items like garden tools or extension cords. This combination of overhead storage solutions can effectively double your usable space while keeping the floor clear for movement and workspace.
Pulley Systems
Harness the power of vertical space with a well-designed pulley system that transforms your shed’s ceiling into valuable storage real estate. These mechanical helpers make it easy to raise and lower heavy items without straining your back, perfect for seasonal equipment like bikes, kayaks, or garden furniture.
Installing a pulley system is simpler than you might think. Start by mounting sturdy ceiling hooks into your shed’s joists, then thread strong rope or cable through the pulleys. Add hooks or storage platforms at the lowering end to secure your items. The beauty of this system lies in its mechanical advantage – even heavier items feel significantly lighter when hoisted using pulleys.
For added convenience, consider installing a locking mechanism to keep items securely elevated. Many DIY enthusiasts use cleats (similar to those found on sailboats) to tie off the ropes safely. Pro tip: label your pulley ropes if you’re storing multiple items overhead, and always ensure your items are properly balanced before lifting.
Safety is paramount – always check weight limits and regularly inspect your pulley system for wear and tear. When properly installed, these systems can free up significant floor space while keeping your belongings easily accessible whenever needed.
Space-Saving Container Systems
Clear Bin Organization
Clear storage bins are a game-changer for shed organization, making it easy to spot exactly what you need at a glance. Opt for high-quality transparent plastic containers in various sizes to accommodate different items, from small gardening tools to seasonal decorations. When selecting bins, look for ones with secure, snap-on lids to keep contents protected from dust and moisture.
To maximize efficiency, implement a color-coding system using different colored labels or tags for various categories. For instance, use green labels for gardening supplies, red for power tools, and blue for household items. Stack similar-sized containers together, and always place heavier bins on bottom shelves for safety and stability.
Make the most of your clear bin system by labeling each container on multiple sides. Include both the category and specific contents – this extra step saves time when items are stacked or stored at different angles. Consider using weatherproof labels that won’t fade or peel in varying shed conditions.
For frequently accessed items, position bins at eye level on sturdy shelving units. Less commonly used seasonal items can be stored on higher or lower shelves. Remember to leave some space between stacks for easy access and air circulation, which helps prevent moisture buildup inside the containers.
Modular Storage Units
Modular storage units are the chameleons of shed organization, offering unmatched flexibility to adapt as your storage needs evolve. These versatile systems typically consist of stackable bins, adjustable shelving units, and interlocking containers that can be mixed and matched to create your perfect storage solution.
Consider investing in clear, stackable storage containers with secure lids. These allow you to easily identify contents while helping to protect tools from rust and keep items safe from moisture and dust. Look for containers with reinforced corners that can handle repeated stacking and unstacking without cracking.
Wall-mounted track systems with removable hooks, baskets, and shelves offer incredible versatility. You can quickly reconfigure these components as seasons change or when new items need storing. For example, switch out garden tool holders in summer for holiday decoration storage in winter.
Many homeowners find success with modular cube organizers, which can be assembled in various configurations. These units work particularly well for storing smaller items like paint supplies, hand tools, and garden accessories. Add fabric bins to some cubes for a tidier appearance and easier access to frequently used items.
Pro tip: Before purchasing any modular system, map out your current storage needs and anticipate future requirements. Choose systems that can grow with you, and always opt for units that can bear more weight than you currently need.
Smart Tool Organization
Mobile Tool Stations
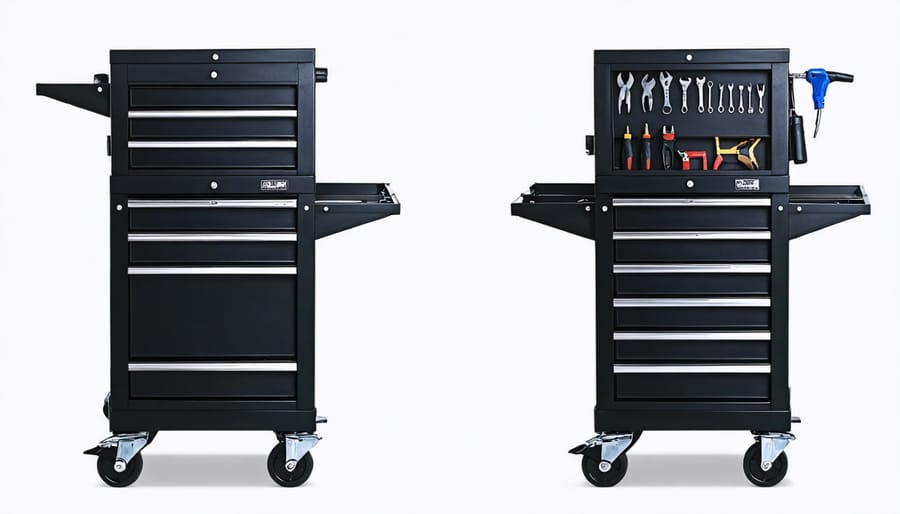
Mobile tool stations are game-changers when it comes to smart shed organization. These versatile units allow you to roll your most-used tools exactly where you need them, saving time and reducing frustration during projects. Consider starting with a basic utility cart equipped with sturdy wheels and multiple shelves. Add pegboard sides for hanging frequently used tools, and install small bins or containers to keep smaller items organized.
For a budget-friendly option, transform an old kitchen cart or microwave stand into a mobile tool station. Simply add a rubber mat on top to prevent tools from sliding, and attach magnetic strips to the sides for holding metal tools. Many DIY enthusiasts have found success using rolling mechanics’ tool chests, which come with built-in drawers perfect for organizing everything from screwdrivers to power tool accessories.
The key to an effective mobile station is customization. Include a mix of storage solutions: open shelving for larger items, drawers for small parts, and hooks for hanging tools. Make sure to add a handle at a comfortable height for easy maneuvering. For additional functionality, consider installing a fold-down work surface that can serve as an extra workbench when needed.
Remember to group similar tools together and label everything clearly. This simple step makes it much easier to maintain organization and quickly locate tools when you need them. Position frequently used items at waist height to minimize bending and stretching.
Custom Tool Storage Solutions
Creating a custom storage solution for your tools not only maximizes space but also helps protect your valuable equipment. One popular approach is building a pegboard wall system, which allows you to arrange tools in a way that matches your specific needs. Simply mount a pegboard panel and use hooks and holders to create a visual display of your most-used tools.
For power tools, consider constructing a dedicated charging station with built-in outlets and labeled spots for each tool. A simple shelf with divided sections keeps batteries organized and readily available. Garden tools benefit from specialized storage solutions like PVC pipe racks mounted to the wall, which keep long-handled tools upright and easily accessible.
Create a mobile tool cart using plywood and casters for frequently used items. Include designated spots for specific tools and add a fold-down work surface for added functionality. For smaller hand tools, magnetic strips mounted at eye level provide quick access while keeping items organized and visible.
Custom wooden holders can be built to accommodate oddly shaped tools or specific collections. For example, a tiered wooden rack works perfectly for storing different sizes of wrenches, while a rotating carousel-style holder is ideal for screwdrivers and similar tools.
Remember to incorporate labels and consider using clear containers for small items like screws and nails. This makes it easier to maintain organization and quickly locate what you need when working on projects.
Seasonal Storage Strategies
The key to an organized shed lies in how you manage seasonal items throughout the year. To effectively maximize your storage space, create designated zones for different seasons. Consider using clear, weatherproof storage bins with color-coded labels – blue for winter items, green for spring gardening tools, yellow for summer equipment, and orange for fall necessities.
During winter months, keep snow shovels and ice melt near the entrance for easy access, while storing summer garden tools and lawn furniture towards the back. As seasons change, rotate these items, bringing frequently needed tools to the front. Install adjustable shelving units that can accommodate different-sized containers as your seasonal storage needs evolve.
Utilize vacuum storage bags for bulky items like pool covers and patio cushions during off-seasons. These bags not only protect against moisture and pests but also significantly reduce storage space requirements. Consider installing a simple pulley system near the ceiling to hoist seasonal decorations and rarely-used items up and out of the way.
Create a seasonal transition checklist and schedule bi-annual organization days (typically spring and fall) to assess, clean, and reorganize your items. This helps prevent clutter buildup and ensures everything remains accessible when needed. Remember to properly clean and maintain seasonal equipment before storage to extend its lifespan and keep your shed organized year-round.
Transforming your shed from a cluttered catch-all to an organized storage haven is easier than you might think. By implementing these smart storage solutions, you’ll maximize every square inch while keeping your items accessible and protected. Whether you’ve chosen vertical storage systems, overhead solutions, or clever wall organizers, the key is to start with a clear plan and tackle the project one area at a time. Remember that good organization isn’t just about storing more – it’s about creating a functional space that makes finding and retrieving items effortless. Take the first step today by selecting one of these storage ideas and watch how it transforms your shed into a more efficient and enjoyable space. With proper planning and the right storage solutions, your shed can become the organized, clutter-free space you’ve always wanted.
Leave a Reply