


Prepare your shed’s foundation correctly, and you’ll prevent decades of headaches from moisture damage, shifting, and structural instability. Start by marking your shed’s footprint plus an extra 2 feet on each side, then remove all vegetation, roots, and organic matter down to firm, undisturbed soil. Level the area using a laser level or transit, ensuring a slight grade away from the planned shed location for proper drainage – aim for a 1-inch drop for every 8 feet of distance.
Create a solid foundation base using 4-6 inches of compacted gravel, followed by a layer of landscape fabric to prevent weed growth and maintain proper drainage. For areas with poor soil conditions or significant slopes, consider installing concrete deck blocks or pouring a concrete slab to provide enhanced stability and load-bearing capacity. These extra steps during preparation will protect your investment and ensure your shed remains level, stable, and moisture-free throughout its lifetime.
A properly prepared foundation not only extends your shed’s lifespan but also simplifies the installation process, maintains proper door alignment, and protects stored items from moisture damage. Take the time to do it right – your future self will thank you.
Why Traditional Ground Prep Often Fails
Water Damage and Soil Erosion
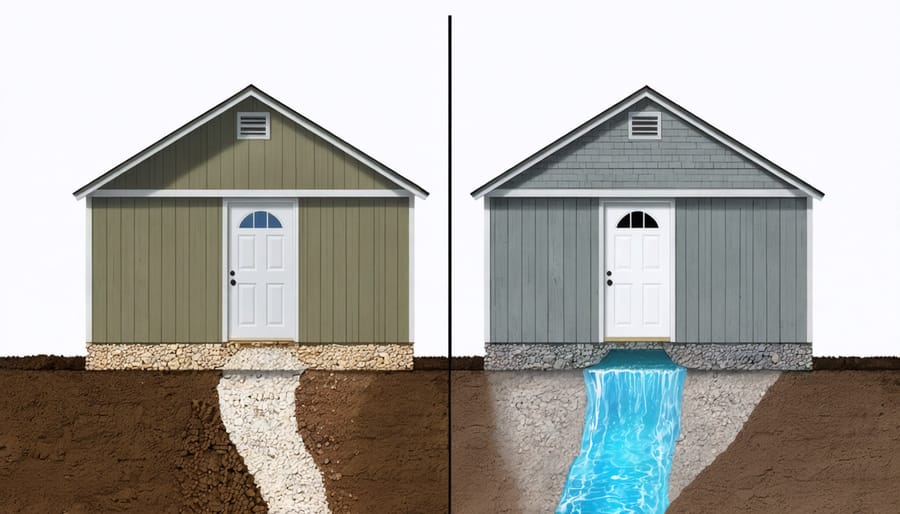
Water damage and soil erosion are two of the biggest threats to your shed’s foundation. When rainwater doesn’t drain properly, it can pool around your shed’s base, weakening the foundation and potentially causing the structure to shift or sink. To keep water out of your shed and protect its foundation, proper drainage is essential.
Poor drainage can lead to several serious issues. The soil beneath your shed can become saturated, causing it to compress or wash away. This creates voids under the foundation, leading to uneven settling and potential structural damage. In winter, trapped water can freeze and expand, pushing against your shed’s foundation and causing cracks.
The good news is that these problems are preventable with proper ground preparation. Installing a slight grade away from your shed, using gravel or crushed stone for drainage, and implementing proper water management systems can protect your investment. Remember, addressing drainage during the initial ground preparation is much easier and more cost-effective than fixing water damage issues later.
Frost Heave Effects
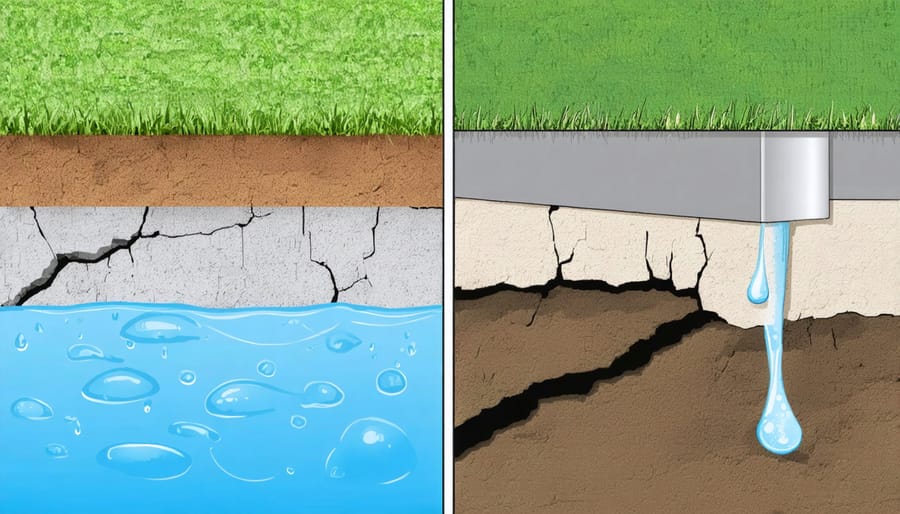
Frost heave can pose a serious threat to your shed’s stability, especially in regions that experience harsh winters. When moisture in the soil freezes, it expands upward, potentially lifting and distorting your shed’s foundation. This freeze-thaw cycle can repeat numerous times throughout winter, gradually causing your shed to become unlevel or structurally compromised.
To protect against frost heave, proper ground preparation is essential. The key is ensuring adequate drainage and creating a foundation that extends below your area’s frost line. A well-planned gravel base helps water drain away from the foundation, while installing a proper frost-resistant foundation prevents the ground beneath your shed from freezing and expanding.
Consider incorporating a layer of crushed stone or gravel at least 4-6 inches deep, combined with landscape fabric to prevent soil mixing. This combination creates a stable, well-draining base that minimizes water retention and reduces the risk of frost heave damage. For areas with severe winters, you might need to dig deeper foundations or consider additional protective measures like perimeter drainage systems to ensure your shed remains stable year-round.
Smart Permeable Ground Solutions
Gravel and Crushed Stone Bases
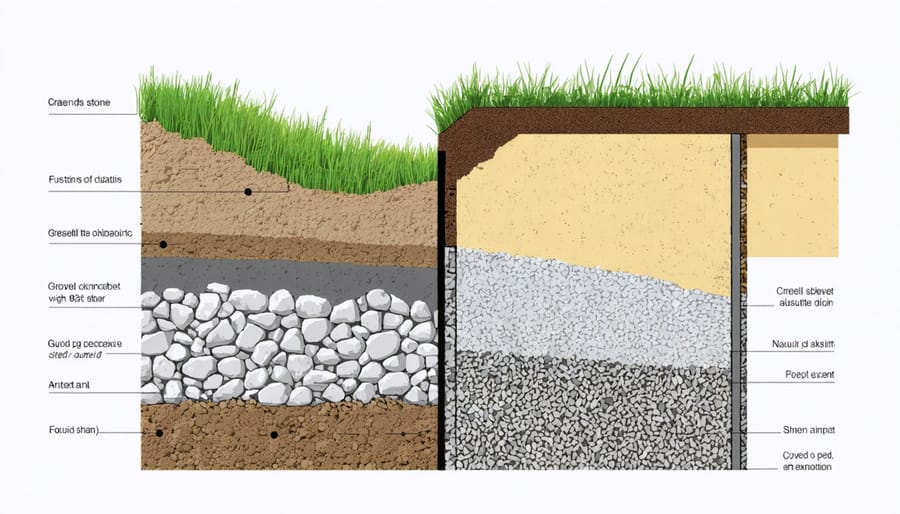
When it comes to creating a solid foundation for your shed, permeable gravel foundations and crushed stone bases are excellent choices that provide both stability and proper drainage. Start with a layer of larger crushed stone (typically 2-3 inches in diameter) as your base layer, spreading it to a depth of about 4 inches. This creates a sturdy foundation that allows water to flow through freely.
Above this base layer, add a 2-3 inch layer of smaller gravel (typically ¾ inch). This middle layer helps create a smooth transition and prevents the smaller top particles from mixing with the larger base stones. Finally, top it off with a layer of fine gravel or crushed stone screenings, about 1 inch deep, which creates a level surface for your shed while maintaining drainage capabilities.
When laying these materials, work in small sections and use a plate compactor after each layer. This ensures maximum stability and prevents future settling. Remember to maintain a slight grade (about 1 inch per 8 feet) sloping away from your planned shed location to direct water away from the structure.
Pro tip: Use landscape fabric between your soil and the first layer of stone to prevent weed growth and keep your gravel layers from mixing with the soil beneath. This simple addition significantly extends the life of your foundation and helps maintain proper drainage for years to come.
Permeable Pavers
Permeable pavers offer an excellent foundation solution for your shed while managing water drainage effectively. These interlocking blocks create a sturdy base that allows rainwater to seep through naturally, preventing pooling and potential foundation damage. Available in various materials like concrete, recycled plastic, and composite materials, permeable pavers can complement your landscape while serving a practical purpose.
Installation begins with excavating the area to a depth of 6-8 inches, followed by adding a layer of crushed stone or gravel. This sub-base creates essential drainage pathways beneath the pavers. Next, add a thin layer of bedding sand before laying the pavers in your desired pattern. The gaps between pavers are filled with small aggregate or special joint material that maintains permeability while keeping the pavers stable.
One of the biggest advantages of permeable pavers is their dual functionality – they provide both structural support and natural drainage. This system helps prevent soil erosion around your shed and reduces the risk of water damage to stored items. Many homeowners appreciate that these pavers require minimal maintenance beyond occasional sweeping and joint material replenishment.
For areas with heavy rainfall or poor natural drainage, permeable pavers can be particularly beneficial. They help maintain ground stability during wet seasons while adding an attractive, organized appearance to your shed area. When properly installed, this foundation system can last for decades with minimal upkeep.
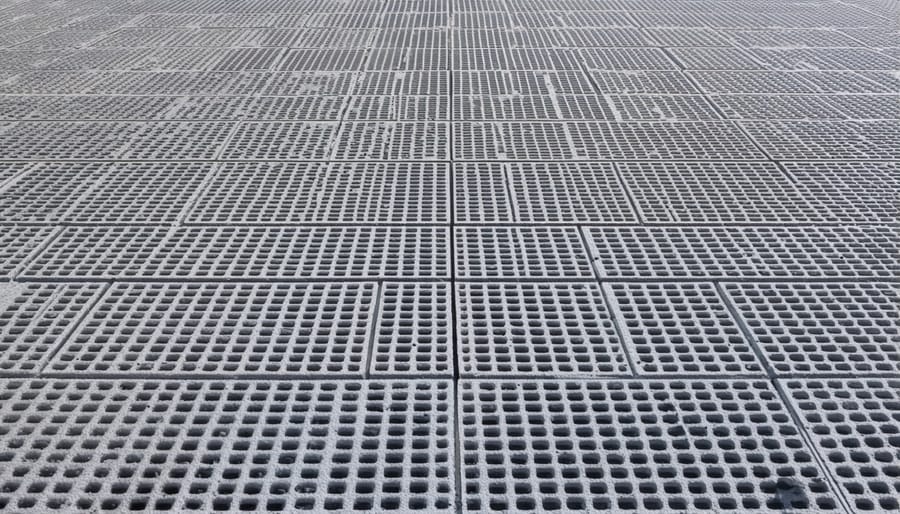
Grid Systems
Modern grid systems offer an innovative solution for creating a stable shed foundation while maintaining proper drainage. These systems come in two main varieties: plastic grid pavers and concrete grid systems. Both options provide excellent support while allowing water to permeate through, preventing pooling and potential foundation issues.
Plastic grid systems are lightweight yet surprisingly strong, capable of supporting substantial weight when properly installed. They typically come in modular panels that interconnect, making installation straightforward for DIY enthusiasts. These grids can be filled with gravel or grass, offering flexibility in appearance while maintaining functionality. The cellular structure prevents gravel from spreading and maintains a level surface over time.
Concrete grid systems, while heavier, provide exceptional durability and load-bearing capacity. These pre-formed blocks feature hollow sections that can be filled with soil, grass, or gravel, creating a permeable surface that looks natural while offering industrial-strength support. They’re particularly effective in areas with heavy rainfall or where erosion is a concern.
Both systems require proper preparation, including excavation and a layer of compacted base material. The key advantage of grid systems is their ability to distribute weight evenly while allowing proper drainage, significantly reducing the risk of settling or water damage. For best results, ensure the grid system extends 12-18 inches beyond your shed’s footprint on all sides, creating a stable perimeter that protects against soil erosion.
Professional Installation vs DIY
When to Call the Pros
While many shed ground preparation tasks can be handled by DIY enthusiasts, certain situations call for professional expertise. If your property has a significant slope (more than 6 inches over 8 feet), consulting a professional is crucial for proper grading and drainage solutions. Similarly, when dealing with unstable soil conditions, clay-heavy ground, or areas with high water tables, expert assessment can prevent costly future problems.
Consider professional help if you’re installing a large shed (over 160 square feet) or if local building codes require specific foundation requirements. Professionals can ensure compliance while providing professional foundation waterproofing and proper structural support.
You’ll also want to call in the experts if you discover underground utilities, tree roots, or other obstacles during initial site inspection. These situations require specialized equipment and knowledge to address safely. Additionally, if you’re planning to run electricity or plumbing to your shed, licensed contractors should handle these installations to ensure safety and code compliance.
Remember, investing in professional help when needed can save money in the long run by preventing foundation issues and structural problems.
DIY Success Tips
To ensure your shed ground preparation project goes smoothly, start by thoroughly measuring your site and marking boundaries with stakes and string. Double-check your measurements against your shed’s dimensions, adding an extra foot on each side for workspace. Always call your local utilities company before breaking ground to avoid hitting underground lines.
Keep your tools organized and within easy reach. Essential items include a level, tape measure, shovel, rake, and tamper. If you’re using gravel, calculate the amount needed by multiplying your shed’s length and width by the desired depth (typically 4-6 inches), then add 10% extra for safety.
Work systematically from the highest point of your site to the lowest when leveling. Take frequent measurements with your level to ensure consistency. If working with concrete blocks or pavers, place your first corner block and use it as a reference point for the rest.
For best results, tackle this project during dry weather. If rain is forecast, cover your prepared area with a tarp to prevent water damage. Remember to take breaks and stay hydrated – proper ground preparation isn’t a race, it’s about getting the foundation right the first time.
Maintenance and Long-term Care
Seasonal Checks
Regular maintenance checks are crucial for ensuring your shed’s foundation remains stable and effective throughout the changing seasons. Create a quarterly inspection routine that focuses on key areas of your shed’s ground preparation and proper foundation ventilation.
Spring Checks:
• Inspect for winter frost damage
• Clear drainage channels of debris
• Check for signs of pest activity
• Assess ground settling after thaw
Summer Checks:
• Monitor moisture levels around foundation
• Clear vegetation growth near foundation
• Inspect for ant or termite activity
• Ensure ventilation isn’t blocked by debris
Fall Checks:
• Clean gutters and drainage systems
• Check grading remains sloped away from shed
• Remove fallen leaves from foundation area
• Inspect for cracks or shifts in foundation
Winter Checks:
• Clear snow away from foundation
• Check for ice dam formation
• Monitor for water pooling
• Ensure foundation stays level
Keep a maintenance log to track any changes or concerns you notice during these seasonal inspections. This proactive approach helps identify potential issues before they become serious problems, potentially saving you time and money on repairs while extending the life of your shed’s foundation.
Remember to adjust your maintenance schedule based on your local climate conditions and specific foundation type. Areas with extreme weather may require more frequent checks during certain seasons.
Troubleshooting Common Issues
Even with careful planning, you might encounter some challenges during your shed ground preparation. Here’s how to address common issues that could pop up along the way:
If you notice water pooling around your planned shed location, consider installing a French drain or adding extra gravel for better drainage. For severely waterlogged areas, you might need to regrade the slope slightly away from the shed site.
Dealing with uneven ground? Don’t rush to level it with loose soil. Instead, remove the topsoil first, then add compacted layers of gravel gradually. This prevents future settling issues that could destabilize your shed.
For areas with tree roots, careful removal is essential. Small roots can be cut, but if you encounter large roots, consult an arborist to ensure you won’t harm the tree or create future foundation problems.
Rocky soil can be particularly challenging. Remove larger rocks and replace them with appropriate fill material. If you hit bedrock, you might need to adjust your foundation plan or consider a different location.
Finding soft spots in your soil? This usually indicates poor soil composition. Dig out the soft soil and replace it with compacted gravel or crushed stone. For extremely soft areas, you might need to install concrete footings for extra stability.
Remember, taking the time to address these issues properly now will save you from bigger headaches down the road.
Proper ground preparation is the cornerstone of a successful shed installation that will serve you well for years to come. By taking the time to carefully evaluate your site, level the ground, and install appropriate drainage solutions, you’re investing in the longevity and stability of your storage structure. Remember that skipping these crucial preparation steps might save time initially but can lead to costly repairs and structural issues down the road.
The key elements we’ve discussed – site selection, soil assessment, proper leveling, and drainage planning – work together to create a solid foundation for your shed. Whether you’ve chosen crushed stone, concrete blocks, or a concrete slab, ensuring proper installation of your chosen base material is essential for preventing future problems like settling, water damage, or shifting.
Don’t forget to check local building codes and obtain necessary permits before beginning your project. Taking these preliminary steps, along with careful planning and preparation, will give you peace of mind knowing your shed is built on a solid foundation that will last for years.
For the best results, consider working with a professional if you’re unsure about any aspect of ground preparation. The investment in proper site preparation today will pay dividends in the form of a stable, durable, and worry-free shed tomorrow. Your future self will thank you for taking the time to do it right from the start.
Leave a Reply