


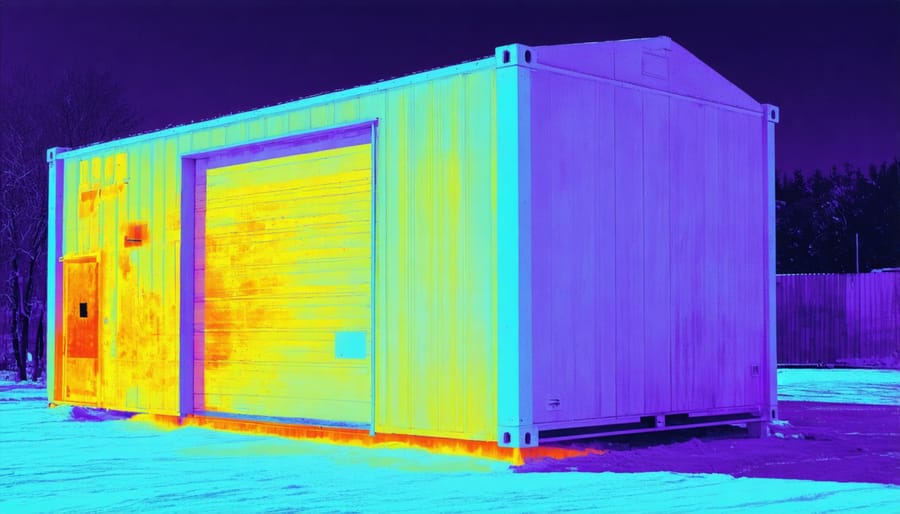
Transform your portable building into a comfortable, energy-efficient space with proper insulation that cuts energy costs by up to 50% and maintains consistent indoor temperatures year-round. Select high-performance materials like fiberglass batts or rigid foam boards based on your building’s specific structure and climate requirements. Install a vapor barrier before adding insulation to prevent moisture damage and mold growth, particularly crucial for portable structures exposed to varying weather conditions. Start with the ceiling and walls, ensuring complete coverage of all gaps and corners, then address the floor using appropriate underlay materials designed for portable buildings. Proper insulation not only enhances comfort but also protects your stored items from extreme temperature fluctuations and condensation damage, making it a vital investment for any portable building owner.
Preparing Your Portable Building for Insulation
Moisture Assessment and Weatherproofing
Before diving into insulation, it’s crucial to assess and address any moisture issues in your portable building. Start by inspecting the structure on a rainy day to identify leaks or water seepage points. Pay special attention to corners, joints, and areas around windows and doors. Look for signs of existing moisture damage like water stains, mold, or warped materials.
Weatherproofing your portable building should be your next priority. Apply a quality waterproof sealant to all exterior joints and seams, and ensure proper ventilation is in place to prevent condensation buildup. Consider installing a vapor barrier on the walls and floor before adding insulation – this creates an extra layer of protection against moisture.
Check that your building’s foundation is slightly elevated and that water drains away from the structure. Install gutters if possible, and maintain proper drainage around the building’s perimeter. Remember, taking these preventive measures now will protect your insulation investment and extend the life of your portable building significantly.
Air Leak Detection
Before installing insulation, it’s crucial to identify and seal any air leaks in your portable building. Start by conducting a visual inspection during daylight hours, looking for visible gaps around windows, doors, and where utilities enter the structure. Pay special attention to corners, joints, and areas where different materials meet.
For a more thorough check, wait until dusk and perform a light test. Have someone shine a bright light from the outside while you observe from inside the darkened building. Any visible light indicates potential air leaks that need addressing.
Another effective method is using an incense stick on a still day. Hold it near potential leak areas and watch the smoke’s movement. If the smoke wavers or gets pulled in a particular direction, you’ve found a leak.
Seal identified leaks using appropriate materials: caulk for smaller gaps, expanding foam for larger openings, and weatherstripping for doors and windows. Focus on making repairs before adding insulation to ensure maximum effectiveness of your insulation efforts.
Choosing the Right Insulation Materials

Fiberglass vs. Foam Board
When it comes to insulating your portable building, two popular options stand out: fiberglass and foam board insulation. Each material has distinct advantages and specific uses that might make it the perfect choice for your project.
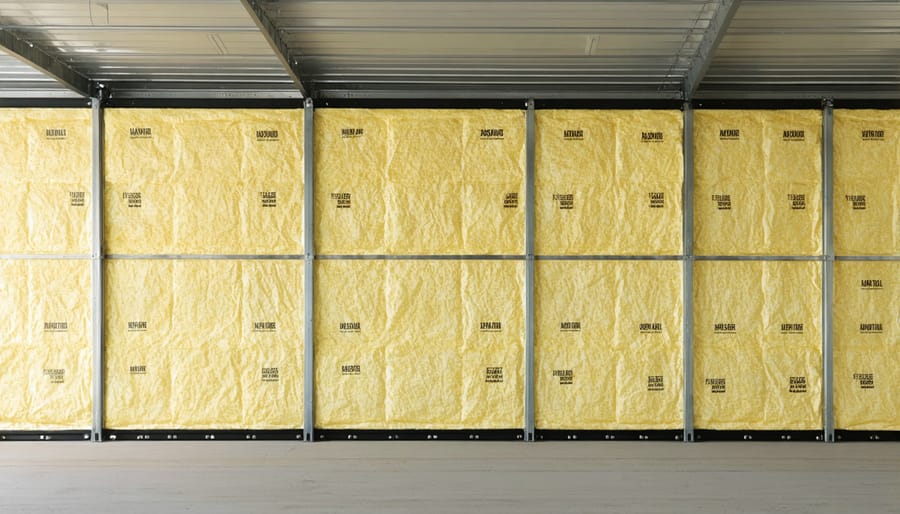
Fiberglass insulation, the fluffy pink material you’re probably familiar with, excels at filling wall cavities and providing excellent thermal resistance. It’s budget-friendly and widely available at most hardware stores. The main advantages include its affordability, fire resistance, and sound-dampening properties. However, fiberglass requires careful handling and protective gear during installation, as its tiny fibers can irritate skin and airways. It also needs a vapor barrier to prevent moisture issues.
For many portable building owners, foam board insulation installation offers distinct benefits. Foam boards are rigid panels that provide excellent insulation value per inch of thickness. They’re moisture-resistant, easy to cut and install, and create a neat, professional appearance. While typically more expensive than fiberglass, foam board’s durability and moisture resistance often make it ideal for portable buildings that may experience temperature fluctuations and humidity changes.
Best uses for fiberglass include:
– Large wall cavities
– Areas where cost is a primary concern
– Spaces requiring sound reduction
Best uses for foam board include:
– Small spaces where maximum R-value is needed
– Areas prone to moisture
– Projects requiring a clean, finished look
– Situations where easy installation is prioritized
Consider your specific needs, budget, and comfort level with installation when choosing between these options. Both can effectively insulate your portable building when properly installed and maintained.
Eco-Friendly Options
For environmentally conscious homeowners, there are several natural and sustainable insulation options that can make your portable building more eco-friendly. Sheep’s wool insulation stands out as an excellent renewable choice, offering natural moisture-wicking properties and impressive thermal performance. This material is not only biodegradable but also helps regulate humidity levels inside your building.
Recycled denim insulation, made from post-consumer blue jeans, provides another sustainable option. This material is free from harmful chemicals, safe to handle, and offers excellent sound absorption alongside its thermal properties. It’s particularly effective in walls and can be easily cut to size without special protective equipment.
Cork insulation panels are gaining popularity among eco-conscious DIYers. Harvested from cork oak trees without harming them, this material is naturally fire-resistant, repels insects, and provides excellent thermal and acoustic insulation. It’s also incredibly durable, with some installations lasting over 50 years.
Another innovative option is cellulose insulation made from recycled newspaper and cardboard. When properly treated with natural fire retardants, it creates an effective thermal barrier while putting waste materials to good use. This option works particularly well for ceiling insulation in portable buildings.
For those interested in ultra-green solutions, straw bales can provide excellent insulation when properly installed and protected from moisture. While this option requires more careful planning and installation, it offers superior insulation values and is completely biodegradable.
Remember to check local building codes before selecting any alternative insulation material, as some areas may have specific requirements or restrictions for portable structures.
Step-by-Step Installation Process
Wall Insulation
Proper wall insulation is crucial for maintaining a comfortable temperature in your portable building. Start by measuring the spaces between wall studs to determine how much insulation material you’ll need. For most portable buildings, fiberglass batts or rolls are an excellent choice, offering good R-value and easy installation.
Before installing the insulation, inspect the walls for any gaps, cracks, or holes, and seal them with caulk or expanding foam. This prevents unwanted air infiltration and ensures maximum insulation efficiency. Next, install a vapor barrier on the warm side of the wall (typically the interior) using 6-mil polyethylene sheeting.
When handling fiberglass insulation, always wear protective gear including gloves, safety glasses, and a dust mask. Cut the insulation slightly larger than the space between studs – about ½ inch wider – to ensure a snug fit. Press the insulation firmly into place, being careful not to compress it too much, as this reduces its effectiveness.
For the best results, install the vapor barrier by stapling it to the wall studs, overlapping seams by at least 6 inches. Seal all seams with specialized vapor barrier tape. Make sure to cut small slits around electrical boxes and other wall penetrations, then seal these areas carefully with tape.
Pro tip: Consider using faced insulation batts, which come with a built-in vapor barrier on one side. This can save time during installation, though you’ll still need to tape the seams between batts. Remember to always install the faced side toward the heated space.
Once the insulation and vapor barrier are in place, you can proceed with installing your interior wall covering of choice.
Floor and Ceiling Insulation
Insulating your portable building’s floor and ceiling is crucial for maintaining comfortable temperatures and protecting your stored items. Start with the floor by laying a vapor barrier directly on the ground or existing floor surface. This moisture-blocking layer prevents dampness from seeping upward and potentially damaging your belongings.
For floor insulation, rigid foam boards are an excellent choice due to their high R-value and moisture resistance. Cut the boards to fit snugly between floor joists, ensuring no gaps remain. Secure them with appropriate adhesive or mechanical fasteners, then cover with plywood or your chosen flooring material.
Moving to the ceiling, remember that warm air rises, making overhead insulation particularly important. Begin by ensuring you have proper ventilation in place to prevent moisture buildup. Roll or batt insulation works well for ceiling spaces, fitting easily between rafters or joists. Use unfaced insulation if you already have a vapor barrier, or faced insulation with the vapor barrier facing the heated side.
Install support wires or netting below the rafters before placing the insulation to prevent sagging over time. Pay special attention to areas around light fixtures or electrical boxes, keeping insulation at least three inches away from these heat sources. For added efficiency, consider installing a radiant barrier beneath your roofing material to reflect summer heat.
Remember to wear appropriate safety gear, including gloves, goggles, and a dust mask, while handling insulation materials. Take measurements carefully and cut pieces slightly larger than needed to ensure a snug fit without compression.
Door and Window Treatment
Doors and windows are common weak points in portable buildings where heat can escape, so they require special attention during the insulation process. Start by thoroughly inspecting the gaps around your door and window frames. Even small cracks can lead to significant heat loss and drafts.
For doors, install weatherstripping along the sides and top of the frame, and add a door sweep at the bottom. Choose self-adhesive foam tape for a quick fix, or opt for more durable rubber or silicone seals for longer-lasting protection. Don’t forget to check that your door closes properly after installing the weatherstripping.
Window treatments require a multi-layered approach. First, apply caulk around the window frames to seal any visible gaps. For additional insulation, consider installing window film kits, which create an extra barrier against cold air. These transparent films are easy to apply with a hairdryer and are nearly invisible once installed.
For maximum efficiency, think about adding insulated curtains or cellular shades. These window coverings provide an extra layer of protection while also allowing you to control natural light and privacy. During installation, ensure the curtains or shades fit snugly against the window frame to prevent air leakage.
Remember to check your door hinges and window mechanisms regularly, as loose hardware can create gaps that compromise your insulation efforts.
Maintaining Your Insulated Building
Regular maintenance of your insulated portable building ensures its longevity and optimal performance. Start by conducting seasonal inspections to check for any damage to the insulation or signs of moisture. Pay special attention to corners and joints where insulation meets the building’s structure.
Preventing condensation buildup is crucial for maintaining your insulation’s effectiveness. Install and maintain proper ventilation systems, and consider using a dehumidifier during particularly humid periods. Keep air vents clear of debris and ensure they’re functioning correctly throughout the year.
Check the vapor barrier periodically for tears or gaps, and repair any damage promptly using appropriate tape or patches. If you notice any wet or compressed insulation, replace it immediately to prevent mold growth and maintain thermal efficiency.
Keep the building’s exterior in good condition by addressing any leaks or gaps that could compromise the insulation. Trim back any vegetation growing too close to the structure, as this can trap moisture against the walls. Clean gutters regularly to prevent water from seeping into the building’s structure.
Consider scheduling an annual professional inspection to catch any potential issues early. This preventive approach will help extend the life of your insulation and maintain your portable building’s comfort and functionality for years to come.
Insulating your portable building is a rewarding project that pays dividends in comfort, energy efficiency, and building longevity. By following the steps we’ve outlined, you can transform your storage space into a comfortable, climate-controlled environment that protects your belongings year-round. Remember to start with a thorough inspection, choose appropriate insulation materials for your specific needs, and maintain proper ventilation throughout the process.
Taking the time to properly prepare and install insulation will help prevent common issues like moisture buildup and heat loss. Whether you’ve chosen fiberglass batts, spray foam, or rigid foam boards, proper installation technique is crucial for achieving maximum effectiveness. Don’t forget to seal any gaps and pay special attention to areas around windows, doors, and utility penetrations.
Ready to get started? Gather your materials, put on your safety gear, and tackle this project one step at a time. With careful planning and execution, you’ll soon enjoy the benefits of a well-insulated portable building that serves your needs in any weather. The investment in time and materials today will lead to years of improved comfort and energy savings tomorrow.
Leave a Reply