


Choosing the right shed flooring impacts everything from storage capabilities to long-term durability. A well-planned floor starts with a proper foundation and requires careful material selection based on your specific needs. While plywood offers an economical and versatile solution, concrete delivers unmatched durability for heavy equipment storage. Pressure-treated lumber provides an excellent middle ground, combining moisture resistance with reasonable cost.
The ideal flooring choice depends on three critical factors: intended use (lightweight storage vs. workshop), local climate conditions (moisture levels and temperature fluctuations), and budget constraints. Whether you’re building a new shed or upgrading an existing one, investing in quality flooring now prevents costly repairs and extends your shed’s lifespan by decades.
Make your decision based on these practical considerations rather than initial cost alone – the right flooring creates a stable, long-lasting foundation for all your storage needs.
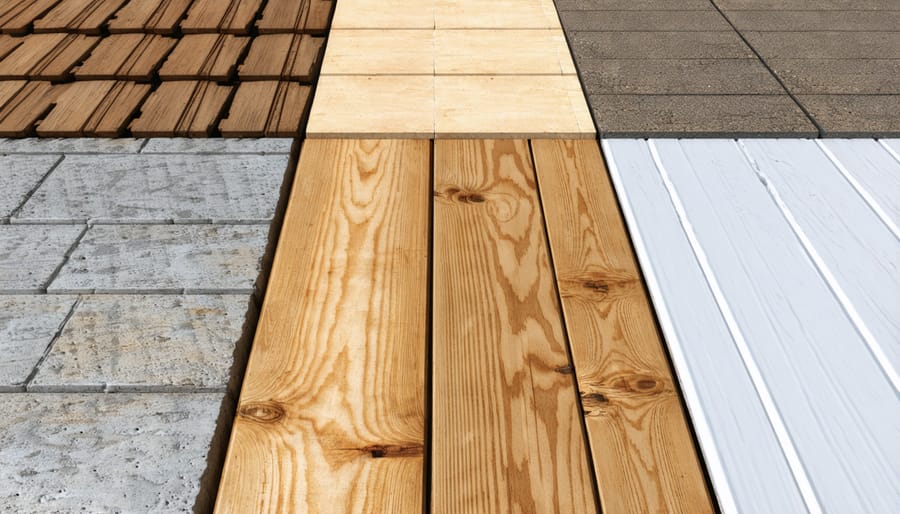
Top Shed Flooring Materials Compared
Concrete Flooring
Concrete flooring stands out as one of the most durable and cost-effective options for shed floors. A properly installed concrete floor can last for decades while providing a stable, level surface for storing heavy equipment and tools. The initial cost typically ranges from $4 to $8 per square foot, including materials and labor, making it a mid-range investment with excellent long-term value.
One of the biggest advantages of concrete is its strength and resistance to moisture. Once sealed, it prevents ground moisture from seeping up and damaging your stored items. It’s also incredibly easy to clean – just sweep or hose it down as needed. Many homeowners appreciate that concrete can be enhanced with stains or epoxy coatings to improve both appearance and durability.
Installation usually involves preparing a proper base, adding reinforcement mesh, and pouring 4 inches of concrete. While DIY is possible, professional installation is recommended to ensure proper leveling and curing. Remember to include expansion joints and adequate drainage slope during installation to prevent future issues.
Pressure-Treated Wood
Pressure-treated wood is a popular and cost-effective flooring choice for sheds, offering excellent durability and natural resistance to rot, insects, and moisture damage. This specially treated lumber undergoes a chemical process that forces preservatives deep into the wood’s fibers, making it significantly more resilient than standard lumber.
When properly installed and maintained, pressure-treated wood flooring can last 15-20 years or more. It’s particularly suitable for areas with high humidity or where the shed might be exposed to occasional water contact. While the initial green tint of new pressure-treated wood may concern some homeowners, it naturally weathers to an attractive gray patina over time.
To maximize longevity, seal your pressure-treated wood floor every 2-3 years and ensure proper ventilation beneath the shed. While this flooring requires some maintenance, its combination of affordability, strength, and moisture resistance makes it an excellent choice for most shed applications.
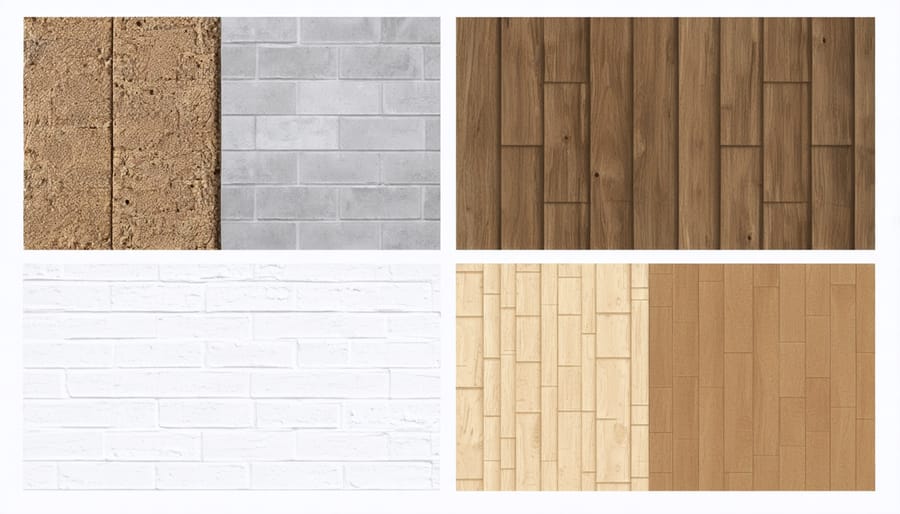
Plywood and OSB
Plywood and OSB (Oriented Strand Board) are popular engineered wood options that offer excellent durability at an affordable price point. For shed flooring, you’ll want to use exterior-grade plywood or OSB with a minimum thickness of ¾ inch to prevent sagging between floor joists. While both materials are sturdy, plywood typically offers better moisture resistance and a smoother surface finish.
To ensure longevity, it’s essential to waterproof your plywood flooring before installation. This extra step will protect against moisture damage and extend the life of your shed floor. Look for products labeled as “exterior grade” or “marine grade” for the best moisture resistance.
When installing either material, maintain a small gap around the edges for expansion and ensure proper ventilation underneath to prevent moisture buildup. While OSB is generally more budget-friendly, plywood tends to hold up better in high-moisture environments and is less likely to swell if water exposure occurs.
Vinyl and Rubber
Vinyl and rubber flooring options offer excellent solutions for shed floors, particularly in areas where moisture resistance is crucial. Vinyl tiles or sheets provide a waterproof barrier and are remarkably easy to clean, making them perfect for garden tool storage or potting sheds. They’re also comfortable underfoot and can help insulate against cold concrete subfloors.
Rubber flooring, especially in interlocking tile form, is incredibly durable and can withstand heavy equipment and frequent foot traffic. It’s naturally slip-resistant, making it an excellent choice for workshop sheds where you might encounter oil spills or wet conditions. The shock-absorbing properties of rubber flooring can also reduce fatigue if you spend long hours working in your shed.
Both options come in various colors and patterns, allowing you to customize your shed’s appearance while maintaining functionality. Installation is typically straightforward, with many products featuring peel-and-stick or interlocking systems that DIY enthusiasts can handle easily.
Choosing the Best Floor for Your Needs
Storage Weight Considerations
When choosing your shed flooring, carefully consider what you’ll be storing and how much it weighs. For light storage like gardening tools, plastic bins, and seasonal decorations, most flooring options will suffice. However, if you’re planning to store heavy equipment like riding mowers, ATVs, or workshop machinery, you’ll need more robust flooring.
Concrete is ideal for heavy storage, capable of supporting several thousand pounds per square foot. For medium-weight storage, pressure-treated plywood (at least 3/4 inch thick) over floor joists provides excellent support while remaining cost-effective. If you’re storing chemicals or oils, sealed concrete or vinyl flooring offers spill protection and easy cleanup.
Remember to distribute weight evenly across your shed floor to prevent stress points. For particularly heavy items, consider installing additional support beams beneath the flooring or using steel plate reinforcements at high-stress areas. It’s always better to choose flooring that exceeds your weight requirements than to risk damage from inadequate support.
Pro tip: Create a list of your heaviest items and their approximate weights before selecting your flooring material. This will help ensure your choice can handle your storage needs for years to come.
Climate and Weather Factors
Your local climate plays a crucial role in choosing the right shed flooring. In areas with high rainfall or flooding risks, opt for water-resistant materials like treated plywood or concrete. These materials prevent moisture damage and help maintain the structural integrity of your shed over time.
For regions experiencing extreme temperature fluctuations, consider materials with good thermal properties. Concrete, while initially cold, helps regulate temperature and prevents warping that can occur with wooden floors in humid conditions. If you live in a hot climate, lighter-colored flooring materials can help keep your shed cooler.
Coastal areas present unique challenges due to salt air and higher humidity levels. In these locations, marine-grade plywood or moisture-resistant vinyl flooring are excellent choices. For areas with heavy snowfall, ensure your flooring has proper drainage and is elevated slightly off the ground to prevent water damage during spring thaws.
Remember that proper ventilation works hand-in-hand with your flooring choice to combat moisture issues, regardless of your climate zone. Installing a vapor barrier beneath your chosen flooring material adds an extra layer of protection against ground moisture and temperature variations.
Budget and Installation
When it comes to budget considerations, plywood and OSB are the most economical options, typically costing $15-25 per sheet. Concrete, while more expensive initially at $4-6 per square foot, offers exceptional long-term value. Vinyl and rubber mats fall in the mid-range category, usually priced between $2-4 per square foot.
For DIY installation, plywood and OSB are incredibly user-friendly, requiring basic tools and minimal expertise. Most homeowners can complete a standard shed floor installation in a single afternoon. Concrete requires more skill and preparation, but many find the process manageable with proper research and planning. Pre-cut vinyl tiles and rubber mats are perhaps the easiest to install, often featuring snap-together designs or simple adhesive applications.
To maximize your budget, consider starting with a basic plywood floor and adding rubber mats in high-traffic areas. This combination provides durability where needed while keeping costs reasonable. For those planning to store heavy equipment, the investment in concrete might be worth the extra expense, as it eliminates the need for future replacements or repairs.
Maintenance Requirements
Each flooring type requires different levels of care to maintain its performance and appearance. Concrete floors need annual sealing to prevent moisture damage and occasional crack repairs. A quick sweep and occasional wash with mild detergent is usually sufficient for regular cleaning.
Plywood and OSB floors require vigilant moisture control to prevent warping and rotting. Apply a waterproof sealant every 2-3 years and inspect regularly for signs of wear. Keep the surface clean and dry, addressing any water spots immediately to prevent damage.
Vinyl and rubber flooring are the most low-maintenance options. Simple sweeping and occasional mopping with a mild cleaner will keep these surfaces in top shape. Check for loose edges or tears annually and repair promptly to prevent further damage.
Treated wood floors need resealing every few years and should be checked annually for loose boards or protruding nails. Regular sweeping and occasional deep cleaning with appropriate wood cleaners will help maintain their appearance and extend their lifespan.
Remember to address any maintenance issues promptly – small problems can quickly become costly repairs if left unchecked.
Essential Floor Protection Tips
Moisture Prevention
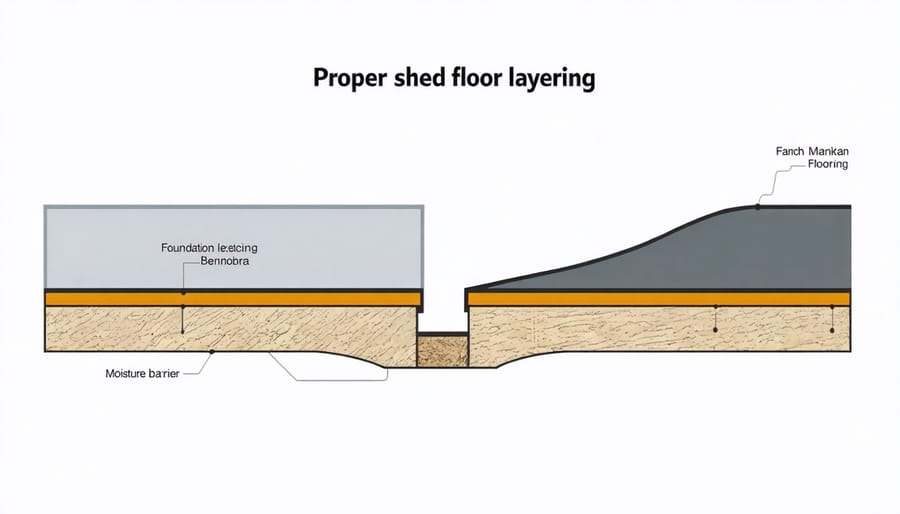
Protecting your shed floor from moisture is crucial for its longevity and functionality. To prevent water damage, start by ensuring proper drainage around your shed. Install gutters and downspouts to direct rainwater away from the structure, and grade the surrounding ground to slope away from the building.
Consider installing a vapor barrier beneath your flooring to block ground moisture. A 6-mil polyethylene sheet works effectively for this purpose. Create a gravel base at least 4 inches deep under your shed to promote drainage and prevent water from pooling underneath.
For added protection, elevate your shed floor slightly using pressure-treated wood blocks or concrete blocks. This creates an air gap that helps prevent moisture accumulation. If you’re in an area prone to flooding, consider raising the floor even higher.
Seal any gaps or joints in your flooring with appropriate waterproof caulking, and regularly inspect for signs of water intrusion. During installation, leave a small gap between the flooring and walls to allow for proper air circulation and prevent moisture buildup.

Proper Ventilation
Proper ventilation is crucial for maintaining your shed’s flooring, regardless of the material you choose. Good airflow prevents moisture buildup, which can lead to mold, mildew, and premature deterioration of your flooring. Start by installing vents near the floor and ceiling to create natural air circulation. A good rule of thumb is to have at least two vents on opposite walls to encourage cross-ventilation.
Consider adding a vapor barrier between the ground and your flooring to provide an extra layer of protection against rising moisture. Raised foundations, even just a few inches off the ground, can dramatically improve air circulation underneath your shed floor. If possible, leave a small gap between the walls and flooring to allow air movement around the edges.
For sheds in particularly humid areas, you might want to install a small battery-operated fan or solar-powered vent to boost air circulation on still days. Regular checks for proper airflow and addressing any ventilation issues promptly will significantly extend your flooring’s lifespan and maintain its appearance.
Seasonal Maintenance
Each season brings unique challenges for shed flooring, making regular maintenance essential for longevity. In spring, inspect your flooring for winter damage and waterproof your shed floor to prepare for spring rains. Remove any accumulated debris and check for signs of moisture damage or pest intrusion.
Summer maintenance focuses on ventilation and preventing heat-related issues. Keep your shed floor clean and dry, using fans if necessary to promote air circulation. For wooden floors, consider applying a fresh coat of sealant during dry, warm weather.
Fall requires preparation for the coming winter. Clear leaves and organic matter that could trap moisture against the floor. Check seals around doors and repair any gaps where water might seep in. If you have concrete flooring, seal any visible cracks to prevent frost damage.
During winter, regularly remove snow and ice from around your shed’s entrance to prevent water from seeping under the floor. Place rubber mats near the entrance to catch moisture from boots and equipment. For raised floors, ensure proper airflow underneath to prevent dampness and rot.
Signs of Floor Damage
Catching floor damage early can save you time and money in the long run. Watch for soft or spongy areas when walking on your shed floor – this often indicates moisture damage or rot beneath the surface. Dark spots or discoloration are telltale signs of water seepage, while warping or buckling suggests that moisture has compromised the flooring material’s integrity.
Keep an eye out for gaps between floorboards or panels, as these can worsen over time and allow moisture to penetrate. Squeaking or creaking sounds when walking across the floor might signal loose boards or failing support structures underneath. For concrete floors, look for cracks, especially those wider than 1/8 inch, as they can indicate settling issues or structural problems.
Check corners and areas near doors regularly, as these spots are most vulnerable to water damage. Musty odors or visible mold growth are serious red flags that require immediate attention. If you notice any of these issues, address them promptly to prevent further deterioration. Remember, catching problems early typically means simpler, less expensive repairs and helps maintain your shed’s functionality for years to come.
Choosing the right flooring for your shed is crucial for its longevity and functionality. After considering all the options, concrete remains the most versatile and durable choice for most homeowners, offering excellent stability and moisture resistance. However, plywood and oriented strand board (OSB) provide more budget-friendly alternatives that work well for elevated sheds, especially in drier climates.
Remember to always consider your specific needs, including your local climate, budget, and intended use of the shed. If you’re storing heavy equipment, concrete or reinforced wood flooring would be your best bet. For general storage in a raised shed, pressure-treated plywood can offer the perfect balance of durability and cost-effectiveness.
Whatever material you choose, proper installation and regular maintenance are key to extending your shed floor’s lifespan. Don’t forget to incorporate moisture barriers and adequate ventilation to protect your investment. By carefully weighing these factors and following proper installation guidelines, you’ll be able to select and install flooring that serves your needs for years to come.
Take your time with this decision – after all, your shed’s floor is literally the foundation of your storage solution!
Leave a Reply