
Smart Shed Insulation: Why Unvented Roofs Are Revolutionizing Storage Solutions
Transform your attic or roof space into a comfortable, energy-efficient zone with unvented roof insulation – a modern approach that eliminates the need for traditional ventilation while providing superior moisture control and thermal performance. Unlike conventional vented systems, unvented roof assemblies create an airtight barrier directly beneath your roofing material, incorporating high-performance insulation materials like closed-cell spray foam or rigid foam boards that serve both as thermal barriers and vapor retarders.
This innovative insulation method has revolutionized residential construction by addressing two critical challenges: energy efficiency and moisture management. By sealing the entire roof assembly and conditioning the space within the building envelope, unvented roof insulation maintains consistent temperatures year-round, reduces energy costs significantly, and prevents the formation of ice dams in cold climates.
For homeowners and builders alike, understanding unvented roof insulation isn’t just about following a trend – it’s about embracing a scientifically proven method that can extend roof life, improve indoor air quality, and create more usable living space. Whether you’re planning a new construction project or retrofitting an existing structure, proper implementation of unvented roof insulation can deliver lasting benefits for your home’s comfort and efficiency.
Understanding Unvented Roof Insulation
Components of an Unvented Roof System
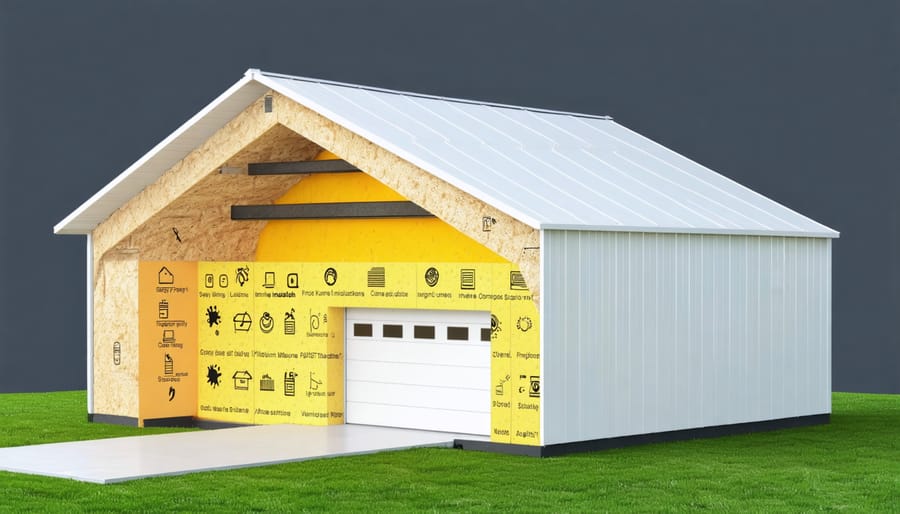
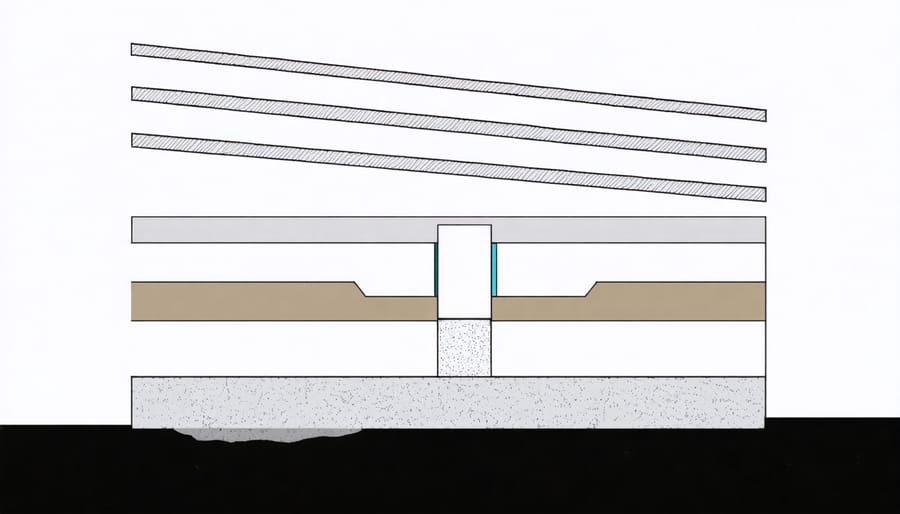
An unvented roof system consists of several carefully planned layers that work together to create an effective moisture barrier and insulation solution. Starting from the interior, you’ll find a vapor barrier that prevents warm, moist air from entering the roof assembly. Next comes the primary insulation layer, typically made of rigid foam boards or spray foam insulation, which provides the main thermal barrier.
Above the insulation, you’ll need a sturdy roof deck, usually made of plywood or oriented strand board (OSB). This creates a solid foundation for the remaining components. The next crucial layer is a waterproof underlayment that protects against any moisture that might penetrate the outer roofing material.
The final elements include proper ventilation channels along the edges of the roof and high-quality roofing materials like shingles or metal panels. For optimal performance, all these components must be properly sealed and connected, with special attention paid to joints and penetrations where air leaks commonly occur.
Remember that the thickness and type of insulation materials will vary depending on your climate zone and local building codes.
How Unvented Roofs Work
Unvented roof systems work by creating a continuous insulation barrier from the top of your roof deck to the ceiling below. Unlike traditional vented roofs, these systems eliminate the need for air movement between the living space and the outdoors. The magic happens when spray foam or rigid foam insulation is applied directly to the underside of the roof deck, creating an airtight seal that prevents warm, moist air from condensing against cold surfaces.
Think of your unvented roof as a thermos – it keeps the temperature stable by preventing air exchange. The insulation layer acts as both a thermal barrier and an air barrier, controlling heat flow and moisture movement. This design is particularly effective because it brings your roof’s entire structure into what we call the “conditioned space” of your building.
In warmer climates, this system helps keep hot air out, while in colder regions, it prevents warm indoor air from escaping and creating ice dams. The key to success lies in proper installation and maintaining the right ratio of air-impermeable to air-permeable insulation for your specific climate zone.
Benefits for Your Storage Shed
Superior Moisture Control
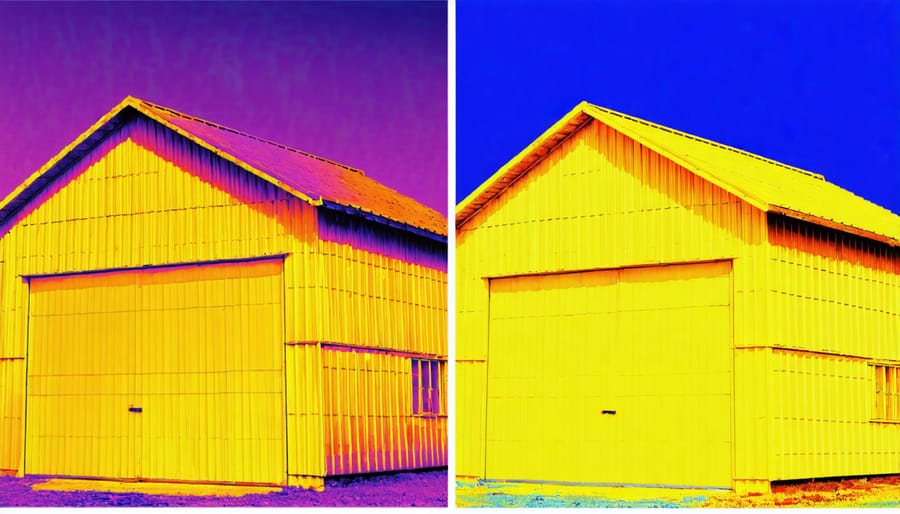
One of the most significant advantages of unvented roof insulation is its superior ability to prevent moisture damage and maintain optimal storage conditions. Unlike traditional vented systems, unvented roofs create a sealed environment that effectively controls humidity levels and prevents condensation from forming on your valuable stored items.
The secret lies in the continuous barrier that unvented insulation creates between the outdoor elements and your storage space. This barrier blocks warm, moisture-laden air from meeting cooler surfaces where condensation typically forms. Think of it as wrapping your storage area in a protective cocoon that maintains a consistent temperature throughout the space.
What makes this system particularly effective is its ability to work with your building’s natural temperature patterns rather than against them. During summer months, it keeps humid air from infiltrating your storage space, while in winter, it prevents warm indoor air from condensing on cold roof surfaces. This year-round protection means you can confidently store sensitive items like documents, electronics, or family heirlooms without worrying about moisture-related damage.
The system also helps eliminate the perfect conditions for mold and mildew growth, which typically thrive in spaces where moisture accumulates. By maintaining consistent humidity levels, unvented roof insulation creates a healthier storage environment that better preserves your belongings.
Energy Efficiency Improvements
Proper insulation in an unvented roof system can dramatically improve your shed’s year-round temperature control and energy efficiency. When installed correctly, this type of insulation creates a thermal barrier that helps maintain consistent temperatures throughout the seasons, reducing the workload on any heating or cooling systems you might have in place.
Many homeowners report significant reductions in energy costs after implementing unvented roof insulation. The sealed system prevents warm air from escaping during winter months and keeps hot air from infiltrating during summer, resulting in a more comfortable and energy-efficient storage space. This improved temperature regulation also helps protect your stored items from extreme temperature fluctuations that could cause damage.
The energy-saving benefits are particularly noticeable in regions with extreme weather conditions. During winter, the insulation helps retain heat, reducing the need for supplementary heating. In summer, it acts as a barrier against solar heat gain, keeping your shed naturally cooler. This passive temperature management means less reliance on electric fans or portable heaters, leading to lower energy consumption and reduced utility bills.
Additionally, the airtight nature of unvented roof insulation helps prevent moisture-related issues, which can further improve the overall energy efficiency of your storage space while protecting your belongings.
Installation Considerations
Material Selection
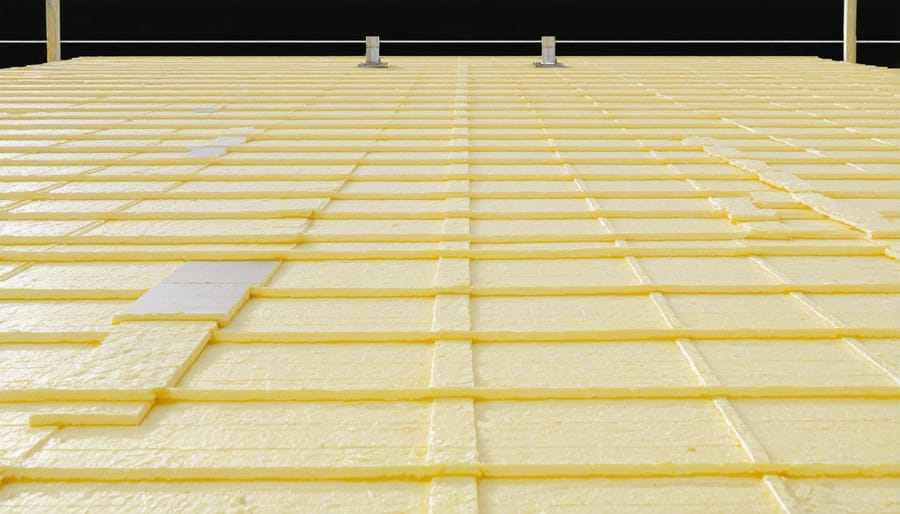
When selecting materials for your unvented roof insulation, it’s essential to choose options that provide both thermal protection and moisture resistance. Closed-cell spray foam insulation stands out as a top choice, offering excellent R-value and creating an effective air barrier. This material adheres well to roof surfaces and helps prevent condensation issues common in unvented spaces.
Another reliable option is rigid foam board insulation, particularly polyisocyanurate (polyiso) or extruded polystyrene (XPS). These materials are ideal for cost-effective shed insulation while maintaining high performance. They’re easy to cut and install, making them perfect for DIY projects.
Fiberglass batts, while common, should be used cautiously in unvented roofs. If you choose this route, ensure it’s paired with a proper vapor barrier to prevent moisture-related problems. Some innovative products combine insulation with radiant barriers, offering enhanced temperature control during summer months.
Remember to consider your local climate when selecting materials. Regions with high humidity levels may benefit more from closed-cell spray foam, while drier areas might do well with rigid foam boards. Always check local building codes, as they may specify minimum R-values and approved materials for unvented roof assemblies in your area.
Professional vs DIY Installation
When it comes to installing unvented roof insulation, homeowners have two main options: professional installation or taking the DIY insulation installation route. Professional installation offers the advantage of expertise and experience, ensuring proper placement and sealing of materials. Professionals understand the complexities of vapor barriers, air gaps, and local building codes, potentially saving you from costly mistakes.
However, many handy homeowners successfully tackle this project themselves, saving significantly on labor costs. The key to DIY success lies in thorough preparation and understanding of the process. You’ll need proper safety equipment, including protective eyewear, gloves, and a respirator mask. The right tools, such as a utility knife, measuring tape, and staple gun, are also essential.
Before deciding which route to take, consider your comfort level with construction projects, available time, and budget. Professional installation typically costs between $2-$4 per square foot, while DIY materials might run $1-$2 per square foot. If your shed has complex architectural features or you’re unsure about proper ventilation requirements, professional installation might be your best bet.
Remember that improper installation can lead to moisture problems, reduced insulation effectiveness, and potential structural issues. Whether choosing professional or DIY, ensure all materials meet local building codes and manufacturer specifications.
Maintenance and Long-term Care
Regular maintenance of your unvented roof insulation system is essential for its long-term performance and efficiency. Start by conducting visual inspections twice a year, ideally in spring and fall. Look for any signs of moisture, discoloration, or sagging in your insulation materials, as these could indicate potential issues that need addressing.
Keep your attic or loft space clean and free from debris, as accumulated dust and dirt can compromise the insulation’s effectiveness. If you spot any gaps or compressed areas in the insulation, address these promptly to maintain the thermal barrier’s integrity.
Monitor your indoor humidity levels using a simple humidity meter. Ideal levels should remain between 30-50%. If you notice consistently high humidity, consider installing or upgrading your ventilation system to prevent moisture-related problems.
Check all roof penetrations, such as vents and chimneys, annually to ensure proper sealing. Any gaps or deteriorated sealant should be repaired immediately to prevent air leakage and moisture infiltration.
Pay attention to your energy bills – sudden increases might indicate insulation problems. If you notice any unusual changes in your home’s temperature or comfort levels, have a professional inspection done to identify potential issues early.
For maximum longevity, avoid storing items directly against insulated areas and maintain good airflow throughout your space. With proper care, your unvented roof insulation should maintain its effectiveness for many years to come.
Proper unvented roof insulation in your shed is a crucial investment that pays dividends in both comfort and protection of your stored items. By following the guidelines we’ve discussed, you can create a well-insulated space that maintains consistent temperatures and prevents moisture-related issues throughout the year. Remember to carefully select your insulation materials based on your climate and needs, ensure proper installation with adequate vapor barriers, and maintain sufficient ventilation where necessary.
For the best results, consider starting with a thorough inspection of your existing roof structure, address any current moisture issues, and plan your insulation project carefully. While DIY installation is possible, don’t hesitate to consult professionals for complex situations or if you’re unsure about any aspect of the process.
Regular maintenance and periodic checks of your insulated roof will help identify and address potential problems early. With proper installation and care, your unvented roof insulation will provide years of effective climate control and protection for your valuable storage space.
Looking for a shed accessories?
Browse our full range of shed accessories from authorized dealer brands. Free shipping to the continental US.