
Build a Rock-Solid Shed Foundation That Lasts (Using Eco-Friendly Concrete Blocks)

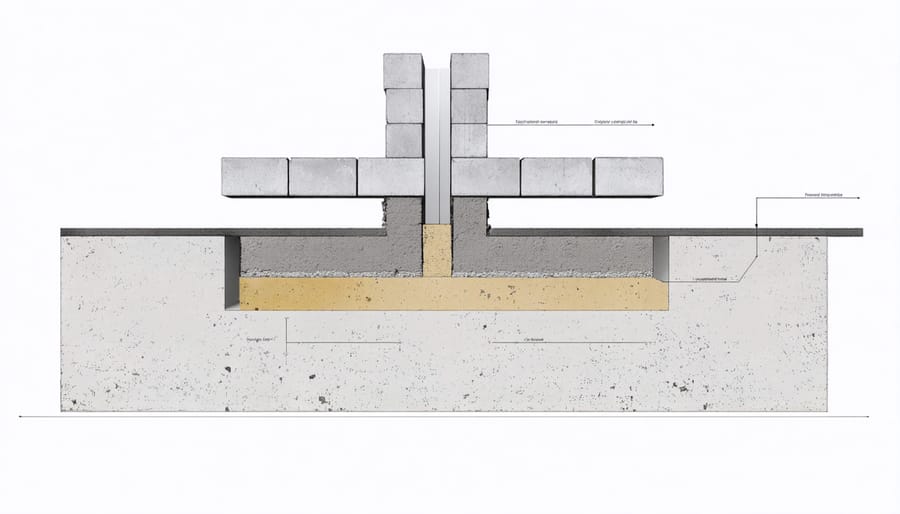
Building a solid shed foundation with concrete blocks transforms your backyard storage project into a lasting investment that stands firm against moisture, frost, and soil movement. Start with a perfectly level site, excavated 6 inches below grade and compacted to 95% density. Layer 4 inches of crushed gravel as your first defense against water damage, creating a stable base that promotes proper drainage. Position your concrete blocks in a grid pattern, spacing them 4 feet apart on center, with additional supports at door frames and load-bearing walls.
This foundation method offers superior ventilation compared to traditional concrete slabs, preventing moisture buildup while providing excellent structural support for sheds up to 200 square feet. The modular nature of concrete blocks allows for easy leveling adjustments and future modifications, making them an ideal choice for DIY enthusiasts who value both durability and flexibility.
Choose solid concrete blocks rated for ground contact, typically 8x8x16 inches, to ensure maximum stability and load-bearing capacity. This approach delivers professional-grade results without requiring specialized equipment or extensive masonry experience, setting you up for a successful shed build that will serve your storage needs for decades to come.
Why Concrete Blocks Make Perfect Sustainable Foundation Materials
Environmental Impact and Recyclability
When considering foundation materials, concrete blocks stand out as one of the more eco-friendly building materials available. These blocks are made from natural materials and can last for decades, reducing the need for frequent replacements and minimizing environmental impact. What’s particularly impressive is their recyclability – old concrete blocks can be crushed and repurposed into new construction materials or used as aggregate for driveways and pathways.
The production of concrete blocks typically requires less energy compared to poured concrete foundations, resulting in a smaller carbon footprint. They’re also locally sourced in many areas, which reduces transportation emissions. When your shed eventually reaches the end of its life, the concrete block foundation can be easily dismantled and recycled, unlike some alternative foundation materials.
To maximize environmental benefits, consider sourcing reclaimed concrete blocks for your project. Many construction sites and demolition companies offer used blocks in good condition at reduced prices, further supporting sustainable building practices while saving money.
Long-Term Cost Benefits
When comparing foundation options, concrete blocks stand out as a cost-effective long-term investment for your shed. While the initial cost might be slightly higher than some alternatives like gravel or timber, concrete blocks typically last 50-75 years with proper installation and maintenance. This durability translates to significant savings over time, as you won’t need to replace or repair the foundation frequently.
Wood foundations, though cheaper upfront, often require replacement every 10-15 years due to rot and pest damage. Gravel foundations may shift and settle, leading to expensive leveling work. In contrast, concrete blocks resist moisture, insects, and ground movement, maintaining their structural integrity for decades.
Additionally, concrete blocks can increase your property value, as potential buyers appreciate the permanence and stability they provide. Many homeowners report that the investment in concrete block foundations pays for itself within the first decade through reduced maintenance costs and improved shed longevity. When you factor in the peace of mind that comes with a stable, long-lasting foundation, the value proposition becomes even more compelling.
Essential Tools and Materials
Before starting your project, gather these essential tools and materials to ensure a smooth foundation-building process. For those interested in earth-friendly foundation methods, we’ve included sustainable alternatives where possible.
Tools Required:
– Level (4-foot and torpedo)
– Tape measure
– String line and stakes
– Shovel and rake
– Wheelbarrow
– Hand tamper or plate compactor
– Work gloves
– Safety glasses
– Marking spray paint or chalk
– Mason’s line
– Rubber mallet
Materials Needed:
– Concrete blocks (number depends on shed size)
– Gravel (crushed stone or recycled concrete aggregate)
– Sand for leveling
– Landscape fabric (opt for biodegradable options)
– Pressure-treated lumber for base frames
– Galvanized deck screws
– Construction adhesive (look for low-VOC options)
Optional but Recommended:
– Transit level or laser level for precise grading
– Drainage pipe
– Edge restraints
– Ground anchors for high-wind areas
Pro Tip: Consider renting larger tools like the plate compactor instead of purchasing them. Many hardware stores offer daily rental rates, making this a cost-effective choice for one-time projects. For the gravel base, ask your supplier about recycled materials – they’re often more affordable and environmentally responsible while maintaining the same quality standards.
Site Preparation and Layout
Ground Leveling Techniques
Achieving perfectly level ground is crucial for your shed’s stability and longevity. Start by removing all vegetation, rocks, and debris from the area, extending about 2 feet beyond your planned foundation perimeter. Use a shovel to dig out any high spots and fill in low areas with clean fill dirt.
For precise leveling, create a reference point by driving a stake at each corner of your foundation area. Connect these stakes with mason’s string to form a rectangle, and use a line level to ensure the strings are perfectly horizontal. Measure down from the strings at various points to check ground height consistency.
Once rough-leveled, compact the soil using a plate compactor or hand tamper. Pay special attention to filled areas, as loose soil can settle over time. Add a 2-inch layer of gravel and level it using a long straight board (screed) and a carpenter’s level. Work in sections, checking diagonal measurements to ensure square corners.
For ultimate precision, use a laser level if available – it’s especially helpful for larger shed foundations. Remember, spending extra time on leveling now prevents headaches later.
Proper Drainage Solutions
Proper water management is crucial for the longevity of your shed foundation. Start by grading the ground around your foundation to create a gentle slope away from the shed. This natural gradient helps prevent water pooling, which can compromise the stability of your concrete blocks over time.
Installing effective drainage systems is essential for managing heavy rainfall and seasonal water flow. Consider laying a 4-inch perforated drain pipe around the foundation’s perimeter, surrounded by gravel. This creates a French drain system that efficiently channels water away from your shed’s base.
Add a layer of crushed stone or gravel beneath and between the concrete blocks to improve drainage and prevent soil erosion. This material allows water to filter through while maintaining the foundation’s stability. For added protection, install gutters along your shed’s roofline and direct downspouts at least 3 feet away from the foundation.
Remember to periodically check your drainage system for clogs and clear any debris that might prevent proper water flow. This simple maintenance routine will help ensure your shed foundation remains dry and stable for years to come.
Installing Your Concrete Block Foundation
Block Placement and Alignment
Start by placing your corner blocks first, as these will serve as your reference points for the entire foundation. Using a string line and level, connect these corners to create a perfect rectangle that matches your shed’s dimensions. The string should be taut and level to ensure precise alignment.
Position your blocks so they’re evenly spaced along the perimeter, typically 4-6 feet apart depending on your shed size. Remember to leave enough space between blocks to distribute the weight properly. Each block should sit firmly on the gravel bed with its holes facing upward.
Use your torpedo level to check that each block is perfectly level both horizontally and front-to-back. If a block sits too high or low, remove it and adjust the gravel underneath. A slight tap with your rubber mallet can help settle blocks into position, but avoid using excessive force.
For added stability, consider placing blocks in the center of your foundation area to support the shed’s floor joists. These interior blocks should align with your perimeter blocks and be leveled with the same care. Step back periodically to visually inspect your work and ensure all blocks form straight lines from every angle.
Pro tip: Use a long straight board spanning multiple blocks to double-check your leveling work. This will help catch any subtle height differences that might cause problems later.
Securing and Stabilizing
Once your concrete blocks are positioned, securing and stabilizing them is crucial for a long-lasting foundation. Start by checking each block with a level, adjusting as needed by adding or removing gravel underneath. For blocks that sit slightly low, add thin layers of crushed stone until they align perfectly with adjacent blocks.
To prevent shifting, install metal ties between blocks where they meet. These ties, available at most hardware stores, create a sturdy connection and help maintain proper spacing. For corner blocks, use L-shaped brackets for additional stability.
Consider installing landscape fabric around the perimeter, extending it about 12 inches beyond the foundation. This barrier prevents weed growth and helps maintain the integrity of your gravel base. Pin the fabric securely with landscape staples every few feet.
For areas with poor soil conditions or significant slopes, add concrete footings beneath the blocks. Mix and pour quick-setting concrete into pre-dug holes at critical points, especially corners and areas bearing the most weight. Allow the concrete to cure completely before proceeding with construction.
Finally, check the entire foundation’s level one more time and make any necessary adjustments. A properly stabilized foundation will prevent future settling and ensure your shed remains sturdy for years to come. Remember to periodically inspect the blocks and surrounding area for signs of movement or erosion, particularly after heavy rains.
Maintenance and Long-Term Care
Regular maintenance of your concrete block foundation is crucial for ensuring your shed’s longevity and stability. Schedule bi-annual inspections during spring and fall to catch potential issues early. During these checks, examine the blocks for signs of cracking, shifting, or deterioration. Pay special attention to areas where water might pool, as moisture is one of the biggest threats to foundation integrity.
Keep the foundation’s perimeter clear of debris, leaves, and growing vegetation. Plants and their root systems can compromise the stability of your blocks over time. Maintain proper drainage by ensuring your gutters are clean and functioning correctly, directing water away from the foundation.
If you notice any cracks, address them promptly using appropriate concrete patching compounds. For wider cracks or signs of settling, consult a professional to assess the situation. Consider applying a waterproof sealant every few years to protect the blocks from moisture damage, especially in areas with harsh weather conditions.
As part of sustainable shed maintenance, check the gravel bed beneath the blocks annually to ensure it remains level and well-draining. Add more gravel if needed to maintain proper elevation and prevent water accumulation.
During winter months, avoid using de-icing salts near your foundation as they can deteriorate the concrete blocks. Instead, use sand or cat litter for traction. If you live in an area with freeze-thaw cycles, consider installing heat cables around the foundation’s perimeter to prevent frost heave damage.
By following these maintenance guidelines and addressing issues promptly, your concrete block foundation will provide reliable support for your shed for many years to come.
Building a shed foundation with concrete blocks is not only a practical choice but also an environmentally conscious one. By following the steps outlined in this guide, you’ve learned how to create a sturdy, long-lasting foundation that will protect your shed investment for years to come. Remember to always check local building codes, prepare your site properly, and take time to ensure your blocks are level and secure.
The beauty of using concrete blocks lies in their versatility, durability, and minimal environmental impact. They’re recyclable, require less energy to produce than poured concrete foundations, and can be easily repurposed if needed. Plus, their modular nature makes repairs or modifications simple and cost-effective.
As you move forward with your shed project, consider incorporating other sustainable building practices, such as using recycled materials for your shed construction or installing a rain collection system. By making thoughtful choices in your building methods and materials, you’re not just creating a practical storage solution – you’re contributing to a more sustainable future for home improvement.
Keep these guidelines handy, take your time with the installation, and don’t hesitate to consult professionals if you encounter any challenges along the way.