
Build Your Dream Workshop Shed: Smart Plans for the Perfect DIY Space

Transform your backyard into a dedicated workshop space with carefully planned workshop shed blueprints that maximize both functionality and efficiency. Design your layout around power tool placement, material storage, and workflow patterns to create an organized workspace that enhances productivity. Consider essential features like proper ventilation, abundant natural lighting through strategically placed windows, and adequate electrical outlets to support your specific woodworking or DIY needs. Factor in local building codes, foundation requirements, and weather considerations when selecting materials and determining the optimal size and placement of your workshop shed.\n\nChoose between popular styles like gambrel, gable, or lean-to designs based on your available space and intended use. Incorporate built-in workbenches, tool storage solutions, and modular organization systems during the planning phase to optimize every square foot. Plan for future expansion by including features like removable wall sections or adaptable storage solutions that can evolve with your growing needs.\n\nRemember to balance practical requirements with aesthetic appeal, ensuring your workshop shed complements your home’s architecture while providing the functionality of a professional workspace. Include proper insulation, moisture barriers, and climate control options to protect your tools and create a comfortable year-round working environment.\n\n\n
Essential Workshop Shed Design Considerations
\n\n
Size and Space Requirements
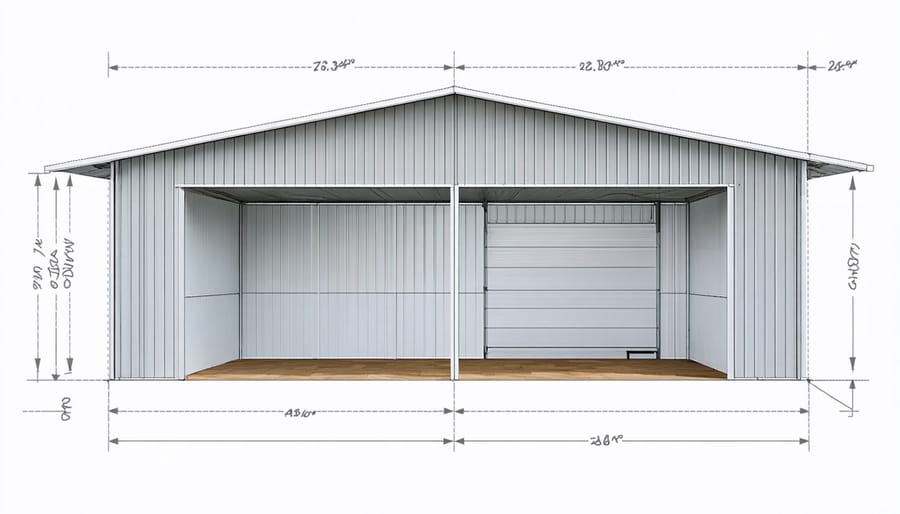
\n\nDetermining the right size for your workshop shed starts with listing your intended activities and equipment. For most DIY enthusiasts, a minimum space of 10′ x 12′ provides enough room for basic woodworking or craft projects. However, if you plan to work with larger tools like table saws or store significant equipment, consider a 12′ x 16′ or larger footprint.\n\nRemember to factor in workspace clearance around major tools. A good rule of thumb is to allow at least 3 feet of space around workbenches and stationary equipment. Don’t forget overhead clearance – a minimum ceiling height of 8 feet ensures comfortable movement and adequate ventilation.\n\nWhen planning your layout, include space for storage solutions like wall-mounted shelves and cabinets. Add an extra 20% to your initial space calculations to accommodate future tools and projects. Also consider external factors like local building codes and property setbacks, which may limit your shed’s dimensions.\n\nFor optimal workflow, plan your door placement carefully. A standard single door (36 inches) works for most tools, but consider double doors (60-72 inches) if you’ll be moving large materials or finished projects in and out frequently.\n\n
 \n
\n\n\n
Location and Accessibility
\n\nChoosing the right location for your workshop shed is crucial for both convenience and functionality. Start by checking local zoning laws and required setbacks from property lines. Aim for a level spot with good drainage, ideally on slightly elevated ground to prevent water pooling around the foundation.\n\nConsider accessibility when planning your shed’s placement. You’ll want enough space to move large equipment and materials in and out easily. Leave at least 3 feet of clearance around all sides for maintenance and ensure there’s a clear, well-lit path from your house to the shed. If you’re planning to use power tools, proximity to electrical connections is essential.\n\nThink about natural lighting too – positioning your shed to take advantage of sunlight through windows can reduce your reliance on artificial lighting. Also, consider noise impact on neighbors when choosing your spot, especially if you’ll be using power tools regularly.\n\n
Ventilation and Lighting
\n\nProper ventilation and lighting are crucial elements for a functional workshop shed. Start by planning for natural light through strategically placed windows – ideally on multiple walls to maximize daylight throughout the day. Consider installing shed windows on the north and south faces to avoid direct glare while maintaining consistent illumination. For ventilation, incorporate both low and high vents to create effective air circulation, which helps prevent moisture buildup and keeps your workspace comfortable.\n\nSupplement natural light with task-specific artificial lighting. Install overhead LED fixtures for general illumination and adjustable work lights near your workbench area. Don’t forget to include electrical planning in your design for power outlets to support these lighting needs.\n\nFor additional airflow, consider adding a small exhaust fan or ridge vent in the roof. This is especially important if you’ll be working with materials that produce dust or fumes. Remember to position your shed’s door to take advantage of prevailing winds for natural cooling during warmer months.\n\n\n
Core Components of Workshop Shed Plans
\n\n
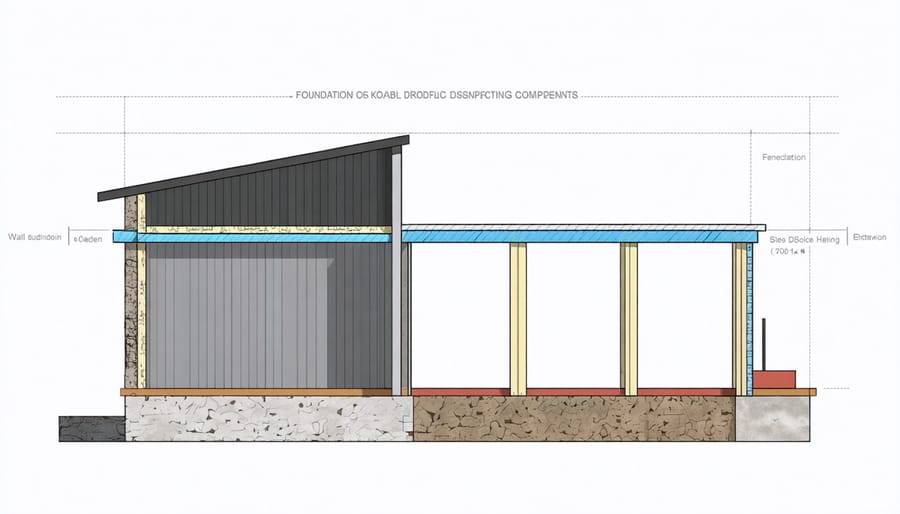
Foundation Options
\n\nBefore preparing your shed site, choosing the right foundation is crucial for your workshop shed’s stability and longevity. Concrete slab foundations offer maximum durability and are ideal for heavy equipment storage, though they require significant preparation and proper drainage. Gravel foundations provide excellent drainage and are more budget-friendly, making them perfect for smaller workshops in areas with good soil conditions.\n\nRaised foundations using concrete blocks or pier systems keep your shed elevated, protecting it from ground moisture and providing better airflow. This option works well in areas with uneven terrain or poor drainage. Timber foundations, consisting of pressure-treated wood beams, offer a balance of affordability and durability, particularly suitable for moderate-sized workshops in areas with stable soil.\n\nFor temporary or portable workshop solutions, consider skid foundations made from heavy-duty timber beams. These allow for potential relocation while still providing adequate support for your workshop needs. Whatever foundation you choose, ensure it meets local building codes and can support your intended workshop use.\n\n
Wall and Roof Structure
\n\nThe walls and roof of your workshop shed form its protective shell, so getting these right is crucial for long-term durability. Start with sturdy wall frames using 2×4 lumber spaced 16 inches on center, ensuring each stud is perfectly plumb. When sheathing the walls, opt for 1/2-inch exterior-grade plywood or oriented strand board (OSB), fastening it securely with 8d nails every 6-8 inches along the edges and every 12 inches in the field.\n\nFor the roof structure, trusses are your best bet, providing excellent support while creating useful storage space above. Space your trusses 24 inches apart and secure them with hurricane ties for added stability. Choose roofing materials that match your home’s aesthetic – asphalt shingles are popular for their affordability and ease of installation, while metal roofing offers superior durability and weather resistance.\n\nDon’t forget to install a moisture barrier beneath your exterior siding and roofing materials. Quality house wrap for the walls and roofing felt for the roof deck will protect your workshop from water damage and help regulate interior temperature. Remember to include proper ventilation through soffit and ridge vents to prevent moisture buildup and extend your shed’s lifespan.\n\n
 \n
\n\n\n
Power and Electrical Planning
\n\nProper electrical planning is crucial for a functional workshop shed. Start by determining your power needs based on the tools and equipment you’ll use regularly. Most workshop sheds require at least a 60-amp subpanel to handle power tools, lighting, and climate control systems safely.\n\nAlways consult a licensed electrician for installation. They’ll ensure compliance with local building codes and help plan the optimal layout for outlets, typically spacing them every 4-6 feet along walls at workbench height. Consider installing GFCI outlets for added safety, especially near areas where water exposure is possible.\n\nInclude dedicated circuits for major power tools and plan for adequate task lighting with a combination of overhead LED fixtures and adjustable work lights. Don’t forget exterior lighting for security and convenience during evening hours.\n\nRun electrical cables through conduit to protect against damage and moisture. Install a main disconnect switch near the entrance for safety, and clearly label all circuits in your breaker box. Consider adding surge protection to safeguard expensive power tools and equipment.\n\nRemember to plan for future expansion by including extra circuits and outlets – it’s easier to install them during initial construction than to add them later.\n\n
Storage and Workspace Layout
\n\nAn efficient workshop layout starts with dedicated zones for different activities. Create a primary workbench area along one wall, ideally near a window for natural light. Install pegboards or slat walls above the workbench to keep frequently used tools within arm’s reach. Consider mounting adjustable shelving units on the walls to maximize vertical storage space.\n\nFor power tools and larger equipment, design mobile storage solutions using heavy-duty casters. This allows you to easily reconfigure your workspace based on current projects. Include a dedicated storage cabinet for potentially hazardous materials like paints, solvents, and finishing products, preferably with proper ventilation.\n\nIncorporate a combination of open shelving and closed cabinets to protect sensitive tools from dust while keeping everyday items accessible. Plan for adequate electrical outlets throughout the space, especially near workstations. Don’t forget to include a small planning desk or area for reviewing project plans and storing documentation.\n\nRemember to leave sufficient floor space for maneuvering large materials and consider installing overhead storage racks for lumber and long materials. This comprehensive organization system ensures every tool has its place while maintaining a clutter-free work environment.\n\n\n
Customization Features
\n\n
 \n
\n\n\n
Workbenches and Built-ins
\n\nA well-planned workshop needs efficient workspaces, and integrating built-in solutions maximizes every square inch of your shed. Start by designing a primary workbench along the longest wall, ideally 24-36 inches deep and at a comfortable working height of 34-36 inches. Consider adding a tool wall above the workbench for frequently used items.\n\nFor additional functionality, incorporate modular storage units beneath the workbench. Pull-out drawers and adjustable shelving allow you to customize storage as your needs change. Corner spaces are perfect for L-shaped benches, which provide extra working surface without wasting valuable floor space.\n\nWhen designing built-ins, think vertically. Install pegboards or slat walls between wall studs, and add overhead cabinets for less frequently used items. Consider including a fold-down workbench on a secondary wall – it provides extra workspace when needed but can be tucked away to maintain floor clearance.\n\nRemember to include adequate lighting above each workstation and power outlets at strategic locations. This planning ensures your workshop remains functional and organized for years to come.\n\n
Tool Storage Systems
\n\nAn effective tool storage system is crucial for organizing your workshop efficiently. Start with wall-mounted pegboards, which offer flexible storage solutions for frequently used tools. Install adjustable shelving units along the walls to maximize vertical space and accommodate bins, boxes, and larger equipment. Consider rolling tool cabinets with multiple drawers for storing smaller items like screws, nails, and hand tools – these can be moved around as needed while working on projects.\n\nFor power tools, dedicate a specific zone with heavy-duty shelves or custom-built storage units. Include foam tool organizers inside drawers to prevent tools from moving around and getting damaged. Magnetic strips mounted at eye level work great for metal tools and create easy access while working.\n\nDon’t forget about overhead storage – install ceiling-mounted racks for lumber storage or seasonal items. Add labeled bins and containers to keep similar items together and make everything easy to find. Remember to leave enough floor space for moving around and working on projects comfortably.\n\n
Climate Control Options
\n\nMaintaining comfortable working conditions in your workshop shed is crucial for year-round productivity. Start with proper insulation in the walls, floor, and ceiling to create a stable indoor environment. Consider installing a combination of fiberglass batts and rigid foam insulation for optimal temperature control.\n\nFor heating options, portable electric heaters work well for smaller spaces, while wall-mounted infrared heaters provide efficient zone heating. During warmer months, proper ventilation becomes essential. Install windows on opposite walls to create cross-ventilation, and consider adding a ceiling-mounted exhaust fan to remove hot air and workshop fumes.\n\nTo manage humidity, which can damage tools and materials, incorporate a dehumidifier during damp seasons. Weather stripping around doors and windows helps prevent moisture infiltration. For summer cooling, a window-mounted air conditioner or portable AC unit can maintain comfortable working temperatures.\n\nDon’t forget to include thermometers and humidity monitors to track conditions. These simple tools help you adjust your climate control strategy throughout the year, ensuring your workshop remains a comfortable and protected space for your projects.\n\n
Security Features
\n\nProtecting your workshop and valuable tools should be a top priority when designing your shed. Start with heavy-duty door hinges and a high-quality deadbolt lock system. Consider installing a keypad entry system for convenient yet secure access without worrying about lost keys. Motion-sensor lighting around the exterior not only provides safety when working late but also deters potential intruders.\n\nWindows should be equipped with sturdy locks and security film to prevent break-ins. Position them strategically to maintain privacy while still allowing natural light. Consider installing wire mesh or security bars on larger windows for additional protection.\n\nFor tool security inside the workshop, mount a combination-lock tool cabinet or install a dedicated safe for expensive equipment. Create designated storage areas with lockable drawers for organizing smaller valuable items.\n\nDon’t forget about fire safety – mount a fire extinguisher near the entrance and install smoke detectors. Consider adding security cameras or a basic alarm system that connects to your home’s security network. These features not only protect your investment but also provide peace of mind while working in your shop.\n\n\nBuilding your own workshop shed is an exciting and rewarding project that can transform your property while creating the perfect space for your hobbies and projects. Throughout this guide, we’ve explored essential aspects of workshop shed planning, from choosing the right size and layout to selecting appropriate materials and incorporating crucial features like ventilation and lighting.\n\nRemember that successful workshop shed construction begins with thorough planning. Take time to consider your specific needs, local building codes, and available space before breaking ground. Whether you’re planning a compact 8×10 workspace or a generous 16×20 workshop, your shed should reflect both your current requirements and potential future needs.\n\nDon’t feel overwhelmed by the process – break it down into manageable steps and tackle each phase methodically. Start with securing necessary permits, preparing your site, and gathering materials. Focus on building a solid foundation, followed by sturdy walls and a reliable roof structure. Finally, add those personal touches that will make your workshop truly functional and enjoyable to use.\n\nNow that you have a comprehensive understanding of workshop shed planning, it’s time to turn your vision into reality. With proper preparation, attention to detail, and the right tools, you’ll soon have a dedicated space that enhances both your property value and your ability to pursue your passions. Get started today, and enjoy the satisfaction of creating your perfect workshop haven.
Looking for a wood shed kits?
Browse our full range of wood shed kits from authorized dealer brands. Free shipping to the continental US.