
Your Shed Can Actually Help the Environment (Here’s How Zero Impact Works)
Survey your yard during different times of day to identify areas where sunlight, drainage, and foot traffic naturally converge without disrupting existing wildlife corridors or established plant root systems. Before you commit to a location, place cardboard or tarps in your preferred spot for two weeks and observe what happens underneath—this reveals which areas support minimal ground life and recover quickly from disturbance.
Choose naturally compacted zones near property edges, existing hardscaping, or previously disturbed areas where construction won’t require removing healthy vegetation or redirecting water flow. Your ideal site already handles foot traffic well, stays relatively dry after rain, and sits away from mature tree root zones that extend 1.5 times beyond the canopy line.
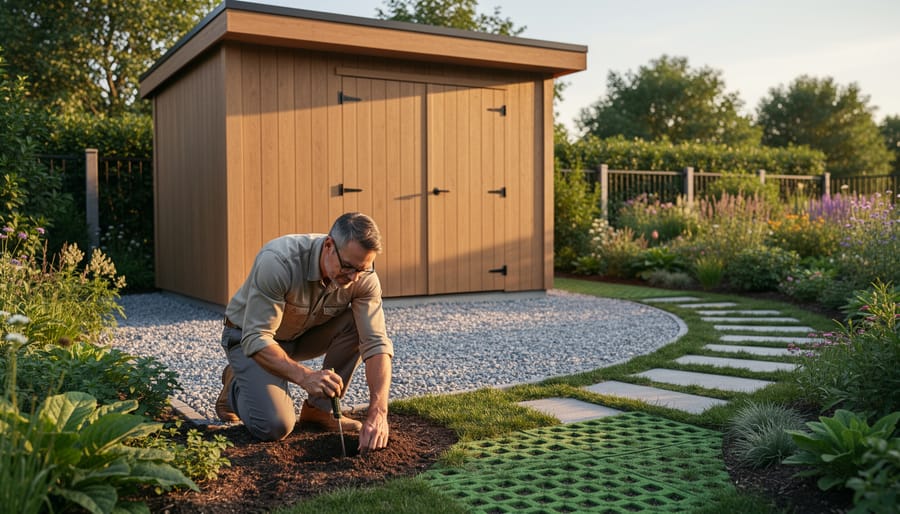
Test soil compaction with a simple screwdriver push—if it sinks easily past six inches, you’ve found softer ground that supports more organisms and should be avoided. Target spots where the screwdriver meets resistance within three inches, indicating already-compact soil with established drainage patterns that won’t flood surrounding areas when you add a structure.
Modern eco-friendly shed solutions work best when you match your structure to the land’s existing characteristics rather than forcing a location to accommodate your storage needs. This approach saves money on site preparation while preserving the yard ecosystem you’ve worked hard to cultivate.
What ‘Zero Impact’ Really Means for Your Backyard
When you hear “zero impact” in the context of placing a shed in your backyard, it might sound like an impossible goal. But here’s the good news: it’s actually more achievable than you might think, and it doesn’t mean your shed needs to float in mid-air!
Zero impact site selection means choosing a location where your shed essentially becomes part of your yard’s existing ecosystem rather than disrupting it. Think of it as finding the sweet spot where nature has already done the heavy lifting for you. This approach focuses on three key principles: preserving how water naturally flows through your property, protecting the trees, shrubs, and plants already thriving there, and working alongside your yard’s natural characteristics instead of fighting against them.
The distinction between zero impact and low impact matters more than you might realize. Low impact strategies aim to minimize damage through techniques like permeable surfaces or rain gardens—they’re damage control measures. Zero impact takes a different route entirely by avoiding the damage in the first place through smart site selection. It’s the difference between needing a band-aid and never getting a cut.
Consider Sarah from Portland, who wanted a storage shed but loved her established garden. Instead of clearing her favorite corner, she identified a naturally level spot near her fence where grass struggled to grow anyway due to tree shade. By placing her shed there, she gained storage without sacrificing a single thriving plant or altering her yard’s drainage patterns. The area was already somewhat compacted from foot traffic, so the shed simply replaced an underperforming space.
This thoughtful approach means you’re not just being environmentally conscious—you’re also avoiding costly drainage fixes, preventing erosion problems, and maintaining the mature landscaping that adds value to your property.
The Real Cost of Poor Shed Placement
Poor shed placement isn’t just an environmental concern—it can quickly become a homeowner’s headache. Let me share what often happens when location decisions are made without thinking through the consequences.
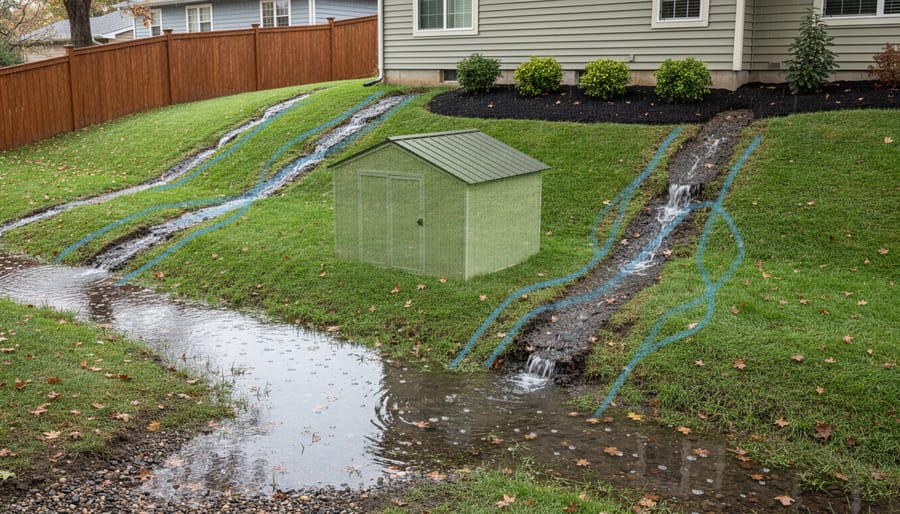
Sarah, a homeowner in Portland, learned this the hard way. She placed her shed in what seemed like a convenient spot near her garden, only to discover standing water pooling around the foundation after the first heavy rain. The shed blocked natural drainage patterns, turning her lawn into a soggy mess and creating the perfect breeding ground for mosquitoes. Within months, the shed’s floor began to rot.
Then there’s the dead grass problem. When you plop a shed directly onto healthy turf without considering what’s underneath, you’re essentially suffocating the soil beneath. But the real issue often extends beyond the shed’s footprint. Poor placement can redirect water flow, creating dry patches in some areas while drowning others.
Tree roots present another challenge that catches people off guard. Building too close to mature trees doesn’t just risk damaging roots during installation—it can destabilize the tree and create hazardous conditions. Plus, roots eventually push against foundations, causing shifting and structural damage over time.
Erosion becomes inevitable when sheds interrupt natural water channels or sit on slopes without proper consideration. That gentle hillside can quickly develop gullies and wash away topsoil, leaving unsightly scars across your property. These aren’t just aesthetic problems—they’re costly repairs waiting to happen.
Reading Your Yard Before You Choose a Spot
Watch Where Water Goes
The best site assessment starts with something simple: watching where water goes during a rainstorm. Grab an umbrella and head outside during the next good downpour. You’ll quickly spot where water naturally pools, which areas drain well, and where streams form across your yard. These observations are gold when choosing your shed location.
Between rainstorms, look for telltale signs of water movement. Low spots often show darker soil or lusher grass. You might notice small channels where water has carved paths over time, or areas where leaves and debris collect. These clues reveal your yard’s natural drainage personality.
Why does this matter? Placing your shed in a natural drainage path creates headaches down the road. Water flowing around your foundation can cause settling, rot, and even structural damage. You’ll also disrupt how rainwater moves through your property, potentially creating new problem areas or flooding issues elsewhere in your yard.
The smartest approach is working with your landscape’s natural flow rather than fighting it. Choose higher ground where water drains away naturally, and you’ll protect both your investment and your yard’s ecosystem. Consider installing a rainwater management system to make the most of runoff while preventing erosion around your shed’s foundation.
Look Down at What’s Already Growing
Before you break ground, take a careful walk around your property to see what’s already established. Your yard likely has zones with very different ecological value, and choosing the right spot can make all the difference.
Start by looking for areas that are already compacted or less productive. The strip alongside your driveway or garage often fits this description perfectly—the soil there is typically harder, with fewer plants thriving due to regular foot traffic and vehicle weight. These spots make excellent candidates for shed placement since they’re already somewhat disturbed.
On the flip side, identify your thriving garden beds, established flower borders, and mature trees. These are the zones you’ll want to protect. Pay special attention to tree root zones, which extend well beyond what you see above ground. A good rule of thumb: a tree’s roots spread at least as wide as its canopy, sometimes much farther. Placing a shed within this critical zone can damage roots and stress the tree for years to come.
Look for bare patches, areas with persistent weeds, or spots where nothing seems to grow well—these low-biodiversity zones are your sweet spots. By choosing wisely, you’ll add storage while leaving your yard’s most vibrant areas untouched.
Consider Sun and Shade Patterns
Your shed will cast shadows that shift throughout the day and seasons, creating shade patterns that can stress sun-loving plants or alter soil moisture levels. Before choosing your site, spend a few days observing how sunlight moves across your yard. Notice which areas receive full sun versus partial shade, especially during growing season.
A shed placed on the south side of your garden beds will block valuable sunlight, potentially killing vegetables or flowers that need six-plus hours of direct light. Similarly, positioning a shed too close to shade-tolerant hostas or ferns could disrupt the balanced conditions they’ve adapted to.
The good news? Many homeowners find perfect spots where shade won’t matter. Consider areas near your home’s north side, existing tree lines, or spaces already occupied by lawn rather than ornamental plantings. One DIYer shared how placing her shed behind a garage created convenient storage while the garage itself already blocked sunlight to that area. Smart placement means your plants keep thriving while you gain the storage you need.
Check for Underground Surprises
Before breaking ground, take time to investigate what’s hiding beneath your chosen spot. Underground utilities like water lines, electrical cables, and gas pipes can turn your eco-friendly project into an expensive hazard. Contact your local utility company for a free locate service—they’ll mark underground lines with colored flags, helping you avoid costly mistakes.
If you have a septic system, keep your shed at least 10 feet away from the tank and drain field to prevent soil compaction that could damage the system. Look for telltale signs like unusually green grass patches or access covers that indicate septic components below.
Don’t forget about tree roots! Large trees can have root systems extending well beyond their canopy. Placing a shed over major roots can stress the tree and create foundation problems down the line. A simple probe with a long screwdriver can help you feel for root networks in the top 12 inches of soil, steering you toward truly impact-free locations.
Zero-Impact Site Selection Strategies That Actually Work
The ‘Already Disturbed’ Sweet Spot
Start your search by walking your entire property with fresh eyes. Look for spots where grass already struggles to grow—these areas near driveways, along fence lines, or beneath tree canopies are naturally less productive and make ideal candidates for shed placement.
Pay special attention to compacted soil zones. These are often found where vehicles park occasionally, where previous structures stood, or along well-worn pathways. The soil here is already dense and offers minimal habitat value, meaning your shed won’t displace thriving plant life or disturb underground ecosystems.
Consider underutilized corners and side yards that receive limited sunlight. If you’ve been unsuccessfully trying to grow grass or flowers in a shaded area for years, that’s your yard telling you it’s better suited for something else. Placing your shed here actually solves two problems at once.
Take note of gravel areas, existing hardscaping, or spots with exposed dirt. Jennifer from Oregon discovered the perfect location beside her existing patio—an awkward strip of land that collected weeds but never supported a healthy lawn. Her shed now sits there without any environmental trade-off, and the space finally serves a purpose.
Foundation Choices That Preserve Soil Health
Choosing the right foundation makes all the difference when it comes to protecting your yard’s natural systems. Let’s look at your options from most to least soil-friendly.
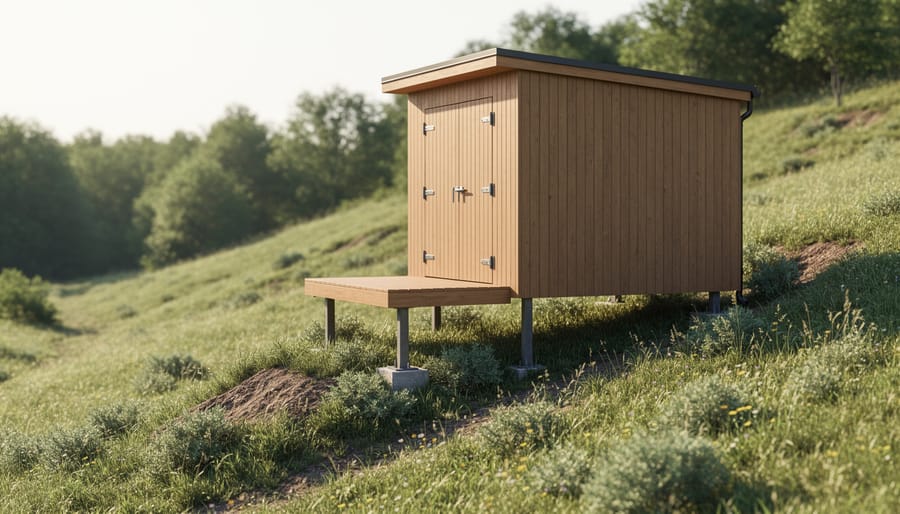
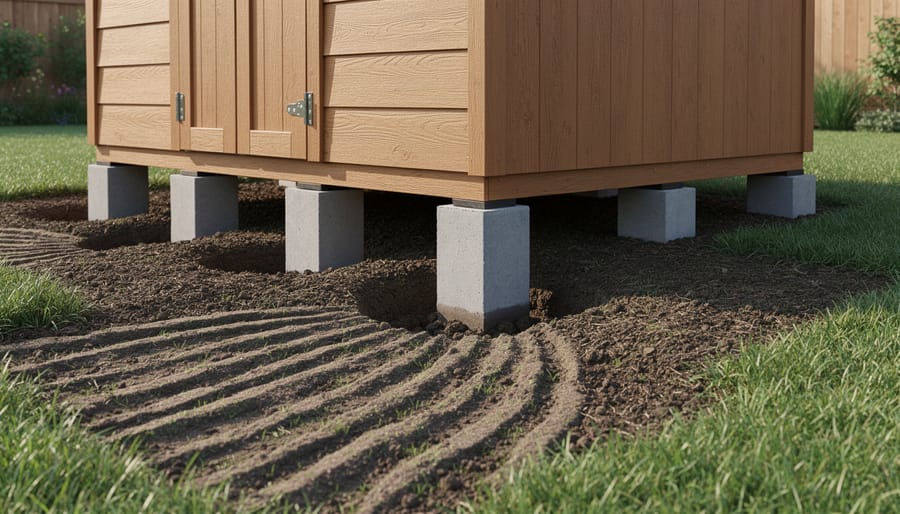
Pier foundations top the list for minimal impact. These elevated supports use concrete blocks or adjustable piers at strategic points beneath your shed’s corners and center beams. They disturb only small footprint areas where each pier sits, leaving soil structure and drainage patterns largely intact. Roots can continue growing underneath, and water flows naturally through your yard just as it did before.
Gravel foundations offer a middle-ground approach. While they require excavating a shallow area and potentially adding landscape fabric, they remain permeable and allow some water infiltration. However, compacting the area does affect soil biology more than piers.
Concrete slabs create the most disruption. Pouring a full slab means excavating several inches of topsoil, destroying existing plant roots, and creating an impermeable surface that redirects water flow. This can lead to pooling issues and affects nearby vegetation.
For most homeowners wanting truly zero-impact installation, pier foundations deliver the best results. They’re also easier to level on sloped terrain and can be installed without heavy equipment tearing up your lawn. Explore more earth-friendly foundation methods to find the perfect match for your yard’s conditions.
Creating Buffer Zones Around Your Shed
Once your shed is positioned, creating a thoughtful buffer zone protects your yard’s ecosystem while keeping your shed accessible. Think of this area as a transition space that prevents erosion, manages water runoff, and maintains soil health without resorting to harsh clearing methods.
Rather than stripping away vegetation or pouring concrete, consider laying down a 2-3 foot border of wood chips or mulch around your shed’s perimeter. This natural solution allows water to penetrate the soil while suppressing weeds and providing a tidy walking surface. One homeowner in Oregon shared that their cedar chip border not only looked attractive but actually improved drainage around their shed during heavy rains.
Native ground covers like clover, creeping thyme, or wild strawberry make excellent living buffers. These low-growing plants stabilize soil, require minimal maintenance, and support local pollinators. For high-traffic areas near your shed door, consider permeable pavers nestled into gravel—they provide firm footing without blocking water absorption.
The key is working with your landscape’s natural drainage patterns rather than fighting them. A simple wood chip path that curves slightly to follow ground contours feels more natural and handles water better than a rigid cleared strip.
Matching Shed Materials to Zero-Impact Goals
Your shed material choice significantly impacts how well it aligns with zero-impact placement goals. Metal sheds offer exceptional longevity—often lasting 20+ years with minimal maintenance—which means fewer replacements and less environmental disruption over time. They’re ideal for naturally flat areas since they don’t contribute organic materials to the soil. Wood sheds, particularly those using eco-friendly shed materials like reclaimed lumber or FSC-certified wood, blend beautifully with natural landscapes but require regular maintenance to prevent rot and chemical treatments that could leach into soil.
Plastic and vinyl sheds resist moisture damage without chemical treatments, making them low-maintenance options for sensitive areas near water features or wildlife corridors. However, they’re petroleum-based products with shorter lifespans than metal alternatives.
Here’s the practical takeaway: match your material to your site’s specific conditions. A metal shed works wonderfully on rocky ground where anchoring is straightforward. Wood suits forested properties where natural aesthetics matter most. For spots near gardens or water sources, opt for materials requiring zero chemical preservatives. The right pairing reduces both installation impact and long-term environmental footprint while keeping your storage solution functional for decades.
Real Homeowner Success Stories
When Sarah in Portland wanted to add a 10×12 storage shed to her sloped backyard, she faced a real dilemma. Her yard featured mature rhododendrons and a natural drainage path that kept her basement dry during Oregon’s rainy season. Instead of leveling the obvious flat spot near her fence, which would have disrupted water flow, she observed her yard through two full rainstorms. She discovered a naturally level area beneath two Douglas firs where rainwater never pooled. By placing her shed there on concrete deck blocks, she preserved the drainage pattern completely. The shed now sits in dappled shade, keeping it cooler in summer, and Sarah didn’t disturb a single plant.
Mark and Jennifer in suburban Chicago had different challenges. Their small yard had only one seemingly perfect spot for a shed, but it sat directly over their main sewer line. After mapping their underground utilities, they identified a narrow side yard they’d dismissed as too shaded. By choosing a slightly smaller 8×10 design and using adjustable plastic foundation blocks, they created a level base without digging into tree roots. The shaded location actually became an advantage, as their gardening supplies and pool chemicals now stay cooler. They avoided a potentially expensive plumbing disaster while gaining the storage they desperately needed.
These homeowners succeeded by observing first and building second, letting their yard’s natural features guide their decisions rather than forcing a preconceived plan.
Common Mistakes and How to Avoid Them
Even well-intentioned homeowners make avoidable mistakes when trying to minimize their environmental footprint. The most common error? Choosing a location based purely on aesthetics rather than site suitability. That picture-perfect spot under the oak tree might actually compact roots and create drainage issues down the road.
Another frequent misstep is over-clearing vegetation in the name of preparation. One homeowner shared how removing native groundcover to create a “clean slate” led to erosion problems within months. Instead, work with existing plants where possible, relocating rather than destroying them.
Ignoring seasonal water patterns is particularly problematic. That dry patch in summer might become a mini-wetland during spring rains, compromising your shed’s foundation and the surrounding soil structure. Observe your yard through different seasons or ask neighbors about typical drainage patterns.
Finally, many people forget to plan for maintenance access. Tucking your shed into a tight corner might preserve more yard space, but if you can’t easily reach all sides for repairs or painting, you’ll eventually create larger environmental disturbances when major work becomes necessary. Leave adequate clearance on at least two sides for long-term sustainability.
Here’s the encouraging truth: achieving zero-impact site selection doesn’t require a degree in environmental science or a hefty budget. It simply takes a willingness to observe your property through a new lens and invest a little time in thoughtful planning before installation day arrives.
You’ve already taken the most important step by educating yourself about how different areas of your yard function as mini-ecosystems. Armed with your observations about drainage patterns, sun exposure, tree root zones, and existing wildlife corridors, you’re prepared to make a choice that honors both your storage needs and the living landscape you’re part of.
The real satisfaction comes from knowing you’ve found that sweet spot where practical storage meets environmental stewardship. Your new shed can serve you beautifully for decades without leaving a trail of compacted soil, displaced wildlife, or drainage headaches behind.
Now that you understand what to look for in a site, you’re ready to explore storage solutions that fit your space perfectly. Take your newfound knowledge with you as you consider your options, confident that you can create the functional outdoor storage you need while being a thoughtful caretaker of your property.