
Why Your Workshop Air is Making You Sick (And How to Fix It)
Every breath you take in your workshop matters. That sawdust hanging in the air after cutting, those wood stain fumes lingering for hours, and the fine particles that settle on every surface aren’t just annoying—they’re potentially harmful to your health and can damage your projects too.
Installing an air filtration system transforms your shed workspace from a dusty hazard zone into a comfortable, safe environment where you can focus on your craft. Whether you’re converting your shed into a workshop or upgrading an existing space, the right filtration setup makes all the difference.
The challenge? Shed workshops present unique obstacles that traditional garage systems don’t address. Limited electrical capacity, irregular air circulation, temperature fluctuations, and varying ceiling heights all impact which filtration solution works best for your space. Add in the diverse activities you might tackle—from woodworking and metalwork to spray painting and resin crafting—and choosing the right system becomes even more crucial.
This guide cuts through the confusion. You’ll discover how to assess your specific air quality needs, match filtration technology to your workshop activities, and install a system that actually works in a shed environment. We’ll cover everything from portable units and ceiling-mounted systems to DIY solutions that fit any budget, plus practical maintenance tips that keep your air clean without constant hassle.
The Real Problem With Workshop Air Quality
What’s Actually Floating in Your Shed Workshop
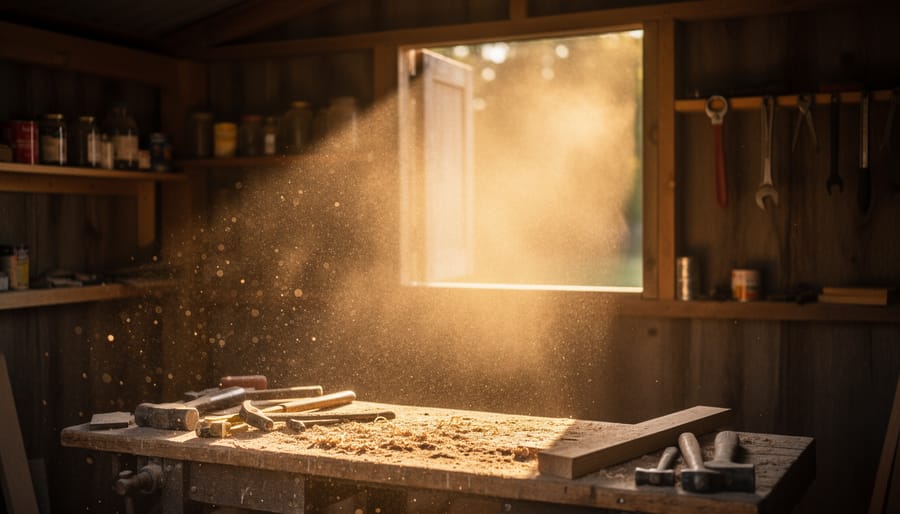
You might not see them, but your shed workshop is hosting an invisible party of airborne nasties every time you fire up a tool. Understanding what’s actually floating around is your first step toward breathing easier.
If you’re working with wood, you’re dealing with sawdust particles ranging from 10 microns down to 0.5 microns. The chunky stuff settles on your workbench, but those superfine particles from your sander or table saw? They stay airborne for hours, drifting right into your lungs. Different woods create different hazards too. Cedar and walnut dust can trigger allergic reactions, while MDF releases formaldehyde as you cut it.
Metalworking introduces a whole different cast of characters. Grinding and welding produce fumes and particles as small as 0.01 microns, which are essentially invisible smoke. These metal particulates are particularly concerning because they’re heavy metals that your body struggles to eliminate.
Painting and finishing work floods your space with volatile organic compounds and solvent vapors. These aren’t just unpleasant smells; they’re chemical particles that can cause headaches, dizziness, and long-term health issues with repeated exposure.
Here’s the challenge: particles under 10 microns are completely invisible to the naked eye, yet they’re small enough to bypass your nose’s natural filters and settle deep in your lungs. That “clean” air after you’ve swept up? It’s likely still loaded with the most dangerous particles. This is precisely why relying on good ventilation alone isn’t enough, and why a proper filtration system becomes essential for anyone spending regular time in their shed workshop.
Why Sheds Need Better Filtration Than Garages
If you’ve transformed your shed into a workshop, you’re likely dealing with tougher air quality challenges than your neighbor with a garage setup. Here’s why: sheds typically have much tighter construction with fewer gaps and cracks, which sounds great for keeping weather out but means dust and fumes have nowhere to go. Unlike garages with their large roll-up doors that provide natural air exchange, sheds often rely on just one or two small windows for proper ventilation.
The compact size of most sheds means airborne particles concentrate faster. When you’re sanding wood or spraying finishes, that small 10×12 space fills up quickly compared to a spacious two-car garage. Temperature extremes create additional problems. Summer heat and winter cold affect how air circulates, often causing it to stagnate in corners where harmful particles settle and linger.
Many DIYers discover this the hard way after their first few projects leave them coughing or noticing a persistent haze. One woodworker shared how he thought opening his shed door would be enough until he realized fine sawdust was coating everything, including his lungs. These unique challenges make a dedicated air filtration system essential rather than optional for shed workshops.
How Air Filtration Systems Actually Work
The Three Types of Filters You Need to Know
Think of filtration layers as your workshop’s defensive lineup, each player tackling different airborne troublemakers. Understanding these three filter types helps you choose the right system for your specific needs.
Pre-filters are your first line of defense, catching the big stuff before it clogs up more expensive filters downstream. These washable or replaceable screens capture sawdust, wood chips, and larger dust particles—the debris you can actually see floating around after cutting plywood or sanding a project. They’re workhorses that extend the life of your other filters and save you money in the long run. If you’re primarily working with wood, a quality pre-filter handles about 80% of workshop dust.
HEPA filters are the precision players, trapping microscopic particles down to 0.3 microns—that’s smaller than you can see with the naked eye. These capture fine dust from sanding operations, concrete grinding, or metal work that can settle deep in your lungs. If you’re doing any amount of power sanding or working with materials that create fine airborne particles, a HEPA filter isn’t optional, it’s essential for protecting your long-term health.
Activated carbon filters tackle what the others miss: fumes, odors, and chemical vapors. When you’re staining, painting, using adhesives, or applying finishes in your shed workshop, carbon filters absorb those vapors before they build up to uncomfortable or dangerous levels.
Most woodworkers can get by with pre-filters and HEPA filtration, but if you’re frequently working with finishes, solvents, or adhesives in your enclosed shed space, all three filter types working together provide complete air quality protection.
Choosing the Right System for Your Shed Workshop
Calculating Your Shed’s Air Volume
Before choosing an air filtration system, you’ll need to know how much air your workshop actually contains. Don’t worry – the math is surprisingly simple!
Start by calculating your shed’s volume: multiply length times width times height (all in feet). For example, a 10-foot by 12-foot shed with 8-foot ceilings equals 960 cubic feet.
Next, determine how many air changes per hour you need. Think of this as how many times you want the system to completely refresh your workshop’s air every 60 minutes. For light woodworking or general crafts, aim for 4-6 air changes per hour. Heavier dust-producing activities like sanding or cutting require 6-8 changes.
Here’s the practical formula: Shed volume multiplied by desired air changes, divided by 60 minutes. Using our example shed with 6 air changes: 960 cubic feet times 6 equals 5,760, divided by 60 gives you 96 CFM (cubic feet per minute).
Real-world tip from experienced woodworker Sarah M: “I initially bought a system rated exactly at my calculated CFM, but upgrading to 25% higher capacity made a noticeable difference during extended sanding sessions.” Consider adding that buffer for optimal performance, especially if you tackle dusty projects frequently.
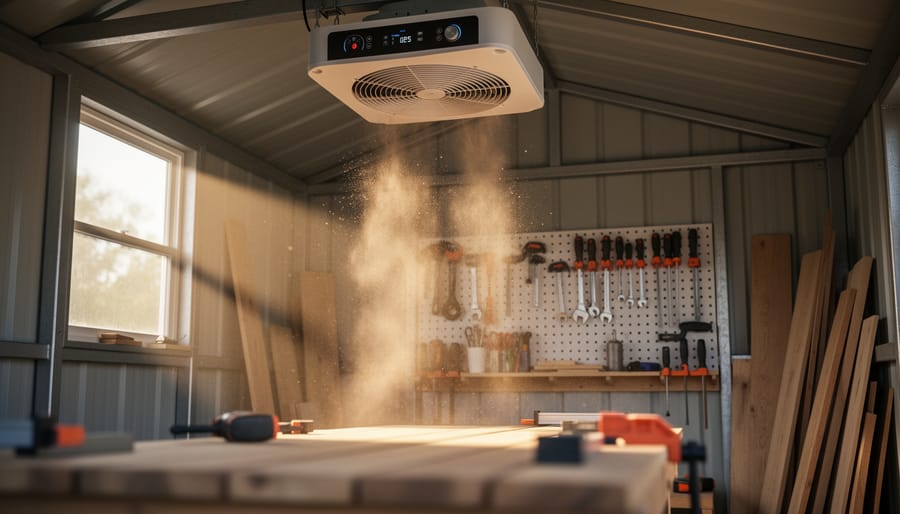
Ceiling-Mounted vs. Portable Units
Choosing between ceiling-mounted and portable air filtration units comes down to your shed’s layout and how you work. Both have their place in a workshop, and understanding each option helps you make the right call.
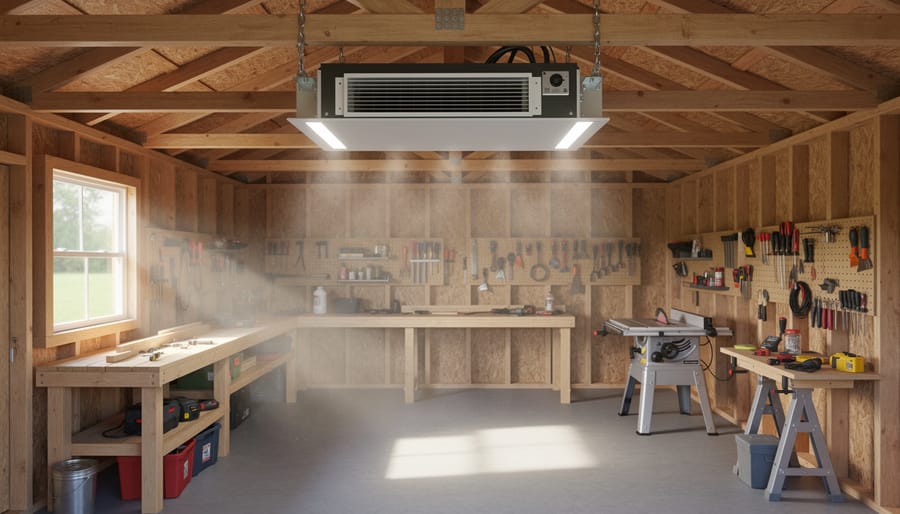
Ceiling-mounted units are fantastic space-savers in compact sheds. They hang overhead, keeping your floor clear for tools and projects. Once installed, they’re out of your way permanently and can filter air across the entire space efficiently. The challenge? Installation requires secure ceiling joists, and you’ll need to feel comfortable with basic mounting hardware. They work best in sheds with adequate ceiling height (at least 7 feet) and when you do most of your work in one general area.
Portable units offer incredible flexibility, especially if you’re still figuring out your workshop layout. You can roll them wherever dust concentrates, whether that’s near your miter saw today or by your sanding station tomorrow. They’re perfect for renters or anyone hesitant about drilling into their shed structure. The downside is they take up precious floor space and can become obstacles in tight quarters.
Here’s a real-world tip from experienced woodworkers: consider your primary dust sources. If you have one main work area, a ceiling-mounted unit positioned above it provides consistent, hands-off filtration. But if you move between different stations or work on various projects requiring equipment relocation, a portable unit moves with your needs. Some shed workshop owners even combine both approaches, using a ceiling unit for general air quality and a portable one for targeted filtration during especially dusty tasks.
Power Requirements and Electrical Setup
Most workshop air filtration systems operate on standard 120V household current, typically drawing between 50-200 watts depending on the unit size. This is great news if your shed already has basic electrical service – you’ll simply need a dedicated outlet near your planned installation spot.
Before purchasing, check your shed’s electrical capacity. A 15-amp circuit handles most portable and ceiling-mounted units comfortably. If you’re running multiple power tools simultaneously, consider a separate circuit for your filtration system to avoid tripping breakers during critical woodworking tasks.
Running costs remain surprisingly affordable. A mid-range 150-watt unit operating eight hours daily costs roughly $3-5 monthly, making clean air an accessible investment for most hobbyists.
Solar power presents an interesting option for remote sheds without grid connection. Small systems paired with battery storage can power energy-efficient filtration units, though upfront costs run higher. One woodworker in rural Montana shared that his solar setup powers both lighting and a compact air filter, eliminating extension cords across his property entirely.
For sheds with limited electrical infrastructure, battery-powered portable units offer temporary solutions, though they lack the continuous operation capacity needed for dust-heavy projects. Most DIY enthusiasts find that running a proper electrical line delivers the best long-term value and performance.
Installing Your Air Filtration System
Best Placement for Maximum Effectiveness
Getting the placement right makes all the difference in how well your air filtration system performs. Think of air movement like water flowing through your workshop—you want to guide it, not fight against it.
Position your filtration unit opposite your main dust source, typically across from your workbench or primary cutting area. This creates a natural airflow path that captures particles as they travel through the space. Avoid placing the unit directly behind where you stand while working, as your body blocks the airflow and reduces effectiveness.
Consider your shed’s door placement carefully. Every time you open the door, you’re introducing fresh air that can either help or hinder filtration. Mount your system on the wall furthest from the door entrance, allowing incoming air to sweep through the space and push airborne particles toward the filter.
Ceiling-mounted units work wonderfully in smaller sheds since dust naturally rises with heat from your activities. Wall-mounted systems at about seven feet high work well too, keeping them above breathing level while staying accessible for filter changes. Keep at least two feet of clearance around the intake and exhaust areas—crowding your unit against stored items or in a corner dramatically reduces its ability to pull contaminated air effectively.
What You’ll Need Before You Start
Before you dive into your air filtration project, let’s make sure you’ve got everything ready. For the filtration unit itself, you’ll need your chosen air filter system, appropriate mounting hardware, and extension cords or dedicated electrical connections. Here’s where shed workshops differ from traditional garages: many sheds have exposed rafters rather than finished ceilings, which can actually make installation easier since you have direct access to mounting points.
If you’re working with a metal shed, grab self-tapping metal screws and rubber washers to prevent vibration noise. Wood sheds typically work fine with standard wood screws and wall anchors. You’ll also want a stud finder (if you have finished walls), a drill with various bits, a level, and a ladder that’s stable on your shed floor.
Don’t forget the basics: a tape measure, pencil, and safety glasses. Consider having a helper on hand, especially for ceiling-mounted units that can be awkward to position alone. If your shed lacks adequate electrical outlets near your ideal mounting location, plan for safe extension cord routing or hire an electrician to add a dedicated outlet. This small investment prevents tripping hazards and ensures your system runs safely.
Maintenance That Actually Keeps Your Air Clean
When to Change Your Filters (And How to Tell)
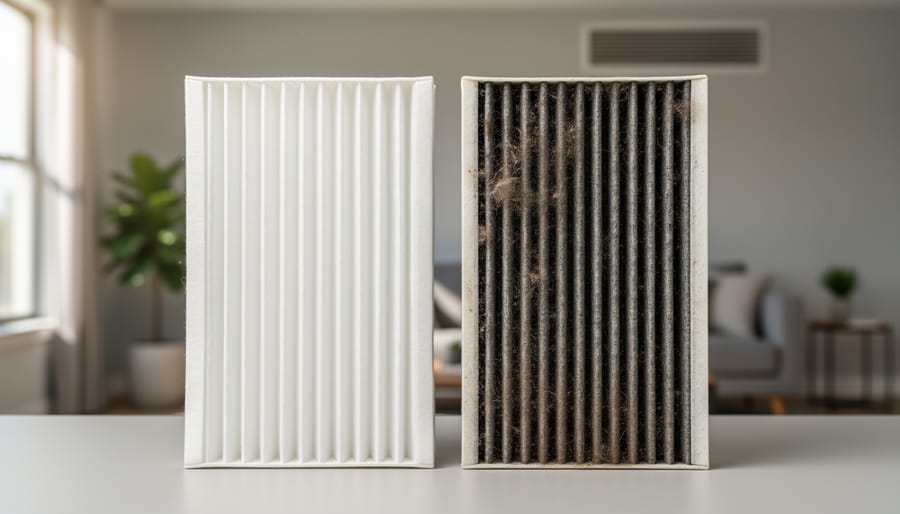
Knowing when to swap out your filters keeps your workshop air healthy and your system running efficiently. The most obvious sign is visual—if you can see a thick layer of dust coating the pre-filter or the main filter looks discolored or clogged, it’s time for a change. Don’t wait until airflow drops noticeably, as this forces your system to work harder and can damage the motor.
For light hobbyist use (a few hours weekly), plan to check pre-filters monthly and replace them every two to three months. The main HEPA or carbon filters typically last six months to a year in occasional-use scenarios. If you’re running power sanders or working with MDF regularly, expect to replace pre-filters every three to four weeks. One woodworker in Ohio shared that marking filter installation dates on his calendar saved him from unexpected breakdowns during busy project seasons.
A smart cost-saving strategy involves buying filters in bulk or choosing systems with washable pre-filters. Some units include filter change indicators, but setting smartphone reminders based on your actual usage patterns works just as well. Remember, clean filters protect both your lungs and your investment in the filtration system itself.
Seasonal Considerations for Shed Workshops
Your shed workshop’s air filtration system works harder when dealing with temperature extremes. In winter, cold air reduces filter efficiency and can cause motor strain. Consider insulating your shed or running your system during warmer daylight hours when you’re actively working. Some woodworkers report success with leaving filters inside their homes overnight during freezing conditions.
Summer heat presents different challenges. High temperatures can warp plastic housings and reduce motor lifespan. Position your unit away from direct sunlight and ensure adequate ventilation around the motor. If your shed gets particularly hot, run the system in early morning or evening hours when temperatures drop.
One maker from Ohio shared that checking and replacing filters seasonally keeps his system running smoothly year-round, while also adjusting fan speeds based on temperature to prevent overworking the motor during extreme conditions.
Making It Work With Your Existing Setup
The good news? You don’t need to rip out your existing dust collection system to add air filtration. These two systems work beautifully together, each handling different aspects of workshop air quality. Your dust collector grabs the big chips and shavings right at the source, while an overhead air filtration system catches the fine particles that escape into the air.
If you’re working with limited shed space, consider mounting your filtration unit on the ceiling to keep floor space clear. Sarah from Oregon installed a ceiling-mounted unit in her 10×12 shed workshop and says it was one of her best workshop improvements. She positioned it opposite her dust collector inlet to create a circulation pattern that pulls air across her work area.
For sheds with existing ventilation, you’ll want to coordinate your filtration system with your airflow patterns. Run your air filtration when windows are closed during colder months, and position it to complement natural ventilation during warmer weather. Many DIYers find that running their filtration system for 30 minutes after finishing work clears remaining particles effectively.
Space-challenged workshop owners often choose compact wall-mounted units or portable floor models on casters that roll out of the way when not in use. Mark from Michigan solved his tight space issue by mounting a smaller unit on an articulating arm, letting him swing it into position over his workbench and tuck it away when needed.
What It Really Costs (And What You Get Back)
Let’s talk real numbers. A quality air filtration system for your shed workshop typically runs between $200 and $600 for initial purchase, depending on the size of your space and the unit’s capabilities. Factor in another $50 to $100 annually for filter replacements, and you’re looking at a genuine investment in your workspace.
Operating costs stay surprisingly low. Most units draw between 50 and 200 watts, adding roughly $5 to $15 monthly to your electric bill if you run them during project time. This modest expense becomes even more reasonable when you consider what you’re getting back.
The health benefits alone justify the cost. You’re protecting your lungs from fine dust particles that would otherwise settle deep into your respiratory system. Beyond personal wellbeing, you’ll notice dramatic improvements in your project quality. No more dust settling on fresh finish coats or finding sawdust embedded in glue-ups. Your tools stay cleaner, requiring less maintenance and lasting longer.
Tom Rodriguez, a furniture maker who added filtration to his converted shed last year, shares his experience: “I was skeptical about spending $400 on an air cleaner, but within two weeks I noticed the difference. My wife stopped complaining about me tracking sawdust into the house, my breathing improved, and I haven’t had a single finish ruined by floating dust since installation. I wish I’d done it years ago.”
The long-term value extends to your shed itself. Less airborne dust means cleaner walls, windows, and stored items. You’ll spend less time sweeping and wiping down surfaces, giving you more time for actual woodworking. When you calculate the cost per year of ownership, most workshop owners find their filtration system pays for itself through improved efficiency and peace of mind.
Investing in a quality air filtration system for your workshop isn’t just about comfort—it’s about protecting your health and making your shed space somewhere you actually want to spend time. Whether you’re sanding wood, working with paints, or simply dealing with dust buildup, cleaner air means fewer respiratory issues, better visibility, and a more pleasant environment overall.
The good news? You don’t need to be an expert to get started. Begin by assessing your workshop’s specific needs based on the projects you tackle most often. Then choose a filtration system that matches your space size and dust production levels. Even starting with a basic ceiling-mounted unit can make a noticeable difference within the first few hours of operation.
Remember, the benefits extend beyond just you. When your workshop air is clean, family members can safely visit your space, and you’re not tracking fine dust particles back into your home. Many DIYers report that once they installed proper filtration, they found themselves spending more quality time in their workshops because it simply felt better to be there.
Take that first step today—your lungs and your family will thank you for it.