
Build Your Dream Outdoor Kitchen for Less Than You Think
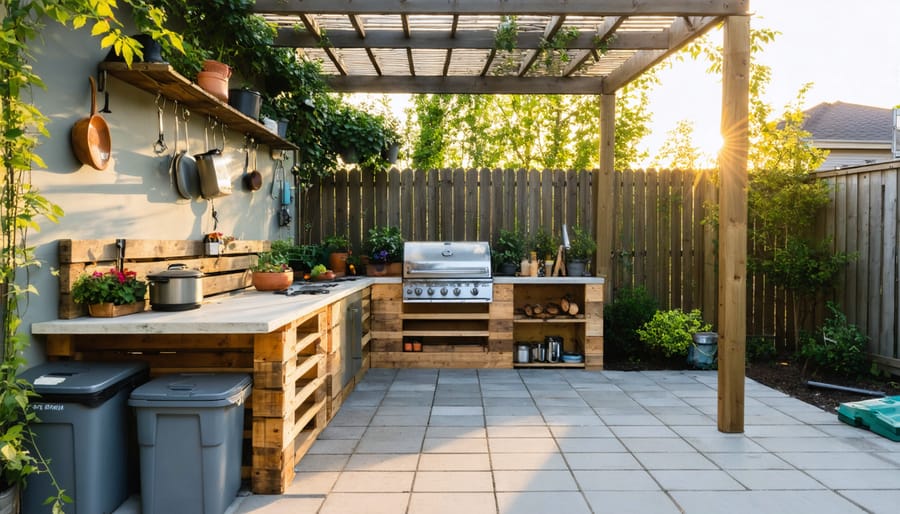
Start with a repurposed wooden pallet as your base countertop—sand it smooth, seal it with weatherproof stain, and top it with affordable concrete pavers for a durable work surface under $50. Transform a basic charcoal grill into your primary cooking station instead of investing in built-in appliances, then add a simple two-burner propane camp stove for versatility at a fraction of the cost. Create budget-friendly outdoor cooking storage using weather-resistant plastic bins tucked beneath your counter or repurposed metal lockers from secondhand stores. Build your own pergola frame using basic lumber from home improvement stores, skipping expensive contractor quotes, and drape it with outdoor fabric or bamboo roll-up shades for instant shade and ambiance.
The dream of an outdoor kitchen doesn’t require a five-figure investment or professional installation. With strategic planning, creative material choices, and a willingness to tackle simple DIY projects, you can design a functional cooking and entertaining space that fits comfortably within a modest budget. Whether you’re working with a compact patio or spacious backyard, the key lies in prioritizing essential elements, shopping smart, and embracing alternatives that deliver style and functionality without the premium price tag.
Why a Budget-Friendly Outdoor Kitchen Makes Sense
Creating an outdoor kitchen doesn’t mean emptying your savings account. In fact, building one on a budget makes perfect sense for most homeowners, and here’s why.
First, let’s address the elephant in the patio: you don’t need professional-grade stainless steel everything to create a functional outdoor cooking space. That’s simply a misconception. Many homeowners have discovered that mixing affordable materials with strategic splurges delivers both style and durability without the premium price tag.
The benefits speak for themselves. An outdoor kitchen extends your living space, essentially adding a room to your home during warmer months. You’ll find yourself cooking outside more often, which keeps your house cooler and reduces air conditioning costs during summer. No more heating up the kitchen while baking or grilling!
From a financial perspective, outdoor kitchens consistently add value to your property. Even budget-friendly versions appeal to potential buyers who see the lifestyle benefits. One homeowner in Arizona shared how her $800 DIY outdoor kitchen setup became a major selling point, with buyers commenting on it during every showing.
The real magic happens when you focus on functionality over flash. A simple setup with a reliable grill, weatherproof storage, and basic counter space often serves families better than elaborate designs that remain underused. Smart planning and creative problem-solving can transform a modest investment into years of outdoor entertaining and delicious meals under the open sky.
Smart Planning: The Foundation of Your Budget Outdoor Kitchen
Start Small and Build Over Time
You don’t need to build your dream outdoor kitchen overnight—and honestly, taking a phased approach often leads to better results. Start with the absolute essentials: a quality grill and a basic prep surface. These two elements alone will transform your outdoor cooking experience and give you time to discover how you actually use the space.
Once you’re comfortable with your setup, add features based on your real-world needs. Maybe you realize you desperately need a small sink for rinsing vegetables, or perhaps extra storage becomes your priority. This gradual approach has several advantages: you’ll avoid costly mistakes by learning what you truly need, you can spread expenses across multiple budget cycles, and you’ll have time to hunt for deals on each component.
Many homeowners find this method less overwhelming financially and more satisfying overall. One couple shared how they started with just a grill station one summer, added a DIY bar counter the next year, and finally installed lighting and seating in year three. By spacing out their investments, they created exactly what they wanted without the stress of a massive upfront expense. Plus, each addition feels like a fresh upgrade to enjoy.
Choose the Right Location to Save Money
Your outdoor kitchen’s location can make or break your budget. Start by choosing a spot close to your existing home utilities—positioning near your indoor kitchen’s plumbing and electrical lines can save you hundreds or even thousands in extension costs. Every additional foot of pipe or wire adds up quickly!
Consider your existing outdoor surface too. Building on a solid concrete patio? You’ve just eliminated foundation expenses. Dirt or grass areas require excavation, grading, and potentially expensive concrete work. Even a gravel base needs proper preparation.
Look for natural advantages in your yard. A spot with partial shade from existing trees reduces the need for costly pergolas or shade structures. An area with natural windbreaks means you won’t need as many privacy screens or walls.
Think about accessibility as well. A location that’s too far from your indoor kitchen means constant trips back and forth, which gets old fast. One homeowner shared how moving their outdoor setup just ten feet closer to their back door transformed their cooking experience completely.
Finally, avoid low-lying areas prone to water pooling—drainage solutions aren’t cheap and can create ongoing maintenance headaches down the road.
Budget-Friendly Counter and Work Surface Ideas
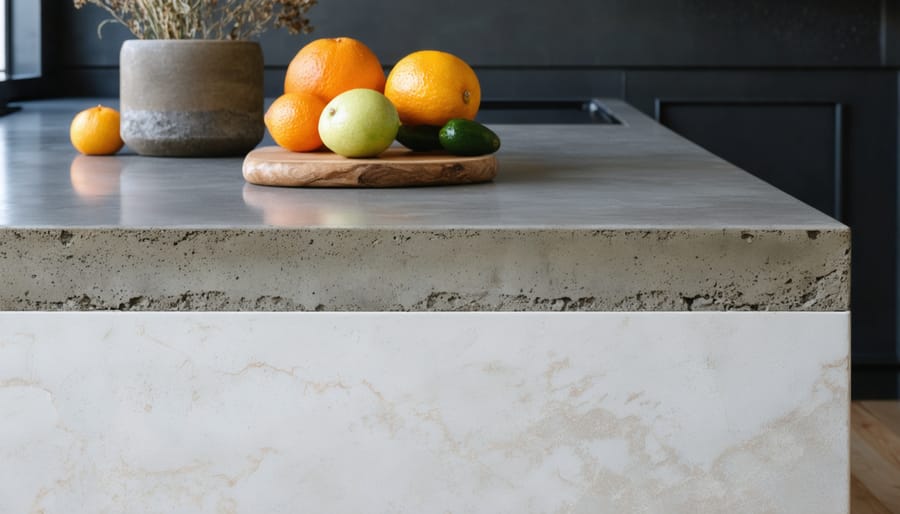
DIY Concrete Countertops That Look Expensive
Concrete countertops deliver that high-end look without the designer price tag, and they’re surprisingly DIY-friendly. You can create custom concrete counters for around $5-10 per square foot compared to $50-100+ for stone alternatives—that’s serious savings!
Start by building a simple wooden frame as your mold, then mix concrete following package directions. Here’s a real-world tip from experienced DIYers: add a concrete fortifier to your mix for extra strength and fewer cracks. Pour slowly to avoid air bubbles, and use a vibrating sander against the frame edges to release trapped air pockets.
The finishing stage transforms ordinary concrete into something special. After curing for several days, sand the surface smooth starting with 50-grit and working up to 400-grit sandpaper. This creates that polished appearance that looks professionally done.
Sealing is your countertop’s best friend—it prevents staining and makes cleanup effortless. Apply a food-safe concrete sealer in thin coats, allowing proper drying time between applications. Reapply annually to maintain protection and keep that beautiful finish looking fresh. You’ll have gorgeous, durable counters that guests assume cost a fortune!
Repurposed Materials That Add Character
Hunting for treasure at salvage yards, estate sales, and online marketplaces can uncover incredible pieces that bring instant personality to your outdoor kitchen. Reclaimed barn wood makes stunning countertop frames or shelving brackets with weathered character that new materials simply can’t replicate. One homeowner discovered thick slate tiles at a demolition auction for just $50—enough to create an entire heat-resistant work surface perfect for setting down hot pans.
Old butcher blocks from restaurant closures often sell for a fraction of retail prices and provide durable prep surfaces after a good sanding and sealing. Salvaged bricks or stone pavers create beautiful backsplashes or counter bases with timeless appeal. Just like repurposed furniture transforms outdoor spaces, these reclaimed materials tell a story while keeping your budget intact.
Before purchasing, inspect materials carefully for structural integrity and ensure they’re safe for food preparation areas. A simple cleaning, sealing with food-safe products, and creative arrangement can transform forgotten materials into the showpiece of your outdoor kitchen—proving that character doesn’t require a premium price tag.
Affordable Cooking Equipment and Appliance Solutions
When to Buy New vs. Used or Refurbished
Quality used outdoor appliances can save you 40-70% compared to new models, making them a smart choice for budget-conscious homeowners. Start your search on Facebook Marketplace, Craigslist, and local estate sales where families often sell gently-used grills and equipment when moving or upgrading.
Before purchasing any used appliance, check these essentials: inspect burners and grates for rust or excessive wear, test all ignition systems, and examine gas lines for cracks or damage. For stainless steel items, look for deep pitting or discoloration that goes beyond surface cleaning. A homeowner in Texas shared how she found a $1,200 built-in grill for just $300 at an estate sale—it only needed new grates and a thorough cleaning.
Refurbished appliances from manufacturers or authorized retailers often include warranties, bridging the gap between used and new. These units have been professionally inspected and repaired, offering peace of mind at mid-range prices.
Skip used items with electronic components unless you can test them thoroughly, as repairs often cost more than the savings. Similarly, avoid refrigerators older than five years due to energy efficiency concerns and potential compressor issues that could leave you with expensive repairs down the road.
The Most Cost-Effective Cooking Setups
Let’s talk real numbers for your outdoor cooking setup! A basic portable charcoal grill starts around $30-$50 and works perfectly for weekend grilling. If you prefer gas convenience, decent two-burner models run $150-$250—they’ll last years with proper care.
Here’s a budget-friendly secret: you can build a simple cinder block grill for under $100. Stack blocks in a U-shape, add a cooking grate, and you’re done! One homeowner shared how their $75 DIY setup has been their family’s go-to for five summers straight.
For pizza lovers, a basic DIY brick pizza oven costs $200-$400 in materials. While it requires weekend effort, you’ll save thousands compared to pre-built units. The key is sourcing firebricks locally—check salvage yards first!
Mid-range portable kamado grills ($300-$500) offer versatility for grilling, smoking, and baking. They’re fuel-efficient and retain heat brilliantly, meaning lower long-term costs.
The smartest approach? Start simple with a $50 grill, then upgrade as your outdoor cooking passion grows. Many families find their basic setup handles 90% of their needs—no fancy equipment required for delicious results!
Storage Solutions That Won’t Break the Bank
Using Garden Sheds as Kitchen Storage
A compact garden shed positioned near your outdoor kitchen can be a game-changer for keeping your cooking space organized and clutter-free. Instead of running back and forth to your indoor kitchen, you’ll have everything you need within arm’s reach—from grilling tools and serving platters to charcoal bags and cleaning supplies.
When selecting a shed for kitchen storage, think about what you’ll be storing most often. A 4×6 or 6×8 foot shed typically provides plenty of room for outdoor kitchen essentials without overwhelming your yard. Look for models with built-in shelving or add your own using weatherproof materials like treated wood or metal brackets.
Weatherproofing is crucial since you’ll be storing items you use regularly. Apply a quality sealant to any untreated wood surfaces, and consider adding weather stripping around the door to keep moisture out. Install hooks on the interior walls for hanging utensils and aprons, and use clear plastic bins to protect items like napkins and tablecloths from humidity.
One homeowner shared that converting a basic storage shed into her outdoor kitchen pantry saved her countless trips indoors and kept her patio area looking neat. She added battery-powered LED strips inside for evening access—a simple touch that made all the difference.
DIY Cabinet and Shelving Options
You don’t need expensive custom cabinetry to keep your outdoor kitchen organized! Weather-resistant alternatives can save you hundreds while still looking fantastic.
Consider repurposing old dressers or cabinets by sealing them with marine-grade polyurethane and adding waterproof hardware. Many homeowners have transformed vintage filing cabinets into charming outdoor storage with just a coat of rust-resistant spray paint and some creative styling.
Simple DIY builds work beautifully too. Cinder blocks stacked with wooden shelves create sturdy, industrial-style storage for under $50. Add outdoor-rated fabric curtains to protect contents from the elements. Wooden pallets mounted horizontally make excellent open shelving for frequently-used items – just sand, seal, and mount securely.
For a polished look on a budget, use plastic deck boxes as base cabinets. They’re waterproof, UV-resistant, and available at big-box stores for $40-80 each. Top them with a butcher block or tile surface to create functional lower cabinets that double as prep space.
The key is selecting materials designed to withstand moisture and temperature changes. Treated lumber, PVC boards, and stainless steel brackets ensure your DIY storage lasts for years without the premium price tag.
Shelter and Shade on a Shoestring Budget
Gazebo Options That Protect Your Investment
Protecting your outdoor kitchen from the elements doesn’t require a custom-built structure. Pop-up canopies offer the most budget-friendly option, starting around $100-$200 for basic models that shield your cooking area during gatherings. Look for water-resistant fabric and sturdy frames that handle moderate wind.
Permanent gazebo kits from home improvement stores typically range from $300-$800, providing year-round coverage without contractor costs. Many homeowners find success with aluminum-framed gazebos featuring polycarbonate roofs—they’re lighter than wood structures and easier to assemble as weekend DIY projects.
Consider positioning matters too. Sarah from Texas saved hundreds by placing her budget gazebo strategically against her house wall, creating natural protection on one side while reducing material needs. She added outdoor curtains on sale for $40 to block afternoon sun.
For maximum value, choose models with drainage features and vented tops to prevent water pooling and wind damage. A $500 gazebo that lasts five years beats replacing cheap alternatives annually.
Creative DIY Shade Structures
Don’t let a tight budget keep you sweating in the sun while grilling! Creating comfortable shade over your outdoor kitchen is more affordable than you might think.
A simple DIY pergola offers excellent bang for your buck. Using basic lumber from your local home improvement store, you can build a straightforward structure for $200-400. Even beginners can tackle this weekend project—just follow online tutorials and start with a basic design. Add climbing vines or outdoor fabric for extra shade.
Shade sails present another wallet-friendly option. These triangular or rectangular canvases cost $50-150 and install in just hours. They’re perfect for renters too, since they’re completely removable.
For the truly budget-conscious, plant fast-growing bamboo, wisteria, or trumpet vines around your cooking area. While they take time to establish, they cost only $20-40 per plant and create beautiful, natural shade that actually improves over time. Plus, they add wonderful ambiance to your outdoor space while keeping you cool during those long summer cookouts!
Frugal Dining Space and Seating Ideas
Furniture That Lasts Without the Premium Price
Quality outdoor furniture doesn’t require a designer price tag if you know where to look. Start by checking local estate sales, auctions, and online marketplaces like Facebook Marketplace or Craigslist—you’ll often find solid pieces at 50-70% off retail prices. Big-box stores like IKEA, Home Depot, and Target offer surprisingly durable options during end-of-season clearance sales, typically in late summer and early fall.
When shopping budget-friendly, prioritize aluminum or resin wicker over wood, as they naturally resist weather damage without constant maintenance. One homeowner found a complete patio set for $200 at a restaurant liquidation sale that’s still going strong after five years.
Extend your furniture’s lifespan with simple care: store cushions indoors during winter, apply UV protectant spray twice yearly, and cover pieces during harsh weather. Repainting metal furniture every few years keeps it looking fresh. These small efforts mean your budget finds will serve you well for many outdoor gatherings to come.
DIY Dining Tables and Benches
Creating an inviting dining area doesn’t require expensive furniture—you can build functional tables and benches with minimal investment. Cinder blocks paired with wooden planks make sturdy, rustic tables perfect for outdoor entertaining. Simply stack the blocks to your desired height and top with sanded lumber or reclaimed wood. For a complete DIY outdoor furniture set, construct matching benches using the same materials.
Pallets offer another budget-friendly option. Clean them thoroughly, sand rough edges, and stack two or three pallets for a casual table base. Add weatherproof stain or outdoor paint for protection and style. For seating, arrange pallets horizontally, add cushions on top, and you’ve got comfortable bench seating. These simple projects typically cost under $50 in materials and require only basic tools like a saw, drill, and sandpaper—making them perfect weekend projects for DIY enthusiasts.
Finishing Touches That Add Style Without Cost
The magic of an outdoor kitchen often comes down to those final touches that transform a functional space into a welcoming gathering spot—and many of these enhancements cost little to nothing.
**Lighting Sets the Mood**
String lights create instant ambiance for under $20. Drape them along your cooking area or overhead to extend usability into evening hours. Solar-powered path lights eliminate electrical costs while guiding guests safely around your space. For targeted task lighting over prep areas, consider budget outdoor lighting options like battery-operated LED strips that stick directly to shelving or counters.
**Personal Touches Make It Yours**
Repurpose items you already own to add character. Old crates become rustic shelving for herbs or utensils. Mason jars transform into utensil holders or lanterns with tea lights. Paint leftover wood scraps in vibrant colors to create decorative signs with your favorite food quotes or menu items.
One homeowner shared how she used leftover fence pickets to build a vertical herb garden for just $8 in screws—now her guests pick fresh basil while she grills.
**Strategic Landscaping**
Plant herbs directly around your kitchen perimeter for functional beauty. Rosemary, thyme, and oregano thrive outdoors and smell wonderful when brushed against. Potted plants from clearance racks add pops of color when grouped together—mismatched containers actually create charming, eclectic appeal.
**Functional Décor**
Hang hooks on any vertical surface for tools, towels, and oven mitts. A chalkboard paint section on a wall becomes your menu board or grocery list. Outdoor-safe tablecloths and cushions from discount stores immediately elevate your dining area when entertaining.
These small investments and creative projects add personality while keeping your outdoor kitchen feeling intentionally designed rather than merely assembled.
Real-World Budget Outdoor Kitchen Success Stories
Maria from Austin, Texas transformed her bare concrete patio into a charming outdoor kitchen for just $850. “I started with a $200 stainless steel prep table from a restaurant supply store, added a portable two-burner propane stove ($120), and built my own serving counter using cinder blocks and reclaimed wood planks,” she shares. Her biggest money-saving tip? “Check Facebook Marketplace religiously. I scored a barely-used mini fridge for $75 that retails for $250.” Maria’s main challenge was creating shade without spending hundreds on a pergola, which she solved by hanging outdoor curtains on galvanized pipes mounted to her house—total cost under $100.
The Johnson family in Phoenix tackled their outdoor kitchen renovation with just $1,200 and plenty of weekends. “We repurposed old kitchen cabinets from a neighbor’s renovation, sealed them with marine-grade varnish for weather protection, and suddenly had tons of storage,” explains Tom Johnson. They invested in a quality used gas grill ($300) and built their countertop using concrete overlay on plywood—a fraction of granite’s cost. “Our favorite hack was using heavy-duty storage bins inside the cabinets instead of expensive drawer systems,” adds his wife Sarah. Their biggest advice? “Start with the essentials and add slowly. We’re still expanding two years later.”
These homeowners prove that creativity and patience matter more than a massive budget when creating functional outdoor cooking spaces that perfectly suit your family’s needs.
Creating your dream outdoor kitchen doesn’t require a massive budget or professional contractors—just creativity, smart planning, and a willingness to tackle the project in stages. Whether you start with a simple grill station and add elements over time, or repurpose materials you already have, the possibilities are truly endless. Remember that some of the most inviting outdoor kitchens come from thoughtful DIY projects rather than expensive renovations.
As you embark on this exciting journey, don’t overlook the importance of proper storage to keep your outdoor kitchen organized and functional. Quality storage solutions protect your cooking equipment, utensils, and supplies from the elements while keeping everything within easy reach. From weather-resistant cabinets to versatile shed options, having dedicated storage space will elevate your outdoor cooking experience and extend the life of your investments.
Ready to transform your backyard into an entertainment haven? Start small, build gradually, and watch your outdoor kitchen dreams become reality—all while staying comfortably within your budget.