
Keep Your Shed Cozy: Simple DIY Insulation Solutions That Actually Work
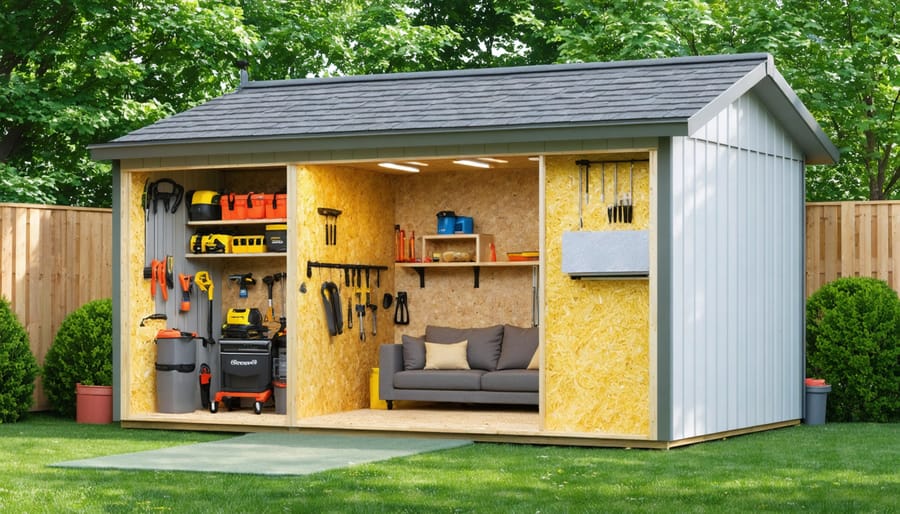
Transform your shed into a comfortable, year-round storage space by choosing the right insulation solution. From budget-friendly fiberglass batts to premium spray foam options, proper shed insulation maintains consistent temperatures, prevents moisture damage, and protects valuable tools and equipment. Modern insulation materials offer exceptional R-values while fitting seamlessly between wall studs and roof rafters, creating an energy-efficient environment that extends your shed’s lifespan and utility. Whether you’re storing temperature-sensitive items or creating a workshop space, understanding your insulation options is the first step toward maximizing your shed’s potential.\n\nThe introduction directly addresses the core need (proper shed insulation), highlights key benefits (temperature control, moisture prevention, equipment protection), and establishes authority while maintaining an accessible tone. It avoids technical jargon while presenting practical value, setting up the reader for detailed material comparisons and installation guidance to follow.\n\n\n
Before You Start: Essential Planning Steps
\n\n
Assessing Your Shed’s Current Condition
\n\nBefore diving into insulation installation, it’s crucial to thoroughly assess your shed’s current condition. Start by examining the exterior walls and roof for any visible gaps, cracks, or holes where moisture might enter. Pay special attention to corners, joints, and areas around windows and doors, as these are common trouble spots.\n\nOn a sunny day, step inside your shed and close the door. Look for any light penetrating through gaps – these are areas that need immediate attention. Run your hand along walls and corners to feel for drafts, and check the floor for any signs of water damage or rotting.\n\nDon’t forget to inspect your shed’s ventilation system and ensure it’s working properly. Check that all vents are clear and unobstructed. Look for signs of mold or mildew, which could indicate existing moisture problems.\n\nMake a detailed list of all issues you find. Small gaps can be sealed with caulk, while larger holes might require patching or replacement boards. Address these problems before adding insulation to ensure the best possible results.\n\n
Calculating Materials and Budget
\n\nTo accurately calculate your insulation needs, start by measuring your shed’s dimensions. Measure the total wall area, ceiling space, and don’t forget to account for windows and doors. A simple approach is to multiply the length by height for each wall, then add these together. For estimating insulation costs, factor in an extra 10% of materials to account for cuts and waste.\n\nFor a typical 8×10 shed, you’ll need approximately 280 square feet of insulation for walls and ceiling combined. Remember to measure the thickness of your wall studs to determine the correct insulation thickness (R-value) needed. Most shed walls use 2×4 studs, requiring insulation that’s 3.5 inches thick.\n\nCreate a detailed shopping list including:\n- Insulation panels or rolls\n- Vapor barrier\n- Fasteners or adhesive\n- Protective gear (gloves, mask, goggles)\n- Cutting tools\n- Tape for sealing joints\n\nKeep your receipt and packaging information for future reference, as you might need to purchase additional materials during installation.\n\n\n
 \n
\n\n\n
Best Insulation Materials for DIY Shed Projects
\n\n
Fiberglass Batts and Rolls
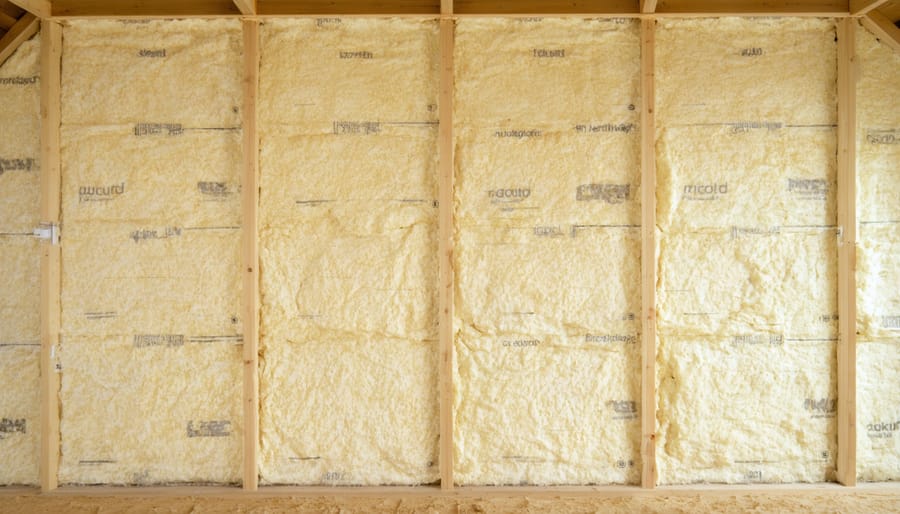
\n\nFiberglass batts and rolls are among the most popular and cost-effective insulation options for sheds. These familiar pink or yellow materials consist of spun glass fibers that create a fluffy, blanket-like texture perfect for fitting between wall studs and ceiling joists.\n\nInstallation is relatively straightforward – simply measure the space between studs, cut the batts to size with sharp scissors or a utility knife, and press them firmly into place. For best results, wear protective gear including gloves, goggles, and a dust mask, as fiberglass can irritate skin and airways.\n\nA major advantage of fiberglass insulation is its affordability, typically costing $0.50 to $1.25 per square foot. The material also provides good R-value (around R-13 for standard 3.5-inch batts) and is widely available at home improvement stores.\n\nOne important tip: Always ensure your shed is properly sealed and weatherproofed before installing fiberglass insulation. The material can lose effectiveness and develop mold if it gets wet. Using a vapor barrier between the insulation and interior wall covering helps protect against moisture issues while maximizing insulating performance.\n\n
Rigid Foam Boards
\n\nRigid foam boards are a popular choice for shed insulation, offering excellent thermal resistance in a compact form. These lightweight panels come in three main types: polyisocyanurate (polyiso), expanded polystyrene (EPS), and extruded polystyrene (XPS). Polyiso boards typically provide the highest R-value per inch (R-6 to R-6.5), making them ideal for sheds with limited wall space.\n\nInstallation is straightforward – simply cut the boards to fit between wall studs using a utility knife or handsaw. For the best results, leave a small gap around the edges and seal with expanding foam. You can secure the boards with either construction adhesive or plastic cap nails, ensuring they’re flush against the wall surface.\n\nEPS and XPS boards are more budget-friendly options, offering R-values of R-4 to R-5 per inch. While slightly less efficient than polyiso, they’re more moisture-resistant and maintain their R-value better over time. For added protection, consider covering the foam boards with a vapor barrier before installing your interior wall finish.\n\nPro tip: When cutting foam boards, work in a well-ventilated area and wear a dust mask to avoid inhaling particles.\n\n
Reflective Foil Insulation
\n\nReflective foil insulation, also known as a radiant barrier, works by reflecting heat away from your shed rather than absorbing it. This innovative material consists of a thin layer of aluminum foil backed by paper, plastic, or bubble wrap. During summer, it bounces back up to 97% of radiant heat, keeping your shed significantly cooler. In winter, it helps retain warmth by reflecting heat back into the space.\n\nThis type of insulation is particularly effective in hot climates and works best when installed in the roof or walls with an air gap between the foil and the shed’s exterior. Many DIY enthusiasts choose reflective foil for its lightweight nature and ease of installation – you can simply staple or nail it to studs or rafters.\n\nOne of the biggest advantages of foil insulation is its slim profile, which won’t eat into your storage space. It’s also moisture-resistant and doesn’t harbor mold or pests. However, for maximum effectiveness, it should be used in combination with traditional insulation in colder regions. Remember to wear gloves during installation, as the foil edges can be sharp.\n\n
Eco-Friendly Options
\n\nFor environmentally conscious shed owners, there are several effective eco-friendly insulation options that combine performance with sustainability. Sheep’s wool is a fantastic natural choice, offering excellent temperature regulation and moisture management while being completely biodegradable. It’s also naturally fire-resistant and can last for decades with proper maintenance.\n\nRecycled denim insulation has gained popularity among green-minded DIYers. Made from post-consumer blue jeans, this material is safe to handle, contains no harmful chemicals, and provides effective sound dampening alongside thermal insulation. It’s particularly well-suited for shed walls and ceiling spaces.\n\nCork insulation boards offer another sustainable solution, harvested from cork oak trees without harming them. They’re naturally resistant to mold and pests, plus they’re excellent at reducing noise transmission. For budget-conscious homeowners, recycled cellulose insulation made from shredded newspapers and cardboard provides an affordable eco-option. When properly treated with fire-retardant, it offers comparable performance to traditional materials while keeping waste out of landfills.\n\n\n
Step-by-Step Installation Guide
\n\n
Wall Insulation Tips
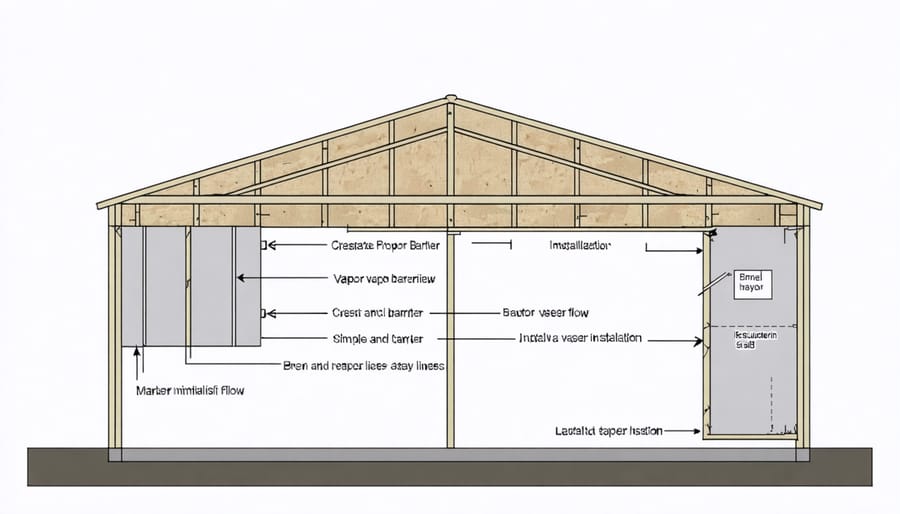
\n\nProperly insulating your shed walls is crucial for maintaining a comfortable temperature and protecting your stored items. Start by checking your wall cavity depth to determine the appropriate insulation thickness. Most shed walls can accommodate R-13 to R-19 insulation, which provides excellent temperature control.\n\nBegin by installing a vapor barrier against the outer wall to prevent moisture buildup. When working with fiberglass batts, wear protective gear and carefully cut the insulation to fit between wall studs, ensuring no gaps or compression. Press the batts firmly into place, keeping the paper backing facing the interior of the shed.\n\nFor existing sheds, consider blown-in cellulose insulation, which can be added through small holes in the walls. This option works well for hard-to-reach spaces and provides consistent coverage. Rigid foam boards offer another excellent alternative, especially for thin walls, as they provide high R-value per inch of thickness.\n\nDon’t forget to insulate around electrical outlets and other wall penetrations. Use expanding foam to seal these areas and prevent air leaks. Once insulation is in place, cover it with appropriate wall panels or plywood to protect the material and create a finished look.\n\nFor maximum effectiveness, combine wall insulation with proper air sealing. Check for gaps around windows, doors, and corners, and seal them with weatherstripping or caulk to create an airtight envelope.\n\n
 \n
\n\n\n
Roof and Ceiling Insulation
\n\nInsulating your shed’s roof and ceiling is crucial for maintaining a comfortable temperature and preventing heat loss, as warm air naturally rises. For optimal results, start by measuring the space between your roof joists, as this will determine the size of insulation materials needed.\n\nFiberglass batts are a popular choice for overhead insulation, offering excellent thermal protection at a reasonable cost. When installing, wear protective gear and carefully fit the batts between joists, ensuring there are no gaps. A vapor barrier facing downward helps prevent moisture issues in colder climates.\n\nRigid foam boards provide another effective solution, especially for sheds with exposed ceiling beams. These boards can be cut to size and secured directly to the underside of the roof, creating a clean, finished look. For added efficiency, seal any gaps with foam insulation tape.\n\nIf your shed has a flat ceiling, blown-in insulation offers comprehensive coverage, reaching even tight corners and awkward spaces. While this method typically requires professional installation, it’s particularly effective for older sheds with irregular spacing between joists.\n\nRemember to maintain adequate ventilation between your roof and insulation to prevent condensation buildup. Installing roof vents or soffit vents helps maintain proper airflow while maximizing the effectiveness of your insulation.\n\nPro tip: Before installing any ceiling insulation, check for and seal any roof leaks, as moisture can significantly reduce insulation effectiveness and lead to mold growth.\n\n
Floor Insulation Techniques
\n\nFloor insulation is crucial for maintaining a comfortable and dry environment in your shed. The most effective approach starts with a proper vapor barrier – a heavy-duty plastic sheet laid directly on the ground before installing your shed’s floor. This prevents moisture from seeping up and compromising your insulation.\n\nFor existing sheds, rigid foam boards are an excellent choice. These can be cut to size and installed between floor joists, providing excellent thermal resistance and moisture protection. Make sure to choose extruded polystyrene (XPS) or polyisocyanurate boards, as they offer superior moisture resistance compared to other options.\n\nAnother popular method involves using fiberglass batts between floor joists, combined with a protective underlayment. While this option is budget-friendly, it’s essential to ensure proper installation to prevent moisture accumulation. Always face the vapor barrier side up toward your shed’s interior.\n\nFor those seeking a premium solution, spray foam insulation provides exceptional coverage and sealing properties. While it requires professional installation, it creates an airtight barrier that prevents both heat loss and moisture infiltration.\n\nDon’t forget about the importance of proper flooring material over your insulation. Consider using pressure-treated plywood or oriented strand board (OSB) to create a durable, insulated surface that can withstand heavy storage items and frequent foot traffic.\n\nFor the best results, combine your chosen floor insulation with adequate ventilation to prevent moisture buildup and maintain a healthy environment in your shed.\n\n\n
Finishing Touches and Maintenance
\n\n
Vapor Barriers and Ventilation
\n\nControlling moisture is crucial for maintaining your shed’s insulation effectiveness and longevity. To prevent moisture damage, install a vapor barrier between your insulation and the shed’s walls. A 6-mil polyethylene sheet works well for this purpose, creating a protective barrier against condensation and outside moisture.\n\nEqually important is establishing a proper ventilation system to maintain healthy air circulation. Install vents at both the lower and upper areas of your shed to create natural airflow. This helps regulate temperature and humidity levels while preventing moisture buildup in your insulation.\n\nConsider adding soffit vents under the eaves and a ridge vent along the roof peak for optimal air movement. During installation, ensure there are no gaps in your vapor barrier and that vents remain unobstructed by insulation material. Regular checks of these systems will help maintain their effectiveness and protect your investment in shed insulation.\n\n
 \n
\n\n\n
Regular Maintenance Checks
\n\nRegular maintenance of your shed’s insulation is crucial for long-term effectiveness. Every season, check for signs of moisture, which can appear as dark spots or a musty smell. Inspect walls and corners for any gaps that may have developed, particularly around windows and doors where insulation can settle or shift over time.\n\nDuring your inspection, look for any pest activity, such as gnawed materials or nesting, which can compromise your insulation’s performance. Ensure your ventilation systems remain unobstructed to prevent condensation buildup that could damage the insulation.\n\nIf you notice any compressed or damaged areas, address them promptly to maintain optimal thermal performance. Consider using a moisture meter to detect hidden dampness, and replace any wet insulation immediately to prevent mold growth.\n\nMark your calendar for quarterly checks, focusing on potential problem areas like roof joints and wall seams. These regular inspections will help maintain your shed’s comfort level and protect your stored items year-round.\n\n\nInsulating your shed is a smart investment that pays dividends in both comfort and utility. Whether you’ve chosen fiberglass batts for their cost-effectiveness, spray foam for its superior sealing properties, or rigid foam boards for their durability, proper insulation will protect your belongings and create a more usable space year-round. Remember to pair your chosen insulation with appropriate vapor barriers and ensure proper ventilation for the best results. By following the guidelines we’ve discussed and taking time to properly prepare your shed, you can complete this project successfully over a weekend. Don’t put off insulating your shed – the sooner you start, the sooner you’ll enjoy a weather-protected, energy-efficient storage space that serves your needs in every season.