
Make Your Shed More Comfortable: Smart Thermal Barrier Solutions That Really Work

Transform your shed into a year-round functional space by mastering thermal barrier implementation. Understanding the benefits of shed insulation starts with selecting the right materials and installation methods. Thermal barriers create a protective envelope that regulates temperature, prevents moisture damage, and reduces energy costs – making them essential for any serious storage or workspace solution. Whether you’re protecting valuable tools, creating a workshop, or establishing a comfortable garden retreat, proper thermal barrier installation marks the difference between a basic shed and a climate-controlled sanctuary. Modern materials like reflective foil, spray foam, and rigid board insulation offer exceptional performance while remaining DIY-friendly, allowing homeowners to tackle this crucial upgrade with confidence.
Understanding Thermal Barriers for Your Shed
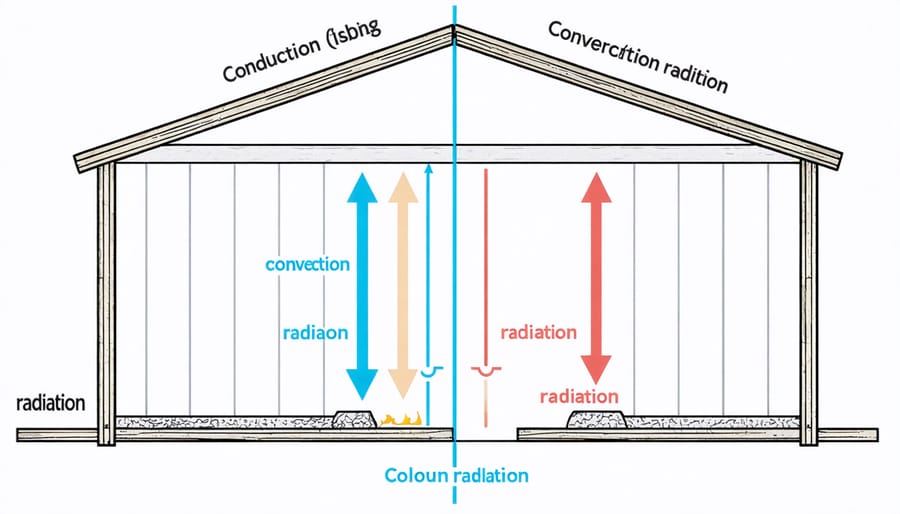
How Heat Transfer Affects Your Shed
Understanding how heat moves in and out of your shed is key to maintaining a comfortable storage environment. Heat transfer occurs in three main ways, each affecting your shed differently throughout the year.
Conduction happens when heat moves directly through solid materials, like your shed’s walls and roof. Think of how a metal tool left in the sun becomes hot to touch – that’s conduction at work. In sheds, this typically means heat from outside seeping through the walls during summer or warmth escaping during winter.
Convection involves heat movement through air currents. As warm air rises and cool air sinks, it creates a natural circulation in your shed. This is why you might notice the upper areas of your shed feeling warmer than the floor, especially on sunny days.
Radiation is heat transfer through electromagnetic waves, primarily from the sun. This is particularly noticeable in sheds with metal roofs, which can intensely absorb and transmit the sun’s heat downward into your storage space.
By understanding these heat transfer methods, you can make better decisions about insulation and ventilation to keep your shed at optimal temperatures year-round.
Common Thermal Weak Points in Sheds
Understanding where heat commonly enters or escapes your shed is crucial for effective insulation. The most vulnerable areas typically include the roof junction, where heat rises and escapes during winter or enters during summer. Door frames and windows are also major culprits, often developing gaps over time that allow air to flow freely. The base of your shed, particularly where it meets the foundation, commonly develops drafts that can significantly impact temperature control.
Corners and joints between wall panels are frequent weak points, especially in metal or plastic sheds where thermal bridging occurs. Electrical conduit entry points and ventilation fixtures often create unexpected passages for heat transfer. Even seemingly solid walls can have hidden gaps behind fixtures or shelving units where insulation may be compressed or missing.
Pay special attention to any modifications you’ve made to your shed, such as installing new lights or adding a window, as these alterations can create new thermal weak points. Regular inspection of these common problem areas helps maintain your shed’s thermal efficiency and ensures your insulation efforts aren’t undermined by overlooked gaps.
Essential Thermal Barrier Components
Insulation Materials That Work Best
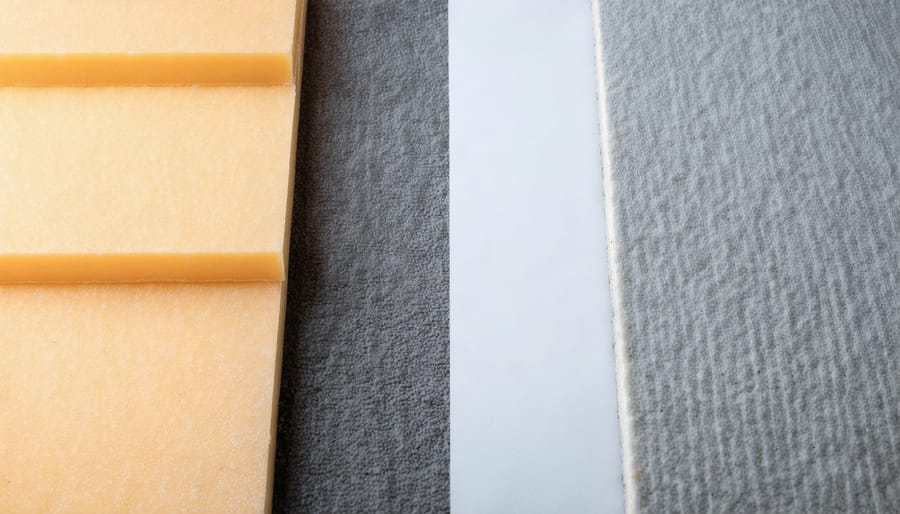
When it comes to creating an effective thermal barrier for your shed, choosing the right cost-effective insulation options is crucial. Foam boards, particularly polyisocyanurate (polyiso) and extruded polystyrene (XPS), offer excellent insulation value while taking up minimal space. These rigid panels are easy to cut and install, making them perfect for both wall and ceiling applications.
Fiberglass insulation remains a popular choice due to its affordability and widespread availability. Available in batts or rolls, it fits perfectly between standard wall studs and ceiling joists. While it requires careful handling and protective gear during installation, fiberglass provides reliable temperature control and sound dampening properties.
Reflective barriers, consisting of aluminum foil-faced materials, work differently by reflecting radiant heat. They’re especially effective in hot climates where solar gain is a concern. Installing these barriers with an air gap maximizes their performance, making them an excellent addition to other insulation types.
For comprehensive protection, consider combining materials. For example, use foam boards on the walls, fiberglass in the ceiling, and add a reflective barrier in the roof space. This multi-layer approach creates an efficient thermal envelope that keeps your shed comfortable year-round while protecting your stored items from temperature extremes.
Vapor Barriers and Weather Stripping
Effective moisture control and air sealing are crucial components of your shed’s thermal barrier system. A properly installed vapor barrier prevents moisture from seeping through walls and floors, while weather stripping ensures tight seals around doors and windows. When implementing these moisture control solutions, start with a high-quality 6-mil polyethylene sheeting for your vapor barrier, installing it on the warm side of your insulation.
For optimal results, overlap vapor barrier seams by at least 6 inches and seal them with moisture-resistant tape. Pay special attention to areas where pipes or electrical lines penetrate the barrier, using appropriate sealing products designed for these applications. When it comes to weather stripping, self-adhesive foam tape works well for most shed doors and windows, while V-strip weather stripping provides excellent protection against drafts in areas with significant temperature fluctuations.
Don’t forget to inspect the threshold area under your shed door – a door sweep or threshold seal can prevent unwanted air infiltration at floor level. Remember to check these components annually for wear and tear, replacing any damaged sections promptly to maintain your shed’s thermal efficiency. This attention to detail in moisture and air control will significantly enhance your shed’s comfort level and protect stored items from humidity-related damage.
Installation Tips for Maximum Effectiveness
Wall and Ceiling Installation
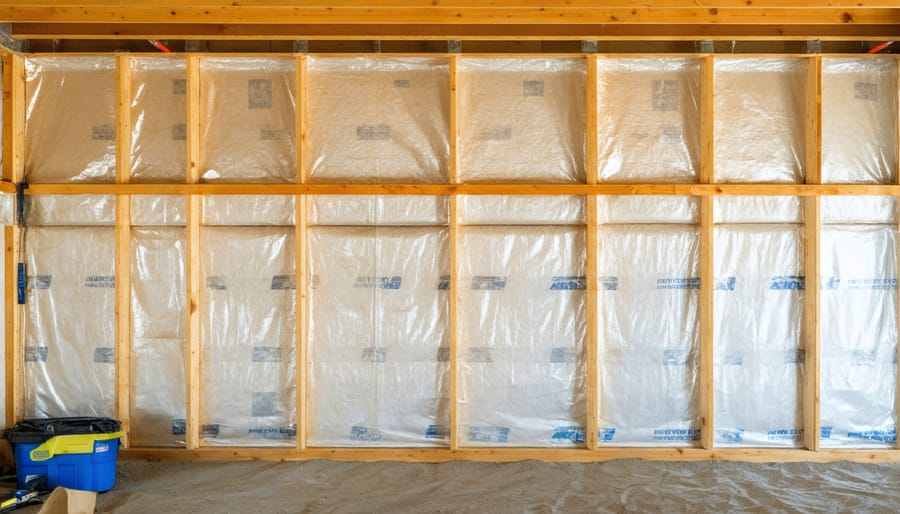
Installing thermal barriers in your walls and ceiling requires careful attention to detail for maximum effectiveness. Start by measuring your wall cavities and ceiling spaces accurately to ensure you have enough material. For walls, begin at the bottom and work your way up, securing the barrier material between studs using a staple gun or appropriate fasteners every 8-12 inches.
When installing in walls, maintain a consistent tension on the material to prevent sagging, which can reduce effectiveness. Create a small air gap of about ¾ inch between the barrier and exterior wall to enhance insulation properties. Overlap seams by at least 2 inches and seal them with appropriate tape designed for thermal barriers.
For ceiling installation, work from one end to the other, ensuring the barrier is properly supported. If working alone, consider using temporary supports or a helping hand to maintain proper positioning. Pay special attention to areas around light fixtures, vents, and electrical boxes, cutting the material carefully to fit around these obstacles while maintaining a proper seal.
Remember to wear appropriate safety gear, including gloves, eye protection, and a dust mask. When cutting the barrier material, use sharp scissors or a utility knife on a clean, flat surface to ensure precise cuts. For areas where barriers meet at corners or edges, use proper sealing tape or specialized corner pieces to prevent any gaps.
Finally, inspect your work thoroughly, looking for any missed spots or loose areas. A properly installed thermal barrier should feel taught and secure, with no visible sagging or gaps.
Door and Window Solutions
Doors and windows are common weak points in any structure’s thermal barrier system, but there are several effective solutions to minimize heat loss through these openings. Start by installing weatherstripping around door frames and window sashes – foam tape or rubber gaskets create an excellent seal while still allowing smooth operation. For doors, adding a sweep or threshold seal at the bottom prevents drafts and helps maintain consistent interior temperatures.
Consider upgrading to double-pane windows if your budget allows. These windows create an insulating air pocket between glass panels, significantly reducing heat transfer. For a more affordable option, window insulation kits featuring clear plastic sheets can provide similar benefits during colder months. Installing thermal curtains or cellular shades adds another layer of protection while offering light control.
Pay special attention to gaps around window frames and door jambs. Use expanding foam insulation to fill any visible gaps, but be careful not to over-apply as this can affect proper operation. For older windows, applying clear caulk around the edges where the frame meets the wall can eliminate sneaky air leaks.
Storm doors provide an extra barrier against temperature fluctuations while protecting your main door from weather damage. Similarly, exterior window shutters not only add charm but also create an additional insulating layer when closed. For shed doors that see frequent use, consider installing a door closer to ensure it always shuts properly, maintaining your thermal barrier’s effectiveness.
Remember to inspect these areas seasonally for wear and tear. Regular maintenance of seals and weatherstripping ensures your thermal barrier solutions continue working effectively year-round.
Maintenance and Long-term Care
Maintaining your thermal barrier’s effectiveness doesn’t have to be complicated, but it does require regular attention. Start with a seasonal inspection routine – spring and fall are ideal times to check for any damage or wear. Look for gaps, tears, or compression in the insulation material, especially around joints and corners where thermal barriers often face the most stress.
Moisture is your thermal barrier’s biggest enemy, so ensuring proper ventilation is crucial. Regular checks of your ventilation systems help prevent condensation buildup that could compromise your insulation’s performance.
Keep an eye on areas where pipes or wiring penetrate the barrier – these spots often develop gaps over time. Use appropriate sealants to address any small breaches promptly, before they become bigger problems. It’s also important to maintain a clean environment inside your shed, as dust and debris can settle into insulation materials and reduce their effectiveness.
If you notice any water stains or discoloration on your walls or ceiling, investigate immediately. These could indicate leaks that might be damaging your thermal barrier. Address any roofing issues promptly to protect your insulation investment.
For long-term care, consider scheduling a professional inspection every few years. They can spot potential issues you might miss and recommend specific maintenance based on your insulation type and local climate conditions. Keep detailed records of any repairs or replacements – this information helps track your thermal barrier’s performance over time and plan for future maintenance needs.
Remember, a well-maintained thermal barrier not only performs better but also lasts longer, saving you money on replacement costs and energy bills in the long run.
Effective thermal barriers are essential for creating a comfortable, energy-efficient storage space that protects your valuable belongings. By selecting the right materials, following proper installation techniques, and maintaining your thermal barriers regularly, you can significantly improve your shed’s insulation performance and extend its lifespan.
Remember that investing in quality thermal barriers pays off through reduced energy costs, better temperature control, and enhanced protection for your stored items. Whether you choose traditional fiberglass insulation, modern reflective barriers, or eco-friendly alternatives, the key is proper installation and attention to detail.
Don’t wait until extreme weather affects your shed’s contents – take action now to implement these thermal barrier solutions. Start with a thorough assessment of your needs, gather the right materials, and follow the installation guidelines we’ve discussed. Regular maintenance checks will ensure your thermal barriers continue performing effectively for years to come.
By making informed decisions about thermal barriers today, you’re investing in the long-term protection and functionality of your storage space while potentially saving money on energy costs.