
Power Your Backyard Workshop Without Running a Single Wire
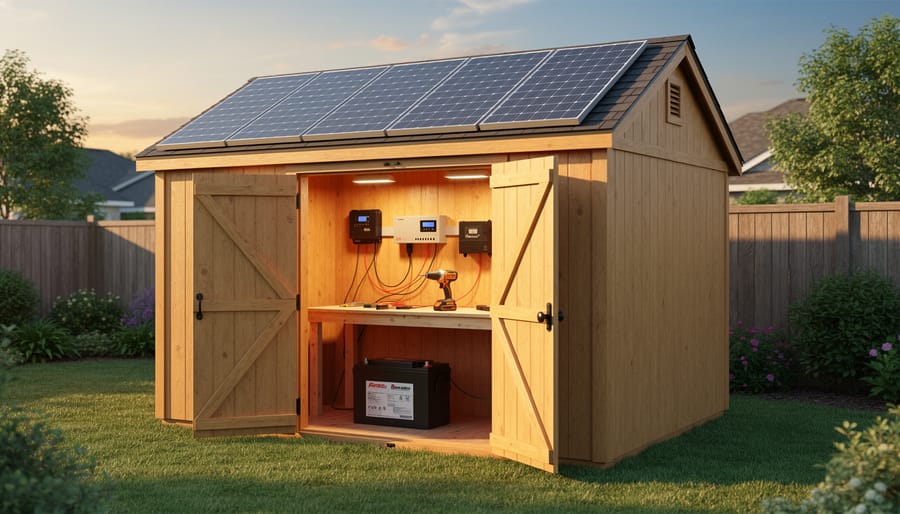
Transform your backyard shed or workshop into a fully powered workspace by installing a basic solar setup with just three components: a solar panel sized to your energy needs, a charge controller to protect your battery, and a deep-cycle battery for storage. Start by calculating your power requirements—add up the wattage of all tools and devices you’ll use, multiply by hours of daily operation, and size your system accordingly.
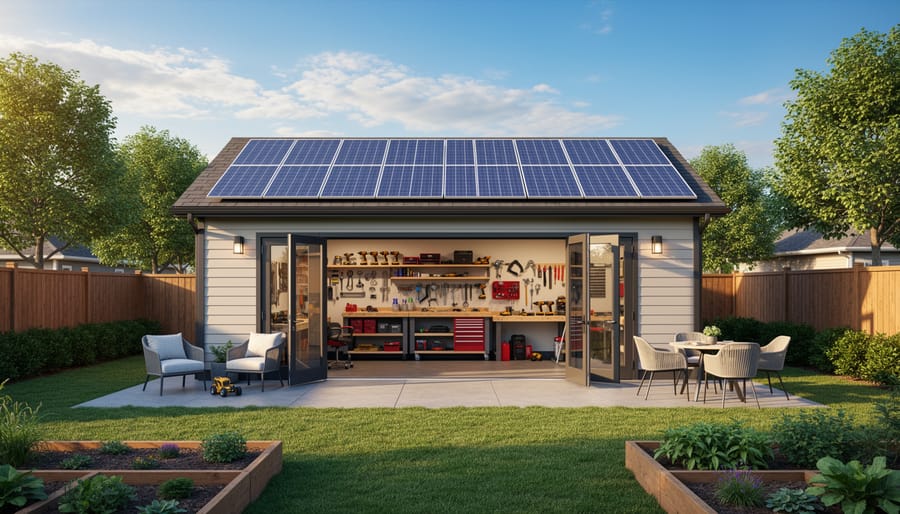
Choose between portable solar kits for occasional use or permanent roof-mounted panels for dedicated eco-friendly outdoor workspaces. Portable systems work perfectly for weekend projects and seasonal garden sheds, while mounted installations make sense when you need consistent power for lighting, power tools, or climate control throughout the year.
Position your panels facing south at a 30-45 degree angle to maximize sunlight exposure, ensuring trees or structures won’t cast shadows during peak hours. Most shed roofs offer ideal mounting surfaces that don’t require additional permits or expensive trenching work like traditional electrical lines demand.
Expect to power LED lighting, phone chargers, laptops, and small power tools with a modest 200-300 watt system costing roughly $500-$800. Larger setups supporting air compressors, heaters, or refrigeration units need 1000+ watts but eliminate monthly electricity bills while increasing your property’s functionality and value. Solar solutions pay for themselves within 3-5 years through eliminated extension cords, avoided electrician fees, and reduced utility costs while giving you reliable power exactly where you need it.
Why Your Outdoor Workspace Needs Its Own Power Source
If you’ve ever tried powering a shed, workshop, or garden studio, you’ve likely encountered the frustrating reality of getting electricity where you need it. Many homeowners initially reach for the simplest solution: running an extension cord from their house to their outdoor workspace. While this might work temporarily, it creates serious safety concerns. Extension cords running across yards become tripping hazards, and when exposed to weather, they can deteriorate quickly. More importantly, they’re not designed for the continuous power draw that tools and equipment require, creating potential fire risks that aren’t worth taking.
The alternative—professionally installing electrical lines to your outdoor structure—comes with its own set of challenges. Trenching electrical lines requires permits, professional electricians, and significant expense. Homeowners typically spend between $1,500 and $3,000 for basic installations, with costs climbing higher if your structure sits far from your main panel or if you need substantial power capacity. The process disrupts your yard, and in many cases, your electrical panel might not have capacity for an additional circuit without costly upgrades.
These limitations create real frustrations when transforming your shed into a functional workspace. Without reliable power, you’re stuck working only during daylight hours, can’t use power tools effectively, and miss out on climate control options like fans or space heaters. Your outdoor structure becomes more of a storage space than the productive workshop or studio you envisioned.
This is precisely why solar power solutions have become increasingly popular for outdoor workspaces. They eliminate both the safety concerns of temporary solutions and the high costs of permanent electrical installation, while giving you the independence to power your space exactly as you need it.
Understanding Solar Power Basics for Your Shed or Workshop
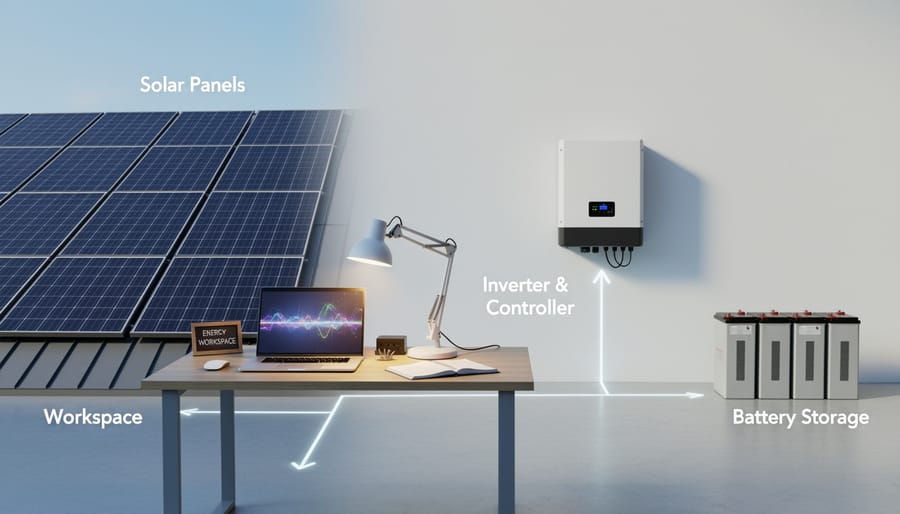
The Four Essential Components You’ll Need
Think of your solar setup like a mini power company for your shed or workshop. Just as your home has a complete electrical system, solar energy requires four key players working together to keep your tools running and lights shining.
Solar panels are your power generators. Picture them as hardworking employees soaking up sunlight and converting it into electricity. They’re the starting point of everything, quietly doing their job whenever the sun’s out, even on cloudy days.
Batteries act as your storage vault. When your panels produce more electricity than you’re using, batteries save that extra power for later. Think of them like a rain barrel that collects water during storms so you have it available during dry spells. Without batteries, you’d only have power when the sun’s shining.
Charge controllers are the traffic cops of your system. They manage the flow of electricity from your panels to your batteries, making sure batteries don’t get overcharged during sunny days or drained too low during extended use. This protection extends your battery life significantly and prevents damage.
Inverters are your translators. Solar panels and batteries speak “DC” (direct current), but most of your power tools, lights, and devices speak “AC” (alternating current). The inverter converts that stored solar energy into the standard electricity your equipment expects.
Together, these four components create a reliable power solution that can transform your shed from a dark storage space into a fully functional workshop where you can work anytime.
How Much Power Does Your Workspace Really Need?
Before investing in solar panels, you’ll want to understand exactly how much power your workspace actually consumes. The good news? Most shed and workshop needs are surprisingly modest.
Start by listing everything you’ll be running. A typical LED lighting setup for a small workshop uses about 20-40 watts. Planning to charge cordless tool batteries? Most chargers draw between 50-150 watts during charging cycles. If you’re running a small radio or fan, add another 20-50 watts.
Here’s a practical example from Jim in Colorado, who transformed his garden shed into a weekend workshop: “I calculated I needed power for four LED bulbs, a battery charger, and occasionally my laptop. That totaled around 200 watts at peak use. A modest 300-watt solar setup handles everything perfectly.”
For equipment, consider usage patterns rather than just wattage. A small table saw might draw 1,500 watts, but if you only use it for 15 minutes per project, that’s minimal daily consumption. However, space heaters are power-hungry companions, often requiring 1,500 watts continuously, making them challenging for basic solar setups.
The simplest calculation method: Add up the wattage of everything you might run simultaneously, then multiply by the hours you’ll use them daily. This gives you your daily watt-hours needed. Most weekend DIY users find that 500-1,000 watt-hours daily covers comfortable workspace use without breaking the bank on solar equipment.
Remember, starting smaller and expanding later is always easier than over-investing upfront.
Solar Solutions That Actually Work for Different Workspace Types
The Weekend Warrior Setup: Basic Lighting and Tool Charging
Perfect for the hobbyist who uses their shed primarily on weekends, this entry-level solar setup delivers reliable workshop lighting solutions and convenient tool charging without breaking the bank.
A basic weekend warrior system typically includes a 50-100 watt solar panel, a 12-volt deep cycle battery, a simple charge controller, and LED light strips. This modest setup provides plenty of illumination for evening projects and keeps your cordless drill, impact driver, and other tool batteries ready to go. Total investment runs approximately $250-$400 depending on battery capacity.
Mike from Portland installed a 100-watt kit in his garden shed last spring. “I mainly work on small woodworking projects Saturday afternoons,” he shares. “The lights are bright enough for detailed work, and I keep two drill batteries charging during the week. Game changer for someone who doesn’t need full workshop power.”
The beauty of starting small is scalability. If your usage grows, simply add another panel or upgrade your battery bank. Most weekend warriors find this basic configuration perfectly adequate for years, proving you don’t need an elaborate system to solve the most common shed power challenges.
The Serious DIYer Package: Power Tools and Year-Round Comfort
For homeowners ready to tackle serious DIY projects in their workshop or shed, a mid-range solar system opens up exciting possibilities. This setup typically includes a 400-600 watt solar array paired with a 100-200 amp-hour battery bank, providing enough power to run circular saws, drills, sanders, and even small air compressors during daylight hours.
The key consideration here is understanding power draw versus storage capacity. Most cordless tool chargers draw 50-100 watts, while corded power tools can spike to 1200-1500 watts during operation. This means you’ll want to run heavy equipment during peak sun hours when panels are actively generating power, reserving battery capacity for lighting, fans, and smaller devices.
Battery capacity becomes critical when you factor in year-round comfort. A quality LED shop light setup draws just 40-60 watts total, while a small space heater might need 500-1500 watts. This is where proper insulation pays dividends, dramatically reducing heating and cooling needs so your solar system handles climate control more efficiently.
One satisfied workshop owner shared that his 600-watt system powers all his weekend woodworking projects plus keeps his space comfortable with a small fan in summer. The trick? He schedules power-hungry tasks for sunny midday hours and relies on battery reserves for early morning or evening finishing work. This strategic approach maximizes what a mid-range system can deliver without breaking the bank.
The Professional Home Workshop: Full Power Independence
For serious woodworkers, metalworkers, and craftspeople who’ve transformed their shed into a full-fledged workshop, consistent power isn’t optional. When you’re running table saws, air compressors, welding equipment, and climate control simultaneously, you need a solar setup that delivers professional-grade reliability.
A professional workshop system typically requires 4,000-6,000 watts of solar capacity paired with substantial battery storage, often 20-30 kWh or more. This investment allows you to operate multiple heavy-duty tools throughout the day without worrying about dimming lights or equipment shutdown. Many workshop owners appreciate the protection from power fluctuations that can damage sensitive electronics and computerized equipment.
Consider John, a furniture maker who installed a 5,000-watt system with 25 kWh battery backup. He runs his planer, dust collection system, and precision tools confidently year-round, even during winter months with shorter daylight hours. His initial investment paid dividends through uninterrupted production schedules and eliminated concerns about expensive grid connection trenching across his property.
The beauty of this comprehensive approach is scalability. Start with core capacity for your most essential equipment, then expand panels and battery storage as your workshop evolves. Many professionals find their solar investment delivers returns through increased productivity and the freedom to work on their own schedule, regardless of utility company limitations.
Greenhouse and Garden Shed Specialties
Solar power brings exciting possibilities to your greenhouse and garden shed beyond basic lighting. For greenhouses, solar-powered ventilation fans maintain ideal temperatures automatically, while solar irrigation systems deliver perfectly timed watering without running extension cords. Heating mats powered by compact solar panels give seedlings the warmth they need for strong starts.
Garden sheds benefit enormously from dedicated solar setups. Imagine keeping all your cordless tools charged and ready in a solar-powered charging station. Motion-activated security lights deter unwanted visitors without increasing your electric bill. Solar irrigation controllers let you manage your entire watering schedule from your shed, making garden maintenance remarkably simple. These targeted solutions solve real problems—no trenching for electrical lines, no worrying about outlet availability, just reliable power exactly where you need it.
Installation Made Simple: What to Expect and Where to Start
Finding the Perfect Spot for Your Solar Panels
Choosing the right location for your solar panels can make the difference between a system that barely keeps up and one that exceeds your expectations. Let’s explore your options to ensure you’re capturing maximum sunlight for your shed or workshop.
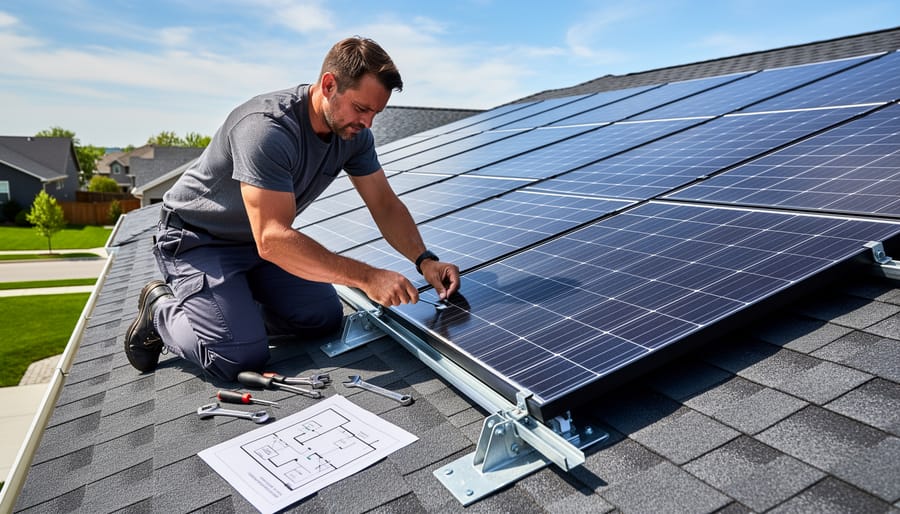
Most shed owners opt for roof mounting since it saves ground space and positions panels closer to the sky. Before climbing up there, though, check that your roof can support the weight and that its angle faces south (or close to it) for optimal sun exposure. Ground mounting offers more flexibility—you can adjust the angle seasonally and position panels away from shade, making it perfect if your shed sits under trees.
Here’s the key to success: your panels need at least 4-6 hours of direct, unobstructed sunlight daily. Walk around your property at different times of day to spot potential shading culprits like trees, nearby buildings, or roof vents. Even partial shade on one panel can reduce your entire system’s output by 25% or more.
Sarah, a homeowner in Oregon, shares her experience: “I almost mounted panels on my shed’s north-facing roof. After checking sun patterns for a week, I chose ground mounting on the sunny side instead. Best decision ever—my power generation doubled what I originally expected.”
Take time observing your space before drilling holes. A little planning now means reliable power for years to come.
Can You Do It Yourself?
Here’s the honest truth: basic solar setups for sheds and workshops are surprisingly DIY-friendly, but knowing your limits is crucial for both safety and success.
If you’re comfortable with basic electrical work and following instructions carefully, installing small-to-medium solar systems is absolutely within reach. Many homeowners successfully install shed solar kits themselves, saving hundreds in installation costs. The process typically involves mounting panels, connecting batteries and charge controllers, and wiring DC outlets—all low-voltage work that’s safer than household AC electricity.
However, professional help becomes worthwhile when you’re dealing with larger systems, roof penetrations that could void warranties, or grid-tied installations requiring permits and utility approvals. One homeowner shared how attempting a complex installation himself led to inefficient panel placement that reduced power generation by 30 percent—an expensive learning curve.
Safety considerations are paramount. Always work on dry days, use proper ladder safety, and never work on systems during lightning storms. Disconnect batteries before wiring, wear insulated gloves, and double-check polarity before connecting components.
For successful DIY installation, start small with expandable systems. Watch manufacturer tutorial videos completely before beginning, and don’t skip the manual’s safety sections. Label all wires clearly as you go, take photos during installation for future reference, and test each component individually before final assembly. Many solar suppliers offer free technical support—use it liberally. Remember, there’s no shame in calling a professional for the tricky parts while handling simpler tasks yourself.
Real Stories from Shed Owners Who Made the Switch
Sarah from Ohio had been using her backyard workshop for woodworking projects but found herself constantly limited to daylight hours or dragging extension cords from her house. “I was worried about the cost of hiring an electrician to run power lines 80 feet to my shed,” she explains. After installing a basic solar setup with two 100-watt panels and a battery system, she now runs her power tools, charges batteries, and even has lighting for evening projects. “The whole system cost me about $600, and I set it up myself in a weekend. Best decision I’ve made for my hobby space.”
Mike in Colorado turned his garden shed into a year-round workspace but struggled with freezing temperatures affecting his equipment. His solar solution powers a small space heater during winter months and ventilation fans in summer. “Before solar, I’d avoided using the shed from November through March,” he shares. “Now I’m out there every weekend, and my electric bill hasn’t changed a bit. The panels even work great on cloudy days, which surprised me.”
Jennifer transformed her potting shed into a comfortable retreat by adding solar power for LED lighting, a small refrigerator for drinks, and phone charging stations. “I wanted a space where I could escape and actually enjoy my gardening work,” she says. “Running electrical lines would have cost over $2,000. My solar kit was under $400 and took just one afternoon to install. Now I’ve got everything I need, and I feel good knowing it’s all powered by the sun.”
Avoiding the Most Common Solar Setup Mistakes
Even the best solar components won’t perform well if common installation mistakes derail your shed or workshop power setup. Let’s walk through the pitfalls that trip up most first-time solar users and how to avoid them.
Undersizing battery capacity ranks as the number-one regret among shed owners. Many people calculate their daily power needs but forget to account for cloudy stretches or winter months when panels produce less energy. A good rule of thumb is to size your battery bank for at least three days of operation without sunlight. If your tools draw 500 watt-hours daily, aim for a minimum 1,500 watt-hour battery capacity.
Poor panel placement wastes valuable energy potential. Panels facing away from true south or tucked under tree shade can lose 30-50% efficiency. Before mounting anything permanently, observe your shed’s roof throughout the day to identify shadows cast by trees, buildings, or structures. One homeowner shared how moving panels just six feet eliminated afternoon shade and doubled his winter charging.
Inadequate weatherproofing creates expensive headaches. Exposed wire connections, unsealed conduit entries, and poorly mounted junction boxes invite moisture damage and corrosion. Invest in quality weatherproof storage solutions for your charge controller and inverter, and use proper outdoor-rated components throughout your system.
Finally, unrealistic power expectations lead to frustration. Your compact 100-watt panel won’t run a space heater or air compressor. Start by powering lights and small electronics, then expand your system as you understand your actual usage patterns. Success comes from matching your setup to realistic needs rather than wishful thinking.
The journey to powering your outdoor workspace with solar energy isn’t just about cutting electricity costs—it’s about reclaiming the freedom to work where and how you want. Whether you’re running power tools in your workshop shed, creating art in your backyard studio, or simply need reliable lighting for evening projects, solar solutions offer a practical path to energy independence that’s surprisingly within reach.
Take a moment to assess your specific situation. What do you actually need to power? How many hours of sunlight does your shed receive? Starting with these simple questions helps you avoid overcomplicating the process. Many homeowners discover that a basic solar setup meets their needs perfectly, while others benefit from expandable systems that grow alongside their ambitions.
The truth is, solar technology has become remarkably accessible and user-friendly. Gone are the days when going solar meant massive upfront investments or complicated installations requiring professional expertise. Today’s plug-and-play options, affordable battery systems, and straightforward mounting solutions put energy independence within reach for most homeowners. Your outdoor workspace deserves reliable power—and achieving that goal is more practical than you might think.