
Stop Your Outdoor Inflatables From Rotting in Storage
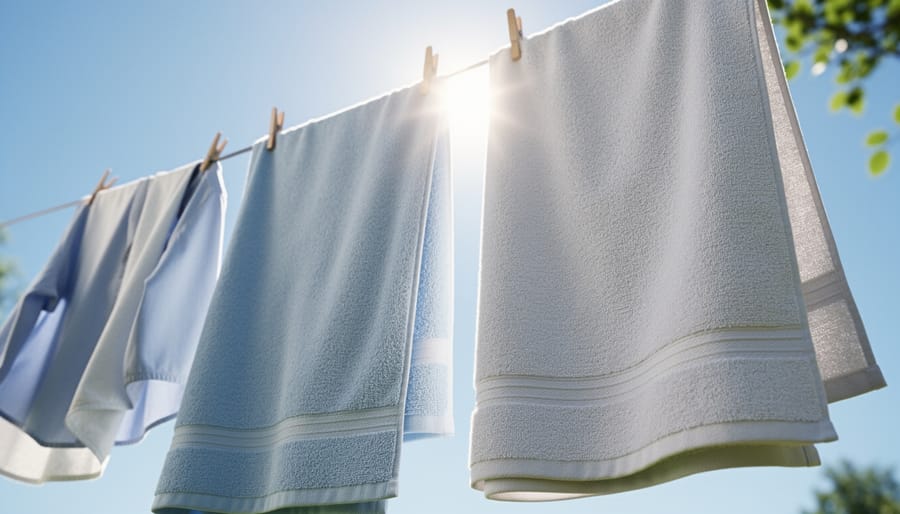
Clean and dry your inflatables completely before storage to prevent mold and mildew growth that can ruin them within weeks. Even small amounts of trapped moisture create the perfect environment for deterioration, so allow at least 24-48 hours of drying time in direct sunlight, paying special attention to seams and crevices where water collects.
Fold your inflatables loosely rather than cramming them into tight spaces. Sharp creases from compressed storage weaken the material over time and create permanent damage points where tears commonly develop. Roll larger items like pool floats and bounce houses with acid-free tissue paper between layers to maintain their shape and prevent vinyl from sticking to itself.
Store in a climate-controlled, dry location away from extreme temperatures and direct sunlight. Garages and basements work if they stay between 50-80 degrees Fahrenheit, but uninsulated spaces that experience freezing temperatures or excessive heat will crack and fade your inflatables. A dedicated storage shed provides ideal protection from weather extremes while keeping seasonal items organized and easily accessible.
Protect from rodents and pests by using sealed plastic bins with tight-fitting lids rather than cardboard boxes or open shelving. Add rodent deterrents like peppermint sachets and inspect your storage area regularly for signs of unwanted visitors that view inflatables as nesting material.
Why Proper Storage Matters (And What Happens When You Skip It)
Let’s be honest – tossing your deflated inflatable into a corner of the garage and calling it a day is tempting. But skipping proper storage can turn your beloved pool floats, holiday decorations, or bounce houses into expensive disappointments.
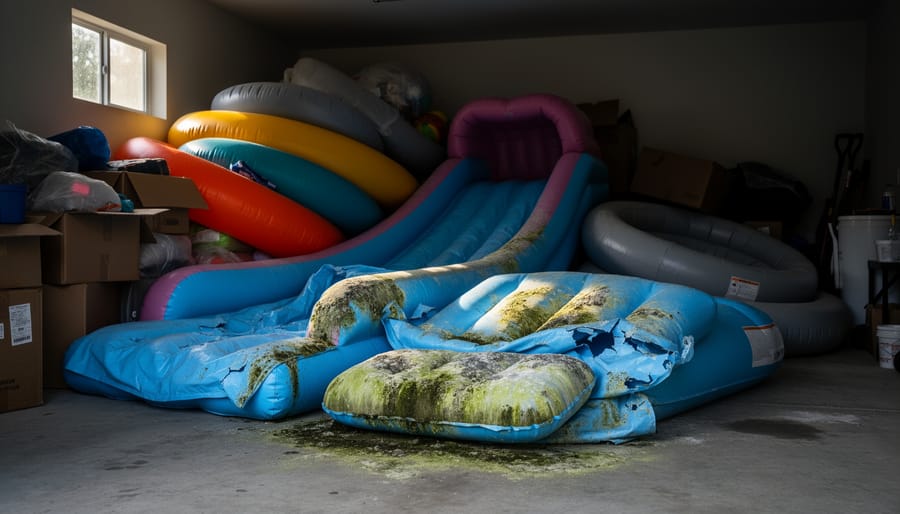
Meet Sarah, a mom from Ohio who stored her kids’ inflatable water slide in a damp basement without cleaning it first. When summer rolled around again, she discovered black mold covering nearly half the surface – a $300 investment completely ruined. Unfortunately, Sarah’s story isn’t unique.
Improper storage creates the perfect storm for damage. Moisture trapped in folds breeds mold and mildew, which not only looks terrible but can also pose health risks to your family. The musty smell alone can be impossible to eliminate. Material degradation happens when inflatables are exposed to extreme temperatures or UV rays, causing the vinyl or PVC to crack, fade, and lose elasticity. What was once bouncy and vibrant becomes brittle and discolored.
Then there’s pest damage. Mice, insects, and other critters love nesting in stored items, especially when they’re loosely piled in corners. One family discovered their Christmas inflatable snowman chewed through in multiple spots – beyond repair after just one season in an unprotected attic.
The bottom line? Taking 30 minutes to store your inflatables correctly protects your investment and ensures they’re ready to enjoy year after year. A little effort now saves money and frustration later.
The Essential Pre-Storage Cleaning Routine
Clean Every Surface Thoroughly
Before tucking your inflatables away for the season, giving them a thorough cleaning is essential to prevent mold, mildew, and unpleasant odors during storage. Start by fully inflating the item so you can access every surface easily. Use a garden hose to rinse off loose dirt, grass clippings, and debris that accumulated during use.
For stubborn stains and ground-in dirt, mix a solution of mild dish soap and warm water. Using a soft-bristled brush or sponge, gently scrub the entire surface, paying special attention to seams and crevices where grime tends to hide. Grass stains can be particularly challenging, but the soap solution usually does the trick with a bit of elbow grease.
Avoid harsh chemicals, bleach, or abrasive cleaners that might damage the material or cause discoloration. One homeowner shared that using a vinegar-water mixture helped eliminate stubborn mildew spots on her pool floats without damaging the fabric.
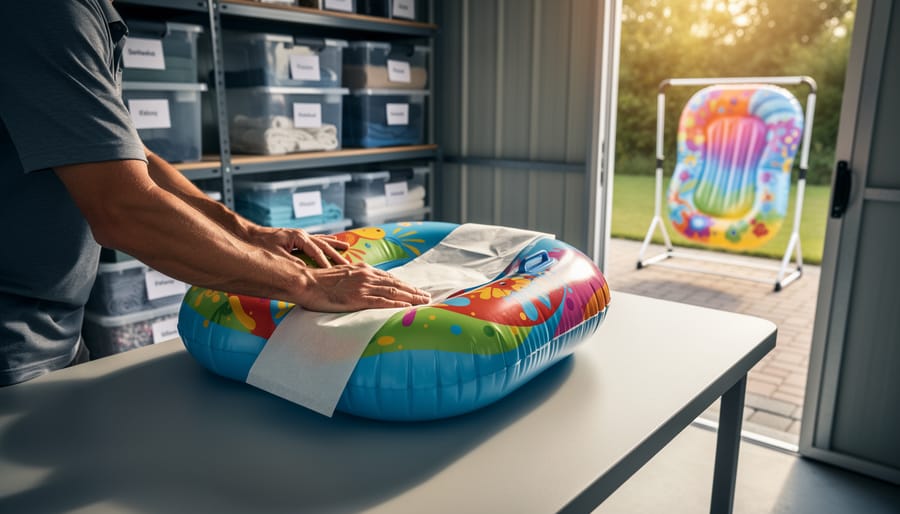
Once cleaned, rinse thoroughly with clean water to remove all soap residue, which can attract dirt or degrade the material over time. The final step is crucial: allow your inflatable to dry completely in the sun before deflating. Any remaining moisture is an invitation for mold growth during storage.
The Critical Drying Phase
Here’s the truth: skipping the drying phase is the fastest way to ruin your inflatables. Moisture trapped inside creates the perfect breeding ground for mold and mildew, which not only looks terrible but can permanently damage the material and create unpleasant odors that are nearly impossible to remove.
After cleaning your inflatable, let it air dry completely in direct sunlight for several hours. Flip it over multiple times to ensure all surfaces get exposed to air and warmth. For larger items like bounce houses or pool floats, this might take most of a day. If sunshine isn’t available, set up fans indoors to circulate air around the deflated item.
Pay special attention to seams, crevices, and any valve areas where water loves to hide. Run your hand along these spots to check for dampness. One homeowner shared how she thought her pool slide was dry after two hours, only to discover mold spots the following spring. She now waits a full day before storing anything.
If you’re short on time, use clean towels to blot excess moisture first, then allow at least six hours of air circulation. Remember, patience now prevents headaches later. A completely dry inflatable means you’ll unpack it next season ready to use, not ready for the trash bin.
Inspect and Repair Before Storing
Before tucking away your inflatables for the season, take a few minutes to give them a thorough once-over. This quick inspection can save you from disappointment next year. Lay the deflated inflatable flat in a well-lit area and examine the entire surface for punctures, tears, or thin spots that might fail later. Pay special attention to seams where stitching or adhesive bonds can weaken over time from repeated inflation and sun exposure.
Check all valves by gently pressing around them to ensure they’re securely attached and not cracked. A failing valve means air won’t hold properly, rendering your inflatable useless. If you spot small holes or tears, most can be fixed easily with vinyl repair patches included with your purchase or available at hardware stores. Clean the damaged area, apply the patch according to package directions, and let it cure completely before storage.
For loose seams, you might need specialized vinyl adhesive. Don’t skip these simple repairs now, thinking you’ll remember later. Future you will appreciate the ready-to-use inflatable when next season arrives.
Smart Folding Techniques That Prevent Damage
The way you fold your outdoor inflatables can make the difference between finding them in perfect condition next season or dealing with cracks, tears, and stubborn creases. Here’s how to fold them properly while keeping stress off the seams.
Start by laying your completely dry inflatable on a clean, flat surface like your driveway or garage floor. For pool floats and smaller items, use the accordion method: fold the inflatable lengthwise into thirds, then roll from one end to the other, gently pressing out remaining air as you go. This technique distributes pressure evenly and prevents sharp creases that can weaken the material over time.
For larger items like inflatable kayaks or bounce houses, the key is creating loose, gentle folds rather than tight, crisp ones. Begin by folding in the sides toward the center, making each fold about 18 inches wide. Then fold the length in half or thirds depending on your storage space. Never fold the same way twice in consecutive seasons, as repeated creasing in identical spots creates weak points.
Holiday inflatables with internal framework need special attention. Remove any support wires or stakes first, then fold around these rigid elements rather than across them. Think of it like folding around bones rather than through them.
One homeowner shared that she used to stuff her inflatable pool toys into bins haphazardly, only to find splits along the fold lines each summer. After switching to the accordion roll method, her floats have lasted three seasons without damage.
For extra protection, place a piece of cardboard or foam between folds to prevent the material from sticking to itself during long-term storage. This simple step has saved countless inflatables from developing permanent creases or color transfer between surfaces.
Best Storage Container Options for Your Inflatables
Storage Bins and Totes
Plastic storage bins and totes are excellent choices for protecting your outdoor inflatables during the off-season. These containers shield your items from moisture, dust, and curious pests that might otherwise cause damage. When selecting bins, consider clear plastic options so you can easily identify contents without opening multiple containers. This simple feature saves time when you’re ready to bring out your decorations again.
Size matters when choosing storage containers. Measure your deflated inflatables and opt for bins that allow items to rest loosely inside without excessive cramming. A homeowner from Ohio shared that forcing a large pool float into an undersized bin created permanent creases that affected its appearance. Look for weatherproof bins with tight-fitting, gasket-sealed lids that lock securely. These features prevent water infiltration if you’re storing containers in garages or sheds where temperature fluctuations create condensation. Heavy-duty plastic construction resists cracking in cold weather, ensuring your investment protects inflatables year after year. Stackable designs maximize vertical space, particularly helpful in smaller storage areas where floor space comes at a premium.
Storage Bags and Duffels
Storage bags and duffels designed specifically for inflatables offer a perfect balance of protection and convenience. These fabric solutions work exceptionally well when you need portable, flexible storage that can fit into existing spaces like closets, under beds, or garage shelving.
The key advantage of quality storage bags is breathability. Unlike plastic bins that can trap moisture and promote mildew growth, breathable fabric allows air circulation while keeping dust and pests out. This is especially important if your storage area experiences temperature fluctuations.
Look for bags with sturdy zippers and reinforced handles, particularly for heavier pool floats or larger yard decorations. Many homeowners love the space-saving benefits – soft-sided bags compress slightly and conform to available space, making them ideal when storage is limited. Sarah from Ohio shares, “I switched to duffel bags for my pool toys last year. They stack perfectly on my utility shelf, and everything stayed fresh and dry all winter.”
For best results, ensure inflatables are completely dry before bagging them, and consider adding a moisture-absorbing packet for extra protection during long-term storage.
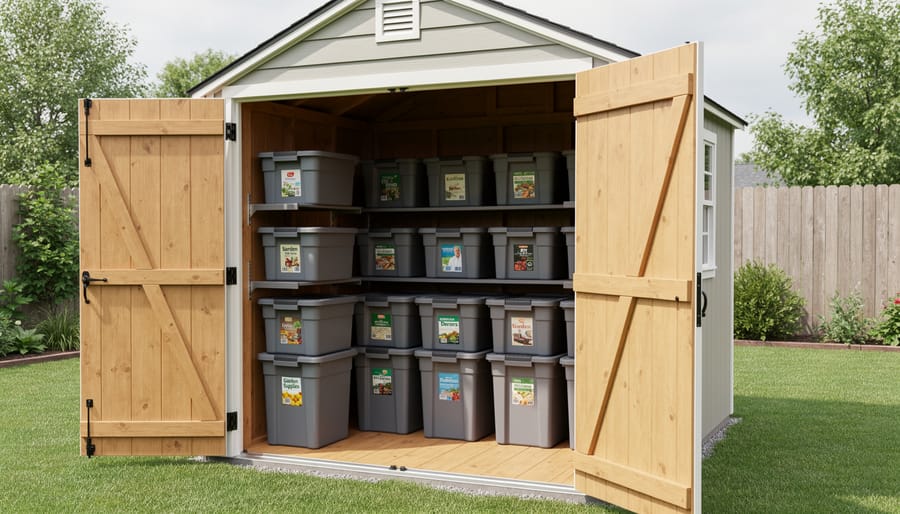
Outdoor Storage Sheds
For homeowners serious about protecting their investment in outdoor inflatables, a dedicated storage shed offers the gold standard solution. Unlike garages that fluctuate with outdoor temperatures or basements prone to dampness, quality weather-resistant storage solutions provide consistent protection year-round.
Sheds keep your inflatables safe from rodents, insects, and curious wildlife that might nest in or damage stored items. The controlled environment prevents the temperature extremes and moisture issues that lead to mildew and material degradation. Plus, you gain valuable organizational space. Install shelving units or hanging racks to keep inflatables off the ground and neatly separated by season or size.
One homeowner shared how her 10×12 shed transformed her storage chaos into an organized system where holiday decorations, pool toys, and lawn inflatables each have designated spots. She reports zero mold issues since making the switch from garage storage three years ago. The convenience of dedicated shed storage means quick seasonal transitions without cluttering your living spaces.
Garage and Basement Storage
Your garage or basement can be an excellent spot for storing outdoor inflatables, offering protection from extreme weather while keeping items accessible. Before storing, ensure the space is reasonably dry, as basements especially can trap moisture that leads to mildew and unpleasant odors. Consider using a dehumidifier during humid months or placing moisture-absorbing packets near your stored inflatables.
When it comes to placement, shelf storage is your best friend. Elevating inflatables off the floor prevents water damage from potential flooding or condensation and keeps them away from pests. Install sturdy shelving units that can handle the weight of multiple storage bins. If floor storage is your only option, use plastic pallets or raised platforms to create airflow underneath.
Keep inflatables in clear, labeled bins so you can quickly identify contents without opening everything. Store them away from sharp tools, chemicals, or anything that could puncture the material. Position bins in climate-controlled areas of your garage or basement, avoiding spots near water heaters or furnaces where temperature fluctuations are common. With these simple precautions, your inflatables will stay fresh and ready for next season.
Where to Store Your Inflatables (Location Matters)
Finding the perfect spot for your inflatables can make all the difference between pulling out pristine decorations next season and discovering an unpleasant surprise. Think of storage location as your first line of defense against damage.
Temperature stability is crucial. Extreme heat can degrade vinyl and plastic materials, while freezing temperatures can make them brittle and prone to cracking. Your ideal storage space maintains a relatively consistent temperature year-round. Basements, climate-controlled garages, and quality storage sheds typically fit the bill perfectly. Avoid attics where summer temperatures can soar above 130 degrees, turning your inflatables into a melted mess.
Humidity is another major consideration. Too much moisture invites mold and mildew, which can permanently stain and weaken fabric. A damp basement might seem convenient, but it’s actually one of the worst choices. If you must use a potentially humid space, invest in a dehumidifier or moisture-absorbing packets.
Direct sunlight is surprisingly damaging even during storage. UV rays fade colors and weaken materials over time. Choose a dark space or ensure your inflatables are completely shielded from windows and skylights.
Finally, think about pest access. Mice and insects love making nests in soft, protected spaces. Elevate your storage containers off the ground and ensure your storage area has no obvious entry points for unwanted visitors. A well-maintained storage shed with proper sealing offers excellent protection on all these fronts, giving you peace of mind throughout the off-season.
Protecting Against Common Storage Problems
Moisture and Mold Prevention
Moisture is the biggest enemy of stored inflatables, leading to mildew and unpleasant odors. Start by placing silica gel packets or moisture absorbers inside your storage container—these inexpensive desiccants work wonders in keeping things dry. When protecting stored items, proper ventilation makes all the difference, so avoid sealing containers too tightly if you’re storing in a climate-controlled space.
Set a reminder to check your inflatables every few months, especially before humid summer months. Sarah from Michigan shares her tip: “I peek at my Christmas inflatables in July and give them a quick air-out if needed—it’s saved me from moldy surprises more than once!” Look for any signs of moisture buildup or musty smells, and air things out immediately if you spot concerns.
Keeping Pests Away
Critters love finding cozy spots to nest, and unfortunately, your stored inflatables can look pretty inviting to mice, insects, and other unwanted guests. Before packing away your items, inspect them carefully for any existing holes or damage that might provide easy access. Once clean and dry, consider placing dryer sheets or cedar blocks near (not directly on) your inflatables—these natural deterrents help discourage rodents without using harsh chemicals that could damage the material.
If you’re storing inflatables in a shed or garage, seal any gaps or cracks where pests might enter. Elevate storage containers off the ground using shelves or pallets to make them less accessible to crawling creatures. Plastic bins with tight-fitting lids work better than cardboard boxes, which mice can easily chew through. For added protection, some homeowners have found success wrapping their containers in hardware cloth or placing them inside larger sealed totes. Checking on your stored inflatables every few months allows you to catch any pest problems early, giving you peace of mind that your investment stays safe until next season.
Temperature Considerations
Extreme temperatures can really take a toll on your inflatable decorations and pool toys. When exposed to freezing conditions, the vinyl or plastic materials become brittle and prone to cracking, especially if moisture is trapped inside. On the flip side, excessive heat can cause materials to warp, fade, or even melt together if stored improperly.
Before storing your inflatables, make sure they’re completely dry and clean to prevent cold-weather mold and material degradation. Choose a climate-controlled space whenever possible, like a basement or garage, where temperatures stay moderate year-round. If you’re storing in an unheated shed or attic, avoid placing inflatables directly on cold concrete floors or against hot metal walls. Instead, elevate them on shelves or pallets and keep them away from direct sunlight streaming through windows.
A practical tip from many homeowners: wrap larger inflatables in breathable fabric or old sheets before boxing them up. This extra layer provides insulation against temperature swings while still allowing air circulation to prevent moisture buildup.
Organizing Multiple Inflatables for Easy Access
A well-organized storage system saves you time and frustration when the next season rolls around. Start by labeling each inflatable with clear, weatherproof tags that identify the item and any specific storage instructions. Use a permanent marker on duct tape, or invest in adhesive labels designed for outdoor gear.
Group similar items together – holiday decorations in one area, pool toys in another, and yard inflatables separately. This makes retrieval much easier when you need just one category. When stacking, always place heavier, sturdier items on the bottom and lighter, more delicate pieces on top. Clear plastic bins work wonderfully because you can see contents at a glance without unpacking everything.
Consider dedicating specific shelves or zones in your storage shed to different inflatable types. You can organize with shelving that keeps items off the floor and protected from moisture. Create an inventory list with photos on your phone – one homeowner shared that this simple step helped her locate her daughter’s birthday pool floats in under two minutes instead of the usual half-hour search. Keep frequently used items near the front for quick access, while seasonal decorations can go toward the back until needed.
Quick Pre-Season Check Before Reinflating
Before you bring your outdoor inflatables back to life, take a few minutes to give them a thorough inspection. This quick check can save you from surprises when guests arrive or kids are eager to play.
Start by unfolding the inflatable completely in a clean, dry area. Look carefully for any signs of mold, mildew, or musty odors that might have developed during storage. Small spots can often be cleaned with a mild soap solution, but extensive mold may indicate the inflatable wasn’t completely dry before storing.
Next, examine all seams and surfaces for tears, holes, or weak spots. Run your hands along the material to feel for any rough patches or thinning areas. Check anchor points, straps, and tethers for fraying or damage that could cause safety issues.
Don’t forget to inspect the blower or pump if your inflatable has one. Make sure the cord is intact, the fan blades are clean, and there’s no debris blocking air intake.
Finally, look for any pest damage like chew marks or droppings. If everything checks out, you’re ready to inflate and enjoy another season. If you spot problems, address repairs before use to extend your inflatable’s lifespan.
Taking care of your outdoor inflatables doesn’t have to be complicated. By following these straightforward storage strategies, you’re making a small time investment now that will save you money and frustration down the road. Think about it: spending an extra thirty minutes properly cleaning and storing your inflatables can mean the difference between years of enjoyment and having to replace them every season.
The good news is that once you establish a routine, the process becomes second nature. Clean, dry, fold, and store in a climate-appropriate location—it’s that simple. And when you have the right storage solution in place, everything becomes even easier. A dedicated storage space keeps your inflatables protected from the elements, pests, and accidental damage while keeping them organized and easy to access when the next season rolls around.
Whether you choose a backyard shed, garage shelving, or indoor closet space, having a designated spot eliminates the guesswork. Your future self will thank you when you pull out decorations or pool toys that look as good as the day you stored them. Start implementing these tips today, and enjoy worry-free inflatables for seasons to come.