
Transform Your Backyard into a Thriving Native Garden This Weekend
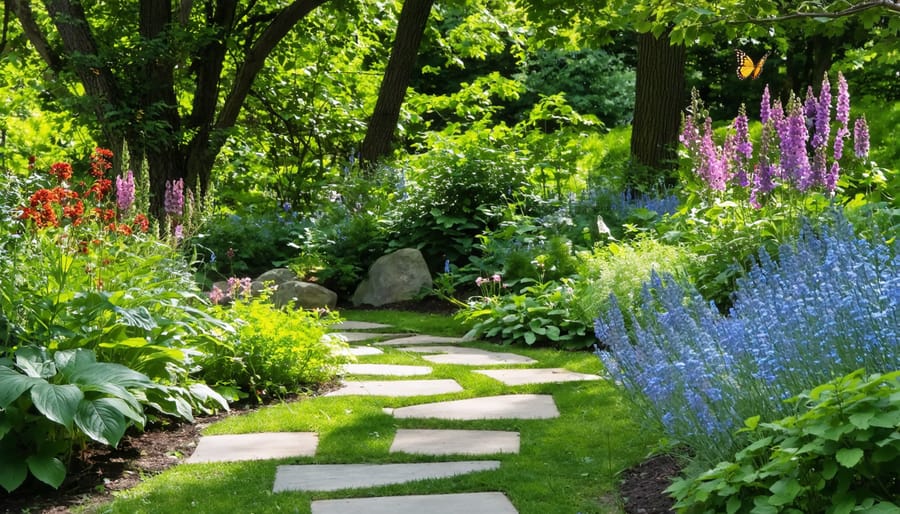
Transform your backyard into a thriving native ecosystem by designing a garden that works with nature, not against it. Native gardens require 70% less water than traditional landscapes while providing essential habitat for local wildlife, from beneficial insects to songbirds. Creating a native garden plan combines smart design principles with local plant knowledge to develop a sustainable, low-maintenance landscape that connects you to your region’s natural heritage.
Start by mapping your yard’s unique conditions – noting sun exposure, soil type, and drainage patterns. Select plants native to your specific region that match these conditions, grouping species with similar water needs together. Consider seasonal interest by incorporating plants that bloom at different times, ensuring year-round visual appeal and continuous support for pollinators. Layer your design with groundcovers, perennials, shrubs, and trees to create a naturally structured space that mimics local plant communities.
This practical guide walks you through each step of planning, installing, and maintaining a native garden that not only looks beautiful but also contributes to local biodiversity. Whether you’re converting a small corner or your entire landscape, growing native plants creates a meaningful connection between your home and the natural world while reducing long-term maintenance needs.
Planning Your Native Garden Layout
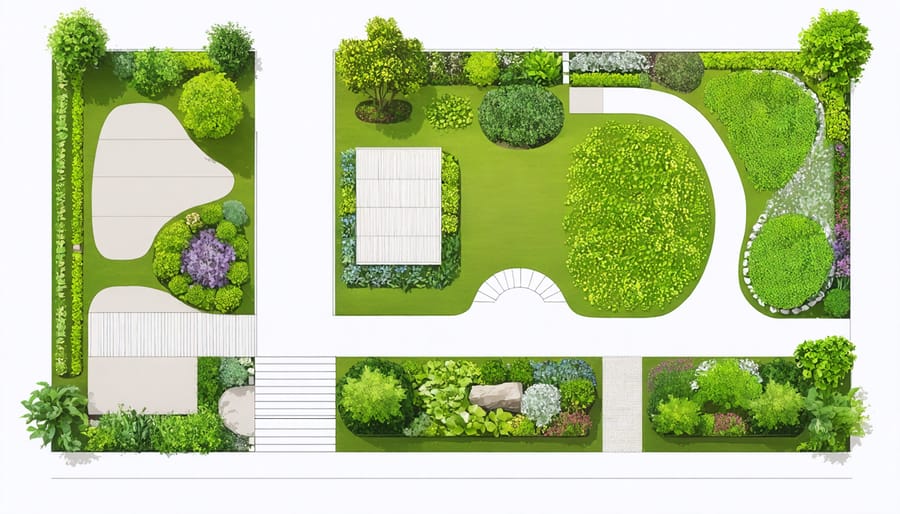
Site Assessment and Sun Mapping
Before planting your native garden, take time to assess your site’s unique characteristics. Start by observing your space throughout the day to track sunlight patterns. Make a simple sun map by noting which areas receive full sun (6+ hours), partial sun (4-6 hours), or shade (less than 4 hours). This information is crucial for selecting plants that will thrive in your specific conditions.
Consider your soil type by performing a basic soil test. Native plants often adapt well to local soil conditions, but knowing your soil’s composition helps ensure successful growth. Take note of any existing features like trees, structures, or utility lines that might affect plant growth or maintenance access.
Map out areas with different moisture levels, paying attention to natural drainage patterns and spots where water tends to pool. Some native plants prefer wet conditions while others thrive in drier soil. Also evaluate your yard’s topography – slopes, flat areas, and low spots all create distinct microclimates that influence plant selection.
Don’t forget to measure your space accurately and consider views from both inside and outside your home. This helps create a garden that looks beautiful from all angles while maintaining practical access for maintenance.
Soil Testing and Preparation
Before planting your native garden, understanding your soil composition is crucial for success. Start by collecting soil samples from different areas of your planned garden space. You can purchase a basic soil testing kit from your local garden center or send samples to a professional lab for detailed analysis.
Native plants often thrive in their local soil conditions, but it’s still important to ensure proper drainage and pH levels. Most native plants prefer well-draining soil with a pH between 6.0 and 7.0. If your soil is heavily clay-based or sandy, you may need to amend it with organic matter like compost to improve its structure.
When preparing your garden bed, remove existing grass and weeds, then loosen the soil to a depth of 12-18 inches. This helps native plant roots establish themselves more easily. Avoid over-tilling, as this can disturb beneficial soil organisms and natural soil structure.
For areas with poor drainage, consider creating raised beds or berms. If your soil test reveals significant deficiencies, add organic amendments specifically suited to your native plant selections. Remember, many native plants have adapted to less-than-ideal soil conditions, so don’t feel pressured to create perfect soil – focus on addressing major issues that could hinder plant growth.
Selecting the Right Native Plants
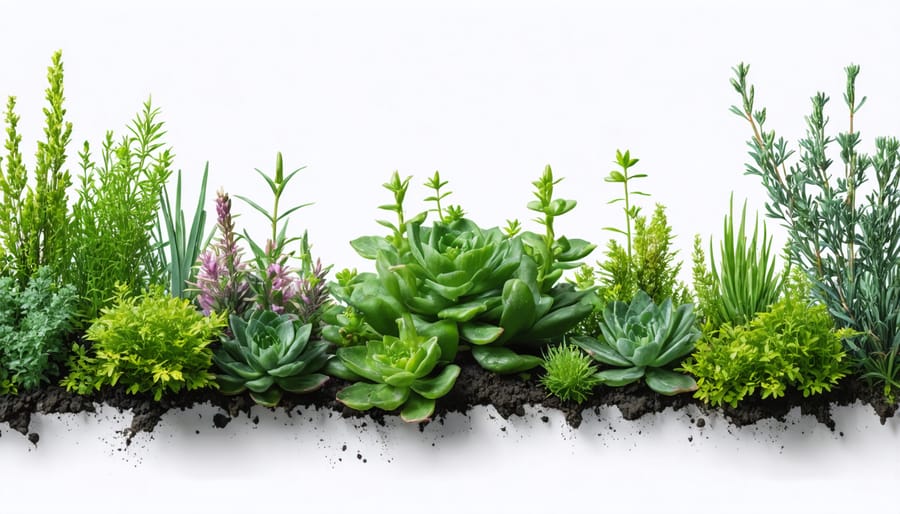
Local Plant Communities
Understanding your local plant communities is like discovering nature’s perfect garden design. These plants have evolved together over thousands of years, creating sustainable partnerships that thrive in your specific climate and soil conditions. By observing which low-maintenance native plants naturally grow together in your area, you can recreate these successful combinations in your garden.
Start by taking walks in nearby natural areas, parks, or preserves to observe which plants naturally coexist. Notice how different species layer themselves, with taller plants providing shelter for shorter ones, and ground covers filling in the gaps. These natural groupings, called plant communities, offer valuable insights into which species will work well together in your garden.
Consider factors like sunlight exposure, moisture levels, and soil type when identifying local plant communities. You might find drought-resistant prairie plants growing together in sunny areas, while shade-loving woodland species cluster under tree canopies. Your local extension office or native plant society can provide detailed information about plant communities specific to your region.
By mimicking these natural groupings in your garden, you’ll create an ecosystem that requires less maintenance and supports local wildlife. These plant communities have already figured out how to share resources effectively, making your gardening journey both easier and more rewarding.
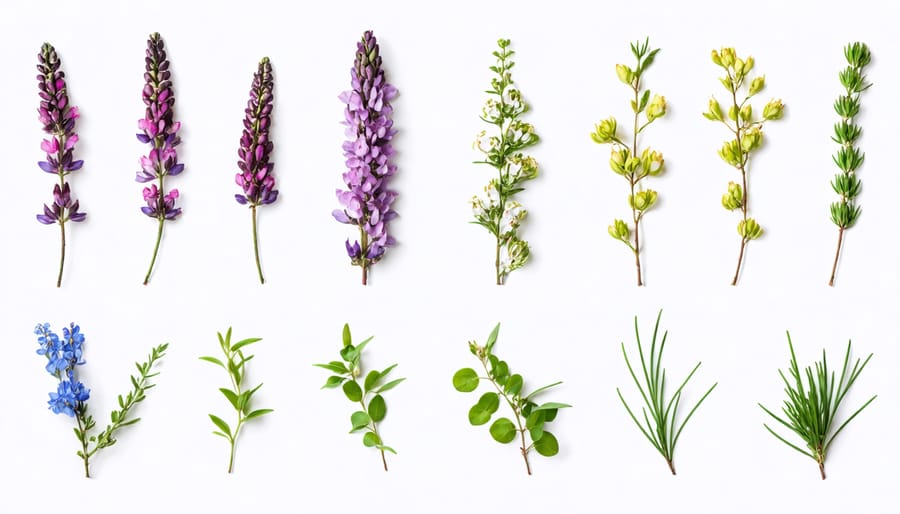
Four-Season Interest
Creating a garden that captivates throughout all seasons requires thoughtful year-round garden planning. Native plants naturally follow seasonal cycles, offering changing displays that keep your landscape interesting across all four seasons.
Start with spring-blooming natives like wild columbine and bleeding heart for early color. Layer in summer performers such as butterfly weed, black-eyed susans, and native bee balm to maintain visual interest when spring blooms fade. For fall drama, incorporate plants like asters, goldenrod, and native grasses that provide both colorful foliage and attractive seed heads.
Don’t overlook winter interest – choose plants that maintain their structure and provide food for wildlife during colder months. Native evergreens offer year-round greenery, while plants with interesting bark patterns or persistent berries create winter focal points. Consider red twig dogwood for its vibrant stems or winterberry holly for bright fruit that persists through snow.
Strategic placement is key – position taller plants where their winter silhouettes will catch morning or afternoon light. Group plants with complementary blooming periods to ensure continuous color, and include varieties with different textures to maintain visual appeal even when flowers aren’t present. Remember to document your garden’s appearance throughout the seasons to identify and fill any gaps in seasonal interest.
Installation and Garden Storage Solutions
Planting Techniques
Success in native gardening starts with proper planting techniques. Begin by preparing your planting area at the right time – typically spring or fall when temperatures are mild and rainfall is more frequent. Before planting, thoroughly remove existing grass and weeds, and loosen the soil to about twice the width of your plant’s root ball.
When removing plants from their containers, gently loosen the root ball, especially if roots are tightly wound. This encourages roots to spread outward into the surrounding soil. Dig holes that are as deep as the root ball but twice as wide, creating a saucer-shaped depression that will help collect water.
Position plants at the same depth they were growing in their containers – planting too deeply can suffocate roots. Space plants according to their mature size to prevent overcrowding. After placing each plant, backfill with native soil rather than adding amendments. This encourages roots to expand beyond the planting hole.
Create a 2-3 inch deep ring of soil around each plant to form a watering basin, and apply a 2-inch layer of organic mulch keeping it away from plant stems. Water thoroughly immediately after planting, ensuring the soil is evenly moist but not waterlogged.
For larger native plants or trees, consider staking only if necessary, and remove stakes after one growing season to encourage strong root development. Group plants with similar water needs together to make maintenance easier and more efficient.
Tool Storage and Organization
Proper tool storage is essential for maintaining your native garden efficiently and keeping your equipment in top condition. A dedicated storage solution not only protects your investments but also makes gardening more enjoyable. Start by assessing your needs and organize your gardening tools based on frequency of use.
Consider installing wall-mounted tool racks or pegboards to maximize vertical space and keep long-handled tools off the ground. Weather-resistant storage boxes or bins work well for smaller items like hand trowels, pruners, and garden gloves. Label everything clearly to maintain organization throughout the growing season.
For soil amendments and organic materials, use sealed containers to keep moisture out and prevent unwanted pests. Create designated zones within your storage area: one for tools, another for supplies, and a separate space for seasonal items. This system makes it easier to find what you need when you need it.
Don’t forget to include a potting station with easy access to containers, soil, and amendments. A small workbench can serve multiple purposes, from seed starting to tool maintenance. Keep frequently used items at eye level and heavier equipment at ground level for safety and convenience.
Remember to clean tools before storing them, and apply a light coat of oil to metal parts to prevent rust. This simple maintenance routine will extend the life of your gardening equipment and keep everything ready for your next native garden project.
Maintenance and Care Tips
Seasonal Maintenance Calendar
A successful native garden thrives with consistent care throughout the year. Following this monthly guide will help you maintain your garden’s health and beauty while practicing water-wise garden maintenance.
Spring (March-May):
– Remove winter mulch and debris
– Prune dead branches from woody plants
– Division of mature perennials
– Begin weekly weeding sessions
– Monitor for early pest issues
– Apply fresh layer of mulch
Summer (June-August):
– Deep watering during dry spells
– Continue regular weeding
– Deadhead spent blooms
– Monitor for invasive species
– Collect seeds from early bloomers
– Document garden performance
Fall (September-November):
– Plant new native species
– Collect and store seeds
– Leave seedheads for winter birds
– Clean and sharpen tools
– Add fall mulch layer
– Remove invasive plants
Winter (December-February):
– Minimal watering if needed
– Leave perennial stalks standing
– Monitor for winter damage
– Plan next season’s additions
– Clean and organize garden storage
– Start seeds indoors (late winter)
Remember to adjust these tasks based on your specific climate zone and local weather patterns. Keep a garden journal to track what works best in your space and maintain a consistent maintenance routine. Store your gardening tools properly in a weatherproof shed or storage solution to extend their life and keep your garden running smoothly all year round.
Creating a native garden is an exciting journey that brings lasting benefits to both your property and the local ecosystem. As we’ve explored throughout this guide, native gardens require thoughtful planning but offer remarkable rewards in terms of sustainability, lower maintenance needs, and support for local wildlife.
Remember to start small if you’re feeling overwhelmed – even a modest corner of your yard can become a thriving native habitat. Focus on selecting plants that match your specific growing conditions and local climate. Take time to prepare your soil properly, and don’t forget to consider the seasonal changes that will affect your garden’s appearance throughout the year.
The success of your native garden relies on proper spacing, regular initial maintenance, and patience as plants establish themselves. Keep in mind that native plants typically require less water and maintenance once established, making them an excellent long-term investment for your landscape.
Whether you’re creating a butterfly garden, a rain garden, or simply want to incorporate more native species into your existing landscape, the key is to start with a solid plan and stick to it. Don’t be afraid to reach out to local native plant societies or gardening groups for additional guidance and support.
Now that you have all the tools and knowledge needed, it’s time to take action. Your native garden journey begins with that first plant – so get out there and start growing your own piece of natural heritage!