
Transform Your Backyard: Simple Outdoor Kitchen Ideas That Won’t Break the Bank
Transform your backyard into a chef’s paradise without breaking the bank or hiring contractors. Creating an easy outdoor kitchen starts with smart planning and modular components that fit your space and budget. A well-designed outdoor cooking area combines essential elements like a quality grill, weather-resistant countertops, and strategic storage solutions, letting you entertain guests while enjoying the fresh air.
Start simple with a portable grill station and expand gradually – adding features like a prep counter, storage cabinet, or mini fridge as your needs and budget allow. Today’s outdoor kitchen solutions include ready-to-assemble units and standalone components that create functional cooking spaces without permanent construction. Whether you’re working with a compact patio or spacious deck, the key is choosing durable, weather-resistant materials and maintaining a practical workflow between cooking, prep, and serving areas.
Focus on these essential elements to build your perfect outdoor kitchen while keeping the project manageable and affordable. The result? A versatile cooking space that extends your home’s living area and creates lasting memories with family and friends.
Starting with the Basics: Essential Elements of a Simple Outdoor Kitchen
Choosing Your Cooking Station
The heart of your outdoor kitchen starts with selecting the right cooking station. For most homeowners, a quality grill serves as the centerpiece, with gas grills offering convenience and charcoal grills providing that authentic smoky flavor. Consider a grill with side burners for added cooking versatility – perfect for warming sauces or cooking side dishes while your main course sizzles.
Don’t overlook the importance of prep space. A sturdy weather-resistant table or counter area is essential for food preparation and serving. Portable stainless steel prep tables are excellent choices, as they’re durable and can be easily moved when needed. For a budget-friendly option, consider repurposing a potting bench or adding a fold-down counter to your existing outdoor space.
For those who love variety in their outdoor cooking, portable cooking surfaces like griddles or pizza ovens can add exciting options to your culinary arsenal. These can be stored away when not in use, making them perfect for smaller spaces. Remember to position your cooking station away from any overhead obstacles and ensure there’s adequate ventilation for smoke and heat.
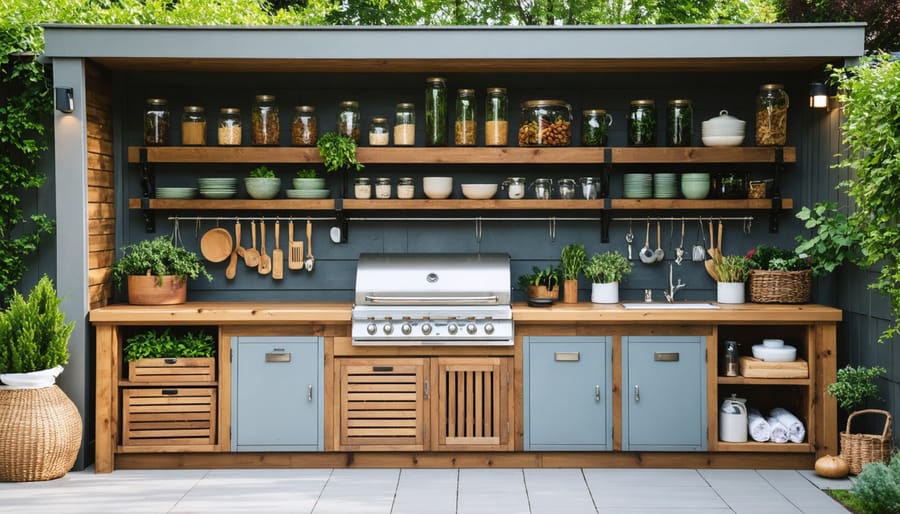
Weather-Ready Storage Solutions
Protecting your outdoor kitchen investments starts with smart storage solutions that shield your essentials from the elements. Weather-resistant cabinets with rubber gaskets provide a tight seal against moisture and dust, while pull-out drawers make it easy to organize outdoor storage efficiently. Consider installing a combination of closed cabinets for delicate items and open shelving for frequently used tools and serving ware.
For areas with frequent rainfall, opt for marine-grade stainless steel or powder-coated aluminum storage units that resist rust and corrosion. Built-in covers for countertop storage bins keep ingredients dry and fresh, while magnetic strips mounted inside cabinet doors cleverly store metal utensils and tools.
Don’t forget about vertical storage solutions! Wall-mounted pegboards and hooks maximize space usage while keeping grilling tools easily accessible. For seasonal items or less frequently used equipment, dedicate a weather-tight storage chest or cabinet slightly away from the main cooking area. This keeps your everyday essentials close at hand while protecting occasional-use items from unnecessary exposure to the elements.
Smart Layout Ideas for Small Spaces
Zone Planning Made Simple
Efficient zone planning is key to creating a functional outdoor kitchen that lets you maximize small outdoor spaces. Start by dividing your space into three main zones: cooking, prep, and dining. Position your cooking zone (grill or cooktop) where smoke won’t blow toward seating areas, typically considering prevailing winds. Create a prep zone within arm’s reach of your cooking area, including a counter space and storage for utensils and seasonings.
Your dining zone should be slightly separated from the cooking area but close enough for easy serving. Consider adding a mobile cart or island that can serve multiple purposes – extra counter space when cooking and additional seating during meals. Keep frequently used items in easily accessible storage solutions near the prep area, and designate a spot for less-used items further away.
Remember to maintain clear pathways between zones, allowing for comfortable movement while entertaining. A good rule of thumb is to leave at least 36 inches of clearance around high-traffic areas.
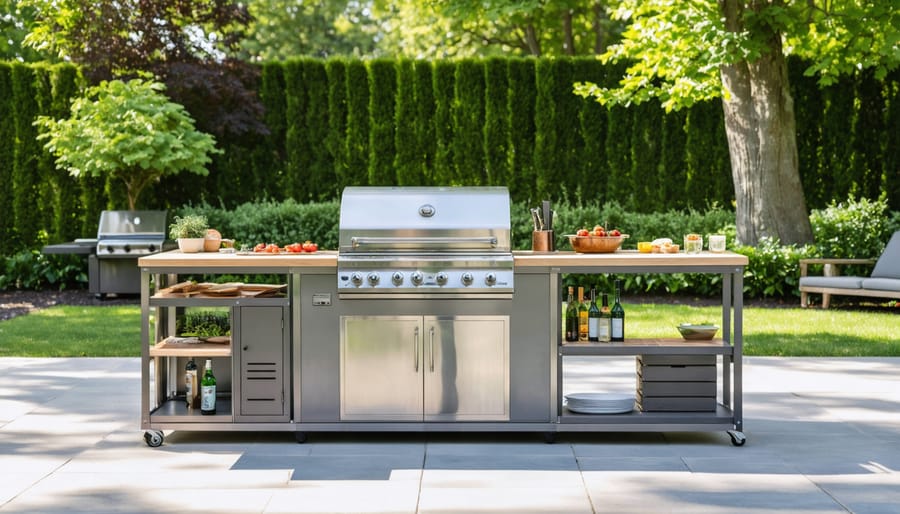
Mobile and Modular Options
For ultimate flexibility in outdoor cooking, mobile and modular kitchen solutions offer the perfect balance of functionality and convenience. Rolling carts equipped with grills, prep stations mounted on wheels, and portable storage units let you customize your cooking space based on your needs. These versatile pieces can be easily rearranged for different occasions or stored away during harsh weather.
Consider investing in standalone modules like a mobile prep station with built-in storage, a rolling grill cart, or a portable sink unit. These individual components can be arranged together when hosting large gatherings or separated for intimate cooking sessions. Many modern outdoor kitchen units come with locking wheels for stability during use and smooth mobility when needed.
Foldable prep tables and collapsible storage solutions are particularly practical for smaller spaces. When the cooking is done, these space-saving pieces can be neatly tucked away in your garage or storage shed, keeping your outdoor area clean and clutter-free. Look for weather-resistant materials like stainless steel or powder-coated aluminum to ensure your mobile kitchen elements stay in top condition year after year.
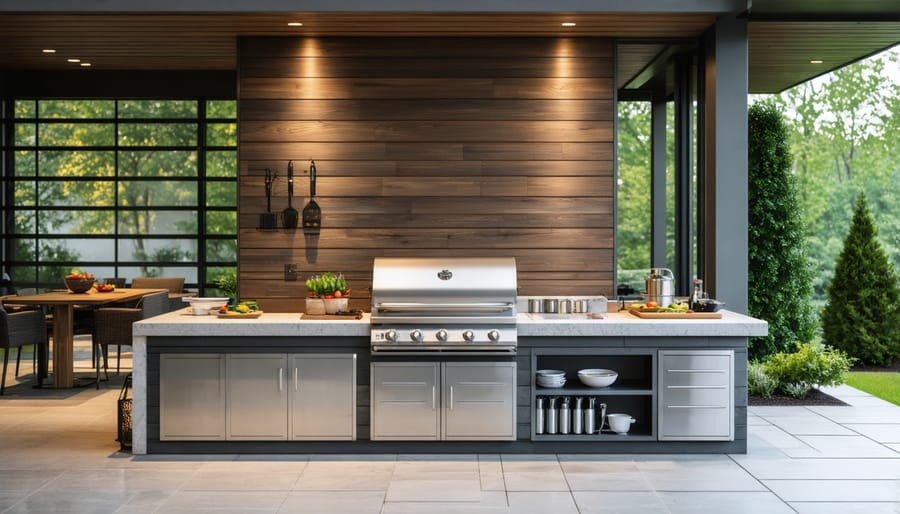
Budget-Friendly Materials and Features
Countertop Alternatives
Creating a durable countertop for your outdoor kitchen doesn’t have to break the bank. Concrete is a popular and cost-effective option that can be customized with different colors and finishes. You can either pour it yourself or use pre-made concrete pavers for a simpler installation. The result is a sturdy surface that stands up well to weather and frequent use.
Tile is another fantastic choice that offers endless design possibilities. Porcelain tiles are particularly suited for outdoor use because they’re frost-resistant and can handle extreme temperature changes. For a budget-friendly approach, consider using larger format tiles to reduce installation time and grout lines.
Natural stone alternatives like granite remnants can provide luxury appeal at a fraction of the cost. Check with local stone yards for leftover pieces from indoor projects – these are often perfect for smaller outdoor kitchen counters. Sealed properly, they’ll withstand the elements beautifully.
For those seeking ultra-affordable solutions, consider marine-grade plywood topped with outdoor-rated laminate. While not as durable as stone or concrete, this option can work well in covered spaces and is easily replaceable when needed. Just be sure to seal all edges thoroughly to prevent moisture damage.
Stainless steel is another practical choice that, while initially more expensive, requires minimal maintenance and can handle any weather condition. Look for commercial-grade sheets at restaurant supply stores for better pricing.
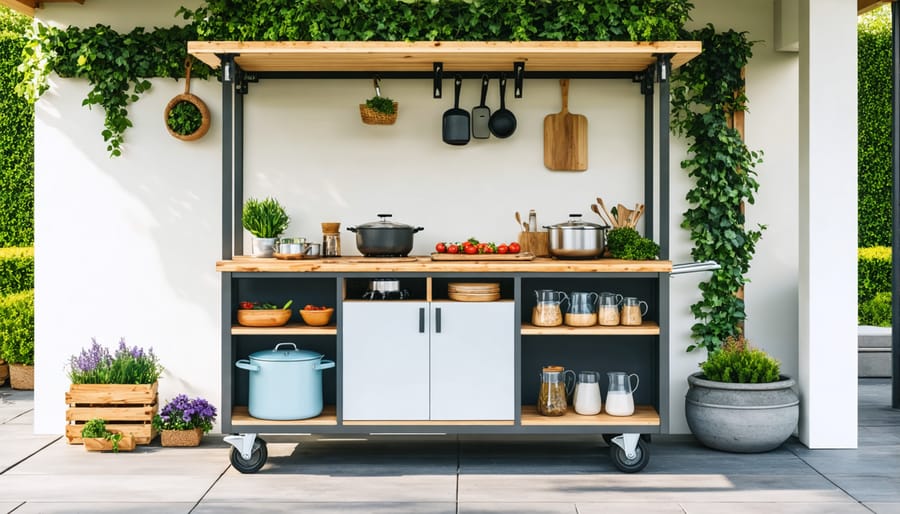
DIY Storage and Organization
Smart storage solutions are essential for keeping your outdoor kitchen organized and functional. Start by installing weather-resistant cabinets beneath your countertop area. Repurposed plastic deck boxes make excellent storage units for cooking utensils and smaller items, while providing protection from the elements. Consider mounting pegboards on nearby walls to hang frequently used tools and create vertical storage space.
To maximize efficiency, incorporate pull-out drawers and rotating corner units in your base cabinets. These make it easier to access items stored in deep spaces and help prevent cluttered corners. For frequently used items, install a magnetic strip on your backsplash to hold metal utensils and knives.
Create designated zones for different activities: a prep area with built-in cutting boards and knife storage, a cooking zone with nearby spice storage, and a cleaning station with integrated trash and recycling bins. Use clear, labeled containers for dry ingredients and cooking supplies to maintain organization and easily spot when items need replenishing.
Don’t forget overhead storage options. Install sturdy shelving units or hanging racks above your workspace for pots, pans, and serving dishes. Weather-resistant wicker baskets can add a decorative touch while providing practical storage for linens and less frequently used items. Remember to include proper ventilation in enclosed storage spaces to prevent moisture buildup and protect your supplies.
Weatherproofing Your Investment
Your outdoor kitchen is an investment worth protecting, and with smart weatherproofing strategies, you can ensure it stands the test of time. Start by selecting materials specifically designed for outdoor use – stainless steel grade 304 or higher for appliances, weather-resistant woods like teak or cedar for cabinetry, and sealed natural stone or concrete for countertops. These weather-resistant outdoor solutions form the foundation of a durable cooking space.
Install proper drainage systems around your cooking area to prevent water pooling, and ensure all electrical components are properly rated for outdoor use with GFCI protection. Consider adding a pergola or retractable awning to shield your kitchen from direct sun and rain. For areas with harsh winters, invest in high-quality covers for your appliances and furniture during off-seasons.
Regularly apply protective sealants to natural materials, checking annually for any signs of wear. Keep gutters clear above your kitchen area to prevent water damage, and ensure proper ventilation to avoid moisture buildup. Install cabinet doors with weather stripping to keep contents dry, and use marine-grade hardware that resists rust and corrosion.
Remember to position your outdoor kitchen to account for prevailing winds and natural shelter from existing structures. These simple yet effective measures will help maintain your outdoor kitchen’s functionality and appearance for years to come.
Creating your dream outdoor kitchen doesn’t have to be complicated or break the bank. As we’ve explored, focusing on essential elements like a reliable grill, adequate counter space, and smart storage solutions can help you build a functional cooking area that suits your needs and budget. Remember that starting small and expanding over time is a perfectly viable approach – you can always add features like a pizza oven or bar area as your needs and resources grow.
The key is to plan your space thoughtfully, considering factors like weather protection, utility access, and traffic flow. By choosing durable, weather-resistant materials and incorporating practical storage solutions, you’ll create an outdoor kitchen that’s both beautiful and long-lasting.
Don’t let perfectionism hold you back – even a simple setup can dramatically enhance your outdoor living space and create countless opportunities for memorable gatherings with family and friends. Take that first step today by measuring your space and sketching out your ideal layout. Before you know it, you’ll be enjoying delicious meals and making memories in your new outdoor kitchen.