
Transform Your Backyard with Free Pallets (Before You Buy That Expensive Shed)
Transform those discarded wooden pallets sitting in warehouses and loading docks into functional outdoor furniture, planters, and storage solutions for a fraction of retail costs. Free or low-cost pallets offer surprisingly sturdy construction when properly selected and treated, making them ideal for everything from vertical gardens that maximize small spaces to complete patio seating sets that rival store-bought alternatives.
The beauty of pallet projects lies in their accessibility. You don’t need advanced carpentry skills to create a potting bench that organizes your gardening supplies or a tool rack that keeps your yard equipment tidy. Start by sourcing heat-treated pallets marked with “HT” stamps to ensure they’re safe for outdoor use, then choose projects matching your skill level and space requirements.
Whether you’re solving storage challenges in a cramped backyard, adding character to a bare patio, or simply looking to reduce waste while beautifying your outdoor area, pallet projects deliver practical results. From simple weekend builds like herb gardens and compost bins to more ambitious undertakings such as pergolas and outdoor bars, these versatile wooden structures adapt to virtually any outdoor improvement goal while keeping your budget intact.
Why Pallets Are Perfect for Outdoor Projects
If you’ve been searching for budget-friendly ways to improve your outdoor space, pallets might be your perfect solution. These sturdy wooden structures offer surprising advantages that make them ideal for DIY projects around your home.
The most obvious benefit is cost-effectiveness. Many businesses give away pallets for free or sell them at minimal cost, meaning you can create functional storage solutions, seating areas, or decorative elements without breaking the bank. This makes pallet projects an excellent starting point before investing in permanent structures like sheds or storage units.
Durability is another key advantage. Pallets are designed to carry heavy loads, so they’re built from robust wood that can withstand outdoor conditions. With proper treatment and sealing, pallet furniture and storage can last for years, giving you excellent value for your investment of time and effort.
The versatility of pallets truly shines in outdoor settings. Their modular design means you can stack, attach, and reconfigure them to suit your specific needs. From vertical gardens to tool organizers, benches to compost bins, the possibilities are nearly endless. You can even create outdoor furniture from repurposed materials that rivals store-bought options.
Finally, there’s the environmental benefit. Repurposing pallets keeps usable wood out of landfills and reduces demand for new materials. You’re solving a storage or organization problem while making an eco-conscious choice. Many homeowners find that successful pallet projects build their confidence and help them determine exactly what they need before making larger investments in permanent outdoor storage solutions.
Finding and Preparing Pallets Safely
Where to Find Free or Cheap Pallets
Finding pallets for your DIY projects doesn’t have to break the bank. Start by visiting local home improvement stores like Home Depot or Lowe’s early in the morning when staff are unpacking shipments. Simply ask the receiving department if they have pallets available – many are happy to give them away rather than pay for disposal.
Distribution centers and warehouses are goldmines for free pallets. Check with grocery stores, furniture retailers, and garden centers in your area. Small businesses are often more accommodating than large chains, so don’t overlook local shops.
Online marketplaces offer excellent opportunities too. Facebook Marketplace and Craigslist frequently list free pallets, and you can even post a request in community groups. Apps like Nextdoor connect you with neighbors giving away materials.
When collecting pallets, look for the HT stamp (heat-treated) rather than MB (methyl bromide treated) for safety. Avoid pallets with oil stains, strong odors, or visible damage. Inspect for loose boards, protruding nails, and signs of rot before loading them up.
The best approach? Build relationships with local businesses. One homeowner shared how her regular bakery visits led to a steady supply of sturdy pallets, perfect for her garden projects.
Choosing Safe Pallets and Prepping Them
Before you start building, choosing the right pallets is crucial for safety and longevity. Not all pallets are created equal, and some contain chemicals you definitely don’t want in your backyard!
Look for stamps on the pallet’s side that reveal its treatment history. The safest choice is “HT” (heat-treated), which means the wood was sanitized using high temperatures without chemicals. Avoid pallets marked “MB” (methyl bromide), as this toxic fumigant can linger in the wood. If you spot “DB” (debarked) or “KD” (kiln-dried), those are safe too. When in doubt, skip pallets without clear markings or those that look stained or smell chemical-like.
Once you’ve selected safe pallets, prep work begins. Start by thoroughly cleaning your pallets with a stiff brush and mild soap solution to remove dirt, debris, and any unwanted hitchhikers. Let them dry completely before moving to the next step.
Sanding is essential for outdoor projects. Use medium-grit sandpaper (80-120 grit) to smooth rough edges and prevent splinters. This step also helps weatherproofing products absorb better. Don’t skip corners and edges where hands frequently touch.
For outdoor durability, weatherproofing is your best friend. Apply an exterior wood sealant, stain, or paint designed for outdoor use. These products protect against moisture, UV rays, and temperature fluctuations that can warp or rot untreated wood. Two coats typically provide adequate protection, and reapplying annually keeps your projects looking great for years.
Simple Pallet Projects That Solve Real Storage Problems
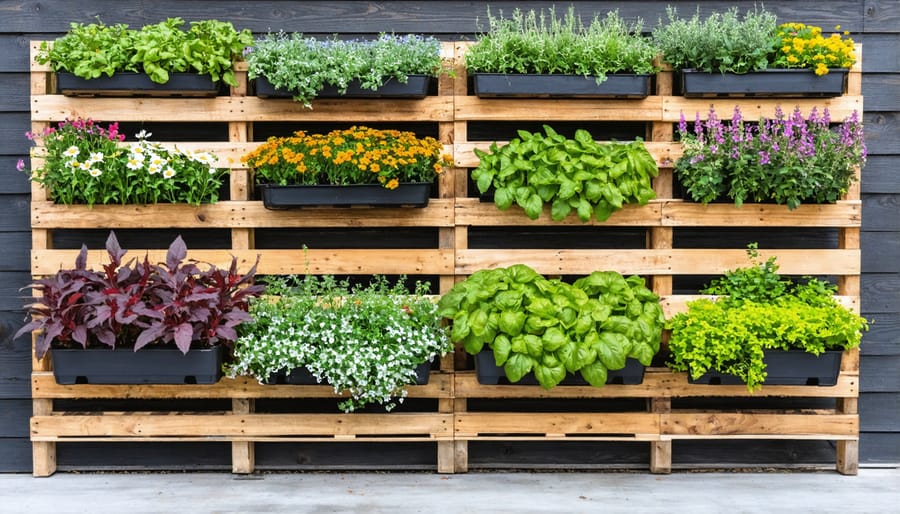
Vertical Garden Wall for Small Spaces
If you’re tight on outdoor space but still want to grow fresh herbs or beautiful flowers, a vertical pallet garden is your perfect solution. This project transforms a single wooden pallet into a multi-level planting system that maximizes vertical space while adding charm to balconies, patios, or narrow yard areas.
You’ll need one heat-treated pallet (look for the HT stamp), landscape fabric or weed barrier, a staple gun, potting soil, and your choice of plants. Start by sanding the pallet smooth to prevent splinters, then attach landscape fabric to the back and bottom using a staple gun, creating pockets that will hold the soil. Secure the fabric between each slat row to form individual planting compartments.
Once your pockets are ready, lay the pallet flat and fill each section with quality potting soil. Plant your herbs, flowers, or succulents, then let the pallet rest horizontally for about two weeks so roots can establish. After this settling period, lean or mount your garden vertically against a wall or fence.
This approach works wonderfully for homeowners who want garden-fresh ingredients without dedicating precious yard space to traditional beds. Like other DIY garden decor projects, vertical pallet gardens prove that limited space doesn’t mean limited possibilities. The best part? You can easily move it around to catch optimal sunlight throughout the seasons.
Tool Organizer and Potting Bench
A pallet potting bench transforms your gardening routine by creating a dedicated workspace right where you need it. This practical project solves the common problem of tools scattered across the yard and plants sitting on the ground while you work.
Start with two sturdy pallets stood vertically as the back frame and sides, then attach a third horizontally as your work surface. The vertical pallets provide built-in shelving for pots, soil bags, and frequently used tools. Add hooks along the sides for hanging trowels, pruners, and gloves within easy reach. Consider attaching small containers to store seeds, plant markers, or twine.
The beauty of a potting bench lies in its customization potential. Mount a pegboard section to one side for additional tool organization, or add a lower shelf for storing watering cans and fertilizers. Many gardeners appreciate having everything consolidated in one spot rather than making multiple trips to their main storage area.
This project pairs perfectly with larger affordable storage solutions by handling your active gardening supplies while your shed stores seasonal items and bulk materials. One homeowner shared that her pallet potting bench reduced her shed clutter by 40 percent, keeping daily-use items accessible outdoors. Weather-proof your bench with exterior stain to ensure years of reliable service.
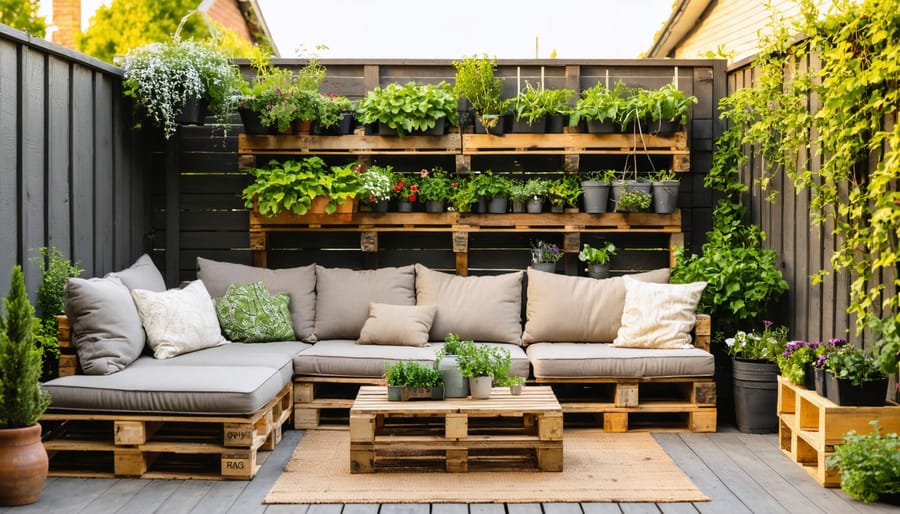
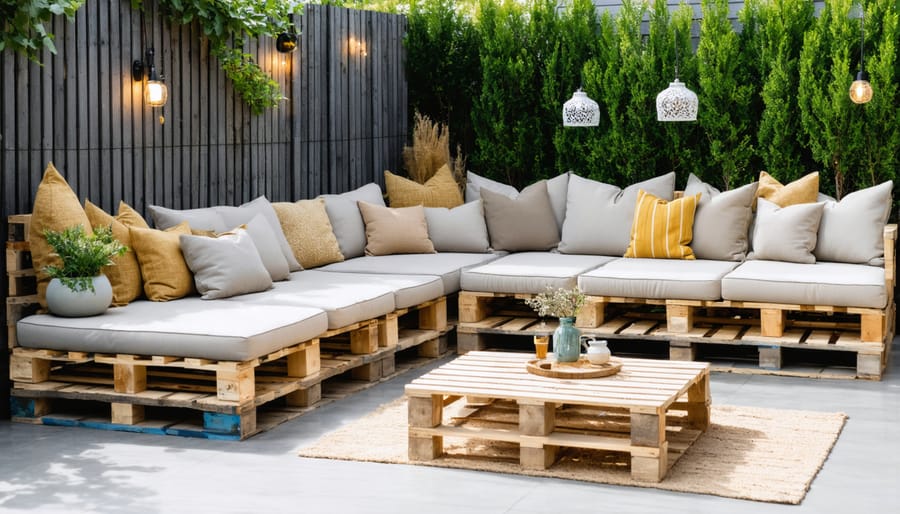
Outdoor Furniture: Benches and Seating
Pallet benches offer a wonderful solution for creating affordable outdoor seating that fits perfectly in any garden or patio space. The beauty of these projects is their simplicity—even if you’re just starting your DIY journey, you can craft a sturdy, attractive bench in a weekend.
Start with two pallets stacked vertically for the backrest and one laid flat for the seat. Secure them together with weather-resistant screws and L-brackets for stability. Sand all surfaces thoroughly to prevent splinters, paying special attention to areas where people will sit or lean. A coat of outdoor wood stain or paint not only adds personality but provides essential protection against moisture and UV damage.
For comfort, cushioning makes all the difference. Outdoor-grade foam cushions with removable, weather-resistant covers are ideal. Many homeowners find that storing cushions in a nearby shed during harsh weather extends their life significantly. Consider adding armrests using extra pallet wood strips for a polished look.
Weather protection is crucial for longevity. Apply a quality outdoor sealant annually, and position benches under covered areas when possible. If your bench will face full sun or rain, treat it with marine-grade varnish for maximum durability. With proper care, your pallet bench can provide years of comfortable outdoor seating while saving you hundreds compared to store-bought furniture.
Firewood Storage Rack
A firewood storage rack solves one of the most common challenges for homeowners with fireplaces or fire pits: keeping your wood supply dry and ready to burn. Pallets are naturally perfect for this project since they’re already designed for stacking and ventilation.
The key to success is elevation. Place your pallets on concrete blocks or landscape bricks to lift the wood off the ground, preventing moisture from seeping up through the soil. This simple step dramatically extends the life of both your firewood and the pallet structure itself. Stack two or three pallets vertically to create back support, then place one horizontally at the base for your firewood to rest on.
For added weather protection, position your rack under an eave or against a covered porch area. The built-in gaps between pallet slats provide excellent airflow, which is essential for keeping firewood properly seasoned. Many homeowners enhance their racks by attaching a simple slanted roof using corrugated metal or weatherproof plywood.
One satisfied DIYer shared that her pallet firewood rack has lasted three winters: “I was skeptical about using pallets outdoors, but proper placement made all the difference. My wood stays dry, and I love having everything organized in one spot.”
This project typically takes just an afternoon and costs next to nothing if you source free pallets locally.
Advanced Projects for the Ambitious DIYer
Pallet Compost Bin System
A multi-compartment pallet compost bin transforms yard waste into garden gold while keeping your outdoor space organized. By positioning three or four pallets in a U-shape or creating separate side-by-side bins, you’ll establish a proper composting system with compartments for fresh materials, active decomposition, and finished compost ready to use.
This setup addresses a common homeowner challenge: what to do with grass clippings, leaves, and kitchen scraps. Instead of bagging yard waste for curbside pickup, you’re creating nutrient-rich soil amendment that reduces your need for store-bought fertilizers. The multiple compartments make it easy to turn and rotate compost at different stages, speeding up the decomposition process.
One homeowner shared that her three-bin pallet system eliminated four bags of yard waste weekly while producing enough finished compost to nourish her vegetable garden throughout the growing season. The key is securing pallets with sturdy posts or brackets and leaving adequate space between slats for airflow. Consider adding a simple hinged front panel for easy access when harvesting finished compost. Position your bin in a partially shaded area near your garden for convenience, and watch as kitchen scraps and yard trimmings become black gold for healthier plants.
Small Garden Shed or Storage Unit
A pallet shed offers an economical entry point into outdoor storage, perfect for gardeners needing a spot for tools, bags of soil, or seasonal items. Start with a simple three-sided structure using pallets as walls, secured to corner posts anchored in the ground. Add a slanted roof made from corrugated plastic sheeting or reclaimed metal to keep contents dry.
This DIY approach works wonderfully as temporary storage while you’re deciding on permanent solutions, or when budget constraints make a manufactured shed impractical right now. Homeowners often use these structures for 2-3 seasons before upgrading, making them ideal for testing placement and determining actual storage needs. Sarah from Portland shared that her pallet shed housed garden supplies beautifully for two years while she saved for a proper unit.
However, understand the limitations. Pallet sheds aren’t weatherproof enough for sensitive items or long-term document storage. They also require regular maintenance—treating wood annually prevents rot and checking structural integrity ensures safety. If you need secure, climate-controlled storage for expensive equipment or valuables, investing in a quality manufactured shed makes more sense from the start. Consider this project when you need immediate, affordable storage for hardy outdoor items and you’re comfortable with occasional upkeep.
Raised Garden Beds with Built-in Pathways
Transform wooden pallets into productive raised garden beds that solve common gardening challenges while keeping your outdoor space organized and accessible. This budget-friendly approach lets you create custom planting areas without the expense of traditional garden bed kits.
Start by positioning pallets on their sides to form rectangular frames, securing the corners with outdoor screws or metal brackets. The natural gaps between slats provide excellent drainage, preventing waterlogged soil that can damage plant roots. Line the interior with landscape fabric to contain soil while allowing water to escape freely.
The elevated design brings multiple benefits to your growing space. You’ll work at a more comfortable height, reducing strain on your back and knees during planting and harvesting. The contained soil warms faster in spring, giving you a head start on the growing season. Plus, you have complete control over soil quality, mixing in compost and amendments tailored to your plants’ needs.
Create pathways between multiple pallet beds using gravel, wood chips, or stepping stones for easy access and a polished appearance. This organization makes maintenance straightforward and keeps muddy footprints from tracking into your home. For more strategies to maximize your harvest, explore these raised bed gardening tips that complement your new pallet garden perfectly.
Making Your Pallet Projects Last
Weatherproofing and Finishing Options
Protecting your pallet creations from the elements ensures they’ll last for years to come. Start with a good quality outdoor wood sealant or waterproofing product, which creates a barrier against moisture, UV rays, and temperature changes. For a natural finish that highlights the wood grain, clear sealants work beautifully and typically need reapplication every 12-18 months depending on your climate.
If you prefer color, choose exterior-grade stains or paints specifically designed for outdoor use. Stains penetrate the wood while allowing it to breathe, making them ideal for furniture and decorative pieces. Paints offer more color options and protection but may require touch-ups after two to three years.
Eco-conscious DIYers will appreciate plant-based oils like linseed or tung oil, which provide natural protection without harsh chemicals. These options are perfect if you’re building planters or pieces near vegetable gardens. One homeowner shared that using eco-friendly sealant on her pallet herb garden gave her peace of mind knowing no toxins would leach into her plants.
Always apply your chosen finish to clean, dry wood, and plan for annual inspections to catch any wear early.
Seasonal Maintenance Tips
Your outdoor pallet projects need regular attention to stay beautiful and functional year-round. Following simple seasonal maintenance routines will prevent common issues like rot, warping, and weather damage.
Start each spring by inspecting for loose boards or hardware, tightening screws as needed. Apply a fresh coat of outdoor sealant or weather-resistant stain every 12-18 months to protect the wood from moisture and UV rays. During rainy seasons, ensure proper drainage around your pallet furniture to prevent water pooling underneath.
Clean surfaces regularly with mild soap and water, removing debris from crevices where moisture can accumulate. Before winter, consider covering pallet pieces with weatherproof tarps or moving smaller items under covered areas. Watch for signs of pest activity or mold growth, addressing problems immediately to extend your project’s lifespan. These straightforward steps mirror the care you’d give any outdoor storage structure, helping your DIY creations last for years.
Pallet projects offer an incredibly affordable way to tackle outdoor storage and organization challenges without breaking the bank. Whether you’re dealing with cluttered garden tools, messy outdoor cushions, or simply want to add functional beauty to your yard, these versatile wooden structures provide real solutions at a fraction of traditional costs.
The beauty of pallet projects lies in their flexibility. You don’t need to dive into a complex build right away. Starting with a simple vertical planter or basic tool rack lets you gain confidence and skills before tackling more ambitious projects. Many homeowners find that their DIY pallet creations work perfectly alongside quality storage solutions, creating a cohesive outdoor organization system that combines budget-friendly ingenuity with professional-grade products where it matters most.
Remember, every expert woodworker started with their first cut, and every organized outdoor space began with a single step. Your pallet journey doesn’t require perfection, just enthusiasm and a willingness to learn as you go. Gather some basic tools, source your pallets safely, and transform your outdoor space one project at a time. The satisfaction of creating something functional with your own hands is just waiting for you to begin.