
Transform Your Garden Shed into a Dreamy Art Studio (Plus Design Tips)
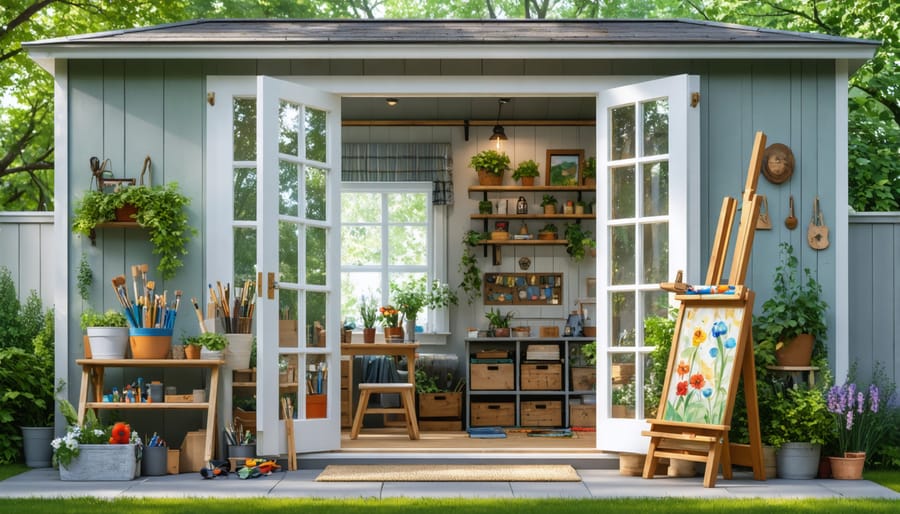
Transform a simple backyard shed into a thriving art studio by maximizing natural light with strategically placed windows, installing proper electrical wiring for task lighting, and creating adaptable storage solutions that grow with your creative practice. Converting your outdoor space into a dedicated creative sanctuary allows artists to transform your garden shed into a professional workspace while maintaining the charm of a personal retreat. Essential elements include proper insulation for year-round comfort, moisture-resistant flooring to protect artwork, and ventilation systems that safely handle art materials. Consider installing adjustable shelving, vertical storage walls, and a sturdy workbench that doubles as a display area. The key to a successful shed studio lies in striking the perfect balance between functionality and inspiration – incorporating both practical workspace solutions and personal touches that fuel creativity. Whether you’re a painter requiring easel space, a potter needing wheel room, or a mixed-media artist demanding flexible arrangements, your shed studio can be customized to support your specific artistic journey while providing a peaceful escape from household distractions.\n\n\n
Planning Your Shed Art Studio Layout
\n\n
Space Requirements and Organization
\n\nBefore setting up your art studio, carefully assess your space requirements based on your preferred art medium and working style. Most artists find that a shed measuring at least 8×10 feet provides adequate room for a basic setup, while 10×12 feet or larger offers more flexibility for multiple workstations and storage.\n\nConsider creating distinct zones within your studio: a main workspace for creating art, a storage area for supplies, and a cleaning station. Allow approximately 50% of your total space for your primary work area, 30% for storage, and 20% for other functions like cleaning or display space.\n\nOrganize your supplies using a combination of vertical and horizontal storage solutions. Install adjustable shelving along the walls for frequently used items, and consider using rolling carts for supplies that need to be mobile. Clear storage containers help you quickly locate materials while keeping them protected from dust and moisture.\n\nRemember to factor in space for larger equipment like easels, drafting tables, or pottery wheels if these are part of your practice. Leave enough clearance around your workspace to step back and view your work from different angles – typically 3-4 feet of viewing distance is ideal.\n\n
 \n
\n\n\n
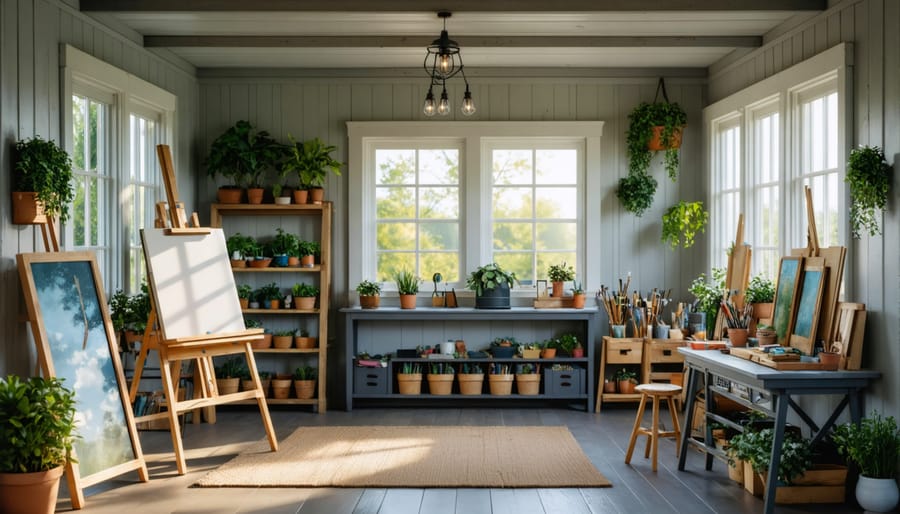
Natural Light and Ventilation
\n\nNatural light is essential for any art studio, and your shed conversion should prioritize this element. Consider installing multiple windows on different walls to capture light throughout the day. Large picture windows facing north provide consistent, glare-free illumination that’s perfect for accurate color work, while skylights can flood your space with overhead brightness.\n\nFor ventilation, incorporate both high and low openings to create effective air circulation. A combination of operable windows and roof vents helps regulate temperature and removes fumes from paints, solvents, and other art materials. Installing window screens allows you to work with fresh air while keeping insects out.\n\nIf possible, add a Dutch door to your studio – you can open the top half for extra ventilation while keeping the bottom closed for security. Solar-powered vents are another smart addition, automatically adjusting to maintain comfortable temperatures year-round.\n\nRemember to position your workstation to take advantage of natural light without creating shadows on your work surface. Strategic window placement also allows you to frame inspiring garden views that can enhance your creative process.\n\n\n
Essential Design Elements
\n\n
Lighting Solutions
\n\nProper lighting is essential for any art studio, and your shed conversion deserves careful consideration of both natural and artificial light sources. Start with maximizing natural light by installing windows or skylights where possible. For artificial lighting, begin with bright overhead LED panels that simulate natural daylight, providing even illumination across your workspace.\n\nTask lighting is crucial for detailed work. Adjustable desk lamps with color-accurate bulbs help you see true colors while painting or drawing. Consider installing track lighting with movable heads, allowing you to direct light exactly where needed as your activities change throughout the day.\n\nFor evening work, warm ambient lighting creates a cozy atmosphere. String lights or wall sconces can provide this softer illumination without interfering with your main work lights. Install dimmer switches to control light levels and create the perfect atmosphere for different artistic pursuits.\n\nRemember to position your main workstation to avoid glare on screens or canvases. Adding light-filtering blinds or curtains helps control natural light and prevents harsh shadows during sunny days.\n\n
Storage and Display Systems
\n\nEfficient storage is crucial in a creative space, and there are countless ways to maximize your storage space while keeping your art supplies organized and accessible. Install adjustable shelving units along the walls to accommodate supplies of varying sizes, and consider using clear bins or containers to easily identify materials. Pegboards are incredibly versatile, allowing you to hang tools, brushes, and frequently used items within arm’s reach.\n\nFor displaying artwork, install track lighting or picture rails that let you easily swap out pieces as needed. Wire cables suspended from the ceiling create a gallery-like atmosphere and provide flexible display options. Consider incorporating a fold-down table or murphy-style easel that can be tucked away when not in use, freeing up valuable floor space.\n\nMake use of vertical space by installing floor-to-ceiling storage units or utilizing the shed’s rafters for storing rarely-used supplies or finished pieces. Rolling carts offer mobility and can be tucked under work surfaces when not needed. Don’t forget about door space – over-the-door organizers and hooks can hold lightweight materials like paper rolls or canvas.\n\nRemember to keep frequently used items at eye level and less-used supplies in higher or lower storage areas. This thoughtful organization will help maintain an inspiring and clutter-free creative environment.\n\n
 \n
\n\n\n
Work Surfaces and Seating
\n\nYour work surface choices can make or break your art studio experience. A sturdy, height-appropriate table is essential – consider an adjustable-height workbench that can accommodate both seated and standing work. Install at least one dedicated workspace along the wall, ideally 24-30 inches deep, to maximize your available space while providing ample room for projects.\n\nFor painters, a quality easel is non-negotiable. Look for a sturdy floor easel that can be folded when not in use, or consider a wall-mounted version to save floor space. Having multiple easel options allows you to work on several pieces simultaneously.\n\nComfort is crucial for those long creative sessions. Invest in an ergonomic artist’s stool with good back support and adjustable height. Include a comfortable chair with armrests for detailed work, and consider a standing mat for areas where you’ll spend time on your feet. Remember to position your seating to take advantage of natural light from windows while avoiding glare on your work surface.\n\nStorage-savvy seating, like ottomans or benches with hidden compartments, can double as both guest seating and supply storage, making the most of your studio space.\n\n\n
Decorative Touches and Inspiration
\n\n
Color Schemes and Wall Treatments
\n\nThe right color scheme can transform your shed studio into an inspiring creative haven. Start with a bright, neutral base color like warm white or light gray to maximize natural light reflection and create an airy atmosphere. Consider adding an accent wall in a stimulating yet soothing shade like sage green, dusty blue, or pale terracotta to spark creativity without overwhelming the space.\n\nFor wall treatments, opt for moisture-resistant paint with a washable finish, making it easy to clean paint splatters and maintain a fresh look. Textured walls can add visual interest – try techniques like color washing or dry brushing to create subtle depth. Installing beadboard or shiplap on lower walls provides durability while adding charming character to your studio space.\n\nDon’t forget the ceiling – painting it a lighter shade than the walls can make your studio feel more spacious. For a unique touch, consider creating a feature wall with magnetic paint for displaying inspiration pieces, or install cork panels for a practical pin-up surface that doubles as sound absorption. Remember to seal any raw wood surfaces to prevent moisture absorption and ensure your wall treatments last longer.\n\n
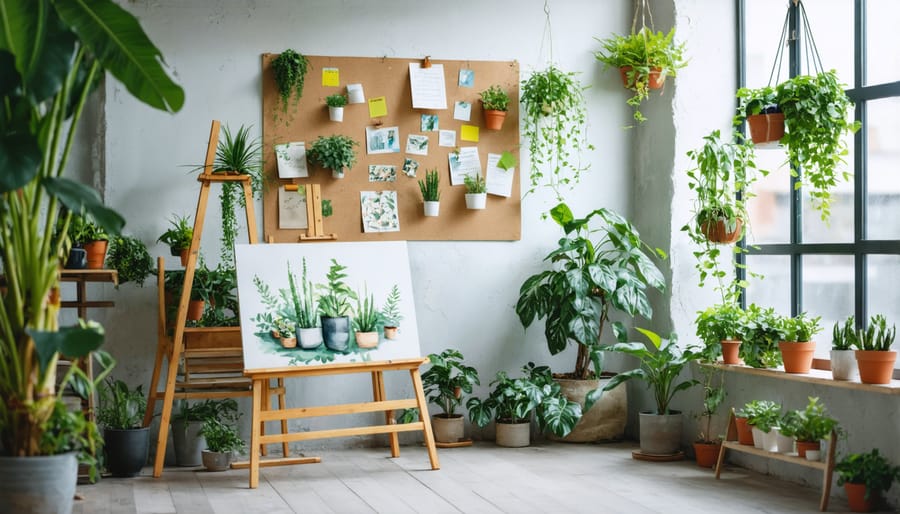
Inspirational Elements
\n\nTransform your art studio shed into a wellspring of creativity by incorporating personal touches that speak to your artistic spirit. Start with a motivation wall featuring your favorite artwork prints, inspirational quotes, or a rotating gallery of your own pieces. Natural elements like potted plants, dried flowers, or a collection of interesting stones can bring organic inspiration into your workspace.\n\nCreate a cozy reading nook with a comfortable chair and some well-loved art books for those moments when you need to recharge your creative batteries. Consider hanging fairy lights or installing adjustable LED strips to create different moods and atmospheres. Personal mementos, such as postcards from art galleries you’ve visited or meaningful trinkets, can add character while keeping you connected to your artistic journey.\n\nDisplay your art supplies in beautiful containers like vintage jars, woven baskets, or repurposed ceramic vessels – making your tools part of the decor. A bulletin board with color swatches, fabric samples, or inspiring magazine clippings can serve as both decoration and a source of creative sparks. Remember, your studio should reflect your unique artistic vision while remaining organized and functional.\n\n
Indoor Plants and Natural Elements
\n\nBringing the outside world into your art studio can significantly enhance your creative flow and overall well-being. Consider placing low-maintenance indoor plants like snake plants, pothos, or ZZ plants near your windows to purify the air and add life to your workspace. These hardy varieties thrive in various light conditions and won’t demand too much attention while you’re focused on your art.\n\nNatural materials can further connect your studio to the outdoors. Try incorporating woven baskets for storage, wooden stools, or a natural fiber rug to add warmth and texture. A collection of interesting stones, branches, or dried flowers can serve both as decorative elements and potential still-life subjects for your artwork.\n\nPosition your plants strategically to create a balanced environment without cluttering your workspace. Hanging planters can maximize vertical space, while corner plant stands keep greenery off your work surfaces. For added inspiration, consider creating a small herb garden on your windowsill – the fresh scents of rosemary or lavender can help stimulate creativity and provide a calming atmosphere during intense creative sessions.\n\n
 \n
\n\n\n\n
Practical Considerations
\n\n
Climate Control Solutions
\n\nMaintaining a comfortable environment in your art studio is crucial for both your creativity and the preservation of your materials. Temperature-controlled ventilation systems are essential for regulating your workspace throughout the year.\n\nFor heating, consider installing a mini-split heat pump, which provides both warming and cooling capabilities with excellent energy efficiency. Portable space heaters can work well for smaller studios, but ensure they have safety features like tip-over protection and automatic shut-off.\n\nCooling solutions should include proper insulation and ventilation. Install a combination of fixed and operable windows to create cross-ventilation, and consider adding a ceiling fan to circulate air effectively. Window-mounted air conditioning units are budget-friendly options for hot summer days.\n\nHumidity control is particularly important for protecting your artwork and supplies. Use a dehumidifier during damp seasons to prevent mold growth and protect paper-based materials. In dry winter months, a small humidifier can prevent canvases from becoming brittle and keep paints from drying too quickly.\n\nWeather stripping around doors and windows helps maintain consistent temperatures while reducing energy costs. Don’t forget to add proper insulation to walls, floors, and ceilings – this investment pays off in both comfort and utility savings. For maximum effectiveness, combine these solutions based on your local climate and specific studio needs.\n\n
Safety and Security Features
\n\nEnsuring your art studio remains a safe and secure space is crucial for protecting both your creative work and art supplies. Start by installing proper lighting around the exterior, including motion-sensor lights that illuminate entry points and pathways. Consider adding a reliable deadbolt lock system and reinforced hinges to secure the door, along with window locks if your shed has windows.\n\nTo protect your artwork and supplies from environmental damage, it’s essential to weatherproof your shed properly. Install proper ventilation to prevent moisture buildup and maintain good air quality while working with art materials. A dehumidifier can help control humidity levels and protect your supplies from mold and mildew.\n\nDon’t forget fire safety – mount a smoke detector and keep a small fire extinguisher rated for multiple fire types nearby, especially if you work with flammable materials. Install GFCI outlets to prevent electrical accidents, and keep all power tools and electrical equipment elevated off the floor in case of flooding.\n\nConsider adding a security camera system that connects to your smartphone for remote monitoring. Storage cabinets with locks can provide an extra layer of protection for valuable supplies and finished pieces. Remember to maintain clear pathways to all exits and keep a well-stocked first aid kit easily accessible for any minor accidents that might occur while creating.\n\n\nCreating your own art studio in a shed is an exciting journey that combines practical space planning with creative expression. By following the guidelines we’ve discussed – from proper insulation and lighting to storage solutions and workspace organization – you can transform a simple garden shed into your perfect artistic haven. Remember to prioritize natural light where possible, invest in proper climate control, and create zones that support your specific artistic needs.\n\nDon’t feel overwhelmed by the process; start with the essential elements and gradually build your dream studio as time and budget allow. The beauty of a shed art studio is its flexibility – you can always modify and adapt the space as your artistic practice evolves. Whether you’re a painter needing easel space, a potter requiring sturdy workbenches, or a mixed-media artist desiring multiple creation stations, your shed can accommodate your vision.\n\nTake the first step today by assessing your available space and creating a realistic plan. With some creativity, careful planning, and dedication, you’ll soon have a professional-grade art studio just steps from your back door.