
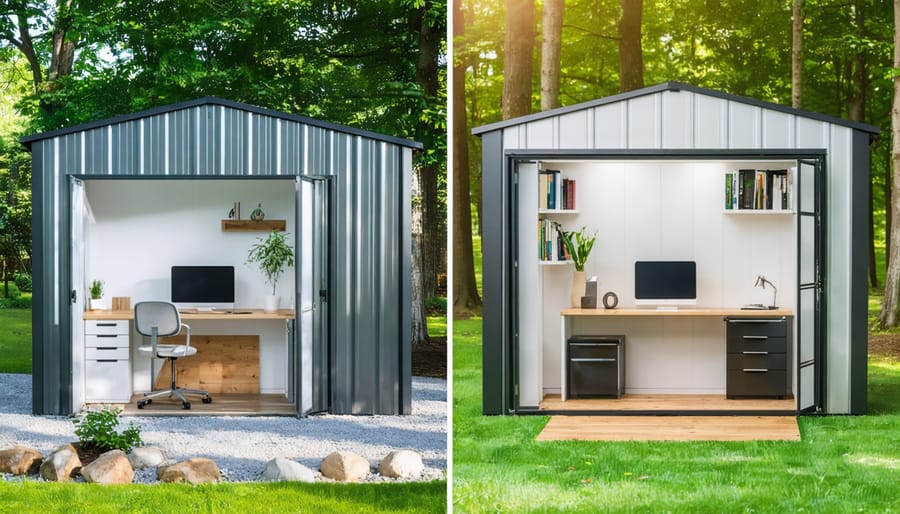
Transform Your Metal Shed into a Stunning Home Office (It’s Easier Than You Think)

Transform your metal shed into a versatile living space that adds value and functionality to your property. From a cozy backyard home office design to a relaxing studio retreat, metal shed conversions offer unlimited potential at a fraction of traditional construction costs. The durability of metal structures, combined with proper insulation and interior finishing, creates a robust foundation for your dream space transformation. Whether you’re looking to maximize your property’s potential or create additional living space without major construction, a metal shed conversion delivers the perfect blend of practicality and innovation. This comprehensive guide walks you through the essential steps of converting your metal shed, from initial planning and permitting to interior finishing touches, ensuring a successful transformation that meets your specific needs and local building codes.\n\n\n
Why Metal Sheds Make Perfect Conversion Projects
\n\n
 \n
\n\n\n
Metal vs Other Materials
\n\nWhen choosing materials for your shed conversion project, metal offers distinct advantages over traditional wood and plastic alternatives. Metal sheds excel in durability and weather resistance, requiring minimal maintenance compared to wooden structures that need regular treatment against rot and pests. They’re also more fire-resistant and typically last longer, making them a cost-effective choice in the long run.\n\nWhile wooden sheds offer natural aesthetic appeal and easier customization options, metal sheds provide superior structural stability and can handle extreme weather conditions better. They’re also lighter than wood, making the initial installation and any future modifications more manageable for DIY enthusiasts.\n\nPlastic sheds, though affordable and maintenance-free, can’t match metal’s strength and versatility in conversion projects. Metal walls are easier to insulate, modify for electrical installations, and reinforce for heavy storage needs. They also maintain their appearance longer than plastic, which can fade and become brittle over time.\n\nHowever, metal does conduct heat more readily than wood or plastic, so proper insulation is crucial for temperature-controlled spaces. The good news is that modern metal sheds come with improved coating technologies that help regulate temperature and prevent condensation.\n\n\n
Essential Preparation Steps
\n\n
Foundation and Flooring
\n\nA solid foundation is crucial for successfully converting your metal shed into a functional space. Start with proper site preparation by leveling the ground and removing any vegetation or debris. For long-term stability, consider installing a concrete slab or creating a raised foundation using pressure-treated lumber frames filled with gravel.\n\nIf pouring concrete, ensure a minimum thickness of 4 inches and incorporate a vapor barrier to prevent moisture from seeping up through the floor. For existing concrete pads, inspect thoroughly for cracks or damage and repair as needed before proceeding with your conversion.\n\nFor the flooring itself, you have several options depending on your intended use. A popular choice is installing plywood sheets (minimum ¾ inch thick) over pressure-treated floor joists. This creates a sturdy, level surface while providing some insulation from the ground. For additional comfort and aesthetics, consider adding vinyl planks, laminate flooring, or even carpet tiles over the plywood base.\n\nDon’t forget to account for drainage by slightly elevating the foundation above ground level and ensuring a gentle slope away from the structure. This prevents water pooling and potential damage to your converted space. Adding floor insulation between the joists will improve temperature control and make your converted shed more comfortable year-round.\n\n
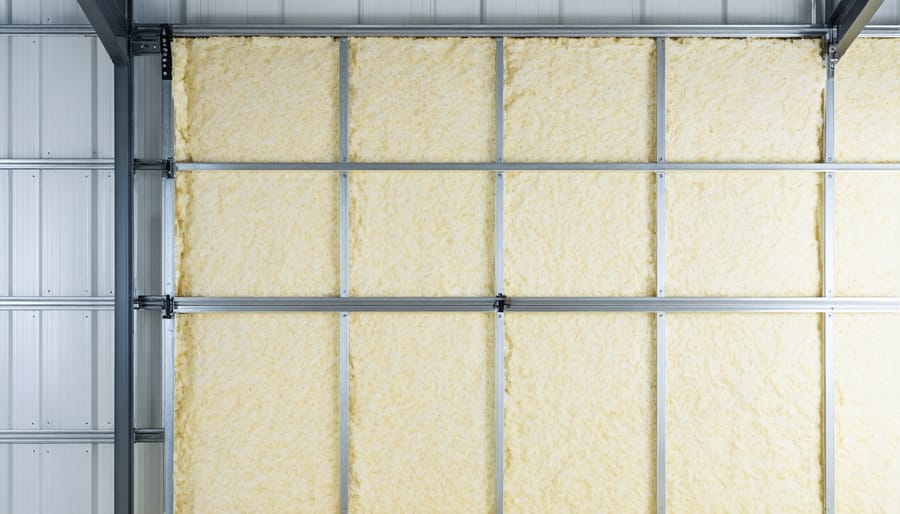
Insulation and Weatherproofing
\n\nProper insulation and weatherproofing are crucial steps in transforming your metal shed into a comfortable, year-round space. Start by checking for any gaps or holes in the structure, paying special attention to areas around windows, doors, and where panels meet. Seal these spots with weatherproof caulk or foam sealant to prevent drafts and moisture infiltration.\n\nFor wall insulation, install a vapor barrier against the metal walls before adding insulation material. Fiberglass batts or rigid foam boards work well in metal sheds, with foam boards offering the advantage of being moisture-resistant and easier to install. Secure the insulation between the wall studs, ensuring complete coverage without compression.\n\nDon’t forget about the ceiling – as heat rises, proper roof insulation is essential for temperature control. Consider using reflective insulation or radiant barriers in addition to traditional materials to combat the intense heat metal roofs can generate during summer months.\n\nFor flooring, start with a moisture barrier directly on the concrete or wood base. Add rigid foam insulation boards before laying your chosen flooring material. This creates a thermal break between the ground and your shed’s interior.\n\nFinally, install weather stripping around doors and windows, and consider adding door sweeps to prevent drafts. These simple additions make a significant difference in maintaining consistent indoor temperatures and protecting your converted space from the elements.\n\n
 \n
\n\n\n\n
Interior Transformation Tips
\n\n
Wall Finishing
\n\nTransform your metal shed’s interior by adding proper wall finishing, creating a comfortable and polished space. Start by installing insulation between the wall studs, which helps regulate temperature and reduces condensation. Next, cover the insulation with a vapor barrier to prevent moisture-related issues.\n\nFor the wall covering, you have several options. Drywall is a popular choice, offering a clean, professional look and excellent fire resistance. However, plywood or oriented strand board (OSB) panels provide durability and are easier to install for DIY enthusiasts. If you’re installing windows in your shed, frame these openings carefully before adding your wall covering.\n\nConsider using beadboard or shiplap for a more decorative finish. These materials add character while being relatively simple to install. Once your walls are up, don’t forget to seal any gaps around outlets, windows, or joints with caulk. Finally, paint or stain your walls to match your desired aesthetic and protect the surface. Choose light colors to brighten the space and make it feel larger.\n\n
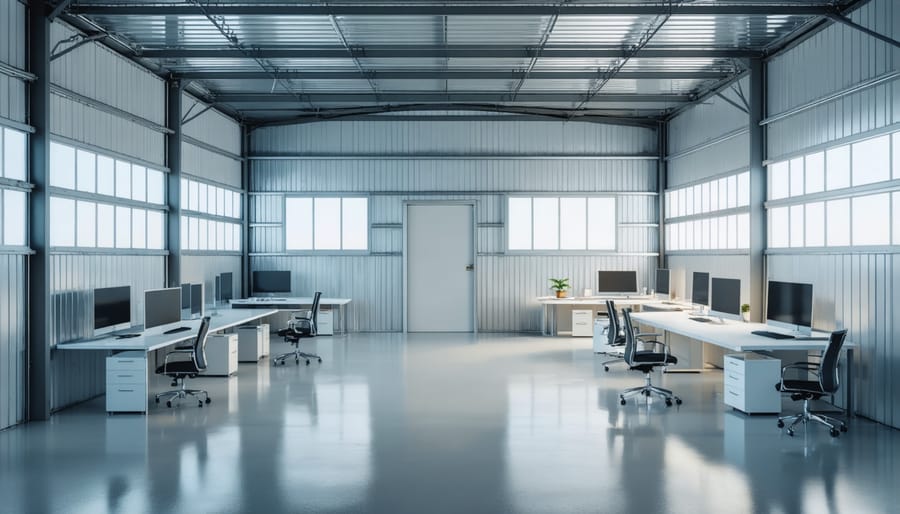
Electrical and Lighting
\n\nProper electrical installation is crucial for a safe and functional converted metal shed. Start by consulting a qualified electrician to assess your power needs and ensure compliance with local building codes. They can help determine the best route for running electrical lines from your main power source to the shed, typically through underground conduit for safety and aesthetics.\n\nFor lighting, consider a combination of natural and artificial sources. Install windows or skylights where possible to maximize daylight. For artificial lighting, LED fixtures are energy-efficient and provide excellent illumination. Consider task lighting for specific work areas and ambient lighting for general space. Motion-sensor lights outside the shed enhance security and convenience.\n\nInstall sufficient outlets along the walls at convenient heights, planning for both standard power tools and specialized equipment. Remember to include GFCI outlets for added safety, especially if your shed will be exposed to moisture. Add a separate circuit breaker for your shed in the main electrical panel to prevent overload.\n\nFor a professional finish, conceal wiring in surface-mounted conduit or behind wall panels. This not only looks better but also protects the wiring from damage and reduces fire risks.\n\n
Space Planning
\n\nEffective space planning is crucial when you transform your shed space. Start by creating a detailed floor plan, measuring every inch of available space, including height. Consider vertical storage solutions like wall-mounted shelves and pegboards to maximize storage capacity while keeping floor space clear for movement.\n\nZone your shed into distinct areas based on function. For example, designate specific zones for workbenches, storage, and frequently accessed items. Install adjustable shelving systems that can be modified as your needs change. Utilize corner spaces with diagonal shelving or custom-built storage units.\n\nDon’t forget about the ceiling space – install overhead storage racks for seasonal items or rarely used equipment. Consider using door-mounted organizers and magnetic strips for tools. Leave adequate clearance around windows for natural light and ventilation.\n\nFor better organization, use clear storage containers with labels, and implement a system where frequently used items are easily accessible. Remember to maintain clear pathways and ensure all storage solutions are securely mounted to prevent accidents.\n\n
 \n
\n\n\n\n
Common Challenges and Solutions
\n\nWhile metal shed conversions can transform your outdoor space, several common challenges may arise during the process. Understanding these issues and their solutions will help ensure a successful project.\n\nMoisture control often poses the biggest challenge. Metal sheds can develop condensation, potentially damaging stored items or causing rust. Installing proper ventilation, using dehumidifiers, and applying anti-condensation coating to the interior walls can effectively manage this issue. Adding a vapor barrier during floor installation also helps prevent ground moisture from seeping up.\n\nTemperature regulation presents another hurdle, as metal structures can become extremely hot in summer and cold in winter. Combat this by installing proper insulation in the walls and ceiling, and consider adding a small ventilation fan. Reflective coating on the exterior can also help deflect heat during warmer months.\n\nFoundation issues may develop over time, especially if the original base wasn’t properly prepared. Signs include uneven floors or doors that won’t close properly. Solutions include releveling the foundation or installing adjustable foundation piers. For existing concrete bases, using shims can help level out minor irregularities.\n\nRust and corrosion can threaten the shed’s structural integrity. Regular inspection and immediate treatment of any rust spots with appropriate primers and paints is essential. For prevention, ensure proper drainage around the shed and maintain good airflow inside.\n\nLastly, many face difficulties with customization, particularly when cutting or drilling metal panels. Using appropriate tools, such as metal-specific drill bits and saw blades, and wearing proper safety equipment will make modifications easier and safer.\n\n\nConverting your metal shed into a functional living or working space is an exciting and rewarding project that can transform an underutilized structure into something truly special. We’ve explored the essential steps, from proper insulation and ventilation to electrical considerations and interior finishing. Remember that successful conversion starts with thorough planning and a clear vision of your end goal.\n\nBy following the guidelines we’ve discussed, you can create a comfortable, weatherproof space that serves your specific needs, whether that’s a home office, workshop, or cozy retreat. Don’t forget to check local building codes and obtain necessary permits before beginning your project. While the process may seem daunting at first, taking it step by step makes it manageable and achievable for most DIY enthusiasts.\n\nThe investment in converting your metal shed will not only add value to your property but also provide you with a customized space that meets your exact requirements. So gather your tools, make your plans, and start turning that basic metal structure into the functional space you’ve been dreaming of. With proper preparation and attention to detail, your converted metal shed can become a standout feature of your property that you’ll enjoy for years to come.