
Transform Your Yard Into a Winter Wonderland (Without the Holiday Electric Bill Shock)
Transform your home’s exterior with outdoor seasonal lights by first determining your power source—calculate the distance from outlets to display areas to decide between plug-in options or solar alternatives that eliminate extension cord hassles. Choose LED bulbs over traditional incandescent to slash energy costs by up to 80% while enjoying lights that stay cool to the touch and last through multiple seasons.
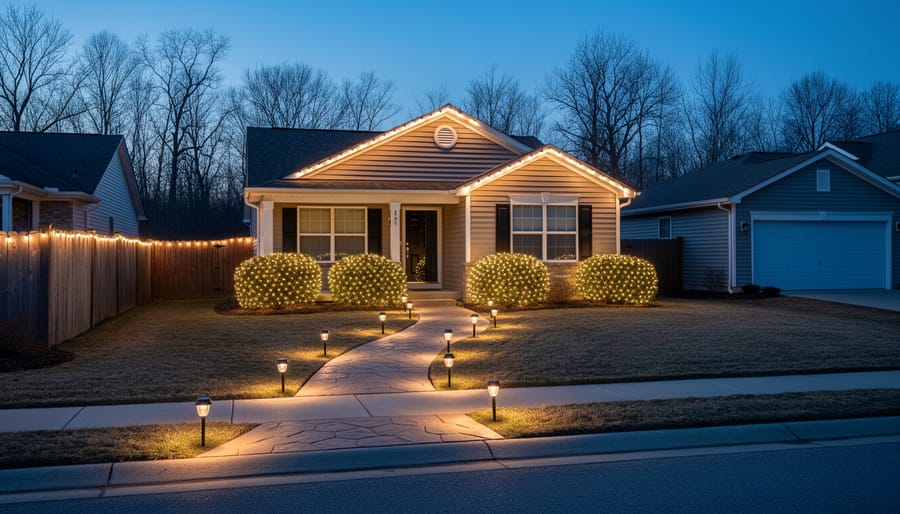
Match your lighting style to your home’s architecture and existing landscape features. String lights work beautifully along rooflines and fence lines, while pathway stakes guide guests and highlight garden beds. Projector lights offer quick setup for those short on time, and net lights simplify covering shrubs and hedges uniformly.
Plan for proper storage before you buy. Invest in weatherproof containers with dividers or use cardboard reels to prevent tangling—a common frustration that damages bulbs and wiring. Label each container by location (front porch, backyard trees) to make next season’s installation effortless.
Consider year-round versatility when selecting colors and styles. Warm white string lights transition seamlessly from holidays to summer entertaining, maximizing your investment. Many homeowners discover that quality outdoor lighting serves double duty for graduation parties, weddings, and everyday ambiance long after seasonal decorations come down.
Why Seasonal Outdoor Lights Are More Than Just Holiday Decor
Outdoor seasonal lights have evolved far beyond their traditional role as December holiday decorations. Today’s homeowners are discovering that strategic lighting can transform their yards into inviting spaces throughout the entire year, offering benefits that extend well into spring, summer, and fall celebrations.
One of the most compelling advantages is the boost to your property’s curb appeal and value. Well-designed seasonal lighting showcases your home’s architectural features and landscaping, creating an attractive nighttime presence that neighbors and potential buyers notice. Whether you’re highlighting a blooming garden in spring or creating a warm autumn ambiance, thoughtful illumination makes your property stand out.
These lights also serve a practical purpose by extending your outdoor living hours. Imagine hosting summer barbecues that comfortably transition into evening gatherings, or enjoying your patio on cool autumn nights with the perfect atmospheric glow. By implementing creative outdoor lighting ideas, you’re essentially adding usable square footage to your home’s entertaining space.
The versatility of modern seasonal lights means you can adapt your outdoor aesthetic for any occasion. String lights create romantic settings for anniversary dinners, while colorful options celebrate birthdays, graduations, or patriotic holidays. Many homeowners find that investing in quality, multi-purpose lighting pays dividends through repeated use rather than single-season storage.
Beyond aesthetics, seasonal lights contribute to safety by illuminating pathways, steps, and potential hazards during darker months. This dual functionality makes them a smart investment rather than a frivolous decoration. When properly stored during off-seasons, these lights maintain their quality and continue enhancing your outdoor spaces for years to come, making them one of the most cost-effective ways to elevate your home’s exterior appeal.
Choosing the Right Seasonal Lights for Your Space
LED vs. Traditional Incandescent: What Actually Saves You Money
Let’s break down the real costs so you can make the smartest choice for your holiday display. While incandescent bulbs cost less upfront, the numbers tell a different story over time.
A typical 25-foot strand of incandescent mini lights uses about 175 watts, while an LED strand of similar brightness uses just 4.8 watts. If you run your lights for six hours daily during the two-month holiday season, those incandescent lights will cost you approximately $6.30 in electricity. The LED strand? Just 17 cents for the same period. Multiply that by the number of strands decorating your home, and the savings add up quickly.
Here’s where it gets even better. Those traditional bulbs typically last around 3,000 hours before burning out. LED bulbs? They can keep shining for 50,000 hours or more. That means you could potentially use the same LED strands for 20 holiday seasons or longer without replacement.
Let’s say you outfit your home with 10 strands of lights. Over five years, you’d spend roughly $315 on electricity with incandescent bulbs, plus at least one or two replacement sets when bulbs burn out. With LEDs, you’re looking at under $10 in electricity costs and no replacements needed.
The bottom line? While LED strands might cost two to three times more initially, they typically pay for themselves within the first two seasons through energy savings alone. After that, it’s pure savings year after year.
Weatherproof Ratings Explained Simply
When shopping for outdoor seasonal lights, you’ll often see something called an IP rating—think of it as a weather-resistance report card for your lights. The IP code has two numbers: the first tells you how well it keeps out dust and solid objects, while the second shows its water resistance.
For most homeowners, here’s what really matters: IP44 lights handle light rain and splashing, making them perfect for covered porches or eaves. IP65 lights can withstand heavier rain and are your go-to choice for most outdoor decorating across lawns, trees, and fences. If you live in an area with harsh winters or heavy downpours, look for IP67 or IP68 ratings—these can handle temporary submersion in water.
A simple rule of thumb: covered areas need at least IP44, exposed areas deserve IP65 or higher. Don’t stress too much about the first number unless you’re in a particularly dusty climate. Focus on that second digit to match your local weather conditions, and your lights will shine bright season after season without flickering out when Mother Nature tests them.
Matching Lights to Your Outdoor Structures
Different outdoor structures have unique lighting needs based on their design, purpose, and construction materials. Let’s explore how to match the right seasonal lights to your backyard features for maximum impact and safety.
For wooden sheds and structures, string lights with plastic or silicone-coated bulbs work beautifully. Avoid attaching lights directly with nails or staples that could damage the wood or create moisture entry points. Instead, use removable adhesive hooks or wrap lights around existing trim and eaves. Cedar and treated lumber sheds handle outdoor lights well, but always keep connections away from direct contact with wood to prevent fire hazards.
Metal sheds and carports pair wonderfully with LED rope lights or icicle strands. The reflective surface amplifies the glow, creating dramatic effects with fewer lights. Use magnetic hooks designed for metal surfaces, which won’t scratch protective coatings and remove cleanly when the season ends. Just remember that metal conducts cold, so LED lights are your best friend since they generate minimal heat regardless of temperature.
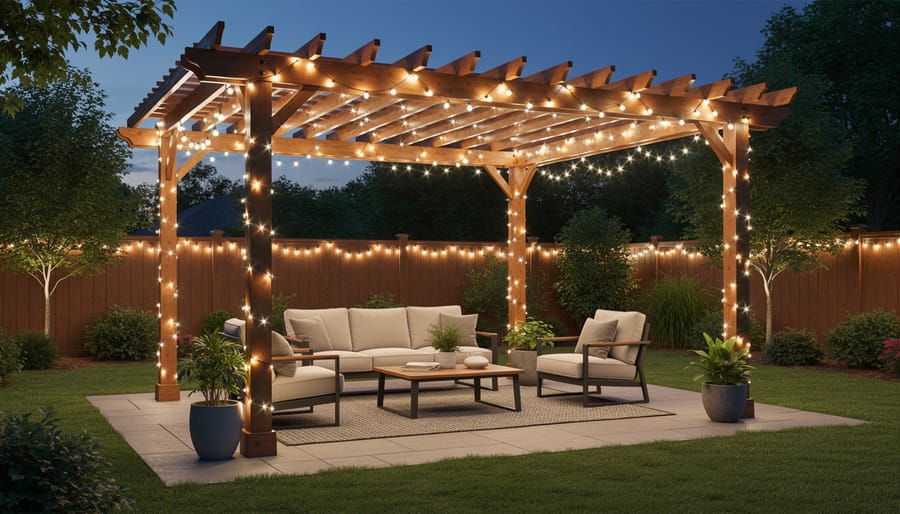
Patios and pergolas offer fantastic opportunities for overhead lighting drama. Battery-operated or solar string lights eliminate tripping hazards from cords while creating a magical canopy effect. Drape lights across beams or weave them through lattice work for dimension and depth.
For gazebos, consider the architectural style when planning your display. Ornate Victorian gazebo designs shine with classic warm white lights that highlight decorative details, while modern structures suit bold color-changing LEDs. Wrap lights around support posts spiraling upward, or create a curtain effect by hanging vertical strands from the roof edge.
Garden beds and pathways benefit from stake lights or net lights draped over shrubs. These low-profile options illuminate without overwhelming delicate plantings while guiding guests safely through your outdoor spaces.
Smart Storage Solutions for Off-Season Lights
How Your Garden Shed Can Double as a Lighting Command Center
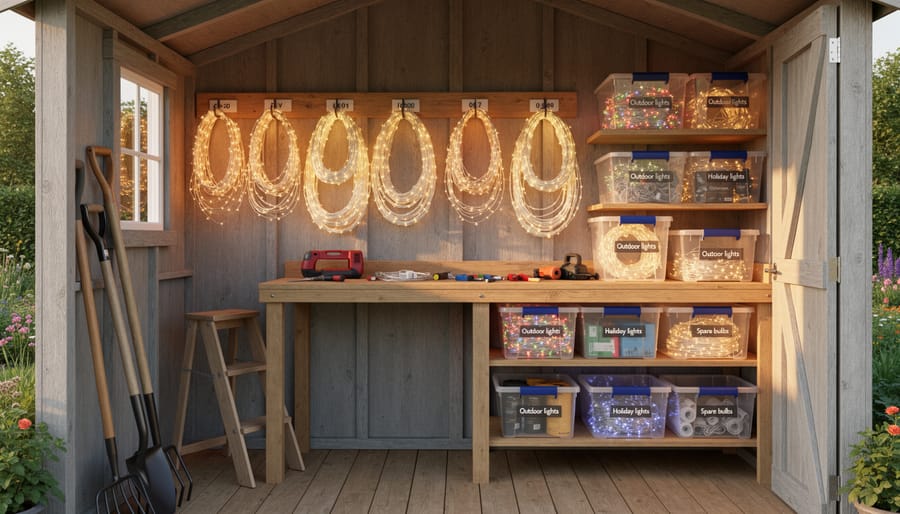
Your garden shed isn’t just for storing lawn mowers anymore—it’s the perfect headquarters for managing your outdoor seasonal lights. By setting up a dedicated lighting storage system, you’ll save time during setup and protect your investment year after year.
Start by designating one wall as your lighting zone. Install pegboards along this wall to create a versatile hanging system for light strands. Use large hooks spaced about 12 inches apart to loop lights in figure-eight patterns, preventing tangles and making it easy to grab exactly what you need. Clear plastic bins with secure lids are essential for storing smaller items like extension cords, timers, and replacement bulbs. Label each container by holiday or season for quick identification.
For longer light strands, consider using cord reels or creating DIY winders from cardboard pieces. Store these vertically in tall, narrow bins to maximize floor space. Keep fragile decorations like glass ornaments or delicate figurines on higher shelves in cushioned containers.
One homeowner, Sarah from Minnesota, shared how she transformed her 10×8 shed: “I added a simple shelving unit and some hooks, and now I can set up my entire holiday display in half the time. Everything has its place, and nothing gets damaged.”
To truly organize your shed effectively, group items by function—all timers together, all extension cords bundled, and all light testers in one spot. This command center approach turns decoration time from a frustrating hunt into an efficient, enjoyable process.
The Right Way to Pack Lights (So They Actually Work Next Year)
Proper storage makes all the difference between lights that shine bright and tangled messes of broken bulbs. Here’s how to pack your outdoor seasonal lights for success.
Start by testing each strand before storing. This saves frustration next year—no one wants to discover dead lights while standing on a ladder. Once you’ve confirmed they work, unplug everything and let the lights cool completely.
For wrapping, cardboard pieces work wonderfully. Cut notches on opposite ends and wind lights around in a figure-eight pattern to prevent tangling. You can also use specialized light storage reels or even empty paper towel tubes for smaller strands. The key is keeping them organized and protected.
Label everything clearly. Use masking tape to note where each strand goes: “Front porch columns,” “Garage roofline,” or “Backyard trees.” Trust me, your future self will thank you when installation takes minutes instead of hours.
Store lights in clear plastic bins rather than cardboard boxes. This prevents moisture damage and lets you see what’s inside without unpacking everything. Place delicate items like net lights on top, and nestle fragile ornaments in bubble wrap.
Keep your storage containers in a climate-controlled space if possible. Extreme temperature swings in uninsulated areas can damage bulbs and wiring over time.
Installation That Won’t Have You Calling an Electrician
Safe Power Setup for Outdoor Lighting
Safety should always come first when setting up your outdoor seasonal lights. Start by checking that all lighting products are specifically rated for outdoor use—look for packaging labeled “suitable for outdoor” or similar markings. Indoor lights simply aren’t designed to withstand moisture and temperature changes.
When it comes to power, use outdoor-rated extension cords and keep all connections off the ground whenever possible. If cords must cross walkways, secure them with outdoor-safe cord covers to prevent tripping hazards. Never overload a single outlet—a good rule of thumb is to limit connections to three standard light strands per outlet, though always check your specific product’s power requirements.
Ground Fault Circuit Interrupter (GFCI) outlets are your best friend for outdoor lighting. These special outlets automatically shut off power if they detect moisture or electrical irregularities, protecting you from potential shocks. If your outdoor outlets aren’t GFCI-protected, consider having them upgraded.
While many lighting projects are perfectly manageable on your own, don’t hesitate to call a licensed electrician if you’re uncomfortable with any aspect of the setup, need additional outdoor outlets installed, or notice flickering lights, buzzing sounds, or warm outlets. These warning signs shouldn’t be ignored. Remember, there’s no shame in prioritizing safety over DIY ambition—some jobs are worth the professional expertise.
Hanging Methods That Protect Your Home and Structures
Protecting your home’s exterior while displaying beautiful seasonal lights doesn’t have to be complicated. The key is matching your hanging method to each specific surface you’re working with.
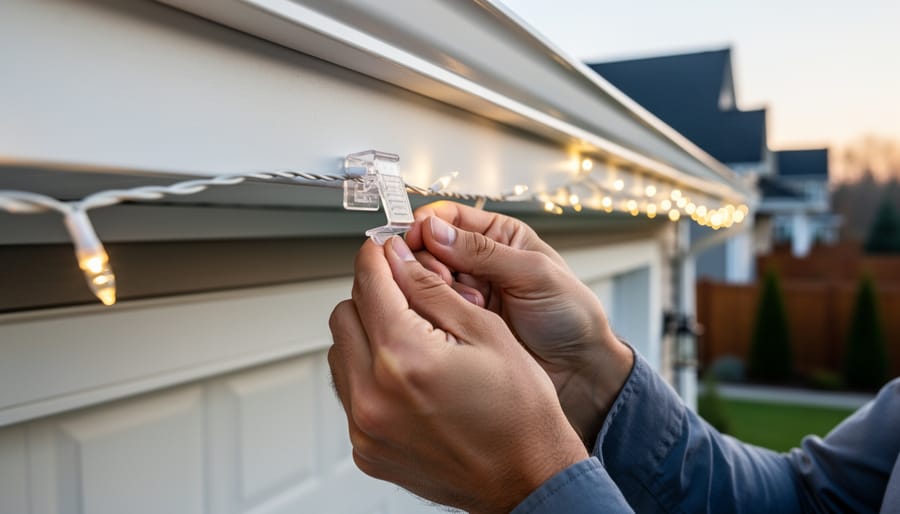
For vinyl siding, specialized plastic clips that slide under the siding’s lip work wonderfully without creating holes or damage. These clips simply hook onto the bottom edge of each panel and provide a secure anchor point for your light strings. They’re also reusable year after year, making them a smart investment.
Wood sheds and trim respond well to removable adhesive hooks designed for outdoor use. Look for options rated for temperature extremes and your local climate conditions. Cup hooks can also be lightly screwed in if you don’t mind small holes, though adhesive solutions are often preferred by homeowners wanting zero damage.
Metal structures like gutters benefit from gutter clips that slide right over the edge. These distribute weight evenly and prevent scratching or denting. For metal siding or posts, magnetic hooks offer incredible convenience without any installation at all.
Vinyl fencing presents unique challenges since drilling weakens the material. Command outdoor strips work for lightweight displays, while zip ties threaded through existing fence openings provide secure attachment without compromising structural integrity. Just remember to trim the excess tie length for a clean appearance.
Always test your chosen method with a short section first to ensure compatibility and holding strength before completing your entire display.
Creating Professional-Looking Displays on a DIY Budget
Creating a cohesive display doesn’t require a professional decorator’s budget. Start by choosing a single color palette and sticking with it throughout your yard. Three colors maximum creates visual harmony without overwhelming the space. For spacing, follow the “odd numbers rule” when grouping decorations, as clusters of three or five items look more natural than even numbers.
Maintain consistent height variations by placing taller displays at focal points like entryways or corners, then gradually decreasing height as you move outward. This creates depth and draws the eye naturally through your display. Space string lights 8-12 inches apart when wrapping trees or posts for even coverage that looks intentional rather than haphazard.
One homeowner shared how switching from random placement to a symmetrical approach at her front door instantly elevated her display’s appearance. Consider your yard’s natural lines and architecture when planning placement. Less is often more, so resist the urge to fill every available space. Strategic lighting creates impact while keeping your electric bill manageable and your storage needs reasonable for the off-season.
Seasonal Transformation Ideas Beyond the Holidays
Spring and Summer: Garden Parties and Evening Ambiance
As the weather warms up, your outdoor space transforms into an extension of your living area, perfect for entertaining and relaxation. String lights are the ultimate crowd-pleaser for garden parties, creating an inviting canopy overhead that extends gatherings well into the evening. Drape them across pergolas, between trees, or along fence lines to establish a festive atmosphere that makes every dinner feel special.
For more sophisticated patio lighting, consider layering your approach. Solar-powered path lights guide guests safely through garden beds while highlighting your favorite plantings. Low-voltage landscape spotlights can dramatically uplight trees or architectural features, adding depth and dimension to your yard after dark.
Lanterns and flameless candles on outdoor tables provide intimate pools of light without fire hazards, particularly helpful when children are present. Many homeowners love battery-operated LED candles in decorative holders that create ambiance without the worry of wind or forgetfulness.
The key to successful warm-weather lighting is creating zones. Brighten conversation areas while keeping ambient lighting softer elsewhere. This thoughtful approach turns ordinary backyards into magical evening retreats where family and friends naturally gather, making the most of those precious warm-weather months.
Fall and Winter: Celebrating Every Season
The cooler months offer a wonderful opportunity to maximize your lighting investment with smart, adaptable displays that transition seamlessly from one holiday to the next. Instead of completely dismantling and reinstalling your setup multiple times, consider creating a versatile foundation that works across occasions.
Start with neutral white string lights as your base layer along rooflines, railings, and landscape features. These work beautifully for Halloween when paired with orange accent lights, then transition perfectly to Thanksgiving by simply swapping in amber or warm white spotlights. For Christmas, add colorful strands or projector lights without removing your original setup. Come New Year’s, those same white lights create an elegant, celebratory atmosphere.
Many homeowners find success with color-changing LED systems that let you adjust hues through smartphone apps. One neighbor shared how she programs her lights to shift from spooky purple in October to festive red and green in December, all from the same installed strands.
The key is planning your installation points strategically in early fall. Use weatherproof clips and hooks that stay in place year-round, making seasonal adjustments quick and effortless. This approach not only saves time but reduces wear on your lights from repeated handling, extending their lifespan significantly while keeping your home festively lit throughout the entire season.
Real Homeowners Share What Actually Worked
Jennifer from Portland learned this lesson the hard way during her first Christmas. “I went overboard buying different strands without checking the wattage,” she admits. “I blew a fuse on Christmas Eve!” Now she maps out her circuits beforehand and uses a simple calculator to ensure she stays within safe limits. Her biggest win? Switching to LED lights cut her December electricity bill by $45 compared to the previous year.
The Martinez family in Ohio tackled a common storage nightmare that many of us face. After years of untangling knotted light strands each season, they invested in simple plastic reels and labeled storage bins. “It sounds basic, but it changed everything,” says Maria Martinez. “What used to take three frustrated hours now takes twenty minutes. Plus, we haven’t had to replace a single strand in two years because nothing gets damaged in storage.”
Tim from Michigan shares his biggest money-saving discovery: buying after-season sales and testing everything before storing. “I grab lights at 75% off in January, test them immediately, and return any duds while I still can,” he explains. This strategy has built him a five-year supply while spending less than $200 total.
Perhaps the most valuable lesson comes from the Johnsons in Texas, who initially bought the cheapest lights available. “We replaced them three times in two years,” Sarah Johnson recalls. “Finally, we invested in quality weatherproof strands with good warranties. They’ve lasted four seasons without a single bulb failure.” Their advice? Calculate cost-per-year rather than just upfront price. Sometimes spending a bit more initially saves money and hassle down the road.
Transforming your outdoor spaces with seasonal lights doesn’t have to be overwhelming. Start small with a simple project like lining your walkway or adding string lights to your porch, then expand your display as you gain confidence. Remember, the key to enjoying seasonal decorating year after year is having the right storage solutions in place. Quality lighting investments deserve protection from moisture, pests, and temperature extremes during off-seasons.
When your decorations are properly organized and stored, setting up becomes a joy rather than a chore. Many homeowners find that exploring storage shed benefits helps them maintain their lighting collections in pristine condition, making each holiday season setup quicker and more enjoyable. A dedicated storage space means no more tangled wires, broken bulbs, or water-damaged controllers.
Whether you’re illuminating your home for holidays or creating year-round ambiance, outdoor seasonal lights offer endless possibilities to showcase your personal style. With thoughtful planning and proper storage, your lighting displays will bring warmth and beauty to your outdoor spaces for many seasons to come.