
Transform Your Yard With Pathways That Actually Look Good (And Last)
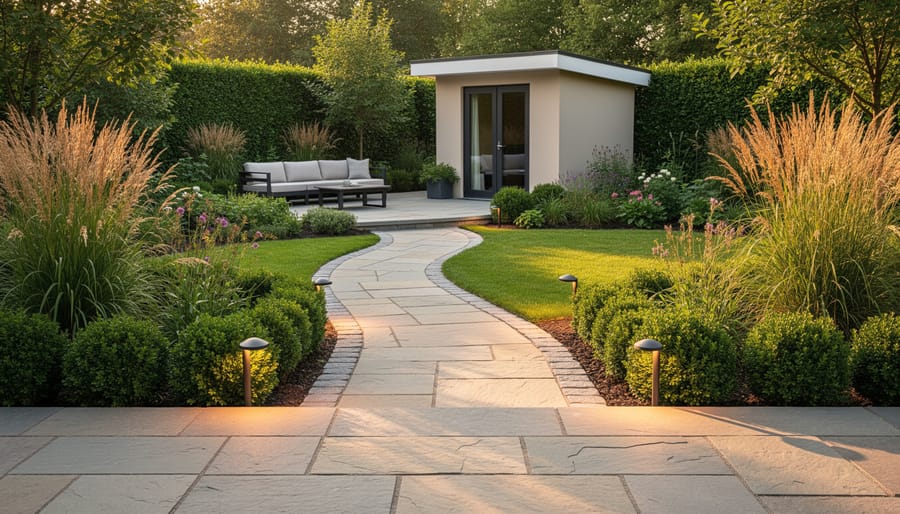
Create a clear destination point for every pathway—whether connecting your storage shed to your patio, linking garden beds, or establishing a welcoming front entrance. Material choices dramatically impact both aesthetics and maintenance: gravel offers affordable drainage and cottage charm, flagstone delivers timeless elegance with natural variation, and pavers provide clean lines with minimal upkeep. Design pathways at least 3-4 feet wide for comfortable two-person walking and wheelbarrow access, ensuring smooth transitions between outdoor structures and living spaces.
Consider your yard’s existing traffic patterns before breaking ground. Notice where family members naturally walk, where grass has worn thin, and which routes make practical sense for moving lawn equipment or accessing storage areas. Match pathway materials to your home’s architectural style—formal brick complements traditional homes, while decomposed granite suits modern landscapes. Plan gentle curves rather than sharp angles to create visual interest and guide visitors naturally through your outdoor space. Factor in lighting placement early, as illuminated pathways enhance safety and extend evening enjoyment of your yard.
Why Your Pathway Choice Matters More Than You Think
You might think pathways are simply about getting from point A to point B, but they’re actually working double-duty in your yard every single day. Let’s talk about the practical side first. Remember the last time it rained and you trudged through mud to reach your shed? Or noticed those worn, brown patches in your lawn where everyone naturally walks? Pathways solve these everyday headaches while tackling less obvious issues like water drainage and soil erosion.
Here’s where it gets interesting: a well-designed pathway can actually boost your property value. Real estate professionals consistently note that attractive hardscaping features, including thoughtfully planned walkways, add measurable curb appeal. It’s one of those upgrades that buyers notice immediately during showings.
The connection between your storage shed and your home deserves special attention. This isn’t just about convenience, though avoiding muddy treks during spring rains is certainly nice. When you’re landscaping around your shed, a proper pathway integrates your storage structure into your overall landscape design rather than leaving it feeling like an afterthought in the back corner.
Think about your daily routine. How often do you grab tools, sporting equipment, or seasonal decorations from your shed? A clear, attractive pathway makes these trips safer and more pleasant while protecting your lawn investment. It’s problem-solving that happens to look beautiful.
Natural Stone Pathways: Timeless Beauty With Modern Function
Flagstone: The Classic Choice
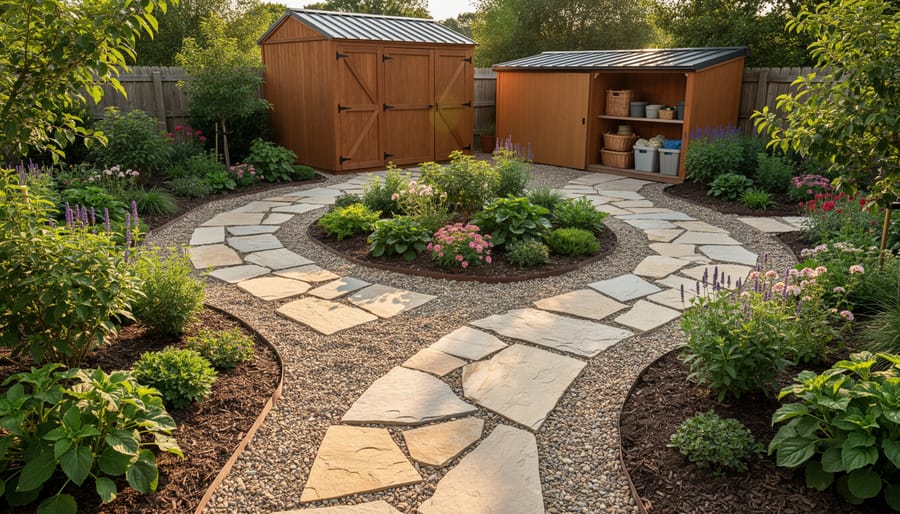
Flagstone remains a timeless favorite for landscape pathways, and for good reason. These naturally irregular stone pieces fit together like a puzzle, creating an organic, cottage-garden feel that works beautifully for winding paths leading to sheds, vegetable gardens, or backyard storage areas. Unlike rigid pavers, flagstone’s irregular shapes actually make installation more forgiving for DIY enthusiasts.
The key to successful flagstone installation is preparing a solid base. Start by excavating 4-6 inches deep, laying landscape fabric to prevent weed growth, then adding a gravel base topped with sand. Arrange your stones before setting them permanently, leaving roughly half-inch gaps between pieces for polymeric sand or ground cover plants like creeping thyme.
One homeowner from Pennsylvania shared how her flagstone path to her garden shed transformed what was once a muddy trek into a charming walkway that complements her flower beds perfectly. The natural earth tones blend seamlessly with any landscape style while providing excellent traction even in wet conditions.
Flagstone handles curves gracefully, making it ideal for paths that wind around trees or meander through garden beds. While it requires more effort than simply pouring concrete, the character and durability you’ll gain make flagstone an investment that enhances your property’s value and visual appeal for decades.
Stepping Stones for Low-Traffic Areas
For those quieter corners of your yard—like the path to your storage shed or along a narrow side yard—stepping stones offer an ideal solution that’s both practical and budget-friendly. These pathways handle light foot traffic beautifully without requiring the investment of a full walkway.
The key to successful stepping stone placement is comfortable spacing. Position stones 18 to 24 inches apart, measuring from center to center. This natural stride length prevents awkward steps and makes the path feel intuitive to walk. Flat flagstones, concrete pavers, or even reclaimed materials work wonderfully here, with each offering its own character at different price points.
Between your stepping stones, consider planting low-growing ground covers like creeping thyme or moss. These living fillers soften the look while reducing mud and weeds. For even lower maintenance, a layer of pea gravel or mulch does the trick and provides good drainage.
One homeowner shared how she transformed her muddy shed access into an attractive pathway using irregularly shaped flagstones set in moss. “It went from being something I dreaded after rain to a charming garden feature,” she explained. The project took just a weekend and completely changed how she felt about accessing her garden tools.
Pavers and Brick: Versatile Options for Every Budget
Concrete Pavers: Affordable and Customizable
Concrete pavers offer an excellent balance of affordability and design flexibility for your landscape pathways. Available in countless shapes, sizes, and colors—from natural stone looks to modern geometric patterns—they let you create a custom pathway that complements your home and outdoor structures perfectly.
One of the biggest advantages? You can mix and match different paver styles to add visual interest or create borders that tie into your existing hardscaping. For example, if you’re connecting your patio to a storage shed, using the same paver color or pattern helps create a cohesive flow throughout your yard.
Installation is straightforward for DIY enthusiasts. Start by excavating 6-8 inches deep, add a gravel base for drainage, then a layer of sand for leveling. Lay pavers in your chosen pattern, leaving small gaps for sand-sweeping between joints. This locks everything in place and prevents shifting.
Pro tip from experienced homeowners: Always order 10% extra pavers to account for cuts and future repairs. Store extras near your shed for easy access when needed. Consider edging restraints to keep your pathway crisp and prevent spreading over time. With proper preparation, your concrete paver pathway will look great and last for decades.
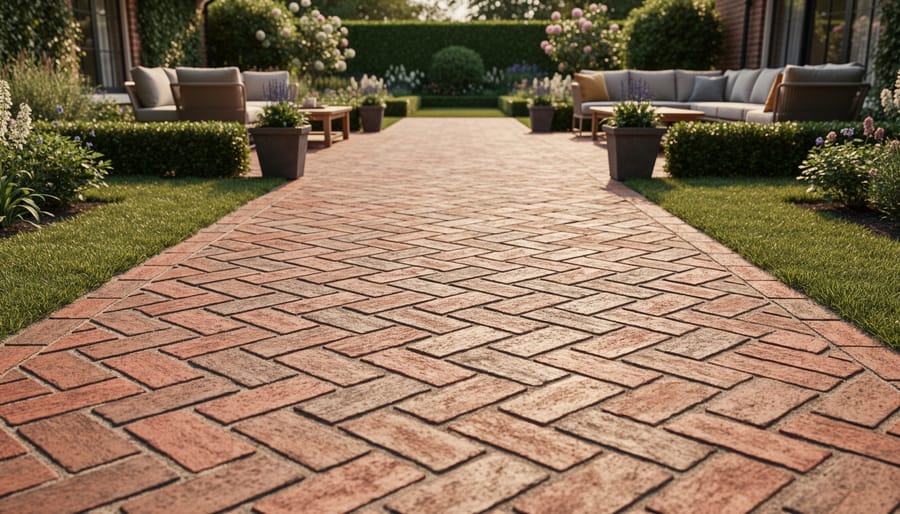
Traditional Brick for Classic Charm
Brick pathways bring timeless elegance to your yard, especially when connecting traditional-style sheds to your home or garden areas. The beauty of brick lies in its versatility—you can create stunning visual effects through different laying patterns. The running bond pattern, where bricks are staggered like a classic wall, offers the simplest installation and works beautifully for straight pathways. For a more sophisticated look, try the herringbone pattern, which creates a zigzag effect that adds movement and interest while providing excellent stability for high-traffic areas.
The basket weave pattern alternates pairs of bricks horizontally and vertically, creating charming square designs that complement cottage-style gardens and rustic sheds perfectly. One homeowner shared that her brick pathway in basket weave transformed her backyard into a cohesive retreat, seamlessly blending her storage area with her flower beds. Brick works especially well with traditional architecture, wooden sheds, and established gardens where you want that lived-in, classic appeal that only improves with age.
Permeable Pavers: Smart Choice for Drainage
Permeable pavers offer a brilliant solution for pathways leading to your shed, especially if you’ve noticed water pooling after rainstorms. These eco-friendly pavers allow rainwater to seep through gaps into the ground below, naturally managing drainage while creating an attractive walkway. They’re particularly useful around shed foundations where water runoff can cause erosion or muddy patches.
Many homeowners love how permeable pavers eliminate puddles without requiring complicated drainage systems. The gaps between pavers can be filled with gravel or ground cover plants for added visual interest. They work beautifully in areas with moderate to heavy rainfall and perform best on relatively level terrain. One happy shed owner shared that switching to permeable pavers solved her constant mud problem near her garden shed entrance. Consider this option if you value both environmental responsibility and practical problem-solving in your landscape design.
Gravel and Crushed Stone: Simple Solutions That Work
Choosing the Right Gravel Type
Selecting the perfect gravel for your pathway depends on how you’ll use it and your aesthetic preferences. Pea gravel, those smooth rounded stones, offers excellent drainage and a soft appearance that complements cottage-style gardens. It’s comfortable underfoot but tends to scatter, so you’ll need edging to keep it in place—especially important for pathways connecting to garden sheds or storage areas.
River rock provides a similar look with larger stones that stay put better, though they can be trickier to walk on. Crushed stone, with its angular edges, locks together beautifully, creating a stable surface that’s ideal for frequently used routes. One homeowner shared that her crushed limestone path to her backyard shed has held up perfectly for five years without shifting.
Decomposed granite sits at the top tier for stability, compacting into an almost concrete-like surface while maintaining a natural appearance. It’s perfect for high-traffic areas but requires occasional reapplication. Consider your climate too—decomposed granite works wonderfully in dry regions but may wash away in heavy rain areas.
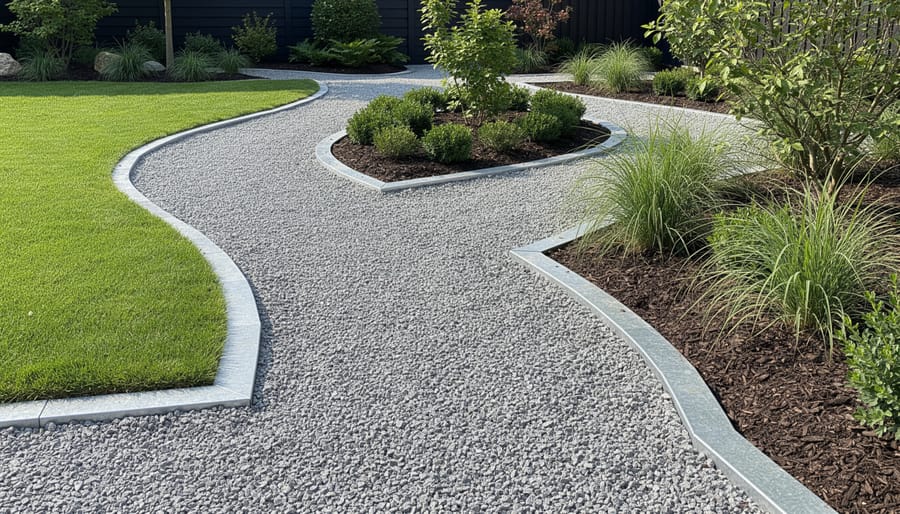
Edging That Keeps Gravel in Place
A beautiful gravel pathway can quickly lose its appeal when stones start wandering into your lawn or garden beds. The solution? Proper edging that creates a firm boundary and keeps everything looking tidy.
Metal edging offers durability and clean lines, perfect for modern pathway designs. Steel or aluminum strips sink into the ground and create a nearly invisible barrier that lasts for years. One homeowner shared how metal edging around her shed pathway eliminated the constant sweeping she’d been doing for months.
Plastic edging provides an affordable, flexible option that works wonderfully for curved pathways. It’s lightweight and easy to install yourself, making it ideal for DIY enthusiasts tackling weekend projects.
Stone or brick edging adds rustic charm while serving as a functional border. These materials complement gravel beautifully and can be mortared in place for extra stability. The key is installing edging at least an inch above your gravel surface to effectively contain those wandering stones and maintain crisp, professional-looking borders.
Mulch and Wood Pathways: Budget-Friendly Natural Options
When Wood Chips Make Perfect Sense
Wood chip pathways shine in informal garden settings and naturalistic landscapes where they blend beautifully with surrounding plantings. They’re particularly practical for connecting garden sheds to vegetable patches or flower beds, creating soft, forgiving surfaces that feel comfortable underfoot. These paths work wonderfully in shaded areas where grass struggles to grow, and they’re budget-friendly enough to experiment with different route configurations.
To keep your wood chip path looking fresh, plan on replenishing the material every 12 to 18 months as natural decomposition occurs. This isn’t a drawback—it’s actually adding organic matter to your soil. Install landscape fabric underneath to suppress weeds and slow decomposition, extending the time between refills. A 3 to 4-inch depth provides adequate coverage and cushioning while minimizing how quickly chips break down. Edge your path with stones, metal strips, or timber to prevent chips from migrating into garden beds. One homeowner shared that adding a fresh top layer each spring became an enjoyable ritual that marked the start of gardening season, taking just an hour to refresh a 20-foot pathway.
Wooden Boardwalks for Wet Areas
Wooden boardwalks offer an excellent solution when you’re dealing with soggy spots or need an attractive pathway between your shed and home. These elevated walkways keep your feet dry while adding a natural, cottage-style charm to your yard. The raised design allows water to flow freely underneath, preventing puddles and mud buildup that typically plague low-lying areas.
Consider pressure-treated lumber or naturally rot-resistant cedar for longevity in damp conditions. Space the boards slightly apart to allow drainage and air circulation. Many homeowners love how boardwalks create defined routes between garden beds and storage areas without compacting the soil. For a weekend project, lay parallel runners first, then attach decking boards across the top—it’s simpler than you’d think and immediately solves those frustrating wet-weather access problems around your property.
Creating Steps and Transitions That Flow
Natural Stone Steps vs. Timber Risers
When designing steps for your pathway, choosing between natural stone and timber risers can shape both the look and longevity of your walkway. Natural stone steps offer incredible durability, lasting decades with minimal maintenance. They handle weather beautifully and provide excellent traction even when wet. The timeless appeal of stone complements everything from cottage gardens to modern landscapes, making them perfect for paths leading to your backyard shed or patio.
Timber risers, on the other hand, bring warmth and a more casual feel to your landscape. They’re easier on the budget and simpler to install, especially for DIY enthusiasts. Treated lumber can last 10-15 years with proper care, though it requires periodic sealing and inspection. One homeowner shared that her timber steps created a welcoming woodland feel along her garden path, though she does stain them every few years.
Consider your climate and traffic level when deciding. Stone excels in wet regions and high-traffic areas, while timber works wonderfully in drier climates and low-traffic garden paths.
Gentle Slopes vs. Defined Steps
Choosing between gentle slopes and defined steps depends on your yard’s terrain and how you’ll use the path. Gentle slopes work beautifully for gradual elevation changes under 15 degrees and are perfect for wheelbarrows, lawn equipment, or anyone with mobility concerns. They create seamless transitions from your home to garden areas or storage sheds without interrupting the flow.
For steeper grades, defined steps become necessary for safety and comfort. Steps shine on slopes over 15 degrees where walking feels unstable. They’re ideal for pathways with lighter foot traffic where you won’t be hauling heavy items regularly. Consider combining both approaches—steps for direct access routes and gentler sloped paths alongside for moving equipment. This gives you the best of both worlds, ensuring everyone can navigate your outdoor space comfortably while maintaining practical access to all areas.
Design Tips That Make Pathways Look Professionally Done
Getting your pathway to look professionally installed doesn’t require hiring a landscape architect—just following a few key principles that transform amateur attempts into stunning results.
Start with width considerations. A primary pathway connecting your home to a storage shed or garage should measure at least 3-4 feet wide, allowing two people to walk comfortably side by side or accommodating a wheelbarrow. Secondary garden paths can narrow to 2-3 feet. One homeowner shared how widening her original 2-foot shed path to 4 feet completely changed how she used her backyard storage space, making trips with gardening equipment far less frustrating.
The curve versus straight line debate depends on your existing landscape. Straight pathways complement modern architecture and create efficient routes to functional spaces like sheds. Curved paths work beautifully in cottage-style gardens, softening the overall aesthetic. However, avoid unnecessary curves—each bend should have a purpose, like navigating around a tree or creating visual harmony with garden beds.
Don’t overlook outdoor lighting integration from the start. Planning for pathway lighting during installation is far easier than retrofitting later. Solar stake lights offer hassle-free illumination, while low-voltage LED systems provide more consistent brightness for frequently used routes.
Finally, match materials and colors to your home’s exterior and existing hardscaping. If your house features warm brick tones, choose pavers or gravel in complementary shades. This cohesive approach makes your pathway feel intentional rather than afterthought, seamlessly connecting outdoor structures to your main living areas while boosting curb appeal and property value.
Real Homeowners Share What Worked (And What Didn’t)
Sarah from Portland tackled her muddy backyard disaster head-on. “Every time it rained, getting to our storage shed was like navigating an obstacle course,” she shares. After installing a gravel pathway bordered with landscape edging, the problem vanished. Her biggest lesson? “I wish I’d laid landscape fabric first. We added it six months later when weeds started popping through.” Total cost: $350 for a 30-foot path, which she notes was half her initial budget estimate.
Mike in Austin chose stepping stones for his shed pathway and couldn’t be happier. “The biggest surprise was how much it improved our curb appeal. What started as a practical fix became a garden feature.” His advice? Space stones based on your actual stride, not what looks good on paper. He learned this the hard way and had to reposition half of them.
Jennifer’s mistake turned into her best tip: “I bought beautiful flagstone without considering my clay soil. After one winter, everything shifted.” She ended up hiring help to create a proper base, adding $600 to her budget. “Do it right the first time,” she emphasizes.
The common thread? Most homeowners spent between $300-$800 on their pathway projects, with DIY installations taking one to two weekends. Those who skipped proper ground preparation universally regretted it, while everyone agreed that connecting their shed to the main yard transformed how they used their outdoor space.
The right pathway does more than just connect point A to point B—it transforms your outdoor space into something both practical and beautiful. You’ll eliminate muddy footprints, protect your lawn from wear patterns, and create an inviting flow throughout your property. Plus, a well-designed pathway adds genuine curb appeal and can even boost your home’s value.
If you’re ready to get started, focus first on your highest-traffic areas. That well-worn route to your shed or garage is the perfect first project. You’re already walking there dozens of times each month, so why not make those trips cleaner and safer? These pathways immediately solve real problems while giving you hands-on experience with materials and techniques.
Here’s the encouraging news: pathway projects are absolutely achievable for DIY homeowners. With proper planning—choosing the right materials for your climate, measuring accurately, and preparing your base correctly—you can create professional-looking results on a weekend. Start small, learn as you go, and before long, you’ll have transformed those muddy tracks into attractive, functional walkways that make your entire property shine. Your outdoor space deserves pathways that work as hard as you do.