
Turn Free Pallets Into Your Perfect Seasonal Storage Shed
Start by collecting free wooden pallets from local businesses, garden centers, or construction sites—most are happy to give them away since disposal costs money. Inspect each pallet carefully for rot, protruding nails, and chemical treatment stamps; avoid any marked with “MB” (methyl bromide) as these contain harmful pesticides, and select heat-treated (HT) pallets instead for safe outdoor construction.
Design your pallet shed dimensions based on what you already have rather than forcing a specific size—four standard 48×40-inch pallets create an 8×8-foot footprint that accommodates lawn equipment, garden tools, and seasonal decorations without requiring complex cuts or additional framing. Position the structure on level ground with proper drainage, using concrete blocks or gravel as a foundation to prevent moisture damage that destroys wooden pallets within months.
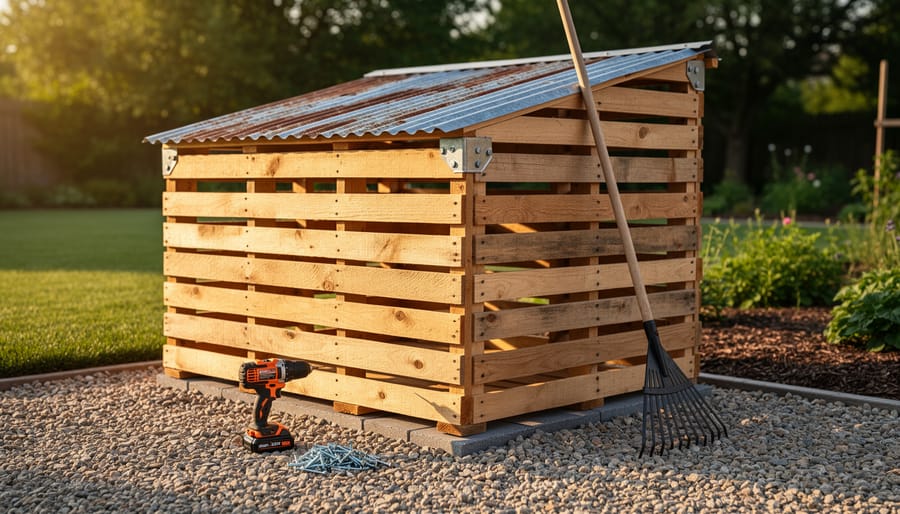
Reinforce connections between pallets using 3-inch deck screws and metal corner brackets rather than nails alone, which loosen over time and compromise structural integrity. Apply two coats of exterior wood sealant to all surfaces before assembly, paying special attention to cut ends and joints where water penetrates fastest—this single step extends your shed’s lifespan from 3-5 years to over a decade.
Transform your basic pallet frame into weather-resistant storage by covering the roof with corrugated plastic panels or reclaimed metal sheeting, ensuring a minimum 15-degree slope for water runoff. Sarah from Michigan built her 6×8-foot pallet shed for under $75 and reports it has protected her holiday decorations and camping gear through three harsh winters without any interior moisture problems.
Why Pallets Make Perfect Seasonal Storage Sheds
The Real Cost Comparison
Let’s talk real numbers. A typical 8×10 pre-made shed from a home improvement store runs between $2,500 and $4,500, not including delivery fees that can add another $200-$300. Building with new lumber? You’re looking at $1,200-$2,000 for materials alone.
Here’s where pallet sheds shine. Sarah from Portland shared her experience: “I built my 6×8 pallet shed for under $200. I sourced free pallets from a local furniture store and only paid for screws, roofing material, and weatherproofing supplies.”
Most DIY builders report spending $150-$400 total, depending on what materials they already have on hand. Your biggest expenses will be roofing (around $100-$150 for corrugated metal or shingles), fasteners ($30-$50), and weatherproofing treatments ($40-$80).
Even if you need to purchase every single item, including basic tools you don’t own, staying under $600 is realistic. That’s saving you at least $1,900 compared to store-bought options. The trade-off? You’ll invest 2-3 weekends of labor. For budget-conscious homeowners, that time investment translates to serious savings while creating a customized storage solution that perfectly fits your space.
What Makes a Good Building Pallet
Not all pallets are created equal, and choosing the right ones is essential for a safe, durable shed. When sourcing pallets, your first stop should be local businesses, garden centers, or home improvement stores. Many are happy to give away pallets for free, but always ask permission before taking them.
The most critical factor is identifying how the pallet was treated. Look for a stamp on the side of each pallet—this is your roadmap to safety. Pallets marked “HT” (heat-treated) are perfect for outdoor projects because they’ve been sterilized using high temperatures without chemicals. These are your go-to choice. Avoid any pallets stamped with “MB” (methyl bromide), as this chemical treatment can be harmful and shouldn’t be used in residential projects.
You’ll also want to steer clear of pallets that show signs of spills, stains, or strong odors, which could indicate chemical contamination. Pallets used for food transportation are generally safer options than those from industrial settings.
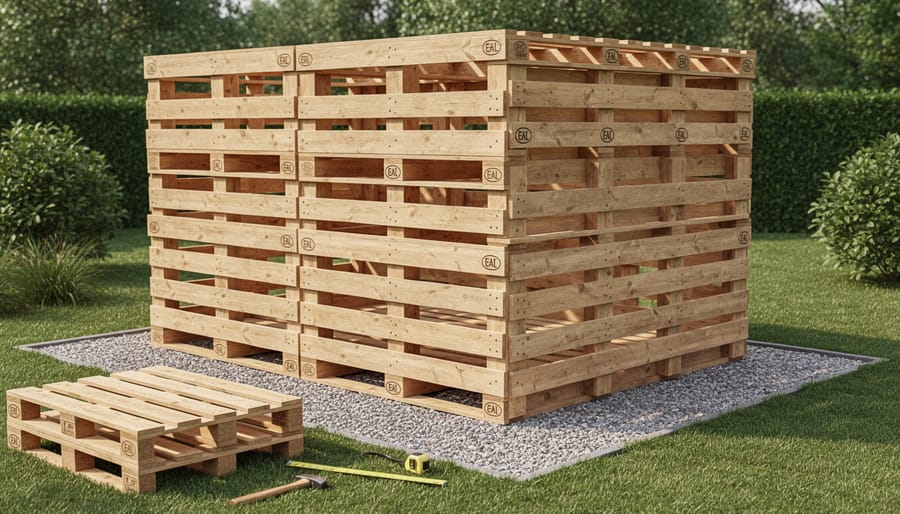
For shed construction, look for pallets in good structural condition with minimal gaps between boards. Standard 48×40 inch pallets are ideal because they’re sturdy and widely available. Hardwood pallets last longer than softwood varieties and handle weather exposure better, though they’re heavier to work with.
Before starting your project, inspect each pallet for rot, cracked boards, or protruding nails. A little extra time during selection saves headaches later and ensures your shed stands strong for years to come.
Essential Planning Before You Build
Sizing Your Shed for Seasonal Needs
Before building your pallet shed, take inventory of what you’ll actually store. This step saves you from constructing a shed that’s too small or unnecessarily large. Start by measuring your bulkiest items. A standard riding lawn mower typically needs a 4×6 foot footprint, while a push mower requires about 2×3 feet. Christmas decorations for an average home fill approximately 15-20 storage bins, each measuring 18×24 inches.
Pool equipment like filters, chemicals, and cleaning tools need at least 3×4 feet of dedicated space, plus vertical room for poles and nets. Garden tools, snow blowers, and outdoor furniture cushions add up quickly. One homeowner shared, “I thought an 8×8 shed would be plenty, but after laying everything out in my garage first, I realized I needed 10×12 to avoid cramming.”
When sizing your shed, add 20 percent extra space for future needs and comfortable movement. For most homeowners storing seasonal items, a 10×12 foot shed with 8-foot walls provides ample room for organization. Include vertical storage by planning for wall-mounted hooks and overhead shelving in your pallet design from the start.
Foundation Options That Work
Choosing the right foundation for your pallet shed doesn’t need to be complicated or expensive. Since pallet structures are relatively lightweight, you can keep things simple while still ensuring stability and longevity.
A gravel base is the most budget-friendly option and works wonderfully for most pallet sheds. Simply excavate 4-6 inches deep, lay landscape fabric to prevent weeds, and fill with crushed gravel. This provides excellent drainage and prevents moisture from reaching your wooden pallets. The downside? You’ll need to occasionally re-level as the gravel settles over time.
Concrete blocks or pavers offer a more permanent solution. Arrange them at the corners and center points where your pallets will rest. This keeps your structure completely off the ground, maximizing airflow underneath and extending your shed’s lifespan. They’re easy to level and adjust, though you’ll spend a bit more upfront.
For those wanting maximum durability, a simple concrete slab provides the ultimate foundation. While it costs more and requires more effort, it eliminates concerns about settling or moisture. One homeowner shared that her concrete-based pallet shed has stood strong for five years without any foundation issues whatsoever. Consider your budget, timeframe, and how permanent you want your shed to be when making your choice.
Step-by-Step Pallet Shed Construction
Building the Base and Floor
Start by selecting a level spot and clearing away grass and debris. This step prevents future settling and moisture problems—a lesson many DIYers learn the hard way! Lay down landscape fabric to block weeds, then add a 2-3 inch layer of gravel for drainage.
For your base, position 4-6 sturdy pallets in a rectangle, ensuring they’re the same height. Check levelness with a long board and carpenter’s level, shimming low spots with gravel or concrete pavers. This foundation matters more than you’d think; an uneven base leads to door alignment headaches later.
Here’s a game-changer: install a moisture barrier by stapling heavy-duty plastic sheeting across the pallet tops before adding your floor. One homeowner shared that skipping this step led to mildew on stored items within months.
Reinforce the base by screwing 2×4 boards across pallet gaps, creating a solid frame. Then attach additional pallets or plywood sheets on top as your floor surface, securing them with deck screws every 8-12 inches. This double-layer approach provides impressive strength for storing heavy equipment while keeping everything dry and stable for years to come.
Framing Your Walls
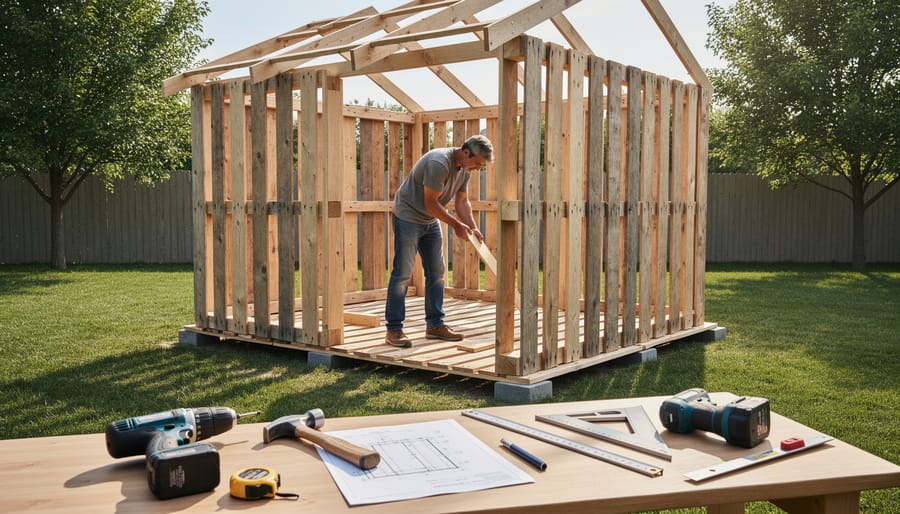
Standing your pallet walls is easier than you might think, even if you’re tackling this project solo. Start by positioning your first pallet upright on the foundation, ensuring it’s perfectly vertical using a level. If working alone, temporarily brace each wall section with 2x4s angled from the wall to the ground before securing permanently.
For maximum stability, connect adjacent pallets at corners using L-brackets or heavy-duty screws driven through the frame boards. Reinforce each corner with vertical 2×4 studs secured on both interior sides, creating a solid column that prevents racking and wobble. This simple addition makes a remarkable difference in overall strength.
Secure the bottom of each wall to your foundation using construction adhesive and 3-inch deck screws. Space fasteners every 12-16 inches for reliable attachment. As you work your way around the perimeter, continuously check for plumb and level before final fastening.
Here’s a helper tip: If you have an extra pair of hands available, have them hold walls steady while you drill pilot holes. This prevents splitting and ensures accurate placement. Sarah, a homeowner from Oregon, shared that using clamps to temporarily hold adjoining pallets together made her solo build much smoother and eliminated frustrating alignment issues.
Roof Construction for Weather Protection
Choosing the right roof design makes all the difference in protecting your pallet shed from the elements. For most DIYers, a simple pitched roof works wonderfully—think of it as creating an A-frame on top of your structure. A pitch of at least 4:12 (rising 4 inches for every 12 inches horizontal) allows rain and snow to slide off naturally, preventing water pooling that could damage your stored items.
Flat roofs are tempting because they’re easier to construct, but they require careful waterproofing and slight angling (around 1:12 pitch minimum) for drainage. If you live in areas with heavy snowfall, stick with a steeper pitch to avoid structural stress.
For roofing materials, corrugated metal sheets are your best friend when working with pallets. They’re lightweight, affordable, and incredibly durable—perfect for supporting with basic pallet framing. You can pick them up at most home improvement stores for reasonable prices. Asphalt shingles work too and give a more traditional look, though they require solid sheathing underneath.
Here’s a game-changing tip many beginners overlook: add at least 12 inches of overhang on all sides. This simple step protects your pallet walls from direct rainfall and extends your shed’s lifespan significantly. One homeowner shared that after adding proper overhang to their pallet shed, they noticed their stored gardening equipment stayed completely dry even during heavy storms.
Seal all roof joints with weatherproof caulk and consider adding a waterproof membrane under your roofing material for extra protection, especially if storing valuable equipment.
Weatherproofing Your Pallet Shed
Sealing and Treating the Wood
Protecting your pallet wood shed starts with choosing the right sealant. For outdoor pallet structures, water-based exterior wood sealers work beautifully and are easy to apply. Look for products containing UV inhibitors to prevent sun damage and color fading. Oil-based stains penetrate deeper and offer excellent moisture protection, though they take longer to dry.
Before sealing, ensure your pallets are clean and completely dry. Sand any rough spots to help the sealant absorb evenly. Apply your chosen product with a brush or roller, working it into all cracks and crevices where moisture might sneak in. Two coats provide optimal protection, with 24 hours drying time between applications.
Sarah from Minnesota shared her experience: “I sealed my pallet shed with a clear waterproof sealant, and three years later it still looks fantastic. I just reapply once annually in spring.”
Plan to reapply sealant every 12-18 months depending on your climate. Areas with harsh winters or intense sun may need more frequent attention. A quick annual inspection helps you catch any weathering early, ensuring your shed protects your belongings for years to come.
Keeping Moisture Out
Moisture is the biggest enemy of any pallet shed, but fortunately, it’s entirely preventable with the right approach. Start by elevating your shed at least 4-6 inches off the ground using concrete blocks or gravel to promote airflow underneath and prevent ground moisture from seeping up through the floor.
For ventilation, install ridge vents along the roof peak and soffit vents near the ground level on opposite walls. This creates natural air circulation that prevents condensation buildup, especially during temperature swings in spring and fall. Consider adding small gable vents on each end for extra airflow.
Proper drainage around your shed is essential. Create a slight slope away from the foundation and consider digging a shallow trench filled with gravel around the perimeter to redirect water. Apply a weather-resistant sealant or exterior paint to all exposed wood surfaces, paying special attention to cut ends where moisture penetrates easily.
For the roof, extend your overhang by at least 12 inches on all sides to keep rain away from walls. Layer roofing felt under your shingles or metal roofing for double protection. These simple steps go a long way toward protecting stored items from moisture year-round, ensuring your pallet shed serves you well through every season.
Organizing Your Shed for Seasonal Rotation
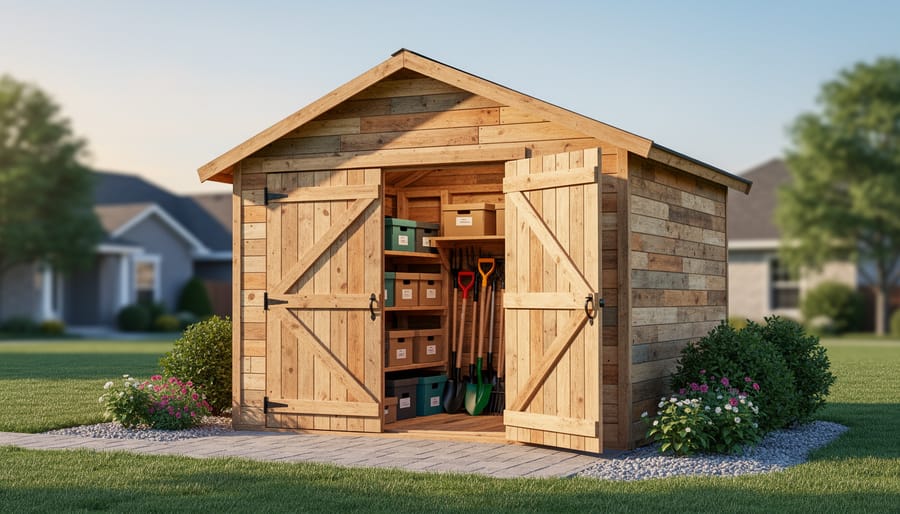
Creating Zones for Different Seasons
Smart zoning transforms your pallet shed from cluttered chaos into organized bliss. Start by dividing your space into three main areas based on seasonal access needs.
Position winter items like snow shovels, salt spreaders, and holiday decorations at the back or higher shelves during summer months. When fall approaches, rotate these forward for easy access. Sarah from Michigan shares her experience: “I labeled three distinct zones in my pallet shed. When December hits, I simply swap my gardening tools to the back and bring winter gear forward. It saves me so much time!”
Summer equipment including lawn mowers, pool supplies, and outdoor toys deserve prime real-time placement from May through September. Create a dedicated zone near the entrance for quick grab-and-go access during busy weekends.
Spring and fall items like rakes, leaf blowers, and planting supplies work well in a flexible middle zone. These transition seasons share similar tools, so combining them makes practical sense.
Consider implementing year-round storage solutions like wall-mounted hooks and adjustable shelving to make seasonal swaps effortless. Use clear plastic bins with large seasonal labels to identify contents instantly. This zoning approach keeps frequently needed items accessible while maximizing every square foot of your pallet shed.
Real Success Stories from Pallet Shed Builders
Maria from Oregon tackled her holiday decoration chaos by building a 10×8 pallet shed over two weekends. “I was amazed at how sturdy it turned out,” she shares. “I found free pallets from a local warehouse and spent about $150 on roofing and hardware. Now my Christmas bins, camping gear, and garden tools finally have a proper home instead of crowding my garage.” Maria painted her shed a cheerful blue that matches her house trim, proving budget-friendly can still look beautiful.
In Texas, retired teacher James took a different approach with his 6×8 pallet shed. He focused on ventilation for storing seasonal sports equipment and pool supplies. “I added extra spacing between pallet boards on the walls to keep air flowing in our humid climate,” James explains. “Three years later, everything stays dry and mold-free. The whole project cost under $100 since I already had leftover shingles from my roof replacement.”
Meanwhile, Sarah and Tom in Michigan built their pallet shed as a weekend family project with their teenage sons. “We wanted something educational that would actually be useful,” Sarah notes. “The boys learned basic construction skills, and we got a weatherproof space for our kayaks and winter gear. It’s not perfect, but it works beautifully and the kids are so proud of what they built.”
Building your own pallet storage shed is absolutely achievable, even if you’re new to DIY projects. With basic tools, some reclaimed pallets, and a free weekend or two, you can create a functional storage space that solves your seasonal clutter challenges while saving hundreds of dollars compared to purchasing new materials. The benefits extend beyond just cost savings—you’ll enjoy the satisfaction of completing a hands-on project, gain valuable carpentry skills, and create a customized storage solution that perfectly fits your space and needs.
Remember, proper planning and weatherproofing are your keys to long-term success. Take your time during the foundation stage, don’t skip the treatment steps for wood protection, and your pallet shed will serve you well for years to come.
Of course, if you’d prefer a professionally built solution without the construction time, Storage Sheds Outlet offers a wide selection of ready-made sheds designed for durability and functionality. Whether you choose to build or buy, the important thing is taking that first step toward solving your storage challenges today.