
Turn Your Noisy Shed Into a Peaceful Retreat With These Soundproofing Methods
**Transform Your Noisy Shed Into a Peaceful Workspace With Strategic Soundproofing**
Soundproofing your shed requires a three-pronged approach: blocking sound transmission through walls, absorbing interior noise reflections, and sealing air gaps where sound leaks through. Unlike basic insulation that primarily manages temperature, effective soundproofing demands dense materials that add mass to your shed’s structure, creating barriers that prevent sound waves from passing through.
Start by identifying your noise sources and goals. A woodworking workshop needs protection from high-decibel power tools escaping outdoors, while a music studio requires preventing outside distractions from entering. Understanding your specific situation determines which techniques deliver the best results for your investment.
The relationship between insulation and soundproofing often confuses homeowners. Standard fiberglass insulation offers minimal sound reduction despite its thermal benefits. True soundproofing combines mass-loaded barriers, acoustic insulation materials, and strategic installation methods that address both airborne sounds (voices, music) and impact noise (vibrations, footsteps).
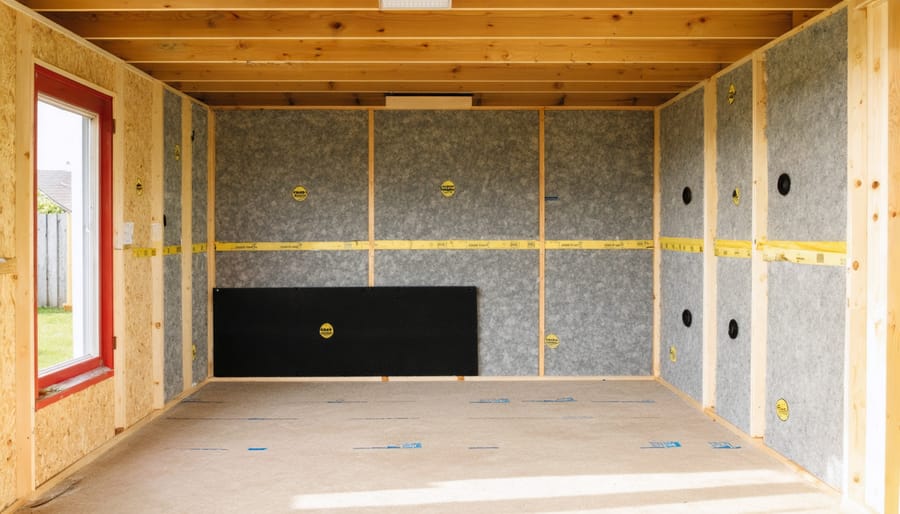
Your shed’s existing construction significantly impacts your approach. Thin walls with gaps transmit sound easily, requiring comprehensive treatment including additional drywall layers, specialized acoustic panels, and weatherstripping around doors and windows. Even a well-insulated shed benefits from targeted soundproofing upgrades in high-traffic areas.
This guide walks you through proven soundproofing techniques specifically designed for shed applications, from understanding material ratings like STC (Sound Transmission Class) to step-by-step installation instructions that work with your shed’s unique structure. Real homeowners share their transformation stories, revealing which methods delivered the quietest, most functional spaces.
Why Your Shed Needs Both Insulation and Soundproofing
Many homeowners assume insulation and soundproofing are the same thing, but they’re actually cousins rather than twins. Understanding the difference can save you time, money, and frustration when transforming your shed into a peaceful workspace or creative studio.
Here’s the deal: thermal insulation primarily keeps your shed comfortable by regulating temperature, while soundproofing specifically targets noise reduction. The good news? Insulation serves dual purposes because the materials that trap air for temperature control also help dampen sound waves. However, they work differently.
Think of it this way: insulation slows down heat transfer through your shed walls, while soundproofing blocks or absorbs sound vibrations. Some materials excel at one job more than the other. Fiberglass batts, for example, provide decent thermal insulation but only moderate sound dampening. Mass-loaded vinyl, on the other hand, excels at blocking noise but does little for temperature control.
Sarah, a woodworker from Oregon, learned this lesson the hard way. “I insulated my shed thinking it would solve the noise complaints from neighbors. It helped a bit, but I still needed additional soundproofing materials to really make a difference,” she shared.
The sweet spot? Using both strategically. Start with quality thermal insulation as your foundation—it’ll keep you comfortable year-round while providing baseline sound reduction. Then add targeted soundproofing layers where noise control matters most. This combination approach tackles both challenges without breaking the bank or requiring a complete shed overhaul.
Understanding what you’re trying to achieve—comfortable temperatures, noise reduction, or both—helps you choose the right materials and techniques for your specific shed project.
Understanding How Sound Travels in Your Shed
Before you start tacking up insulation or sealing gaps, it’s helpful to understand exactly how sound is sneaking into—or out of—your shed. Think of sound as an incredibly persistent visitor that finds every possible entry point!
Sound travels through your shed in two main ways: through the air and through solid materials. Airborne sound slips through any gap it can find—under doors, around window frames, through ventilation openings, and even tiny cracks you might not notice. This is why you’ll hear conversations from outside even when your door is closed but not sealed properly. Structure-borne sound, on the other hand, travels through solid materials like vibrations. When someone slams a car door nearby, you might feel it rumble through your shed’s floor and walls.
**Identifying Your Noise Problem**
Take a moment to pinpoint where your noise issue originates. Are you trying to keep outside noise out so you can record music or concentrate on detailed work? Or do you need to contain noise inside your shed to keep the neighbors happy while you’re running power tools?
Walk around your shed during a noisy time of day. You’ll likely notice that doors and windows are your biggest culprits—they’re typically the thinnest barriers. Walls, floors, and ceilings transmit less sound but can still be problematic, especially in basic shed construction with single-layer walls and no insulation. Understanding these weak points helps you prioritize which soundproofing solutions will give you the biggest improvement for your investment.
The Four Principles of Effective Shed Soundproofing
Adding Mass to Block Sound
Think of mass as your shed’s sound barrier—heavier materials simply make it harder for sound waves to pass through. Dense materials like mass-loaded vinyl, extra drywall layers, or oriented strand board (OSB) significantly reduce noise transmission by absorbing sound energy rather than letting it vibrate through thin walls.
For workshop conversions, adding a second layer of 5/8-inch drywall can reduce noise by 10-15 decibels—that’s the difference between hearing every power tool clearly and barely noticing background hum. One DIY enthusiast transformed her backyard shed into a pottery studio by installing mass-loaded vinyl beneath wood paneling, keeping wheel noise from disturbing neighbors during evening sessions. The principle is simple: doubling wall mass approximately halves sound transmission, making your shed quieter inside and out.
Absorption Materials That Trap Sound
Soft, porous materials are your best friends when controlling sound in your shed. Think acoustic foam panels, thick curtains, fabric wall hangings, or even repurposed blankets—these absorb sound waves rather than bouncing them around. One DIY enthusiast transformed her shed music studio by covering walls with decorative fabric panels filled with cotton batting, eliminating the harsh echo that plagued her recordings. Pair these sound-deadening techniques with your insulation for maximum effect, creating a quieter, more comfortable workspace that neighbors will appreciate too.
Damping to Stop Vibrations
Damping materials work like shock absorbers for your shed, preventing surfaces from resonating and amplifying sound. Think of how a drumhead vibrates when struck—your shed walls can do the same with noise. Apply damping compound between layers of drywall or directly onto metal surfaces before adding insulation. Green Glue is a popular choice that’s easy to apply with a standard caulking gun. For metal sheds converted into workshops, damping significantly reduces the “ping” effect when tools contact surfaces. One DIY enthusiast shared that adding damping compound to her music studio shed reduced vibration transmission by nearly 80%, making practice sessions much more neighbor-friendly.
Decoupling to Create Sound Barriers
Decoupling creates physical separation between surfaces to prevent sound vibrations from traveling through your shed’s structure. Think of it as breaking the direct path sound uses to move from one side of a wall to another. By installing resilient channels or staggered studs with an air gap between layers, you’re essentially building two walls that don’t quite touch. This simple technique dramatically reduces sound transmission, especially helpful if you’re setting up a band practice space or woodworking shop. One homeowner converted their shed into a music studio and found that adding a 1-inch air gap between drywall layers cut neighbor complaints completely—proof that a little space goes a long way!
Best Insulation Materials for Soundproofing Your Shed
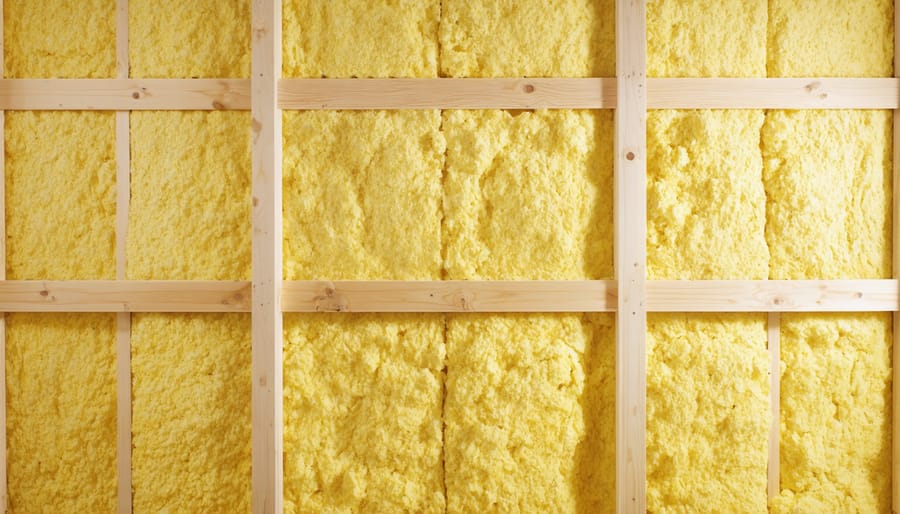
Fiberglass Insulation
Fiberglass insulation remains one of the most popular choices for shed soundproofing, and for good reason. It effectively absorbs sound waves while providing excellent thermal insulation—a win-win for your backyard workspace or studio. Available in batts or rolls, fiberglass works beautifully in metal, wood, and vinyl sheds, though installation approaches differ slightly.
For wooden sheds, simply cut batts to fit snugly between wall studs, ensuring no gaps where sound could leak through. Metal shed owners should add a vapor barrier first to prevent moisture issues, then secure insulation with adhesive or friction fit between furring strips. Vinyl sheds benefit from a similar framing approach before installation.
**Pro tip from Sarah in Portland:** “I lined my metal shed with R-13 fiberglass batts before converting it to a pottery studio. The difference was incredible—my neighbors can barely hear my wheel running now!”
Always wear protective gear during installation, as fiberglass particles can irritate skin and lungs. Combine fiberglass with dense materials like drywall for maximum soundproofing effectiveness.
Mineral Wool (Rockwool)
Mineral wool, particularly Rockwool, stands out as the gold standard for shed soundproofing thanks to its dense fiber structure that effectively traps sound waves. Unlike standard fiberglass insulation, Rockwool’s tightly-packed composition blocks airborne noise while also reducing vibrations—perfect if you’re setting up a music studio or woodworking shop.
The material is naturally fire-resistant and moisture-repellent, solving two common shed concerns at once. Sarah, a hobbyist drummer, shared that after installing Rockwool in her practice shed, neighborhood complaints stopped completely.
Expect to invest around $1.20-$1.80 per square foot for quality mineral wool batts. While it’s pricier than fiberglass (typically $0.50-$0.90 per square foot), the superior sound-dampening performance justifies the cost difference for serious noise control projects. Installation is straightforward—the batts cut easily with a serrated knife and friction-fit between studs without requiring special tools or expertise.
Foam Board and Spray Foam
Foam board and spray foam excel at thermal insulation, but their soundproofing abilities are often misunderstood. These materials work best when you’re primarily concerned about temperature control with modest sound dampening as a bonus benefit.
Foam board provides a moderate sound barrier, particularly effective against higher-frequency noises like voices or birdsong. However, it won’t significantly reduce low-frequency sounds such as power tools or bass-heavy music. One homeowner converted their shed into a craft studio and found foam board adequate for normal conversation privacy but insufficient when using a router or saw.
Spray foam offers slightly better performance by sealing air gaps where sound typically leaks through. This makes it valuable for blocking noise around windows, doors, and wall penetrations. The density matters—closed-cell spray foam outperforms open-cell varieties for sound control.
For genuine soundproofing in workshops or music studios, combine these materials with dedicated acoustic solutions like mass-loaded vinyl or acoustic panels rather than relying on foam alone.
Recycled Denim and Natural Alternatives
Looking for greener soundproofing solutions? Recycled denim insulation offers excellent noise reduction while keeping materials out of landfills. It’s safe to handle, non-toxic, and performs comparably to traditional options. Cork boards provide natural sound absorption with antimicrobial properties—perfect for studio spaces. Sheep’s wool is another renewable choice that dampens sound effectively while regulating moisture. These eco-friendly insulation options prove you don’t need to sacrifice performance for sustainability. Many homeowners report that denim insulation actually installs easier than fiberglass, making it ideal for DIY projects without the itchiness!
Mass Loaded Vinyl
Mass loaded vinyl (MLV) is a dense, flexible material that’s perfect when you need serious soundproofing in your shed. Think of it as a heavy blanket specifically engineered to block sound waves. It’s particularly effective for workshops where power tools create consistent noise, or music studios where sound quality matters.
MLV works by adding mass without taking up much space—it’s typically just a few millimeters thick but incredibly heavy for its size. You can hang it directly on walls, layer it between drywall, or even use it as an underlayment beneath flooring. One shed owner who converted their space into a drum practice room shared that adding MLV to their walls reduced noise transmission by about 60%, keeping peace with the neighbors while still enjoying their hobby.
Step-by-Step Soundproofing Installation for Shed Walls
Ready to soundproof your shed walls? This practical guide walks you through the process, no matter what type of shed you’re working with. Let’s set realistic expectations right away: adding soundproofing to an existing shed requires some effort, but most homeowners can tackle this weekend project with basic tools.
**For Wood-Framed Sheds with Exposed Interior Walls**
Start by measuring the space between wall studs—typically 16 or 24 inches apart. Cut mass loaded vinyl (MLV) or acoustic panels to fit these cavities. If you’ve already completed basic DIY insulation installation, you’re adding soundproofing on top of that layer. Secure MLV using a staple gun, ensuring it overlaps at seams by at least two inches. Next, install a layer of 5/8-inch drywall over the soundproofing material using drywall screws every 12 inches. This combination creates excellent noise reduction.
**For Metal or Vinyl Sheds**
These structures present unique challenges since there’s no stud framework. Your best approach involves creating an interior frame using 2×4 lumber attached to the floor and ceiling. Fill this new wall cavity with acoustic batts, then cover with drywall or plywood panels. This effectively creates a “room within a room” and can reduce noise by 50-70%.
**Realistic Results and Effort Level**
Expect to spend 8-12 hours soundproofing a standard 10×12 shed. The physical difficulty is moderate—lifting drywall sheets is the most challenging part. One homeowner converting their shed into a music practice space shared: “I was amazed at the difference. My drums no longer bother the neighbors, and I only needed a weekend to complete it.”
Remember, soundproofing works best as a system. Walls are just one component—don’t forget doors, windows, and ceiling gaps for optimal results.
Don’t Forget the Ceiling and Floor
When most people think about soundproofing their shed, they focus on the walls—but here’s a reality check: noise travels through every surface. If you’ve insulated your walls beautifully but left the ceiling and floor untreated, you’re essentially leaving the door wide open to sound transmission.
The ceiling is particularly problematic because sound waves naturally rise. If you’re planning a music studio or workshop with power tools, overhead noise can be substantial. Start by installing insulation batts between ceiling joists, just as you would in walls. For enhanced soundproofing, add a layer of mass-loaded vinyl before installing your ceiling panels. This dense material blocks airborne sound effectively. One DIY enthusiast shared that adding acoustic panels to her art studio’s ceiling reduced echo by 70%, transforming it from a “tin can” into a comfortable workspace.
Don’t neglect the floor, either—especially if your shed sits on a concrete slab or wooden platform. Footsteps, dropped tools, and vibrating equipment all create noise that travels downward and reflects back up. Lay down dense rubber underlayment or foam mats designed for soundproofing before adding your flooring. These materials absorb impact noise brilliantly. For wooden floors, consider adding an extra subfloor layer with Green Glue sandwiched between—this damping compound turns vibrations into tiny amounts of heat.
Remember, comprehensive soundproofing means treating your shed as a complete envelope. Every untreated surface weakens your overall efforts, so give ceiling and floor the same attention you’d give those walls.
Sealing the Weak Points: Doors and Windows
Doors and windows are the weakest links in any soundproofing project—they’re where noise sneaks in and out most easily. The good news? You don’t need to replace them entirely to see dramatic improvements.
Start with weatherstripping around door frames. This inexpensive foam or rubber material fills gaps that let sound waves pass through. Simply measure your door perimeter, cut the strips to size, and press them into place along the frame. One homeowner converted his shed into a drum practice space and reported a noticeable difference after spending just $15 on weatherstripping—his neighbors certainly appreciated it!
Door sweeps tackle the gap at the bottom of your door. These attach directly to the door’s lower edge, creating a seal against the threshold. For budget-conscious DIYers, basic rubber sweeps work well at around $10-20. Premium automatic door bottoms (which drop down when the door closes) offer superior sealing for $40-60.
Windows present their own challenges. Heavy curtains or acoustic blankets provide the most affordable solution, though they block natural light. For a better balance, consider acoustic window inserts—transparent panels that mount inside your existing window frame, creating an air gap that disrupts sound transmission. While pricier at $200-400 per window, they maintain visibility and light.
Don’t overlook acoustic caulk for sealing small cracks around window and door frames. Unlike regular caulk, it remains flexible and absorbs vibrations rather than conducting them. Apply it anywhere you notice gaps or drafts.
Remember, sealing these weak points works hand-in-hand with your insulation efforts—together, they create a comprehensive sound barrier that transforms your shed into a genuinely quiet space.
Real-World Results: What Homeowners Are Achieving
Real homeowners are transforming their sheds into functional spaces with impressive results. Take Sarah from Portland, who converted her 10×12 shed into a music practice room. Using mass-loaded vinyl, acoustic insulation batts, and resilient channel on the walls, she achieved approximately 25-30 decibel reduction. “I can play my drum kit at reasonable volumes without bothering my neighbors,” she shares. Her total investment was around $800, and the project took one weekend to complete.
Mike’s woodworking workshop in Michigan tells a similar story. He focused on weatherstripping doors, adding insulation between studs, and installing two layers of drywall with Green Glue dampening compound. The result? A 20-25 decibel drop that keeps power tool noise contained. His cost ran about $600 for a 12×16 shed.
For home offices, expectations should be more modest but still effective. Jessica in Colorado spent $400 on basic acoustic insulation and solid-core door replacement, reducing outside distractions by roughly 15-20 decibels—enough to take video calls without neighborhood noise interference.
The key takeaway? Complete soundproofing is rarely achievable on typical budgets, but meaningful noise reduction absolutely is. Most homeowners report spending between $400-$1,200 depending on shed size and desired noise reduction. The sweet spot seems to be targeting 20-30 decibel reduction, which makes spaces genuinely usable for their intended purposes without breaking the bank.
Budget-Friendly vs. Premium Soundproofing Approaches
When planning your shed soundproofing project, understanding the investment levels helps you make the smartest choice for your situation. Let’s break down what you can expect at different price points.
**Budget-Friendly Approach ($200-$500)**
For homeowners working with limited funds, strategic improvements can still make a meaningful difference. Focus on sealing air gaps around doors and windows with weatherstripping and acoustic caulk ($50-100). Add mass-loaded vinyl to one or two key walls where noise is most problematic ($150-300), and install affordable fiberglass batts between studs. This approach typically reduces noise by 30-40%, which works well for occasional hobby use or light workshop activities.
Sarah, a weekend woodworker, shared: “I spent about $350 on basic soundproofing, and my neighbors stopped complaining about my Saturday projects. It’s not recording-studio quiet, but it solved my immediate problem.”
**Mid-Range Solutions ($500-$1,500)**
This sweet spot delivers the best bang for your buck. Combine fiberglass or rockwool insulation throughout with MLV on critical walls, acoustic drywall panels, and a solid-core door upgrade. Expect 50-65% noise reduction—perfect for regular workshop use, practice studios, or home offices. Understanding insulation costs helps you budget effectively for this tier.
**Premium Approach ($1,500-$3,500+)**
For professional studios or workshops adjacent to living spaces, comprehensive treatment includes full rockwool insulation, double-layer drywall with Green Glue damping compound, acoustic doors with seals, resilient channels, and floor treatments. This achieves 70-85% noise reduction.
**Best Recommendation:** Most homeowners find the mid-range approach offers optimal value, addressing both thermal efficiency and noise control without breaking the bank.
Creating a quieter, more functional shed space doesn’t have to be overwhelming or break the bank. The key is to start with your biggest noise problems first—whether that’s blocking out neighborhood sounds so you can focus in your home office, or containing the buzz of power tools in your workshop. Remember, you don’t need to tackle everything at once to see real results.
Even basic soundproofing steps like sealing gaps around doors and windows or adding a layer of mass-loaded vinyl can make a remarkable difference in your shed’s comfort and usability. Many DIY enthusiasts report that just addressing the most obvious weak points transformed their space from frustratingly noisy to pleasantly peaceful.
Think of soundproofing as an investment in how you’ll actually use your shed. A quieter space means better concentration for work projects, more enjoyable creative sessions, and fewer complaints from family or neighbors. Whether you’re converting your shed into a music studio, a woodworking shop, or a tranquil retreat, implementing even a few of these techniques will significantly enhance your experience. Start small, measure your results, and you’ll be amazed at the transformation a little soundproofing can bring to your backyard sanctuary.