
Transform Your Backyard Shed into a Multi-Purpose Dream Space
Transform your backyard storage solution into a multi-functional masterpiece with today’s innovative shed designs. From classic garden cottages to modern workspace retreats, sheds have evolved far beyond simple tool storage. Modern shed designs blend practical storage with lifestyle enhancement, offering homeowners creative ways to maximize their property’s potential while maintaining aesthetic appeal.
Whether you’re seeking a compact garden shed, a spacious workshop, or a stylish home office retreat, the right shed design can dramatically enhance your property’s functionality and value. Contemporary shed designs incorporate features like natural lighting, climate control, and modular storage systems, making them adaptable to various uses throughout the seasons.
Key design categories include traditional gable-roof structures perfect for classic homes, sleek modern designs with clean lines and innovative materials, and hybrid models that combine storage with living space. Each style offers unique advantages, from maximizing vertical storage in small yards to creating comfortable year-round workspaces.
Success in shed design lies in balancing form with function – choosing a style that complements your home’s architecture while meeting your specific storage and activity needs. Consider factors like local building codes, climate requirements, and long-term adaptability when exploring different shed designs.
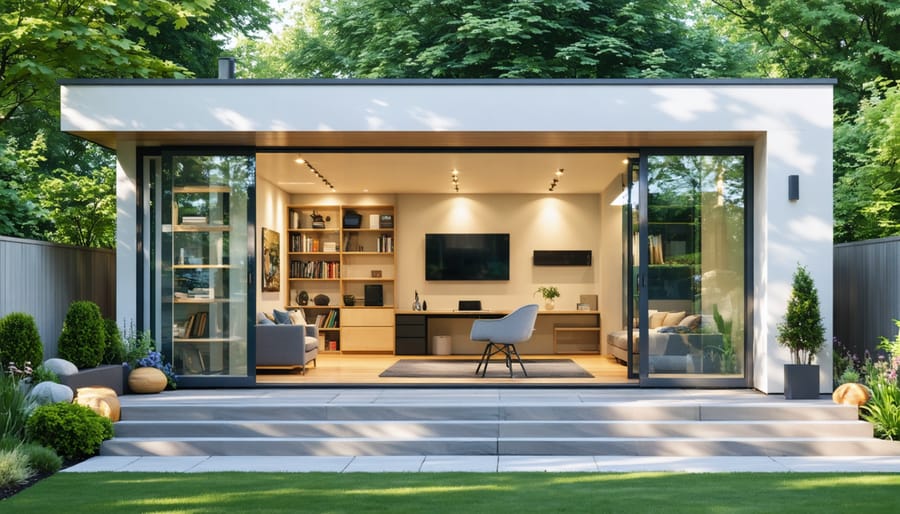
Home Office and Studio Shed Designs
Essential Features for a Work-Ready Shed
When transforming your shed into a functional workspace or a professional home office setup, several essential features need careful consideration. Proper insulation is crucial for year-round comfort and energy efficiency. Consider using both wall and ceiling insulation with a suitable vapor barrier to regulate temperature and prevent moisture buildup.
Electrical requirements deserve special attention. Install adequate outlets throughout the space, ensuring they meet local building codes. Plan for both general-purpose outlets and dedicated circuits for equipment that demands higher power. Don’t forget to include exterior-grade wiring and weatherproof boxes for safety.
Lighting plays a vital role in creating a productive environment. Combine natural light through well-placed windows with layered artificial lighting. Install task lighting for detailed work, ambient lighting for overall illumination, and consider LED options for energy efficiency.
Ventilation is essential for maintaining air quality and preventing mustiness. Include both passive ventilation (such as vents and windows) and active solutions like small exhaust fans. Strategic placement of vents at both low and high points creates effective air circulation.
Remember to integrate these features during the initial construction phase, as retrofitting can be more complicated and costly. Working with qualified professionals for electrical installations ensures safety and compliance with local regulations.
Creative Space Solutions
Maximizing your shed’s potential starts with smart storage solutions that adapt to your changing needs. By implementing versatile storage systems and multi-functional furniture, you can transform your shed into both a practical storage space and a creative studio space that serves multiple purposes.
Consider installing adjustable shelving systems with removable brackets, allowing you to modify storage configurations as needed. Wall-mounted pegboards offer flexible organization for tools while keeping floor space clear for other activities. Fold-down workbenches and tables provide instant workspace when needed and can be tucked away when storage takes priority.
For dual-purpose sheds, invest in mobile storage units on wheels that can be easily repositioned. Storage ottomans and benches serve as both seating and storage solutions, while stackable containers maximize vertical space. Install track lighting that can be adjusted to illuminate different areas based on your current activity.
Make use of often-overlooked spaces by adding overhead storage racks for seasonal items and door-mounted organizers for frequently used tools. Consider furniture that serves multiple functions, such as a storage chest that doubles as a potting bench or a collapsible craft table with built-in supply drawers.
Remember to maintain clear pathways and designate specific zones for different activities to ensure your space remains functional and organized, regardless of how you’re using it at any given time.
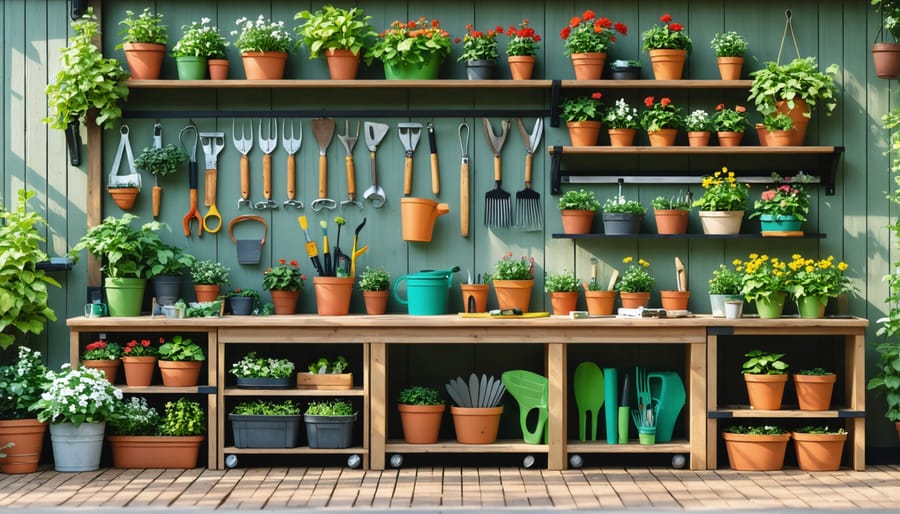
Garden Room and Potting Shed Combinations
Practical Layout Planning
Effective layout planning is crucial to maximize your storage space and create a functional environment in your shed. Start by mapping out zones for different activities and storage needs. Consider creating dedicated areas for frequently used tools near the entrance, while storing seasonal items towards the back.
Wall-mounted storage solutions are game-changers for organization. Install pegboards for hanging tools, adjustable shelving systems for boxes and containers, and hooks for larger equipment. Don’t forget to utilize vertical space – the walls up to the ceiling offer valuable storage opportunities.
If your shed serves multiple purposes, establish clear boundaries between work areas and storage sections. For instance, position your workbench near a window for natural light, and keep it separate from garden equipment storage. Include a small cleanup station if you frequently work with soil or paint.
Remember to leave adequate floor space for movement and temporary project staging. Consider installing wheels on heavy equipment or storage units to make them easily movable. Good organization isn’t just about storing more – it’s about creating an efficient space where everything has its place and is easily accessible when needed.
Weather-Resistant Features
When it comes to protecting your shed from the elements, several key features can make a significant difference in its longevity. Start with proper roof pitch and overhangs – a steeper pitch of at least 15 degrees helps water and snow slide off easily, while extended eaves protect the walls from water damage. Consider installing quality gutters and downspouts to direct rainwater away from the foundation.
Choose materials specifically designed to withstand harsh weather conditions. Pressure-treated lumber for ground contact areas, cedar or vinyl siding for the walls, and galvanized or stainless steel hardware resist rust and decay. Metal or architectural shingles provide excellent protection against UV rays and heavy precipitation.
Proper ventilation is crucial in preventing moisture buildup. Install ridge vents along the roof peak and soffit vents under the eaves to create natural airflow. Weather stripping around doors and windows helps keep the interior dry, while raised flooring or a concrete foundation prevents ground moisture from seeping upward.
Don’t forget about strategic design elements like drip edges along the roof line and water-resistant door thresholds. These small but important features direct water away from vulnerable areas, ensuring your shed remains dry and durable for years to come.
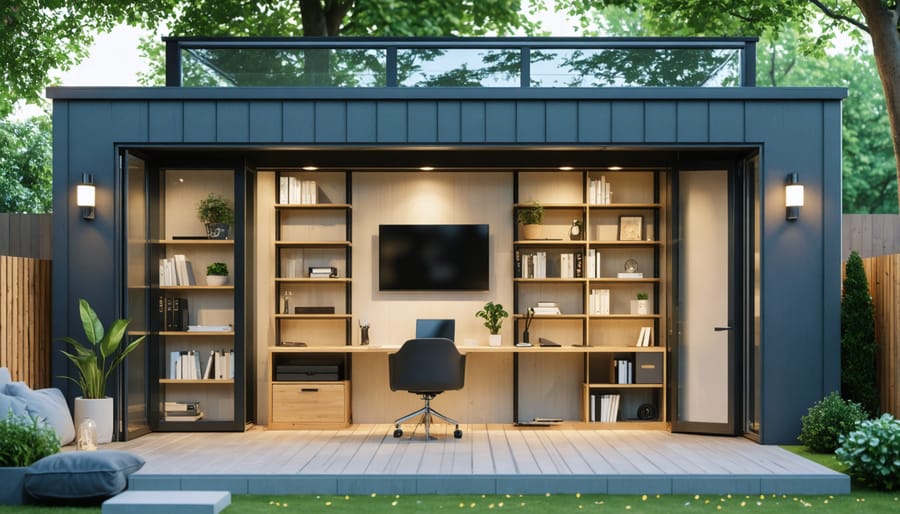
Workshop and Storage Hybrid Designs
Maximizing Vertical Space
When it comes to maximizing your shed’s potential, vertical space is often an untapped goldmine of storage opportunities. Start by installing wall-mounted pegboards or slatwall panels, which offer incredible flexibility for hanging tools, garden equipment, and accessories. These systems can be easily reconfigured as your storage needs change throughout the seasons.
Overhead storage racks suspended from the ceiling provide an excellent solution for storing seasonal items, camping gear, or holiday decorations. Consider installing adjustable shelving units that can accommodate boxes and containers of various sizes. For frequently used items, magnetic strips mounted at eye level keep metal tools easily accessible while keeping them off your workbench.
Custom wall organizers, such as PVC pipe sections mounted horizontally, make perfect holders for long-handled tools like rakes and shovels. Installing bike hooks on the walls or ceiling helps keep valuable floor space clear while protecting your bicycles from damage.
Don’t forget the space behind your shed door – an often-overlooked area perfect for shallow shelving or hanging organizers. Consider installing fold-down workbenches or tables that can be tucked away when not in use, providing additional workspace without permanently sacrificing storage area.
Pro tip: Before mounting any storage solution, ensure your shed walls can support the weight by installing proper backing or reinforcement where needed. Label storage zones clearly to maintain organization and make the most of your vertical space system.
Safety and Accessibility Features
Safety should always be a top priority when designing your shed, whether you’re using it for storage or transforming it into a relaxing backyard retreat. Start with proper lighting by installing both natural and artificial light sources. Windows should be positioned strategically to illuminate work areas, while motion-sensor exterior lights enhance security and visibility during evening hours.
Install non-slip flooring materials and ensure proper drainage to prevent water accumulation. Consider adding rubber mats in high-traffic areas and near workbenches. For tool storage, mount pegboards and magnetic strips at eye level to keep sharp implements organized and easily accessible. Heavy items should be stored at waist height to prevent strain when lifting.
Include proper ventilation through windows, vents, or fans to maintain air quality and prevent moisture buildup. Install smoke detectors and keep a fire extinguisher readily available, especially if you plan to use power tools or electrical equipment.
For accessibility, ensure doorways are wide enough to accommodate larger equipment and consider installing a ramp if there’s a height difference from ground level. Create clear pathways between storage areas and maintain at least 3 feet of clearance around workspaces. Label storage containers and zones clearly, and implement a “first in, first out” system for frequently used items.
Remember to secure dangerous tools and chemicals in locked cabinets, particularly if children have access to the shed. These thoughtful safety features will help create a secure and functional space for years to come.
Entertainment and Relaxation Shed Spaces
Indoor-Outdoor Flow
Creating a seamless transition between your shed and outdoor living space can transform a simple storage solution into an inviting extension of your home. Strategic design elements like French doors, sliding glass panels, or bifold doors can instantly open up your shed to the surrounding landscape, making it perfect for entertainment or relaxation.
Consider incorporating a covered porch or deck area that extends from your shed. This transitional space not only provides shelter from the elements but also creates an ideal spot for container gardens, outdoor seating, or a peaceful reading nook. Adding window boxes or built-in planters helps blend the structure naturally with your garden setting.
Thoughtful placement of windows and skylights can create visual connections to the outdoors while flooding the interior with natural light. Position these openings to frame pleasant garden views or capture morning sunlight. For evening use, install subtle outdoor lighting along pathways and around the shed’s exterior to enhance both safety and ambiance.
Many homeowners are now incorporating outdoor workspaces into their shed designs. A fold-down exterior table or built-in potting bench can serve as a functional workspace while maintaining a connection to the garden. Weather-resistant materials like composite decking or treated lumber ensure these features will last for years to come.
To maximize flow, consider the surrounding landscaping carefully. Create inviting pathways using stepping stones or gravel, and integrate the shed’s color scheme with your existing outdoor features. This attention to detail helps create a cohesive outdoor living space that feels intentional and well-designed.
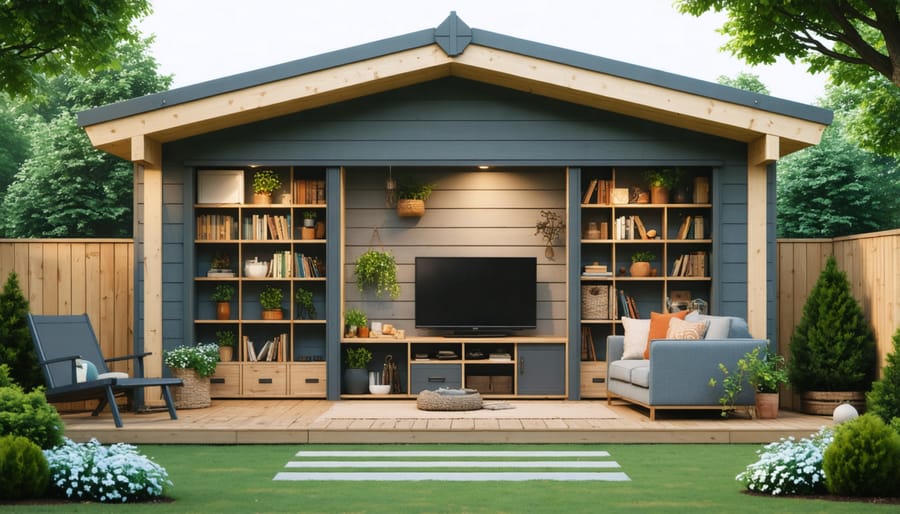
Comfort and Convenience Features
Modern shed designs go beyond basic storage by incorporating features that enhance comfort and usability while maintaining their primary storage function. Strategic window placement maximizes natural light and improves ventilation, creating a more pleasant environment for extended use. Adding a small desk area or workbench along one wall provides a dedicated workspace without compromising storage capacity.
Insulation plays a crucial role in comfort, making your shed usable year-round. Installing proper wall and ceiling insulation helps regulate temperature and reduces moisture issues. Consider adding a small electric heater for winter months and a portable fan or built-in ventilation system for summer comfort.
Lighting options should include both task and ambient lighting. Solar-powered lights offer an eco-friendly solution, while battery-operated LED fixtures provide flexibility without requiring electrical wiring. Installing pegboards or adjustable shelving systems allows for customizable storage while keeping frequently used items within easy reach.
For enhanced functionality, consider adding a small seating area with folding chairs that can be tucked away when not in use. Built-in storage benches serve dual purposes, offering both seating and storage space. Simple amenities like a wireless speaker system, phone charging station, or mini-fridge can transform your shed into a more comfortable workspace or retreat.
Remember to include practical features like non-slip flooring, weather stripping around doors and windows, and adequate ventilation to ensure your shed remains comfortable and functional throughout the year.
As we’ve explored throughout this guide, sheds have evolved far beyond simple storage spaces into versatile, multi-functional structures that can transform your property. From traditional garden storage units to stylish home offices, workshops, and even entertainment spaces, the possibilities are truly endless. The key to success lies in carefully considering your specific needs, available space, and local regulations before settling on a design.
Remember that the perfect shed combines practical functionality with aesthetic appeal. Whether you opt for a classic gable roof design, a modern lean-to, or a charming gambrel style, your shed should complement your home’s architecture while serving its intended purpose. Don’t be afraid to think outside the box – features like skylights, French doors, or wrap-around workbenches can dramatically enhance your shed’s utility and enjoyment.
Consider starting small with a basic design that can be modified or expanded as your needs change. Many homeowners find that their shed evolves over time, adapting to new hobbies or storage requirements. By choosing quality materials and incorporating proper ventilation, insulation, and lighting from the start, you’ll create a lasting investment in your property.
Take inspiration from the various designs we’ve discussed and reimagine your outdoor space. With careful planning and thoughtful design choices, your shed can become more than just a storage solution – it can be a valuable extension of your living space that enhances both your property’s functionality and value.