
How Portable Snow Melting Mats Keep Your Shed Access Safe All Winter
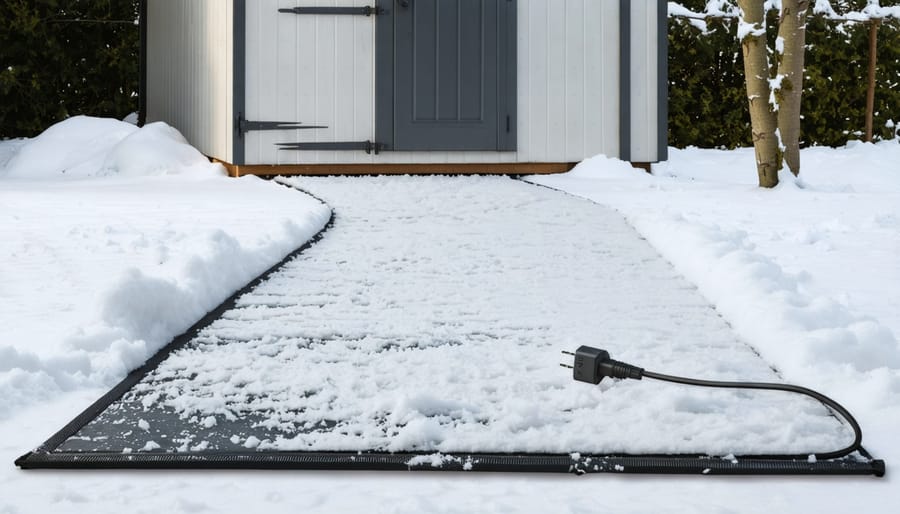
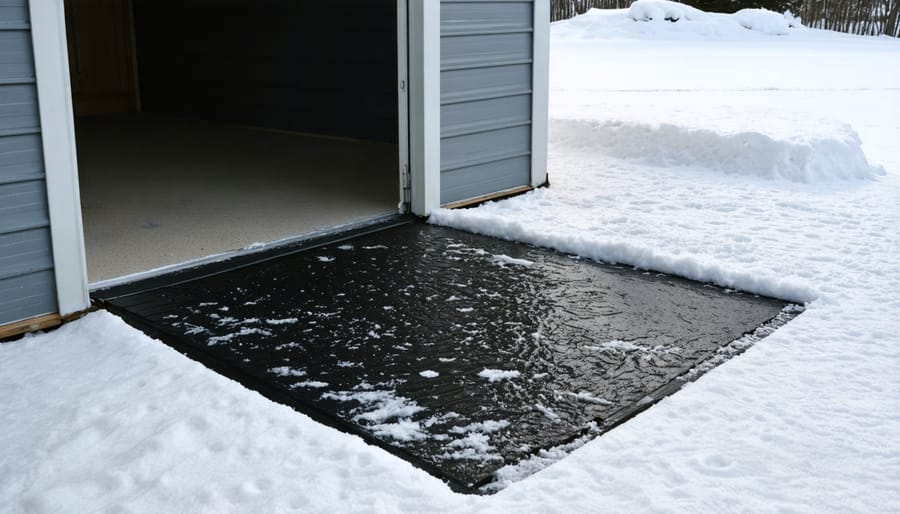
Transform your winter walkways and shed access with portable snow melting mats – the smart solution that eliminates manual shoveling and hazardous ice buildup. These innovative heating systems, essential for effective winter shed maintenance, use radiant heat technology to keep paths clear and safe even during heavy snowfall. Operating on standard household electricity, these durable mats can be quickly deployed before storms and easily stored during warmer months, making them ideal for homeowners seeking reliable snow management solutions. Unlike chemical de-icers or labor-intensive snow removal methods, heated mats provide continuous, automatic snow melting while protecting your concrete and landscaping from damage. With various sizes available and simple plug-and-play installation, these mats offer a practical, energy-efficient approach to maintaining safe access to your outdoor structures throughout the winter season.
What Are Portable Snow Melting Mats?
Key Features and Components
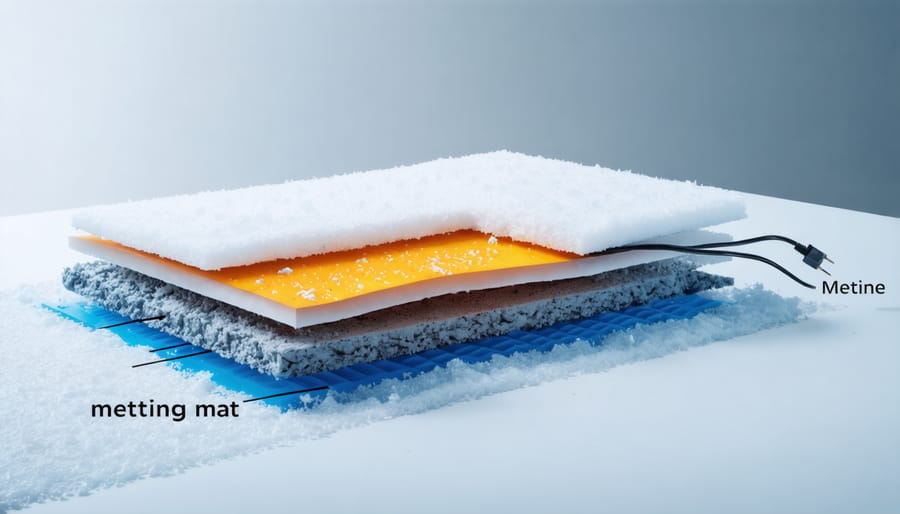
Portable snow melting mats feature a durable, slip-resistant surface made from industrial-grade rubber or thermoplastic materials. The core contains embedded heating elements, typically electric resistance wires or cables, evenly distributed throughout the mat for consistent heat distribution. These heating elements operate at low temperatures (usually between 40-60°F) to efficiently melt snow and ice without becoming dangerously hot.
Most mats include built-in GFCI protection and waterproof connectors to ensure safe operation in wet conditions. The outer layer is UV-resistant and designed to withstand heavy foot traffic, while the non-slip surface texture provides secure footing even when wet. Many models feature interlocking edges that allow multiple mats to be connected for custom coverage areas.
For added convenience, some snow melting mats come with automatic temperature and moisture sensors that activate heating only when needed. The standard thickness ranges from ½ to 1 inch, making them easy to roll up and store during warmer months. Most residential models operate on standard 120V power, though commercial versions may require 240V connections for increased heating capacity.
Power Requirements and Operation
Most portable snow melting mats operate on standard 120V household power, drawing between 5-10 watts per square foot. For safe operation, ensure proper weatherproof electrical connections to protect against moisture. Simply plug in your mat about 2 hours before expected snowfall to prevent accumulation, or turn it on after snow begins to melt existing coverage. Many models feature built-in thermostats that automatically activate when temperatures drop below freezing, helping to manage energy consumption. For optimal performance, clear any existing snow before laying the mat, and ensure it lies flat against the ground. Remember to regularly check the power cord for wear and tear, especially during heavy winter use.
Strategic Placement for Maximum Protection
Entry Points and Walkways
Strategic placement of snow melting mats at your entry points and walkways is crucial for maintaining safe winter access. Start by installing mats at your main doorway, ensuring they extend at least 2-3 feet on either side of the entrance. For optimal safety, create a clear path from your driveway or main walkway to the door by placing mats end-to-end.
Consider high-traffic areas where ice typically accumulates, such as steps or sloped pathways. Place mats on these surfaces first, as they pose the highest risk for slips and falls. For steps, ensure each tread is completely covered, and extend the mat slightly over the edge for better melting effectiveness.
Remember to position mats where water naturally drains away from your entrance. This prevents melted snow from refreezing and creating new hazards. For wider walkways, overlap mats by 2-3 inches to prevent gaps where snow could accumulate. Many homeowners find success in creating L-shaped configurations at corners, ensuring continuous protection along their entire access route.
A smart tip is to mark mat positions before winter arrives, making seasonal installation quick and consistent.
Ramps and Slopes
When installing snow melting mats on inclined surfaces, proper placement and secure anchoring become even more crucial. Ramps and sloped driveways require special attention to prevent the mats from sliding or creating potential hazards. For optimal safety, position the mats to cover the entire inclined surface, ensuring no gaps where ice could form.
Consider using additional anchoring methods beyond the mat’s standard features when dealing with steeper grades. Many homeowners successfully use weather-resistant tape or specialized mat clips at the top of the incline to provide extra security. For particularly steep surfaces, installing a small lip or barrier at the bottom edge can prevent any downward sliding.
The melting pattern on slopes differs from flat surfaces, as water tends to run downhill. Position your mats to direct melted snow and water away from high-traffic areas. Some users find that overlapping mats on slopes provides better coverage and prevents gaps from forming. Remember to check your mat placement regularly during heavy snowfall, as the weight of accumulating snow can sometimes cause shifting on inclined surfaces.
Installation and Maintenance Tips

Setup Process
Setting up your portable snow melting mats is a straightforward process that anyone can handle. Start by thoroughly cleaning the area where you’ll place the mat, removing any debris or loose material. Unroll the mat completely and position it flat against the ground, ensuring there are no wrinkles or overlaps that could create tripping hazards.
Next, secure the mat’s edges using the provided fasteners or weighted objects to prevent wind from lifting the corners. If you’re using multiple mats, align them edge-to-edge without overlapping. Connect the power cord to a nearby GFCI-protected outlet, making sure the cord is safely positioned away from foot traffic.
For best results, place your mats before snowfall begins. Most models include an automatic sensor that activates heating when snow or ice is detected. Remember to periodically check the mat’s surface and connections throughout the winter season to ensure optimal performance and safety.
Seasonal Care
Proper care of your snow melting mats during off-seasons ensures their longevity and reliable performance when winter returns. After the last snow, thoroughly clean your mats with mild soap and water to remove any salt residue or debris. Allow them to dry completely before rolling them up for storage. Never fold the mats, as this can damage the internal heating elements.
Store your mats in a cool, dry place away from direct sunlight. A climate-controlled space like your garage or basement works best. Consider using a storage tube or wrapping the rolled mats in a protective cover to prevent dust accumulation and protect against moisture.
Before winter returns, inspect your mats for any signs of wear, checking the power cord and connections for damage. Test each mat briefly to ensure proper heating function. This pre-season check helps identify any issues before you need the mats for snow management.
Cost and Energy Efficiency
When comparing portable snow melting mats to traditional snow removal methods, the initial investment might seem higher, but the long-term savings in both time and resources often justify the cost. These mats typically operate at 50-60 watts per square foot, which translates to about $0.15-0.20 per hour of operation for a standard 2×5 foot mat under normal winter conditions.
Unlike manual snow removal, which requires physical effort and time, or chemical de-icers that need frequent reapplication, snow melting mats work automatically when plugged in. This efficiency becomes particularly valuable when considering the comprehensive costs of traditional methods: snow shovels need replacement, salt damages concrete and vegetation, and professional snow removal services can cost hundreds of dollars per season.
The energy consumption of these mats can be optimized when integrated with proper climate control for sheds. Many models come with built-in thermostats that activate only when needed, preventing unnecessary power usage. For a typical residential installation, users report average monthly electricity costs of $20-30 during winter months – significantly less than the combined costs of alternatives.
To maximize efficiency, consider using timers or smart plugs to operate the mats during expected snowfall periods. This strategic approach helps maintain safe access to your shed while keeping operating costs reasonable throughout the winter season.
Safety Considerations
While snow melting mats offer convenience, proper safety practices are essential for optimal performance and user protection. Always inspect your mats for signs of wear, exposed wiring, or damage before each use. Keep the mat’s surface clear of sharp objects and avoid using chemical de-icers directly on the mat, as these can potentially damage the heating elements.
Ensure proper grounding of electrical connections and use only GFCI-protected outlets to prevent electrical hazards. When positioning mats, avoid overlapping them as this can lead to overheating. For temporary storage, roll the mats carefully rather than folding them to prevent internal wire damage.
Monitor weather conditions and activate your mats before heavy snowfall for best results. While the mats are designed to be slip-resistant, exercise caution when walking on them during wet conditions. If you notice any unusual heating patterns or electrical issues, discontinue use immediately and consult a professional.
Remember to keep children and pets supervised around heated mats, and always follow the manufacturer’s specific safety guidelines and weight capacity recommendations. When not in use, store your mats in a dry, climate-controlled environment to extend their lifespan.
Portable snow melting mats offer a game-changing solution for winter shed maintenance, providing reliable, safe access to your storage space throughout the coldest months. These innovative mats eliminate the need for manual snow removal, saving time and reducing the risk of injury from slipping or strenuous shoveling. Their plug-and-play design makes them incredibly user-friendly, while their durability ensures years of dependable service. Whether you’re maintaining a workshop shed or accessing seasonal storage, these mats create a clear, hazard-free path exactly where you need it. By investing in portable snow melting mats, you’re not just buying a winter maintenance tool – you’re securing peace of mind and continuous access to your shed, regardless of weather conditions. The convenience, safety, and efficiency they provide make them an invaluable addition to any shed owner’s winter maintenance strategy.
Looking for a storage sheds?
Browse our full range of storage sheds from authorized dealer brands. Free shipping to the continental US.