
Beautiful Backyard Furniture from Old Junk (Yes, Really!)
Transform forgotten furniture into stunning statement pieces while saving money and reducing landfill waste through creative upcycling. With just basic tools, a creative eye, and a few weekends of dedication, those discarded dressers, weathered wooden pallets, and vintage chairs can become remarkable custom pieces that tell a unique story in your home.
Whether you’re a seasoned DIY enthusiast or just starting your upcycling journey, furniture transformation offers endless possibilities. From converting an old ladder into a stylish bookshelf to reimagining a vintage suitcase as a quirky side table, the art of upcycling lets you create one-of-a-kind pieces that perfectly match your style and space requirements.
This growing movement isn’t just about creativity – it’s a practical solution for budget-conscious homeowners who want to combine environmental responsibility with personal expression. By breathing new life into existing furniture, you’ll develop valuable DIY skills, reduce your environmental footprint, and create conversation pieces that can’t be found in any store. Ready to turn trash into treasure? Let’s explore the essential techniques, tools, and inspiring ideas that will help you master the art of furniture upcycling.
Essential Tools and Materials for Outdoor Furniture Upcycling
Weather-Proofing Essentials
To ensure your upcycled furniture withstands outdoor conditions, proper weatherproofing is essential. Start by thoroughly sanding your piece and applying a quality exterior primer designed for your material type. For wooden furniture, use marine-grade varnish or exterior polyurethane for superior protecting outdoor furniture from moisture and UV damage. Apply at least three coats, sanding lightly between each layer.
For metal pieces, remove any rust with a wire brush and apply rust-inhibiting primer before finishing with exterior-grade paint. Consider using spray-on waterproof sealants for added protection. For fabric elements, choose weather-resistant materials like Sunbrella or treat regular fabric with waterproofing spray.
Don’t forget to elevate furniture slightly off the ground using rubber feet or blocks to prevent water absorption. Apply furniture wax or protective oil every few months to maintain the finish. For added durability, consider adding protective caps or covers for when the furniture isn’t in use. These simple steps will help your upcycled pieces remain beautiful and functional for years to come.
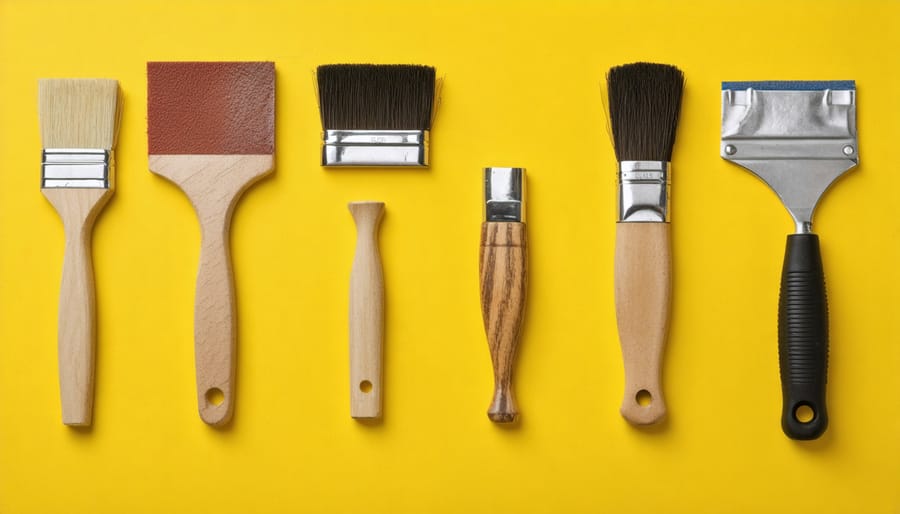
Must-Have Tools for Success
To successfully upcycle furniture, you’ll need a solid collection of basic woodworking tools and some specialized items. Start with a reliable power drill, screwdrivers (both Phillips and flathead), and a sturdy hammer. A orbital sander is essential for smoothing surfaces and removing old finishes, while a quality measuring tape and level ensure precise work.
For detailed transformations, invest in wood chisels, a utility knife, and wood glue. Paint brushes, rollers, and sandpaper in various grits are must-haves for surface preparation and finishing. Don’t forget safety equipment: protective goggles, work gloves, and a dust mask are non-negotiable.
Some projects might require specialized tools like a jigsaw for cutting curves, a staple gun for upholstery work, or a heat gun for removing stubborn paint. A set of clamps will prove invaluable when gluing pieces together or holding items steady while working. Consider adding a palm sander for smaller surfaces and detail work, making your upcycling projects more professional and polished.
Transforming Common Items into Outdoor Treasures
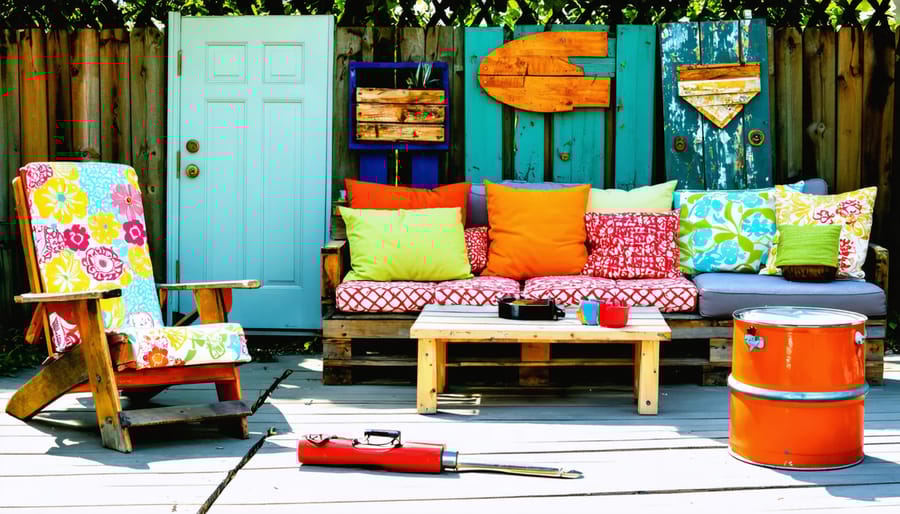
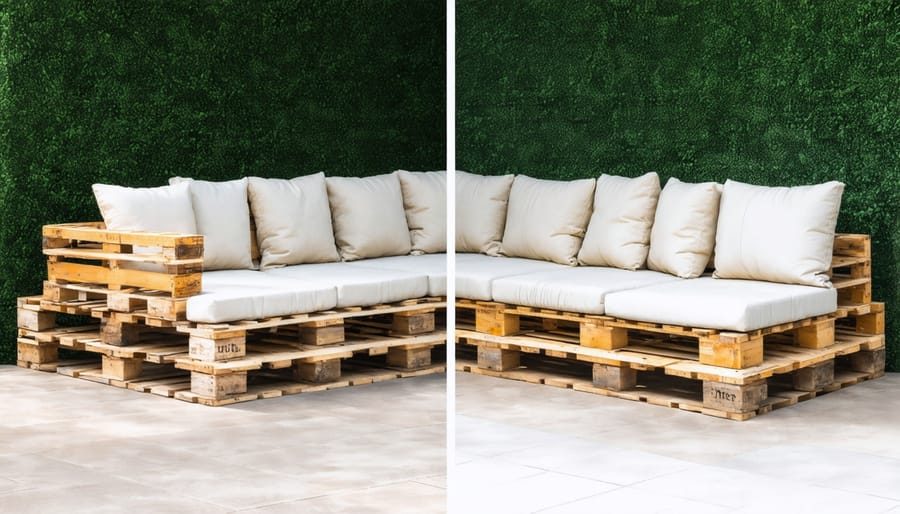
Pallet Lounge Seating
Transform ordinary wooden pallets into stylish outdoor lounge seating with this straightforward DIY project. If you’re looking for budget-friendly pallet furniture ideas, this weather-resistant setup is perfect for your patio or garden space.
Start by selecting sturdy pallets with the HT (heat-treated) stamp, ensuring they’re safe for residential use. Clean thoroughly with warm soapy water and let dry completely. Sand all surfaces until smooth, paying special attention to edges and corners to prevent splinters.
Apply an exterior-grade wood sealer to protect against moisture, followed by two coats of outdoor paint or stain in your chosen color. For added durability, finish with a clear waterproof sealant.
Create the seat base using two pallets stacked and secured together with galvanized screws. For the backrest, cut a third pallet at a 15-degree angle and attach it to the base using heavy-duty hinges. Add support brackets for stability.
Complete your lounge seating with weather-resistant cushions. Use outdoor fabric and foam to make custom cushions, or purchase pre-made patio cushions. For extra comfort, add removable throw pillows that can be stored indoors during inclement weather.
Regular maintenance includes checking for loose screws, resealing annually, and storing cushions when not in use. With proper care, your pallet lounge seating will provide years of outdoor enjoyment.
Old Door Coffee Table
Transform an old door into a charming outdoor coffee table with this creative upcycling project. Start by thoroughly cleaning your salvaged door and removing any hardware. Sand the surface to remove old paint or varnish, paying special attention to rough spots and edges. If there are any holes from old hardware, fill them with wood filler and sand smooth once dry.
For the table legs, you have several options. Metal hairpin legs offer a modern industrial look, while repurposed wooden posts create a more rustic feel. Attach your chosen legs securely to the door’s corners using appropriate screws and brackets. For added stability, install support braces between the legs.
To protect your table from outdoor elements, apply several coats of exterior-grade sealer or marine varnish. If desired, paint the table in your chosen color before sealing. Consider adding a piece of tempered glass on top to create a smooth surface while preserving any interesting details or textures of the original door.
For extra character, maintain some of the door’s original features like panels or decorative trim. You might even incorporate the old doorknob as a unique accent piece. Add rubber feet to the bottom of the legs to protect your patio surface and prevent water damage to the wood.
Remember to periodically reapply sealer and store the table in a covered area during harsh weather to extend its lifespan.
Metal Drum Fire Pit Seating
Transform an old metal drum into a striking outdoor seating solution that combines industrial charm with comfort. Start by thoroughly cleaning your drum and removing any hazardous residue. Using an angle grinder, carefully cut the drum in half lengthwise to create two identical curved pieces that will serve as your seat backs.
Sand down all edges until smooth and drill drainage holes in the bottom to prevent water accumulation. Apply a rust-resistant primer followed by outdoor metal paint in your chosen color. For added durability, finish with clear weatherproof sealant.
Create a comfortable seat by building a simple wooden frame that fits inside the curved metal. Use pressure-treated lumber for the base and attach wooden slats across the top for seating. Add high-density outdoor foam cut to size and cover with weather-resistant fabric for maximum comfort.
Secure the metal drum back to the wooden base using heavy-duty brackets and bolts. For stability, consider adding legs or a platform underneath. You can enhance the design by incorporating storage space beneath the seat or adding armrests using the drum’s leftover metal.
Complete the look with weather-resistant cushions and throws. These unique seats work wonderfully around a fire pit or as standalone statement pieces on your patio. Regular maintenance with metal polish will keep them looking sharp for years to come.
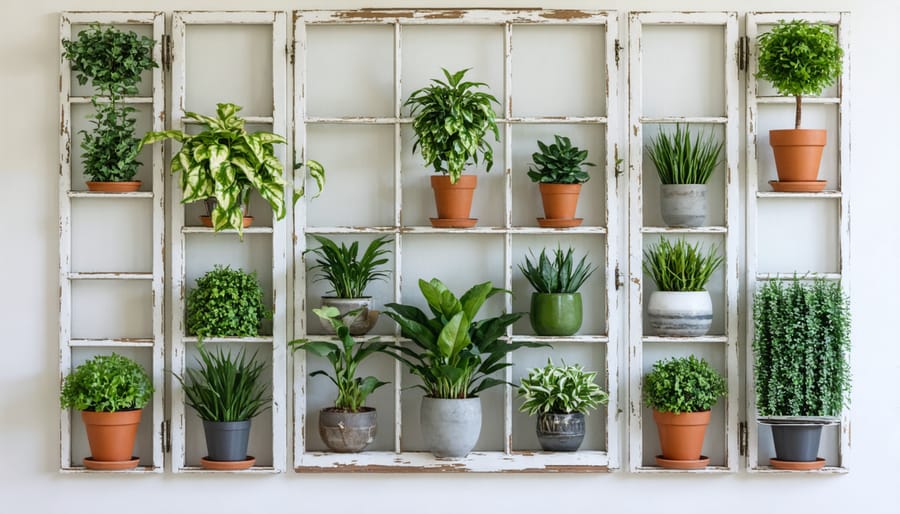
Window Frame Plant Stand
Transform discarded window frames into a charming plant stand that adds vintage character to your garden or patio. Start by thoroughly cleaning two to three old window frames and removing any loose paint or glass. Sand the frames lightly to create a smooth surface, being careful to wear protective gear if dealing with older paint.
For stability, create a simple base using reclaimed wooden boards cut to match the width of your windows. Attach the boards perpendicular to each other in a cross formation using weather-resistant screws. Next, secure your window frames vertically to this base, forming a triangle or square shape depending on your design preference.
Add wooden shelves at different heights within the frame openings using recovered boards or pallets. These will serve as platforms for your plants. Secure each shelf with L-brackets for added support. Consider weatherproofing your creation with exterior paint or sealant in your chosen color scheme.
For functionality, add small hooks to the frames to hang trailing plants or garden tools. You can also incorporate wire mesh or chicken wire in some frame sections to create space for air plants or climbing vines. Place your completed stand in a partially shaded area to protect both the structure and your plants from harsh weather conditions.
This versatile piece works beautifully on patios, in garden corners, or as a striking focal point in your outdoor space. Remember to check the structure periodically for stability and touch up the weatherproofing as needed.
Maintenance and Care Tips
Seasonal Protection Strategies
For successful seasonal furniture protection, adapt your care routine to match changing weather conditions. During summer, apply UV-resistant sealants to prevent sun damage and fading. Create shade solutions using pergolas or outdoor umbrellas to extend furniture life. In autumn, clean thoroughly and store cushions indoors to prevent mold growth. For winter protection, either move furniture to covered storage or use heavy-duty waterproof covers, ensuring proper ventilation to prevent moisture buildup. Spring calls for a deep clean and fresh protective coating. For year-round outdoor pieces, consider applying multiple layers of weather-resistant finish and elevating furniture off the ground to prevent water damage. Regular maintenance checks and prompt repairs will significantly extend the life of your upcycled creations, keeping them beautiful and functional through every season.
Regular Maintenance Schedule
To keep your upcycled furniture looking its best, establish a simple monthly cleaning routine. Wipe down surfaces with a damp cloth and mild soap solution, paying special attention to corners and crevices where dust accumulates. For wooden pieces, apply a natural furniture polish every three months to maintain their luster and protect against moisture damage.
Check all hardware connections quarterly, tightening any loose screws or brackets. Inspect upholstered sections for wear and treat fabric with appropriate protectors twice a year. For outdoor upcycled pieces, bring them under cover during harsh weather conditions and apply weather-resistant sealant annually.
Touch up paint or finish as needed, typically every six to twelve months depending on use. Keep a small supply of your original paint or finish for quick repairs. For metal components, watch for signs of rust and address immediately with appropriate treatment. Consider repositioning furniture periodically to prevent uneven wear and sun damage, especially for pieces near windows or outdoor areas.
Transforming old furniture into stunning new pieces isn’t just a creative outlet – it’s a powerful way to reduce waste, save money, and create truly unique items for your home. By upcycling furniture, you’re not only giving forgotten pieces a second life but also developing valuable DIY skills that can be applied to future projects. The satisfaction of creating something beautiful and functional with your own hands is truly unmatched.
Whether you’re starting with a simple paint job or tackling a complete furniture transformation, remember that every project is an opportunity to learn and grow. Don’t be afraid to experiment with different techniques, colors, and styles to find what works best for your space and personal taste.
Ready to begin your upcycling journey? Start by looking around your home, visiting thrift stores, or checking online marketplaces for potential pieces. With some creativity, basic tools, and the tips we’ve shared, you’ll be well-equipped to turn cast-off furniture into cherished statement pieces that reflect your style while contributing to a more sustainable future.
Start small, stay patient, and most importantly, enjoy the creative process of breathing new life into old furniture!