
Build Your 8×8 Shed Right: Essential Materials for Safety and Longevity
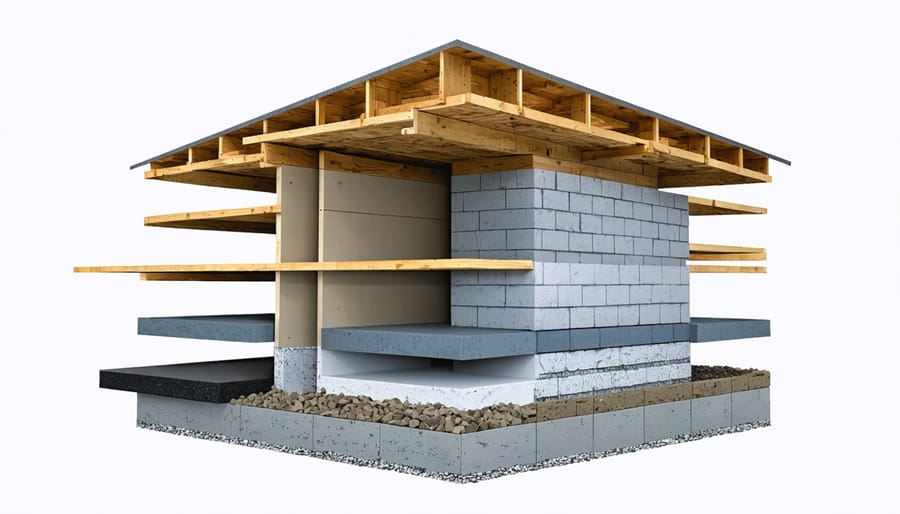
Building an 8×8 shed demands careful material selection and adherence to local building codes to ensure durability and safety. This compact storage solution requires approximately 20 2×4 pressure-treated lumber pieces for framing, 4×8 exterior-grade plywood sheets for walls and flooring, and weather-resistant roofing materials including shingles and underlayment. Factor in essential hardware like galvanized nails, deck screws, and hurricane ties to withstand environmental stresses. The foundation choices – whether concrete blocks, gravel bed, or poured slab – significantly impact your material requirements and long-term stability. Smart material selection now prevents costly repairs later, while proper planning ensures your shed serves as a reliable storage space for years to come.
Foundation and Floor Materials
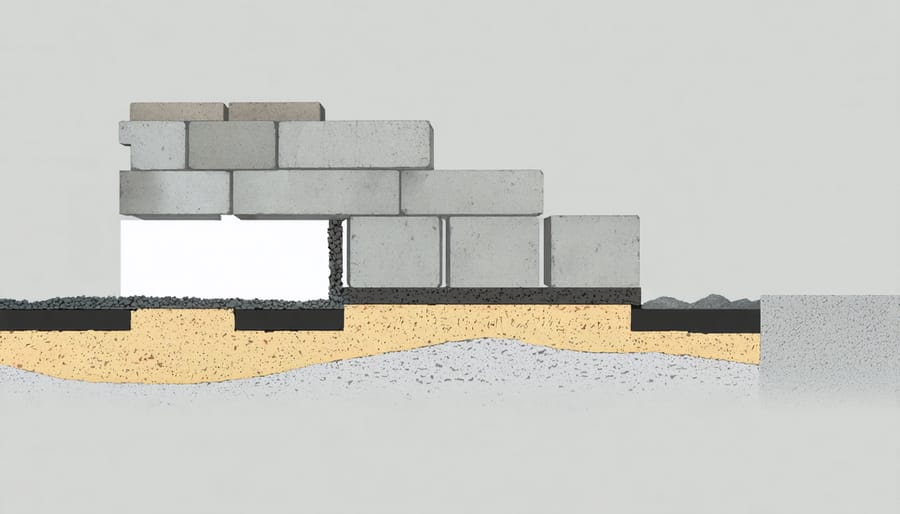
Foundation Options
A solid foundation is crucial for your 8×8 shed’s longevity and stability. For a standard gravel foundation, you’ll need approximately 2 cubic yards of crushed gravel (¾-inch) to create a 4-inch deep base. Level the area and compact the gravel thoroughly before proceeding with construction.
If you prefer a block foundation, plan for 12 concrete blocks (8x8x16 inches) placed at strategic points: one at each corner and two along each wall. Remember to include concrete cap blocks to protect the wood from ground moisture.
For the foundation frame, you’ll need pressure-treated lumber to resist moisture and decay. Your material list should include:
– Four 8-foot pressure-treated 2x6s for the perimeter
– Three 8-foot pressure-treated 2x6s for floor joists
– Sixteen 16-inch pressure-treated 2x4s for block supports
– Galvanized deck screws and joist hangers
Consider adding a moisture barrier between the ground and foundation to provide extra protection against dampness. A 10×10-foot heavy-duty polyethylene sheet works perfectly for this purpose.
Remember to check local building codes, as some areas require specific foundation types or additional materials for shed construction.
Flooring Components
For a solid foundation, you’ll need pressure-treated lumber for your floor joists, typically 2×6 boards spaced 16 inches on center. Plan for nine joists running the 8-foot length of your shed, plus two end joists. These pressure-treated components resist moisture and insects, ensuring your shed floor stays sturdy for years to come.
For the decking, a 3/4-inch pressure-treated plywood is your best bet. You’ll need two 4×8 sheets to cover the entire floor area. This thickness provides excellent support for your stored items and prevents sagging between joists. Make sure to choose plywood rated for ground contact to maximize durability.
Don’t forget the rim joists, which frame the perimeter of your floor. You’ll need two 8-foot pieces for the sides and two 8-foot pieces for the front and back. Also include joist hangers to secure each floor joist to the rim joists – you’ll need 18 of these metal connectors for proper installation.
For added moisture protection, consider laying a vapor barrier beneath your floor system. This simple addition will significantly extend the life of your flooring components.
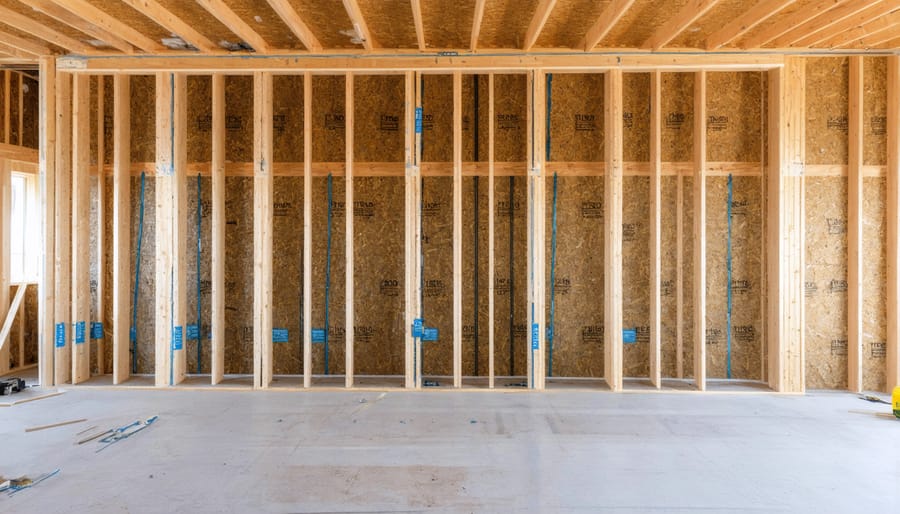
Wall and Frame Materials
Structural Lumber
The backbone of your 8×8 shed consists of essential structural lumber components that provide strength and stability. For the wall framing, you’ll need fourteen 2×4 studs (92-5/8″ length) for vertical support, spaced 16 inches on center. The top and bottom plates require four 2x4s (8-foot length) to create a solid frame foundation.
For door and window framing, include two 2×4 headers (depending on your opening sizes) and matching jack studs. The roof structure calls for four 2×6 rafters (10-foot length) and two 2×6 ridge beams (8-foot length). Don’t forget four 4×4 pressure-treated posts for the corners, which should extend at least 2 feet into the ground for stability.
Consider using pressure-treated lumber for any wood that comes in contact with the ground or concrete to prevent rot and extend your shed’s lifespan. When selecting your lumber, look for straight pieces with minimal knots, especially for load-bearing components. Take time to inspect each piece, checking for warping, splitting, or other defects that could compromise structural integrity.
Remember to factor in a 10% waste allowance when purchasing your lumber to account for any cuts or potential material defects you might discover during construction.
Wall Sheathing and Siding
For effective exterior protection, your 8×8 shed requires durable wall sheathing and siding materials. Start with 7/16-inch oriented strand board (OSB) or 1/2-inch exterior-grade plywood for the wall sheathing. You’ll need approximately eight 4×8-foot sheets to cover all walls, including some extra for waste. Before installing siding, apply a layer of house wrap as one of the essential weather protection measures to prevent moisture damage.
For siding, consider either vinyl siding panels (about 12 squares needed) or T1-11 plywood siding (eight 4×8-foot sheets). Vinyl offers low maintenance and comes in various colors, while T1-11 provides a more traditional wood appearance and can be painted to match your home. Don’t forget trim pieces for corners and around openings – you’ll need:
– 4 corner trim pieces (10-foot length each)
– 2 door trim sets
– Sufficient J-channel for vinyl installation
– Galvanized nails or screws for securing materials
Remember to factor in a 10% material overage for cuts and possible mistakes. Choose materials rated for exterior use to ensure long-lasting protection against the elements.

Roofing Materials
Roof Framing
For a sturdy 8×8 shed roof, you’ll need 2×6 rafters spaced 16 inches on center, typically requiring 12-14 pieces to span both sides. The ridge beam, which serves as the roof’s peak, should be a 2×8 pressure-treated lumber piece cut to 8 feet. Don’t forget the gable end rafters, which need extra stability for protecting against wind.
Essential support materials include hurricane ties or rafter ties to secure each rafter to the top plates, ensuring your roof stays put during strong winds. You’ll also need metal straps and joist hangers for additional structural integrity. Plan for 1/2-inch plywood or oriented strand board (OSB) sheathing to cover the rafters – you’ll need about four 4×8 sheets.
To properly finish the roof, include drip edge flashing for both the eaves and rakes, roofing felt (15# or 30#), and approximately 2-3 bundles of asphalt shingles. Remember to add ridge caps for a professional-looking finish and proper waterproofing at the peak. A box of 3-inch deck screws and 1¼-inch roofing nails will secure everything in place.
Roofing Coverage
For proper roof protection, you’ll need approximately 2 bundles of asphalt shingles to cover your 8×8 shed’s roof. These should be high-quality, 3-tab shingles rated for at least 20 years of use. Don’t forget to include a roll of roofing underlayment (about 100 square feet) to create a moisture barrier beneath the shingles.
For the edges and valleys, you’ll need metal drip edge flashing – roughly 50 linear feet should suffice. Include 2-3 pieces of vent flashing if you’re planning to install roof vents. Essential roofing materials also include 1 box of roofing nails (1¼-inch), and about 100 underlayment staples.
Consider adding ridge caps (approximately 10 linear feet) for a professional finish at the roof peak. For additional weather protection, especially in areas with heavy rainfall, include ice and water shield for the eaves – one roll covering 100 square feet will be more than enough.
Pro tip: Always purchase about 10% extra shingles to account for cuts and waste during installation. This ensures you won’t run short during the project.
Hardware and Finishing Materials
Essential Hardware
Your 8×8 shed will require several types of hardware to ensure proper assembly and long-term durability. For framing, you’ll need 16d common nails (about 5 pounds) for joining structural elements and 8d common nails (3 pounds) for wall sheathing. Grab a box of 2½-inch exterior wood screws for additional reinforcement and 1⅝-inch roofing nails for shingles.
Don’t forget galvanized joist hangers and hurricane ties for structural stability – you’ll need at least 12 of each. For the door, include heavy-duty hinges (3-4 pieces), a handle set, and a latch or lock for security. Pick up some L-brackets and corner braces for extra support at crucial joints.
Pro tip: Always choose exterior-grade, corrosion-resistant hardware to prevent rust and deterioration. It’s worth spending a bit more on quality hardware – it’s much easier to install things right the first time than to replace rusted fasteners later.
Weather Protection
Protecting your shed from the elements is crucial for its longevity. Start weatherproofing your shed with high-quality exterior caulk for sealing joints and gaps around windows and doors. You’ll need at least two tubes of silicone caulk and a caulk gun for application. Choose an exterior paint specifically formulated for outdoor use – plan for one gallon of primer and two gallons of paint to ensure proper coverage. Don’t forget self-adhesive weather stripping for doors and windows; purchase enough to go around all openings completely. Include foam tape for additional sealing and a door sweep to prevent water from seeping under the entrance. For extra protection, consider adding rubber gaskets around any vents or openings. These materials will work together to create a weather-tight seal that keeps your belongings dry and protected year-round.
Building an 8×8 shed is a rewarding project that requires careful planning and the right materials. By following this comprehensive material list and guidelines, you’ll be well-equipped to create a durable, functional storage space that meets your needs. Remember to always check local building codes and obtain necessary permits before starting your project.
Regular maintenance will extend your shed’s lifespan and protect your investment. Inspect your shed seasonally for any signs of wear, particularly around the roof and foundation. Keep gutters clean, seal any gaps that may appear, and touch up paint or stain as needed. Consider adding ventilation if you haven’t already to prevent moisture buildup.
For the best results, purchase your materials from reputable suppliers and store them properly before construction begins. While the upfront cost might be higher for quality materials, they’ll pay off in the long run through increased durability and reduced maintenance needs. With proper planning, quality materials, and regular upkeep, your 8×8 shed will provide reliable storage space for years to come.