
Build Your Perfect 6×8 Storage Shed (Easy Weekend Project)
Building a 6×8 storage shed transforms your backyard into an organized haven while maximizing every square inch of available space. At 48 square feet, this compact yet versatile structure perfectly balances storage capacity with a modest footprint – ideal for urban yards and smaller properties. Standard 6×8 plans accommodate everything from garden tools and seasonal decorations to bicycles and workshop equipment, with enough room to move comfortably inside. Customize your build with strategic shelving, pegboard walls, and overhead storage to double the usable space. Whether you’re a first-time builder or an experienced DIYer, these dimensions create a manageable weekend project that requires minimal materials and basic carpentry skills. Follow our detailed construction guide to create a durable, weather-resistant structure that enhances your property’s functionality and value while meeting most local building codes.\n\n\n
Essential Features of a 6×8 Storage Shed
\n\n
Space Planning and Layout Options
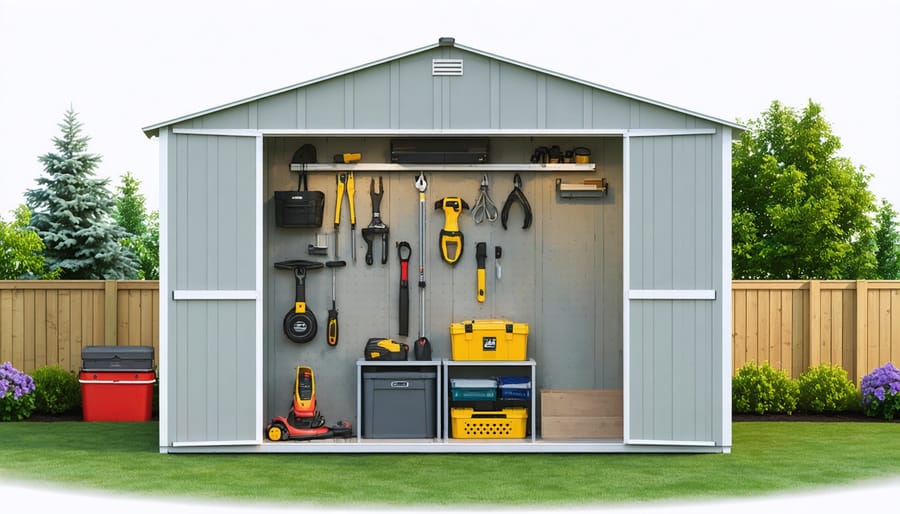
\n\nA 6×8 shed offers versatile space planning options to maximize every square foot. The most popular layout places the door on the 8-foot wall, creating a wider entrance for easy movement of large items like lawn mowers and bicycles. Consider installing shelving units along both 6-foot walls, leaving a central aisle for access. This configuration typically provides 24-30 linear feet of storage space.\n\nFor garden tool storage, vertical organization is key. Install pegboards or tool hangers on one wall, and use corner spaces for longer items like rakes and shovels. Overhead storage options, such as ceiling-mounted racks or loft spaces, can effectively double your storage capacity without consuming floor space.\n\nMany homeowners find success with a workbench setup along one 6-foot wall, leaving the opposite wall for shelving. This creates a functional workspace while maintaining adequate storage. For seasonal items, consider installing adjustable shelving systems that can be reconfigured as your storage needs change throughout the year.\n\nRemember to leave at least a 3-foot pathway from door to back wall for comfortable movement and easy access to all stored items.\n\n
 \n
\n\n\n
Common Uses and Versatility
\n\nA 6×8 shed offers remarkable versatility for various storage and functional needs. Garden enthusiasts can create an organized space for tools, potting supplies, and seasonal equipment. DIY hobbyists find it perfect for storing power tools, workbenches, and project materials. The compact size makes it ideal for storing bicycles, outdoor furniture, and sports gear without overwhelming your yard.\n\nMany homeowners transform these sheds into mini workshops or craft rooms by adding proper lighting and ventilation. The space can accommodate a small potting station or basic workbench while maintaining enough room for storage. Some creative users even convert their 6×8 sheds into cozy reading nooks or peaceful meditation spaces with minimal modifications.\n\nThe key is strategic organization – utilizing vertical space with wall-mounted storage solutions and overhead shelving can maximize every square foot while keeping items easily accessible.\n\n\n
Building Your 6×8 Shed: Step-by-Step Process
\n\n
Foundation Requirements
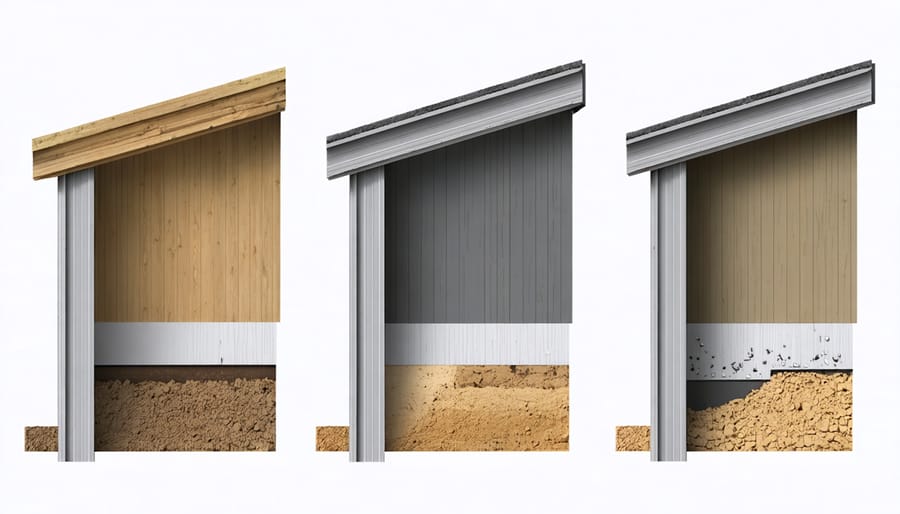
\n\nA solid foundation is crucial for your 6×8 shed’s longevity and stability. Before construction begins, you’ll need to prepare your site properly by ensuring the ground is level and well-drained. You have several foundation options to choose from, each with its own benefits.\n\nA concrete slab foundation offers the most durability and prevents moisture issues, though it requires more initial investment. For a more budget-friendly approach, a gravel pad with crushed stone provides excellent drainage and can be completed in a weekend. Concrete pier blocks are another popular choice, offering a balance between affordability and stability while keeping your shed elevated from ground moisture.\n\nWhichever option you choose, ensure the foundation extends 6 inches beyond your shed’s footprint on all sides. The ground should be cleared of vegetation, and any organic material removed to prevent future settling. Using a level throughout the preparation process is essential to avoid doors that won’t close properly or walls that lean. Consider local building codes and frost lines when determining your foundation depth.\n\n
 \n
\n\n\n
Wall and Roof Assembly
\n\nThe wall and roof assembly is where your 6×8 shed really starts taking shape. Begin by installing the wall studs 16 inches on center, using 2×4 pressure-treated lumber for the bottom plates and standard lumber for the rest. Secure each stud with 16d nails or 3-inch deck screws, ensuring they’re perfectly plumb using your level.\n\nFor the walls, 7/16-inch oriented strand board (OSB) or 1/2-inch exterior plywood works well. Start from a corner and work your way around, leaving a 1/8-inch gap between panels for expansion. Use 8d nails every 6-8 inches along the edges and every 12 inches in the field.\n\nThe roof frame consists of rafters cut to create a 4/12 pitch, which provides excellent drainage while maintaining headroom. Install hurricane ties at each rafter-to-wall connection for added stability. Deck the roof with 1/2-inch OSB or plywood, then add a layer of 15-pound roofing felt. For the final roofing layer, architectural shingles offer durability and attractive aesthetics.\n\nDon’t forget to install siding after the walls are sheathed. Vinyl siding is low-maintenance and weather-resistant, while T1-11 provides a classic wood look. If using T1-11, prime and paint all sides before installation to prevent moisture damage.\n\nPro tip: Before closing up the walls, consider adding a vapor barrier and basic insulation. This small investment helps prevent condensation and protects your stored items from temperature extremes. Remember to caulk all corners and joints for better weather protection.\n\n\n
Customization and Add-ons
\n\n
Storage Solutions
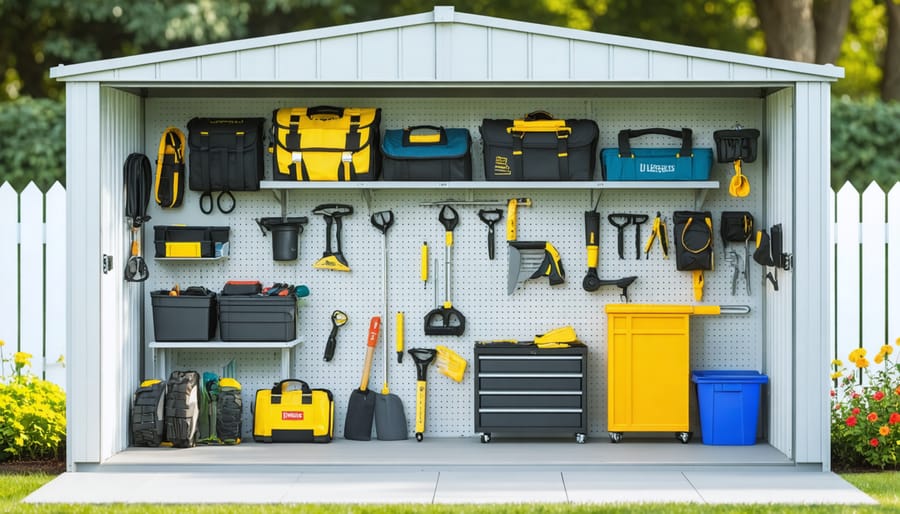
\n\nMake the most of your 6×8 shed by implementing smart storage solutions that maximize every inch of space. Start by installing adjustable wall-mounted shelving units along both sides, which provide flexible storage options for various item sizes. Add heavy-duty hooks and pegboards to the walls for hanging garden tools, extension cords, and frequently used equipment.\n\nTo effectively organize your storage space, consider installing overhead storage racks near the ceiling for seasonal items or rarely used equipment. Door-mounted organizers can hold smaller tools and supplies, while corner shelving units maximize typically unused spaces.\n\nInclude a combination of open shelving and closed cabinets to protect sensitive items from dust and moisture. Consider adding a small workbench with built-in storage underneath for projects and tool maintenance. Remember to leave a clear pathway to access all areas of the shed easily.\n\n
 \n
\n\n\n
Ventilation and Lighting
\n\nProper ventilation and lighting are crucial for maintaining a comfortable and functional 6×8 shed. Consider adding at least one window on either the front or side wall, with installing shed windows being a straightforward weekend project. A 24×24-inch window provides ample natural light while promoting airflow. For enhanced ventilation, install gable vents near the roof peak or add a small turbine vent on the roof.\n\nFor artificial lighting, a battery-operated LED light fixture or solar-powered lights offer flexibility without requiring electrical wiring. Position lights near your workbench or storage areas for maximum visibility. Consider adding a small solar-powered exhaust fan to prevent moisture buildup and maintain air quality, especially if you’re storing sensitive items or using the shed as a workspace. A combination of these ventilation and lighting solutions will help protect your stored items while making the space more pleasant to use.\n\n\nA 6×8 shed offers the perfect balance of functionality and space efficiency for most homeowners. Throughout this guide, we’ve explored the essential aspects of planning, building, and maximizing a shed of this size. Remember that proper foundation preparation, material selection, and attention to local building codes are crucial for a successful project. Whether you’re storing garden tools, creating a workshop, or organizing seasonal items, these shed plans provide a solid framework for your needs.\n\nFor the best results, take time to customize your shed’s features, such as shelving, window placement, and door style, to match your specific requirements. Consider the climate in your area and choose appropriate materials and weatherproofing methods. While the building process may seem challenging at first, following these detailed plans step by step will help ensure a durable, attractive addition to your property.\n\nBefore starting construction, double-check your measurements, gather all necessary materials and tools, and consider recruiting a helping hand for certain stages of the build. With proper planning and execution, your 6×8 shed will serve as a valuable storage solution for years to come.