
Clean & Protect Your Shed in One Afternoon (Simple 3-Step Process)
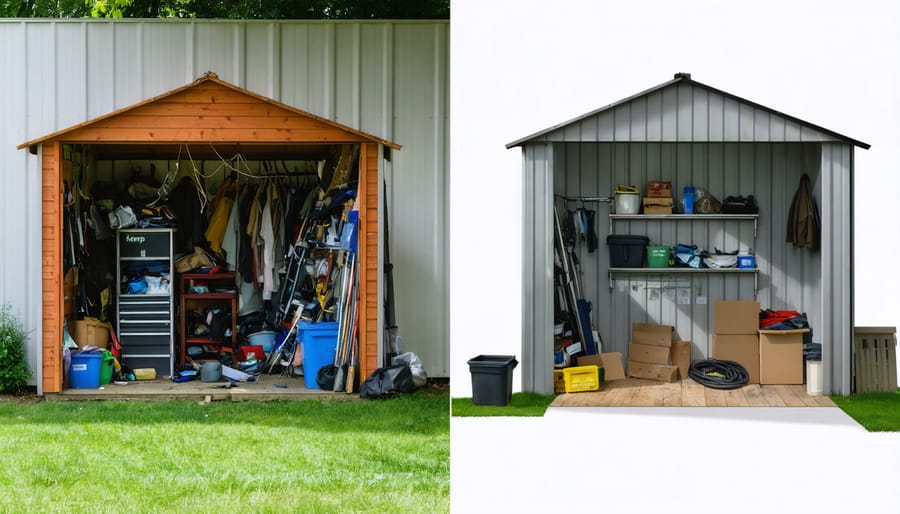
Transform your cluttered shed into an organized, clean space with this proven three-step cleaning process that saves time and ensures lasting results. Start by clearing everything out and sorting items into keep, donate, and dispose piles – this crucial first step prevents you from simply shuffling mess around. Next, tackle the deep clean by addressing cobwebs, dust, and grime from top to bottom, paying special attention to corners and hidden spaces where pests love to hide. Finally, implement a strategic organization system using shelves, hooks, and storage containers to maintain the clean space while protecting your items from future dust and pest problems. This systematic approach not only creates an immediately cleaner shed but also establishes habits that keep your storage space functional and tidy throughout the year.
Step 1: Clear Out and Sort
Creating Sorting Zones
To organize your shed effectively, start by creating three distinct sorting zones: Keep, Donate/Sell, and Dispose. Set up these areas using tarps, cardboard, or designated corners of your yard. The Keep zone should be closest to your shed for easy access, while the Donate/Sell and Dispose zones can be positioned further away.
Label each zone clearly and establish sorting criteria before you begin. Items in good condition that you haven’t used in over a year should go to the Donate/Sell pile. Damaged, broken, or outdated items belong in the Dispose zone. The Keep zone should only contain items you regularly use and that serve a specific purpose in your shed.
As you sort, make quick decisions to maintain momentum. Handle each item only once and immediately place it in its designated zone. This prevents the common mistake of creating “maybe” piles that can slow down the process. Keep a notepad handy to list any replacement items you might need or to record items for future organization.
Remember to have appropriate disposal containers and donation boxes ready before you start. This preparation ensures a smooth, uninterrupted sorting process and prevents sorted items from getting mixed up again.

Initial Pest Inspection
Before diving into the cleaning process, take time to thoroughly inspect your shed for signs of pest activity. Look for droppings, especially in corners and along walls, which might indicate rodent presence. Check for gnaw marks on wooden surfaces, boxes, or storage items. Inspect dark, humid areas where insects might nest, and examine the ceiling corners for cobwebs or wasp nests.
Pay special attention to areas where food, pet supplies, or garden seeds might be stored, as these attract various pests. Note any small holes in walls, floors, or around pipe entries – these could be entry points for unwanted visitors. The presence of shredded paper or fabric might indicate nesting activities.
If you spot any live pests, note their location and type to address them properly in later cleaning steps. Remember to wear protective gear during this inspection, including gloves and a dust mask, as disturbing pest-inhabited areas can release harmful particles into the air. This initial assessment helps you plan your cleaning strategy and identify areas needing extra attention.
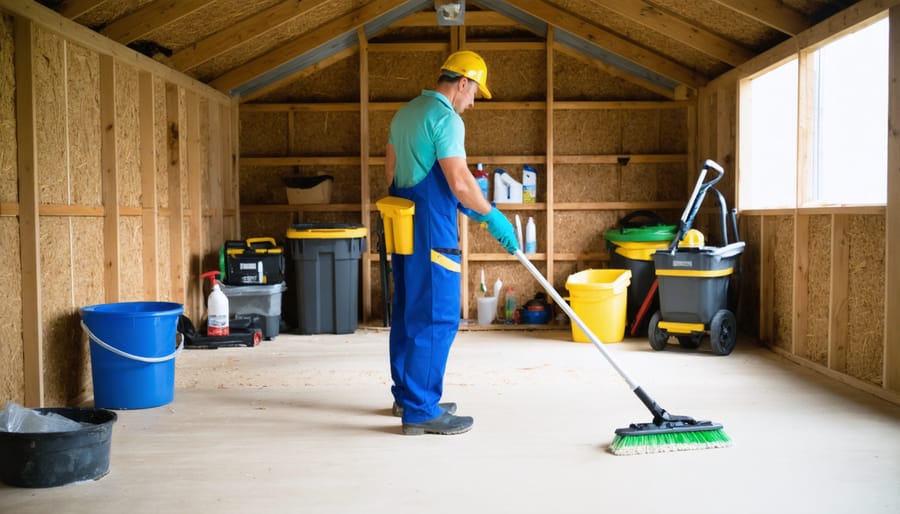
Step 2: Deep Clean and Sanitize
Floor-to-Ceiling Cleaning
Start your comprehensive floor-to-ceiling cleaning by gathering all necessary supplies: a long-handled duster, microfiber cloths, an all-purpose cleaner, and a sturdy step ladder. This systematic approach ensures no surface is overlooked and maintains your shed’s condition for years to come.
Begin at the ceiling, working your way down to avoid redistributing dust and debris. Use your long-handled duster to remove cobwebs and dust from ceiling corners, light fixtures, and upper wall sections. Pay special attention to areas where walls meet the ceiling, as these spots often harbor spider webs and insect nests.
Following proper cleaning techniques, move methodically down the walls, wiping them with a damp microfiber cloth and all-purpose cleaner. Don’t forget to clean window frames, door frames, and any built-in shelving units along the way.
Finally, address the lower portions of your walls and baseboards. This bottom-to-top approach prevents cleaned areas from being re-soiled as dust and dirt naturally fall downward. Remember to work in sections, completing one area before moving to the next, ensuring thorough coverage and preventing missed spots.
This methodical cleaning process not only improves your shed’s appearance but also helps identify potential maintenance issues early on, such as water damage or pest intrusion points that might need attention.
Treating Problem Areas
Tackling problem areas in your shed requires special attention and targeted cleaning methods. Start by identifying areas prone to mold and mildew, typically found in corners, under shelves, and around windows. Mix one part white vinegar with one part water in a spray bottle for an effective natural solution that eliminates mold while being safe for most surfaces.
For pest-prone spots, focus on areas where walls meet the floor and around entry points. Clear these spaces of debris and spray a mixture of peppermint oil and water, which naturally deters many common shed pests. Pay extra attention to dark corners and spaces behind stored items, as these are prime locations for spider webs and insect nests.
If you notice water damage or persistent dampness, address the root cause immediately. Check for roof leaks, poor drainage, or inadequate ventilation. Once identified, repair these issues before deep cleaning to prevent recurring problems. For stubborn mildew stains, create a paste using baking soda and water, apply it to the affected area, and let it sit for 15 minutes before scrubbing.
Remember to wear protective gear when dealing with mold or using cleaning solutions. After treating problem areas, improve air circulation by installing a small fan or dehumidifier, which will help prevent future issues from developing.
Step 3: Preventive Measures
Sealing and Weatherproofing
After completing your thorough cleaning process, it’s crucial to seal and weatherproof your shed to maintain its pristine condition. Start by inspecting all edges, corners, and joints for potential gaps or cracks where moisture might seep in. These same entry points often serve as invitations for unwanted pests, so addressing them serves a dual purpose.
Apply a high-quality silicone caulk around windows, doors, and any visible gaps. Pay special attention to areas where different materials meet, such as where the walls join the roof or where utility lines enter the structure. For optimal results, consider exploring effective waterproofing methods that can provide long-lasting protection.
Install weather stripping around doors and windows to create a tight seal. This not only prevents moisture infiltration but also helps maintain a consistent internal environment. Don’t forget to check your roof for potential weak spots – replace any damaged shingles or roofing materials immediately.
For pest prevention, install fine mesh screens over vents and any necessary openings. Place door sweeps at the bottom of entrances to prevent small creatures from squeezing underneath. Consider using natural deterrents like cedar blocks or mint plants around the perimeter of your shed, as these can help keep various pests at bay while adding a pleasant aroma to your storage space.

Natural Pest Deterrents
Keep unwanted visitors at bay with these natural, family-friendly pest deterrents that are both effective and safe for your shed environment. Start by placing dried bay leaves in corners and along shelves – their natural oils repel many common insects and rodents. Cedar blocks or chips not only add a pleasant aroma but also naturally deter moths and other fabric-damaging pests.
Create a protective barrier around your shed using a mixture of diatomaceous earth and borax powder. This combination is particularly effective against crawling insects while being safe for humans. For added protection, plant pest-repelling herbs like lavender, mint, or citronella around your shed’s perimeter. These plants not only look attractive but create a natural defense zone.
Essential oils can be your secret weapon against pests. Mix 10-15 drops of peppermint, eucalyptus, or tea tree oil with water in a spray bottle. Apply this solution around windows, doorframes, and potential entry points monthly. For rodent control, cotton balls soaked in peppermint oil placed strategically around the shed work wonders.
Remember to maintain good airflow and keep your shed dry, as moisture attracts many pests. Regular inspection and replacement of these natural deterrents every few months will ensure continuous protection while keeping your storage space fresh and inviting.
Following this three-step cleaning process not only transforms your shed into a spotless space but also helps maintain its condition for years to come. By regularly implementing these steps, you’ll prevent dirt buildup, reduce pest problems, and protect your stored items from damage. The systematic approach saves time and effort in the long run, as each cleaning session becomes more manageable when done consistently.
To maintain the results of your thorough cleaning, consider scheduling quarterly deep cleans while performing quick weekly tidying. Keep cleaning supplies stored in an easily accessible spot in your shed, making it convenient to address spills or dirt immediately. Remember to inspect your shed’s exterior monthly for signs of wear or damage, especially after severe weather.
By staying proactive with your shed maintenance, you’ll create a clean, organized space that protects your belongings and maintains its value. The investment in regular cleaning now will save you from costly repairs and replacements in the future, making this three-step process an essential part of responsible shed ownership.