
Keep Your Tools Sharp and Safe: Smart Storage Solutions That Actually Work
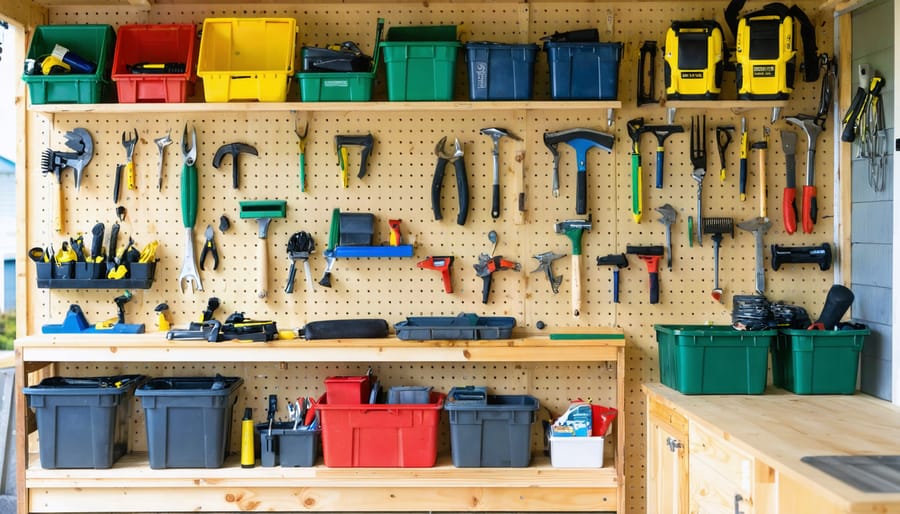
Transform your cluttered tool shed into a functional workspace by implementing proven smart organization hacks that protect your investment and maximize accessibility. Mount adjustable pegboard systems on walls to display frequently used tools at eye level, creating visual organization while preventing rust-causing contact with damp surfaces. Install magnetic strips above workbenches to secure metal tools and bits, eliminating drawer rummaging and keeping essential items within arm’s reach. Group tools by function using clear, labeled bins on industrial-grade shelving units, ensuring proper air circulation to prevent moisture buildup and extend tool life. Implement a zone-based layout with dedicated areas for power tools, hand tools, and garden equipment, reducing search time and maintaining clear pathways. This systematic approach to tool organization doesn’t just save time – it preserves your tools’ condition and transforms daily maintenance tasks from frustrating searches into smooth, efficient operations.
Creating Zones for Maximum Protection
Climate-Sensitive Tool Placement
Proper tool placement based on climate considerations is crucial for maintaining your equipment’s longevity. The way you control temperature and humidity in your shed directly impacts your tools’ condition. Store moisture-sensitive items like power tools and metal hand tools on upper shelves where humidity tends to be lower. Keep these tools at least six inches off the ground to prevent rust and corrosion from ground moisture.
Create a designated dry zone for electronic tools and batteries using moisture-absorbing silica gel packets or a small dehumidifier. For garden tools that can handle some moisture, lower shelves work well, but always clean and dry them thoroughly before storage. Consider installing a small fan to improve air circulation, particularly in humid climates.
During extreme weather, use protective cases or cabinets for valuable tools, and wrap metal surfaces with a light coat of machine oil or protective spray. Remember to check your tools regularly for any signs of moisture damage, especially during seasonal changes when humidity levels fluctuate most dramatically.
Heavy vs. Light Tool Organization
When organizing your tools, consider weight distribution as a key factor in both safety and accessibility. Heavy tools like sledgehammers, post hole diggers, and large power tools should be stored at waist height or lower to prevent accidents and strain when retrieving them. Install sturdy hooks or brackets rated for heavy loads, and ensure they’re mounted directly into wall studs for maximum support.
Lighter tools such as hand trowels, pruning shears, and measuring tapes work well in upper storage areas. Consider using pegboards or wall-mounted organizers for these items, making them easily visible and accessible. For medium-weight tools like hammers and handsaws, position them at eye level where they’re most comfortable to grab and replace.
Create designated zones based on tool weight, with heavy equipment closest to the shed entrance to minimize carrying distance. Use rubber-coated hooks for heavier items to prevent slipping, and incorporate anti-tip straps for tall storage units. Remember to leave clear pathways between storage areas and maintain about 18 inches of space between heavy tool zones for safe maneuvering.
Storage Solutions That Prevent Rust
Wall-Mounted Systems
Maximizing vertical space in your tool shed is a game-changer for organization and accessibility. Wall-mounted systems not only help keep your tools organized but also prevent tool rust by keeping them off the ground and away from moisture.
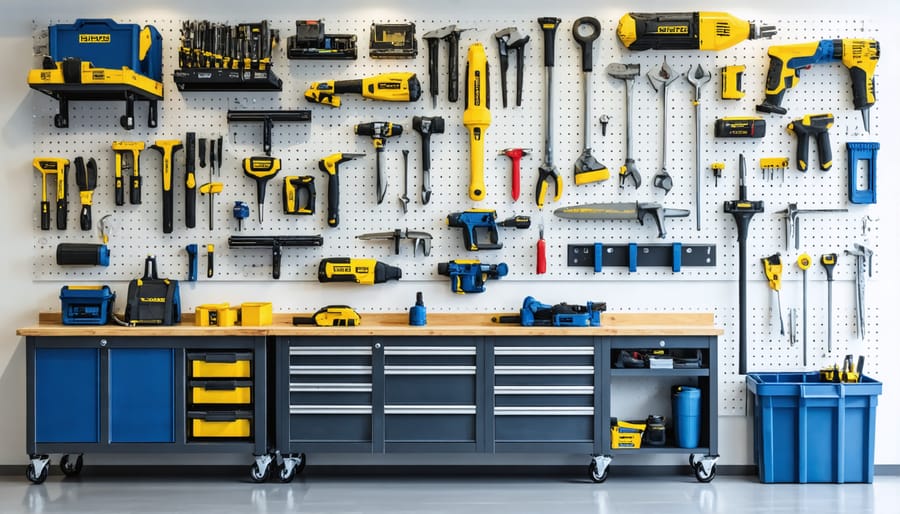
Start by installing a combination of pegboards, slat walls, and magnetic strips at eye level. Pegboards are incredibly versatile, accommodating everything from small hand tools to larger equipment with the right hooks. For heavier items, consider using heavy-duty wall brackets or purpose-built tool holders that can support the weight of items like shovels, rakes, and ladders.
Don’t forget to utilize the space between wall studs. Installing shallow shelving or custom-built holders between studs creates storage nooks without taking up valuable floor space. For frequently used tools, magnetic strips mounted at arm’s height provide quick access while keeping items visible and organized.
Create designated zones on your walls for different tool categories. For instance, keep gardening tools in one section, power tools in another, and hand tools in a third. This system makes it easy to find what you need and return items to their proper place. Add labels or outlines of tools on the pegboard to ensure everything returns to its designated spot – a simple trick that maintains organization long-term.
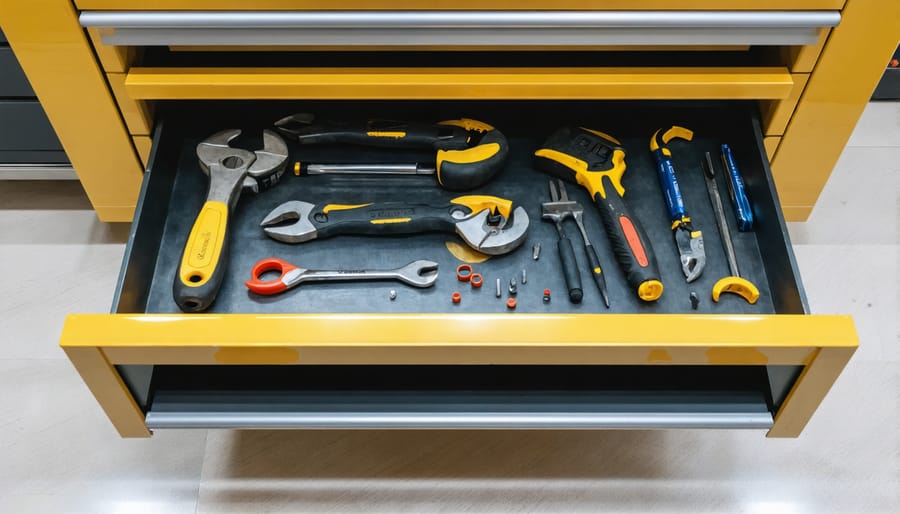
Drawer and Cabinet Protection
Protecting your tools in drawers and cabinets requires special attention to moisture control and proper organization. Start by installing silica gel packets or moisture absorbers in each enclosed space to prevent rust and corrosion. These small but mighty moisture fighters should be replaced every few months to maintain their effectiveness.
Line your drawer bottoms with rubber matting or foam liner sheets, which not only protect your tools from scratches but also help absorb any residual moisture. For metal cabinets, consider adding magnetic strip liners to keep tools in place while allowing air circulation.
Install small battery-operated fans or passive vents in larger cabinets to promote air movement. This simple addition can make a significant difference in preventing moisture buildup, especially in humid climates. For wooden drawers, apply a coat of moisture-resistant sealant to the interior surfaces every year.
Keep tools organized within these spaces using dividers or small containers, ensuring they don’t bump against each other. Consider adding small packets of vapor corrosion inhibitors (VCI) in drawers containing precision tools or expensive equipment.
Finally, regularly inspect the seals around cabinet doors and drawer edges. Replace any worn weatherstripping to maintain an effective moisture barrier. A quick wipe-down of tools before storage and leaving cabinet doors slightly open on particularly humid days can also help maintain a dry environment for your valuable tools.
Maintenance Stations for Long-Term Care
Essential Cleaning Station Components
A well-equipped cleaning station is essential for proper tool maintenance and longevity. Start with a sturdy workbench or dedicated table where you can perform regular cleaning tasks. Stock this area with lint-free cloths, wire brushes in various sizes, and high-quality cleaning solutions specifically designed for different tool materials. Keep a supply of mineral oil for rust prevention, and WD-40 for loosening stubborn dirt and grime.
Include a collection of small brushes for detailed cleaning, compressed air for removing dust from power tools, and sandpaper in various grits for addressing light rust. Don’t forget to maintain adequate ventilation in your cleaning area, as some cleaning products require proper air circulation. Following proper seasonal maintenance tips will help extend the life of your tools.
Store cleaning supplies in a designated cabinet or drawer system, preferably with clear labels. Include safety equipment like protective gloves, safety glasses, and a first-aid kit nearby. Consider adding a small LED light source to ensure proper visibility during cleaning sessions, especially in poorly lit areas of your shed.
Quick-Access Maintenance Tools
Create a dedicated maintenance station in your shed by mounting a pegboard or small shelf near your workbench for essential tool care supplies. Stock this area with cleaning cloths, lubricating oil, rust preventative, and basic maintenance tools like wire brushes and sharpening stones. Keep a collection of microfiber rags in an easily accessible container, and store cleaning solutions in clear, labeled spray bottles to quickly identify what you need.
Install a magnetic strip to hold metal cleaning tools and organize small maintenance items like brushes and files in clear jars or divided containers. Include a basic tool maintenance checklist nearby as a quick reference guide. Consider adding a small LED light above this station to ensure good visibility when performing maintenance tasks.
Store frequently used items like WD-40 and cleaning sprays at eye level, with less commonly used supplies on lower shelves. Keep a designated container for oily rags separate from clean materials, and maintain a small supply of replacement parts like screws, nuts, and washers in labeled containers within arm’s reach.
Smart Labeling Systems
Digital vs. Physical Inventory
Keeping track of your tools can be done through both digital and physical methods, each offering unique benefits for maintaining an organized shed. A simple physical inventory system might include a pegboard outline of tools, where missing items are instantly noticeable, or a basic checklist attached to the door. These traditional methods work well for those who prefer tangible tracking systems.
For tech-savvy organizers, digital solutions offer powerful features. Mobile apps like Tool Tracker or Home Maintenance Manager let you catalog tools with photos, record maintenance dates, and set reminders for tool servicing. You can even add warranty information and instruction manuals to your digital database, ensuring everything is accessible with a quick tap.
Consider implementing a hybrid approach by using QR codes on tool storage areas. Simply scan the code with your phone to access a digital list of what belongs in each zone. This system bridges the gap between physical and digital organization, making it easier to maintain order even when multiple family members use the shed.
For maintenance tracking, digital calendars with automated reminders help ensure your tools stay in top condition. Set up quarterly reminders for tool sharpening, annual deep cleaning schedules, and rust prevention treatments. Whether you choose digital, physical, or a combination of both, the key is consistency in updating your inventory and following maintenance schedules.
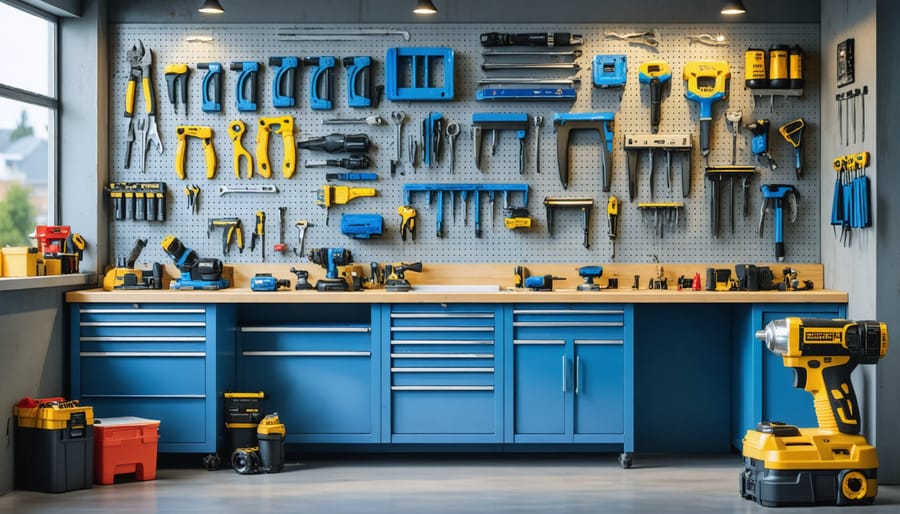
Visual Organization Techniques
Visual organization is a game-changer when it comes to keeping your tool shed tidy and efficient. Color coding is one of the most effective ways to instantly identify your tools and their designated storage spots. Consider using different colored tape or paint to mark tool handles and their corresponding storage areas. For example, use red for gardening tools, blue for woodworking equipment, and yellow for general maintenance items.
Labels and symbols also play a crucial role in quick tool identification. Create simple, weather-resistant labels using a label maker or permanent markers on durable materials. Pictograms or simple drawings can be especially helpful for frequently used items or when multiple family members share the space. For instance, a hammer symbol above a pegboard section instantly shows where hammers and mallets belong.
Take advantage of silhouette boards, where tool outlines are drawn or painted directly onto the wall or pegboard. This visual guide makes it immediately apparent when tools are missing and shows exactly where each item should return. For smaller items like screwdrivers or wrenches, create color-coded shadowboxes with foam inserts.
Remember to keep your visual system simple and consistent. Too many colors or complicated symbols can defeat the purpose of quick identification. Update your visual markers regularly to maintain their visibility, and consider using reflective or glow-in-the-dark materials for better visibility during early morning or evening work sessions.
A well-organized tool shed is more than just a tidy space – it’s an investment in your tools’ longevity and your own productivity. By implementing the storage solutions and organizational strategies we’ve discussed, you’ll save countless hours searching for tools and protect your valuable equipment from damage and deterioration.
Remember that successful tool shed organization starts with a thorough assessment of your needs and available space. Taking the time to sort, categorize, and properly store your tools will pay dividends in the long run. Not only will you extend the life of your tools through proper storage and maintenance, but you’ll also create a more efficient workspace that makes every project more enjoyable.
The key to maintaining your newly organized shed is consistency. Make it a habit to return tools to their designated spots after each use, regularly inspect storage solutions for needed repairs or upgrades, and periodically reassess your organization system as your tool collection grows or changes.
By investing time in proper tool organization now, you’re creating a workspace that will serve you well for years to come. Whether you’re a weekend DIY enthusiast or a serious craftsperson, an organized tool shed means less time searching and more time doing what you love – working on your projects with well-maintained, easily accessible tools.