
Make Your Shed Smart: DIY Temperature-Controlled Vents That Actually Work

Transform your standard HVAC system into a custom high-tech storage solution with smart vents you can build yourself. Using basic materials like Arduino controllers, servo motors, and temperature sensors, create automated vents that precisely regulate airflow throughout your space. Smart vents reduce energy costs by up to 30% while maintaining optimal room temperatures through automated zone control. By integrating WiFi-enabled microcontrollers and freely available open-source software, DIY enthusiasts can build professional-grade smart vents for a fraction of commercial costs. The entire system connects seamlessly with existing smart home platforms like Home Assistant or SmartThings, giving you complete control through your smartphone or voice commands. This practical guide walks you through selecting components, assembling the hardware, and programming your custom smart vent system – all achievable in a weekend with basic tools and moderate technical skills.\n\n\n
Why Your Shed Needs Smart Ventilation
\n\n
Temperature Control Benefits
\n\nSmart vents play a crucial role in maintaining optimal temperature throughout your home while protecting against moisture-related issues. By automatically adjusting airflow based on room conditions, these innovative devices ensure even heating and cooling across different spaces, eliminating hot and cold spots that plague many households.\n\nThe intelligent regulation of airflow helps prevent condensation buildup in your ductwork and rooms, which is a common cause of mold growth and structural damage. During humid summer months, smart vents can work with your HVAC system to reduce excess moisture, while in winter, they help distribute warm air more effectively to prevent cold spots where condensation might form.\n\nBeyond moisture control, smart vents can help reduce your energy bills by directing conditioned air only where it’s needed. They can automatically close vents in unused rooms and adjust airflow based on occupancy patterns, making your HVAC system work more efficiently while maintaining comfort in the spaces you actually use.\n\n
Energy Efficiency Advantages
\n\nInstalling DIY smart vents is an excellent way to maximize your shed’s efficiency while reducing energy costs. By automatically regulating airflow based on temperature and humidity levels, smart vents can cut your heating and cooling expenses by up to 30%. These intelligent systems prevent energy waste by closing vents in unused areas and redirecting airflow where it’s needed most.\n\nBeyond the financial benefits, smart vents contribute to various eco-friendly shed improvements by optimizing energy consumption. They help reduce your carbon footprint by ensuring your HVAC system works more efficiently, resulting in lower energy usage and decreased greenhouse gas emissions. The smart scheduling features allow you to create customized comfort zones while maintaining optimal energy efficiency throughout different times of the day.\n\nAdditionally, these systems help extend the life of your HVAC equipment by preventing unnecessary strain, leading to fewer repairs and replacements over time.\n\n\n
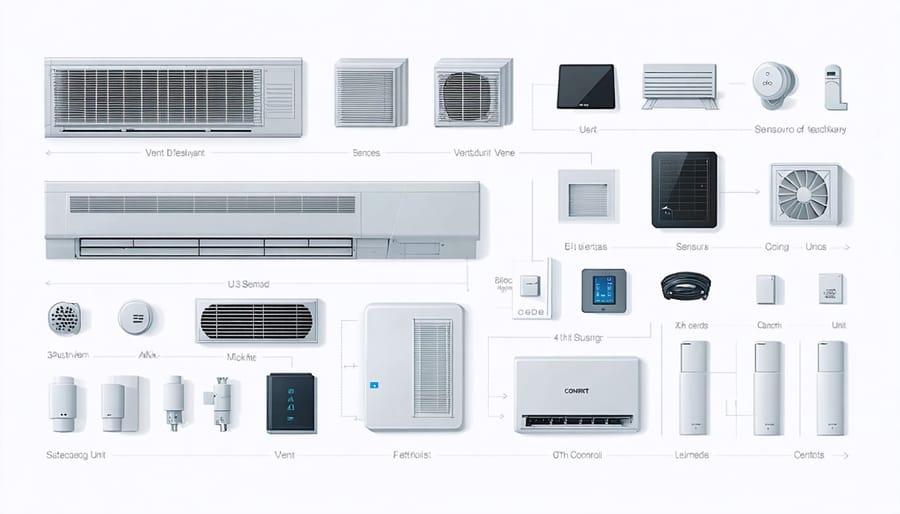
Essential Components for DIY Smart Vents
\n\n
 \n
\n\n\n
Hardware Components
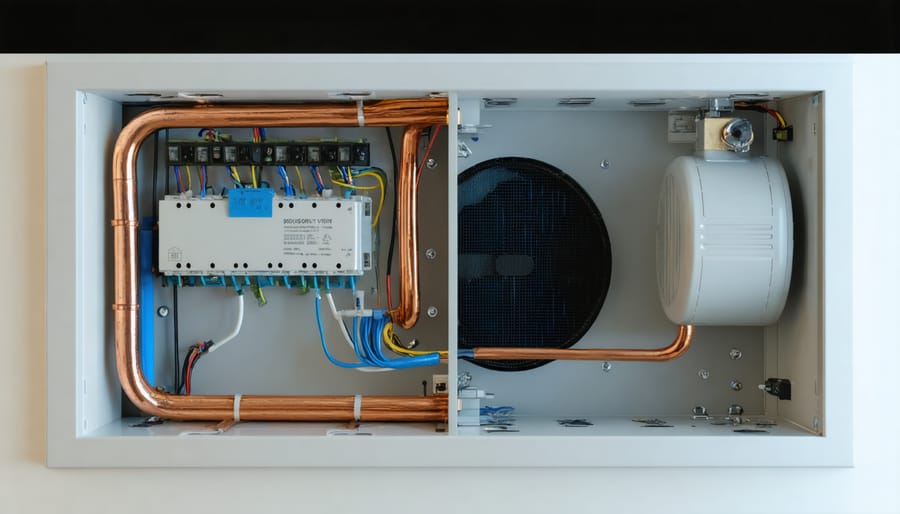
\n\nTo build your DIY smart vent, you’ll need several key components that work together to create an automated ventilation system. The heart of the system is a motorized damper or actuator, which controls the airflow. You’ll also need a microcontroller (like an Arduino or ESP32) to serve as the brain of your smart vent, along with a temperature and humidity sensor to monitor environmental conditions.\n\nFor power, gather a 12V DC power adapter and necessary wiring. A small servo motor will help control the vent’s opening and closing mechanism. You’ll also want to include a WiFi module if your microcontroller doesn’t have built-in wireless capabilities.\n\nFor the physical construction, you’ll need:\n- Standard HVAC vent cover\n- Mounting brackets\n- Screws and nuts\n- Plastic or 3D printed housing\n- Wire connectors\n- USB cable for programming\n- Zip ties for cable management\n\nOptional components include a display screen for local readings and a backup battery system. Remember to choose components that match your existing vent sizes and your home’s specific needs.\n\n
Smart Technology Elements
\n\nTo create your DIY smart vent system, you’ll need several key electronic components. The heart of the system is a microcontroller, with popular choices including Arduino Nano or ESP8266, which offer excellent connectivity and programming flexibility. You’ll also need temperature and humidity sensors to monitor your environment and trigger automated responses.\n\nFor the mechanical aspects, servo motors are essential to control the vent’s opening and closing mechanism. These should be paired with reliable power supplies – either hardwired or rechargeable batteries, depending on your setup. A WiFi module enables remote control through your smartphone or home automation system.\n\nThe control interface can be as simple as a basic mobile app or integrated into existing smart home platforms like Home Assistant or SmartThings. Motion sensors can add another layer of intelligence, automatically adjusting ventilation based on room occupancy.\n\nFor safety and longevity, include surge protectors and voltage regulators to protect your electronic components. Remember to choose weather-resistant housings for any components exposed to moisture or temperature fluctuations.\n\n\n
Step-by-Step Installation Process
\n\n
Preparing Your Shed
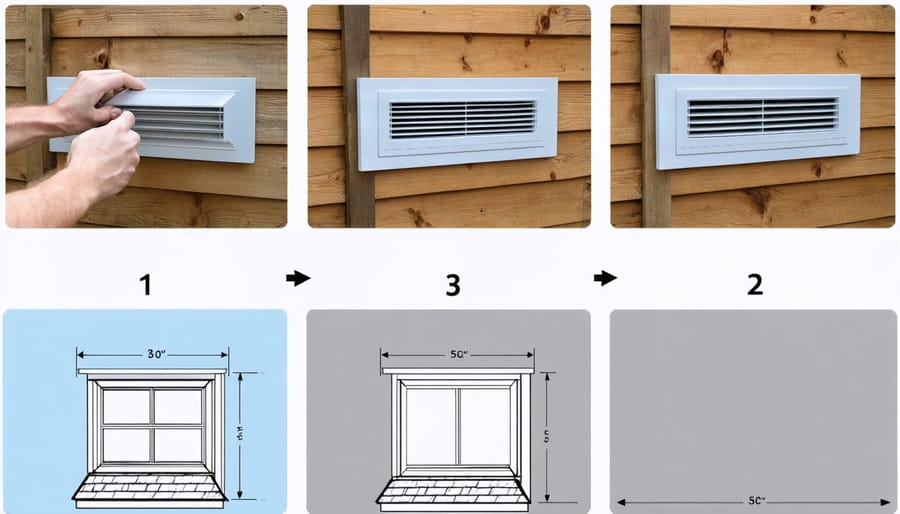
\n\nBefore diving into the installation of your DIY smart vents, proper preparation of your shed is crucial for optimal performance. Start by measuring your shed’s interior dimensions, paying special attention to the highest points where hot air tends to accumulate. Make note of existing vents or openings that could be upgraded with smart capabilities.\n\nNext, assess your shed’s current ventilation needs by monitoring the temperature and humidity levels throughout different times of the day. This information will help you determine the ideal placement and number of smart vents needed. A simple thermometer and humidity meter can provide valuable baseline readings.\n\nIdentify potential power sources for your smart vent system. If your shed already has electricity, locate the nearest outlets. If not, consider solar-powered options or running a new electrical line. Clean the areas where you plan to install the vents, ensuring they’re free from dust, cobwebs, and debris.\n\nFinally, check your shed’s structural integrity around the planned vent locations. Mark installation spots with a pencil, and verify there are no hidden pipes or wiring that could interfere with the installation.\n\n
 \n
\n\n\n
Installing the Vent Hardware
\n\nBefore starting the installation, ensure your power is turned off at the breaker for safety. Begin by removing your existing vent cover – most are held in place with two or four screws. Clean the vent opening thoroughly, removing any dust or debris that could interfere with the new installation.\n\nNext, check if your smart vent requires a mounting bracket. If so, align it carefully with the vent opening and mark the screw holes. Pre-drill these holes using a drill bit slightly smaller than your mounting screws to prevent splitting. Secure the mounting bracket firmly but avoid overtightening.\n\nFor the main vent unit, connect any necessary wiring according to your model’s instructions. Most smart vents use either a hardwired connection or a battery pack. If hardwiring, carefully connect the wires using wire nuts and electrical tape for added security. For battery-powered units, insert fresh batteries before mounting.\n\nPosition your smart vent into the opening or mounting bracket. Ensure it’s level using a bubble level – this is crucial for proper operation. Secure the vent using the provided screws, starting with opposite corners to maintain even pressure. Again, avoid overtightening as this could crack the vent housing.\n\nTest the vent’s movement before finishing up. Most units have a manual override or test mode. Make sure the louvers move smoothly without catching or making unusual noises. If everything works correctly, clean any fingerprints from the vent cover with a soft, dry cloth.\n\nRemember to keep the installation manual in a safe place – you’ll need it for troubleshooting and maintenance later on.\n\n
Setting Up Smart Controls
\n\nOnce your smart vent components are in place, it’s time to bring them to life through programming and connectivity. Start by downloading your chosen smart hub’s app to your smartphone – popular options include SmartThings, Home Assistant, or Apple HomeKit. Follow the app’s instructions to connect your hub to your home’s Wi-Fi network.\n\nNext, add your smart vent controls to the network. Most modern smart vents use either Zigbee or Z-wave protocols, which should be automatically detected by your hub when in pairing mode. Simply press and hold the pairing button on your vent controller until you see the indicator light flashing, then follow the prompts in your app.\n\nCreate automated schedules based on your needs. You might want the vents to open gradually in the morning as temperatures rise, or close automatically when your HVAC system isn’t running. Many systems also allow you to set up temperature-based triggers – for example, closing vents when a room reaches your desired temperature.\n\nConsider setting up zones in your home for more precise control. You can group multiple vents together and control them as a single unit, perfect for managing different areas of your house. Don’t forget to test your automation rules thoroughly before relying on them, and make adjustments as needed based on your comfort levels and energy usage patterns.\n\nRemember to keep your hub’s firmware updated for the best performance and security. Most apps will notify you when updates are available.\n\n\n
 \n
\n\n\n
Maintenance and Troubleshooting
\n\n
Regular Maintenance Tasks
\n\nTo maintain your shed properly, regular upkeep of your DIY smart vents is essential. Every three months, remove the vent covers and gently clean them with a soft brush to remove dust and debris. Check the motor components for any signs of wear and apply a light lubricant if needed. Inspect the weatherstripping around the vents to ensure it remains intact and effective.\n\nMonthly filter changes are recommended to maintain optimal airflow and prevent strain on the system. Test the smart controls regularly to confirm proper operation, and verify that the temperature sensors are giving accurate readings. Clean the surrounding area to prevent leaves and debris from blocking the vents.\n\nDuring seasonal transitions, recalibrate your system settings to accommodate changing weather patterns. This helps ensure your smart vents continue working efficiently throughout the year while extending their lifespan.\n\n
Common Issues and Solutions
\n\nWhen your DIY smart vent isn’t performing as expected, start by checking the battery level of your sensors and motors – low power is often the culprit behind erratic behavior. If your vent isn’t responding to temperature changes, ensure your sensors are properly positioned and not blocked by furniture or curtains. Connection issues can usually be resolved by moving your smart hub closer to the vent or adding a WiFi extender to boost the signal.\n\nFor motors that seem stuck or noisy, a gentle cleaning with compressed air can remove dust buildup that’s causing friction. If your smartphone app shows the vent is open but airflow feels restricted, check for debris in the vent opening and verify that the damper is moving freely through its full range of motion.\n\nTemperature calibration problems are common but easily fixed by adjusting your sensor settings through the app. For persistent issues, double-check your wiring connections and ensure all components are securely mounted to prevent vibration or misalignment.\n\n\nCreating your own DIY smart vents is an exciting and rewarding project that can transform your home’s comfort and energy efficiency. By implementing the steps and guidelines outlined in this guide, you can enjoy precise temperature control in each room while potentially reducing your energy bills by up to 30%. The beauty of DIY smart vents lies not just in their functionality, but also in the satisfaction of building and customizing a solution that perfectly fits your home’s needs.\n\nWhether you’re a seasoned DIY enthusiast or just starting your home automation journey, smart vents offer an accessible entry point into creating a more intelligent living space. The initial investment in materials and time will quickly pay off through improved comfort and reduced energy costs. Plus, the modular nature of these systems means you can start small with just one or two rooms and expand as your confidence and needs grow.\n\nReady to take control of your home’s climate? Gather your materials, follow the installation steps carefully, and enjoy the benefits of a smarter, more efficient home ventilation system. Your comfort awaits!