
Transform Your Backyard Into an Eco-Paradise (Without Breaking the Bank)
Transform your outdoor space without breaking the bank using everyday items and smart recycling techniques. Create stunning raised beds from wooden pallets, fashion vertical gardens from repurposed plastic bottles, and design eye-catching pathways using fallen leaves and mulch. Whether you’re working with a tiny balcony or a sprawling backyard, budget-friendly gardening isn’t just about saving money—it’s about crafting a sustainable, personalized oasis that thrives on creativity.
Start small with container gardens using five-gallon buckets, thrift store finds, and kitchen scraps that regrow into fresh produce. Turn cardboard boxes into compost bins, old wheelbarrows into flower displays, and salvaged bricks into charming border walls. These simple, cost-effective solutions prove that beautiful gardens don’t require expensive materials or professional expertise—just imagination and a willingness to get your hands dirty.
Let’s explore how everyday items can become extraordinary garden features, proving that stunning outdoor spaces are possible on any budget.
Reclaimed Material Magic
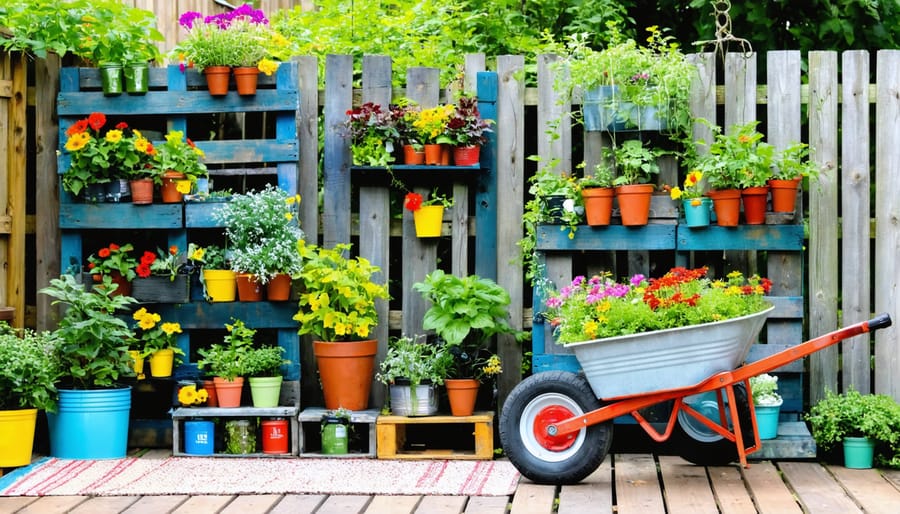
Pallet Paradise
Transform your garden on a budget with wooden pallets – the versatile superstar of upcycled garden furniture and DIY projects. These readily available materials can be sourced for free from local businesses or for minimal cost from recycling centers, making them perfect for budget-conscious gardeners.
Start with a simple pallet planter by standing a pallet upright and securing it to a wall or fence. Line the back with landscape fabric, fill the spaces between slats with potting soil, and plant herbs, succulents, or trailing flowers for an instant vertical garden. For added stability, reinforce the base and ensure proper drainage holes.
Create raised bed planters by dismantling pallets and reconstructing them into boxes. Sand the wood thoroughly to prevent splinters, and line the inside with heavy-duty plastic before adding soil. These beds are perfect for growing vegetables and create defined garden spaces without breaking the bank.
Turn pallets into practical garden furniture by adding wheels for mobile plant stands or stacking them to create a potting bench. With basic tools and some creativity, you can build seating areas, coffee tables, or even a rustic outdoor sofa. Remember to treat the wood with weather-resistant sealant to extend its life outdoors.
For best results, choose pallets marked with “HT” (heat-treated) and avoid those with chemical treatments. Clean thoroughly before use, and always wear protective gear when working with reclaimed wood.

Container Creativity
Transform everyday household items into charming garden planters with these budget-friendly ideas. Creating creative garden decor from recycled materials not only saves money but also gives your garden unique personality.
Start with old wooden crates or pallets, which make excellent vertical planters when mounted on walls. Clean them thoroughly, add drainage holes, and paint or stain them to match your garden’s aesthetic. Old boots, teapots, and vintage colanders can become whimsical containers for herbs and small flowers – just remember to drill drainage holes in the bottom.
Empty tin cans are perfect for creating an herb garden. Remove labels, sand any sharp edges, and paint them in bright colors or leave them rustic. Large plastic bottles can be transformed into self-watering planters by cutting them horizontally and inverting the top section.
Don’t overlook broken wheelbarrows or retired bicycles – these make stunning statement pieces when filled with cascading flowers. Old wooden ladders can become tiered plant displays, while chipped teacups and mason jars work beautifully for succulents and small indoor herbs.
Remember to thoroughly clean all repurposed items and ensure proper drainage. Position your creative containers strategically throughout your garden to create visual interest at different heights and angles. These unique planters not only save money but also add character and charm to your outdoor space.
Nature’s Free Resources
Composting Basics
Composting is one of the most budget-friendly ways to enrich your garden soil, and you can start with materials you already have at home. Begin by choosing a shady corner of your yard for your compost pile. You don’t need a fancy bin – simply create a square using old wooden pallets tied together, or use chicken wire formed into a cylinder.
Layer your compost materials following the “green and brown” rule. Green materials include kitchen scraps (fruit and vegetable waste, coffee grounds, and eggshells), fresh grass clippings, and young weeds. Brown materials consist of dry leaves, cardboard, newspaper, and small twigs. Aim for roughly three parts brown to one part green materials.
Keep your pile moist but not waterlogged – it should feel like a wrung-out sponge. Turn the contents every few weeks using a garden fork or shovel to speed up decomposition. If you’re worried about aesthetics, disguise your compost area with climbing plants or decorative screens made from repurposed materials.
Common household items make excellent composting tools. Use a covered kitchen container to collect scraps, and keep a separate bin for collecting dry materials. Shred paper and cardboard before adding them to increase decomposition speed. Coffee grounds are particularly valuable as they add nitrogen and attract earthworms.
Your compost is ready when it looks like dark, crumbly soil and smells earthy. This process typically takes 3-6 months, depending on your climate and maintenance. Once ready, use your homemade compost to enrich garden beds, pot plants, or make compost tea for natural fertilizer – all without spending a dime.
Water-Wise Solutions
Saving water doesn’t mean sacrificing your garden’s beauty. With a few clever DIY solutions, you can create an efficient irrigation system that’s kind to both your wallet and the environment. Start by setting up a basic rainwater collection system using clean, food-grade barrels positioned under your roof’s downspouts. Add a mesh screen on top to filter debris and prevent mosquito breeding.
For distribution, create a simple gravity-fed drip irrigation system using old garden hoses. Punch small holes every few inches and snake them through your garden beds. To regulate flow, install an inexpensive timer valve at the barrel’s outlet. For container gardens, try making self-watering planters using recycled plastic bottles. Cut the bottom off, invert the top portion, and place it inside the bottom half to create a water reservoir.
Save shower and cooking water (as long as it’s free from harsh chemicals) in buckets for your garden. Place partially buried clay pots (ollas) throughout your garden beds – these ancient irrigation tools slowly release water directly to plant roots. For smaller spaces, create water-wise plant groupings by placing moisture-loving plants together and using mulch extensively to retain moisture.
Consider installing a simple grey water diversion system from your washing machine to water trees and ornamental plants. Remember to use biodegradable, plant-friendly detergents. Add moisture-retaining materials like coconut coir or shredded paper to your soil mix, and collect morning dew by laying out old sheets overnight – you’d be surprised how much water you can gather!

Smart Plant Selection
Seed Starting
Starting your garden from seeds is one of the most cost-effective ways to grow a vibrant garden, and it’s easier than you might think! Begin by repurposing household items like egg cartons, yogurt cups, or toilet paper rolls as seed starting containers. Just remember to punch drainage holes in the bottom.
Create your own seed starting mix by combining equal parts compost, peat moss (or coconut coir for an eco-friendly alternative), and perlite. This DIY mix costs significantly less than pre-made options and can be adjusted to suit different plants’ needs. Following proper seasonal garden maintenance tips will help ensure your seedlings thrive.
Save even more money by creating a mini greenhouse using clear plastic containers from salad greens or rotisserie chickens. These containers provide perfect humidity levels for seed germination. For lighting, place seedlings near a sunny south-facing window, or use affordable LED shop lights suspended just above the plants.
Don’t forget to label your seedlings using popsicle sticks or cut-up plastic containers. Keep track of planting dates and expected germination times in a simple notebook. When it’s time to transplant, gradually harden off your seedlings by exposing them to outdoor conditions for increasing periods each day. This careful preparation ensures strong, healthy plants without the expense of buying mature specimens from garden centers.
Plant Sharing
One of the most cost-effective ways to expand your garden is through plant sharing and community exchange programs. Many neighborhoods have informal plant-sharing networks where gardeners swap cuttings, divide perennials, and exchange seeds. Social media platforms like Facebook and Nextdoor often host local gardening groups where members regularly organize plant swaps and share excess seedlings.
Check with your local library or community center for seed libraries, where you can “borrow” seeds for free and return some after your harvest. Many gardening clubs also host annual plant exchanges, providing an excellent opportunity to diversify your garden without spending money while meeting fellow gardening enthusiasts.
Don’t overlook online gardening forums and community boards, where experienced gardeners frequently offer divisions of their established plants. Some communities even have dedicated plant-sharing apps that connect local gardeners. Remember to participate actively in these communities – offering your own plants or gardening knowledge makes you a valuable member and increases your chances of receiving plants in return.
Consider starting a neighborhood plant-sharing initiative if none exists in your area. A simple group chat or seasonal meet-up can evolve into a thriving community of gardeners helping each other grow beautiful gardens on a budget.
Storage Solutions on a Shoestring
DIY Tool Organization
Organizing your garden tools doesn’t have to break the bank. With some creativity and recycled materials, you can create efficient budget-friendly storage solutions that keep your tools tidy and accessible. Start by repurposing an old wooden pallet into a vertical tool holder – simply sand it down, add a coat of weather-resistant paint, and mount it securely to your shed wall or fence. The pallet slots are perfect for storing long-handled tools like rakes and shovels.
Transform empty plastic containers into handy storage bins for smaller items. Clean five-gallon buckets make excellent holders for hand trowels, pruning shears, and garden twine. Add wheels to the bottom for easy mobility, and drill drainage holes to prevent water accumulation. Old coffee cans, properly cleaned and painted, become perfect containers for storing seeds, plant markers, and small garden accessories.
For a creative twist, repurpose an old wooden ladder as a leaning tool rack. Paint it in your favorite garden-complementing color and lean it against a wall – the rungs provide natural slots for tools of various sizes. Don’t forget to utilize vertical space by installing hooks made from bent metal hangers or repurposed cabinet pulls. These simple solutions help maintain garden organization while keeping your tools protected from the elements and readily available when you need them.
Mini Greenhouse Ideas
Creating a mini greenhouse doesn’t have to break the bank. One of the most popular budget-friendly options is using old windows to build a simple A-frame structure. Simply hinge together four to six old windows and secure them at the top to create an instant growing space. You can often find discarded windows at salvage yards or online marketplaces for free or at minimal cost.
Another clever solution is transforming clear plastic storage bins into individual growing pods. Turn them upside down over your plants, drill a few ventilation holes, and you’ve got an instant mini greenhouse. For even smaller spaces, clean plastic milk jugs with the bottoms cut off make perfect individual plant covers.
CD cases can be upcycled into a unique tabletop greenhouse – simply arrange them in a box shape and seal the edges with clear tape. Old plastic bottles are another versatile option; cut them in half and use them as individual plant covers, or connect multiple bottles side by side to create a longer growing tunnel.
For a slightly larger option, consider using PVC pipes and clear plastic sheeting to build a hoop house. This method is particularly cost-effective and can be scaled to your needs. The entire structure can often be built for under $50, providing ample growing space for seedlings and tender plants.
Remember to include ventilation in any DIY greenhouse to prevent overheating and maintain healthy plant growth. Small adjustable openings at the top or sides will help regulate temperature and humidity.

Creating a beautiful garden doesn’t have to break the bank, as we’ve explored throughout this guide. By embracing recycled materials, repurposing everyday items, and utilizing natural resources, you can craft a stunning outdoor space that’s both budget-friendly and environmentally conscious. Remember that starting small with container gardens or vertical planters is perfectly fine – you can always expand your garden as your confidence and resources grow.
The key to success lies in planning carefully, being creative with available materials, and staying patient as your garden develops. Whether you choose to start with simple pallet projects, create your own compost system, or experiment with propagating plants from cuttings, each step brings you closer to your dream garden while keeping costs low.
Don’t be afraid to reach out to local gardening communities for advice and surplus materials. Often, the most rewarding gardens are those built gradually with love, creativity, and resourcefulness. Now that you’re equipped with these budget-friendly ideas, it’s time to roll up your sleeves and start transforming your outdoor space into the sustainable paradise you’ve always wanted.