
Transform Your Backyard Shed into a Dream Creative Studio (Without Breaking the Bank)
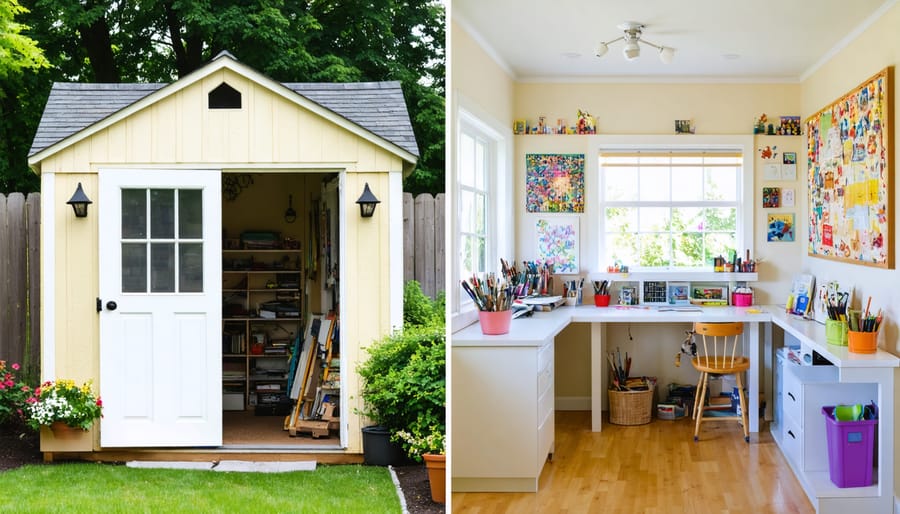
Transform your underutilized shed into a professional creative haven through smart converting outdoor spaces strategies. Start by assessing your shed’s structural integrity, ensuring proper insulation, and weatherproofing capabilities. Install adequate electrical wiring for lighting, heating, and studio equipment while maintaining compliance with local building codes. Maximize natural light by adding windows or skylights, complemented by task-specific artificial lighting to create an inspiring workspace. Create a comfortable environment with proper ventilation, climate control, and sound insulation to maintain year-round functionality. Focus on practical storage solutions and modular furniture that adapts to your creative needs while maximizing the available space. Whether you’re a photographer, artist, or remote worker, a thoughtfully converted shed studio delivers the perfect balance of functionality and inspiration without the cost of a traditional home addition.\n\n\n
 \n
\n\n\n
Planning Your Shed Studio Conversion
\n\n
Assessing Your Existing Shed
\n\nBefore diving into your shed conversion project, it’s crucial to assess your site preparation needs and evaluate your existing structure. Start by checking the foundation – look for any signs of settling, cracks, or water damage. A solid, level foundation is essential for a successful studio conversion.\n\nNext, examine the roof and walls for structural integrity. Look for water stains, rot, or pest damage that might compromise the building’s stability. Check that the walls are properly secured to the foundation and the roof is weathertight. If you spot any issues, address these before proceeding with the conversion.\n\nConsider your space requirements carefully. Measure the interior dimensions and think about how you’ll use the space. Most building codes require a minimum ceiling height of 7 feet for habitable rooms, so verify your shed meets this requirement. Also, check your local zoning laws and building codes regarding shed conversions – some areas may require permits or have specific requirements for electrical work and insulation.\n\nLook at ventilation options and natural light sources. Windows and doors should be in good condition and properly sealed. Remember, proper ventilation will be crucial for your comfort and the longevity of your studio space.\n\n
Creating Your Studio Layout
\n\nCreating an efficient studio layout starts with measuring your available space and sketching a floor plan. Begin by designating specific zones for different activities – whether it’s a painting area, desk space, or storage section. Consider the natural light sources and plan your work areas accordingly, positioning your main workspace near windows when possible.\n\nMaximize vertical space by installing wall-mounted shelves and pegboards for tools and supplies. Create a mobile storage solution with rolling carts or tables that can be moved as needed, giving you flexibility in your workspace. Don’t forget to leave adequate walking space between areas – a minimum of 30 inches is recommended for comfortable movement.\n\nThink about your workflow when arranging furniture and equipment. Keep frequently used items within easy reach and less-used supplies in designated storage areas. If your studio will serve multiple purposes, consider using room dividers or folding furniture that can be tucked away when not in use.\n\nRemember to plan for proper ventilation and electrical outlet locations, as these will influence where you can place certain equipment or work stations. A well-thought-out layout ensures both comfort and productivity in your converted studio space.\n\n\n
Essential Conversion Steps
\n\n
Weatherproofing and Insulation
\n\nProper weatherproofing and insulation are crucial for creating a comfortable studio space you can use year-round. Start by thoroughly inspecting your shed for any gaps, cracks, or holes where moisture and drafts might enter. Seal these openings with quality weatherstripping and caulk, paying special attention to windows, doors, and corners.\n\nFor effective insulation, begin with the walls. Install a vapor barrier against the shed’s interior walls, followed by proper insulation material. While fiberglass batts are popular and cost-effective, rigid foam insulation offers excellent R-value and moisture resistance in compact spaces. Don’t forget to insulate the floor and ceiling, as these areas significantly impact temperature control.\n\nConsider upgrading your windows to double-pane versions for better thermal efficiency. Installing storm doors can provide an additional barrier against the elements. For the roof, ensure proper ventilation to prevent moisture buildup while maintaining adequate insulation.\n\nMany studio owners find that combining different insulation methods yields the best results. For example, using reflective foil insulation in the ceiling along with traditional wall insulation can help manage summer heat. Remember to choose materials rated for your climate zone, and don’t skimp on quality – proper insulation will pay for itself in energy savings and comfort throughout the seasons.\n\n
Installing Electricity and Lighting
\n\nProper electrical installation is crucial for a safe and functional studio space. Start by consulting a qualified electrician to assess your power needs and ensure compliance with local building codes. They can help determine if your existing electrical panel can handle the additional load or if you’ll need an upgrade.\n\nConsider installing a separate electrical sub-panel in your shed-studio to manage power distribution efficiently. This setup should include proper grounding and weatherproof outlets to protect against moisture. Plan for both general-purpose outlets and dedicated circuits for equipment that requires more power, such as heaters or air conditioners.\n\nWhen it comes to lighting, create layers of illumination for different purposes. Install overhead LED fixtures for general lighting, ensuring even coverage throughout the space. Add task lighting, such as adjustable desk lamps or track lighting, for detailed work areas. Consider natural light too – installing additional windows or skylights can reduce your reliance on artificial lighting during daylight hours.\n\nDon’t forget about exterior lighting for safety and security. Motion-sensor lights near the entrance and pathways will make accessing your studio comfortable after dark. Installing dimmer switches gives you control over the ambiance and helps reduce energy consumption when full brightness isn’t needed.\n\nRemember to document all electrical work and keep permits on file. This documentation will be valuable for insurance purposes and future maintenance needs.\n\n
 \n
\n\n\n
Flooring and Wall Finishing
\n\nThe foundation of your studio conversion starts with selecting appropriate flooring that can withstand creative activities while maintaining comfort. Plywood or oriented strand board (OSB) provides an affordable and durable base layer. For a more polished look, consider vinyl planks or laminate flooring, which are moisture-resistant and easy to clean. If you’re planning to use the space for painting or messy crafts, epoxy coating offers excellent protection and can be customized with colors or patterns.\n\nFor walls, start by ensuring proper insulation is in place before adding your finishing touches. Drywall is the most common choice, creating a smooth, professional appearance that’s perfect for hanging artwork or storage solutions. If you’re seeking a more rustic aesthetic, consider wood paneling or shiplap, which adds character while maintaining warmth. For a budget-friendly option, painted plywood panels can create a clean, modern look.\n\nDon’t forget about moisture protection – installing a vapor barrier behind your wall finishing is crucial for preventing dampness and mold. Consider using moisture-resistant drywall in areas that might be exposed to water or humidity. For added style and functionality, incorporate built-in storage nooks or display shelving during the wall finishing process.\n\nPaint choice can dramatically impact your studio’s atmosphere. Light, neutral colors make the space feel larger and brighter, while accent walls can add personality and inspiration to your creative workspace.\n\n
Windows and Ventilation
\n\nNatural light and proper ventilation are crucial elements for creating a comfortable and inspiring studio space. Start by assessing your existing shed windows and determining if they provide adequate lighting for your intended use. Consider installing additional windows on multiple walls to maximize natural light throughout the day.\n\nDouble-hung windows are excellent choices as they offer both light and ventilation control. Position them strategically to create cross-ventilation, which helps maintain comfortable temperatures and prevents moisture buildup. For northern hemispheres, south-facing windows provide the most consistent natural light, while north-facing windows offer softer, indirect illumination perfect for artists and photographers.\n\nDon’t forget to include at least one operational window for fresh air circulation. Consider adding a small exhaust fan or vent near the ceiling to help remove warm air during summer months. Window treatments like blinds or curtains will help control light levels and provide privacy when needed.\n\nFor added ventilation, you might want to install a ridge vent or soffit vents. These passive ventilation solutions work year-round to prevent condensation and maintain air quality. Remember to properly seal all window installations to prevent drafts and water infiltration, ensuring your studio remains comfortable in all seasons.\n\n\n
Designing Your Studio Interior
\n\n
Storage Solutions
\n\nSmart storage solutions are essential when converting your shed into a studio space. To maximize storage efficiency, consider installing floating shelves along the walls, which keep your supplies accessible while maintaining valuable floor space. Wall-mounted pegboards offer versatile storage for tools and art supplies, allowing you to easily reconfigure your setup as needed.\n\nMake use of vertical space by incorporating tall, narrow cabinets or installing overhead storage racks for seasonal items or rarely-used materials. Multi-functional furniture, such as ottomans with hidden storage or fold-down tables with built-in compartments, helps maintain a clutter-free workspace while providing practical storage solutions.\n\nDon’t forget about the space under tables or workbenches – rolling storage bins or crates can slide underneath, keeping materials organized and easily accessible. Clear plastic containers with labels help maintain order and make it simple to locate items quickly. Consider adding door-mounted organizers or magnetic strips for frequently used tools, making the most of every available surface in your studio space.\n\n
Furniture and Equipment Layout
\n\nStart by mapping out your studio’s workflow to determine the most efficient furniture arrangement. Position your main work surface, whether it’s a desk or crafting table, where it will receive optimal natural light from windows. Consider creating distinct zones for different activities – a primary workspace, storage area, and possibly a small seating area for breaks or client meetings.\n\nInvest in furniture that serves multiple purposes, such as storage ottomans or fold-down tables that can maximize your limited space. Wall-mounted shelving units and pegboards can keep tools and supplies organized while freeing up valuable floor space. If your studio work involves digital equipment, ensure easy access to power outlets and consider installing a surge-protected power strip.\n\nFor artists and crafters, mobile storage solutions like rolling carts can be invaluable, allowing you to move materials around as needed. Include comfortable, ergonomic seating that supports long working sessions, and don’t forget task lighting for darker corners or evening work. Remember to leave enough clearance around furniture for comfortable movement and consider the flow of foot traffic when arranging larger pieces.\n\n
 \n
\n\n\n
Climate Control Options
\n\nTo maintain a comfortable working environment year-round, proper climate control is essential in your converted studio space. A combination of heating and cooling solutions will help regulate temperature effectively. For winter months, consider installing a compact electric heater or infrared panel heater, which provide efficient warmth without taking up much space. Wall-mounted units are particularly practical as they free up valuable floor area.\n\nDuring summer, a portable air conditioning unit or a mini-split system can keep your studio cool and comfortable. Mini-splits are especially efficient and operate quietly, making them ideal for creative work. Proper insulation is crucial for maintaining temperature control and reducing energy costs – consider adding weatherstripping around doors and windows, and installing adequate wall and ceiling insulation.\n\nTo improve air circulation, install a ceiling fan or portable fan. This not only helps distribute warm or cool air more effectively but also ensures proper ventilation. Don’t forget to add appropriate ventilation options like a small window fan or air vent to prevent moisture buildup and maintain air quality. These climate control solutions will help create a comfortable workspace you can enjoy throughout all seasons.\n\n\n
Budget-Friendly Tips and Tricks
\n\nConverting your shed into a studio doesn’t have to break the bank. Start by sourcing materials from local salvage yards, construction sites (with permission), and online marketplaces. Second-hand windows and doors often come at a fraction of retail prices while adding character to your space. Consider using recycled insulation materials like denim or newspaper, which can be both eco-friendly and cost-effective.\n\nFor flooring, explore alternatives like painted plywood or vinyl tiles instead of expensive hardwood. You can create stunning wall treatments using pallet wood, which is often available for free from local businesses. When it comes to lighting, maximize natural light with strategically placed windows, reducing your dependence on artificial lighting during daytime hours.\n\nSave on furniture by repurposing existing pieces or shopping at thrift stores. Many storage solutions can be crafted from inexpensive materials like PVC pipes or wooden crates. For climate control, start with good insulation and ventilation before investing in expensive HVAC systems. Installing ceiling fans and proper window treatments can significantly reduce heating and cooling costs.\n\nConsider tackling simple tasks yourself, like basic demolition, painting, and installing baseboards. However, always budget for professional help with electrical and plumbing work to ensure safety and code compliance. Join local DIY groups to share tools and expertise, potentially cutting costs while building valuable skills.\n\n\nConverting your shed into a studio is an exciting project that can transform an underutilized space into your personal creative haven. By following proper planning procedures, ensuring adequate insulation, installing appropriate electrical systems, and adding the right finishing touches, you can create a comfortable and inspiring workspace right in your backyard. Remember to check local regulations, maintain a realistic budget, and take your time with each step of the process. Whether you’re planning to use your studio for art, music, writing, or crafts, the satisfaction of creating your own dedicated space will be worth the effort. Don’t be afraid to start small and upgrade gradually – your shed-to-studio conversion can evolve along with your needs and creative journey. Take that first step today and watch your vision come to life!