
Transform Your Storage Shed into a Cozy Bedroom (Complete DIY Process)
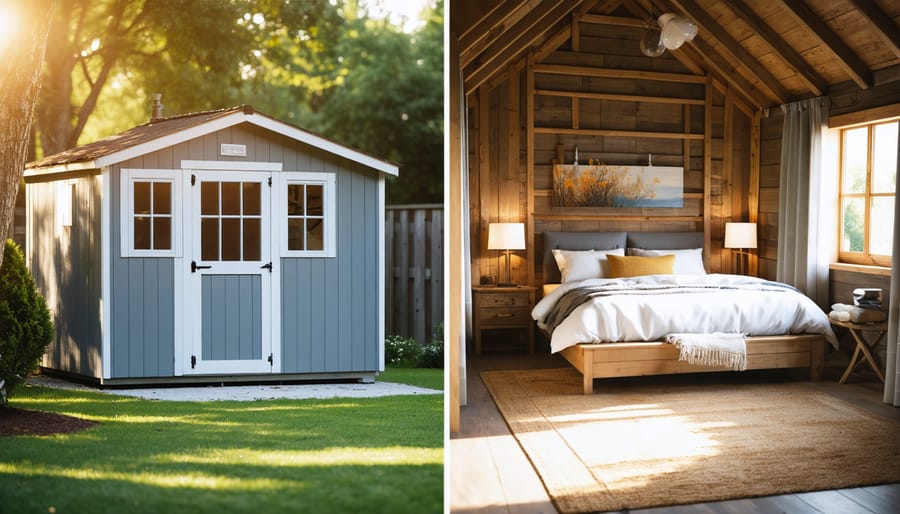
Transform your backyard shed into a comfortable bedroom and maximize your property’s potential with this comprehensive conversion guide. Learning how to transform your shed into living space opens up exciting possibilities for guest accommodations, rental income, or a private retreat. \n\nBefore starting your conversion project, assess three critical factors: local zoning regulations and building permits, the shed’s structural integrity, and access to essential utilities like electricity, water, and climate control. A properly converted shed bedroom requires proper insulation, ventilation, and moisture protection to ensure comfort and longevity.\n\nThis guide walks you through every phase of the conversion process, from initial planning and weatherproofing to interior finishing and decorating. Whether you’re an experienced DIY enthusiast or working with contractors, you’ll discover cost-effective solutions and professional techniques to create a cozy, code-compliant living space that adds value to your property.\n\nLet’s explore how to turn your basic storage shed into a comfortable, fully functional bedroom that meets all safety and comfort requirements.\n\n\n
 \n
\n\n\n
Planning Your Shed-to-Bedroom Conversion
\n\n
Legal Requirements and Permits
\n\nBefore starting your shed-to-bedroom conversion, it’s crucial to navigate the legal requirements in your area. Most jurisdictions require specific permits and inspections for this type of project. Start by contacting your local building department to understand the zoning laws and whether residential conversions are allowed on your property.\n\nTypically, you’ll need a building permit, which involves submitting detailed plans showing structural modifications, electrical work, and plumbing installations. Many areas also require that the converted space meets minimum ceiling height requirements (usually 7 feet), has proper emergency exits, and includes adequate ventilation.\n\nDon’t forget to check if your property’s setback requirements allow for residential use of the shed’s location. You may also need additional permits for electrical, plumbing, and HVAC work, which often must be completed by licensed professionals.\n\nWorking without proper permits can result in fines, forced removal of improvements, or complications when selling your home. While the permit process might seem daunting, it ensures your conversion is safe and legally compliant.\n\n
Assessing Your Shed’s Suitability
\n\nBefore diving into your shed conversion project, it’s crucial to determine if your existing structure can safely and legally become a bedroom. Start by examining the shed’s foundation – it should be level, stable, and preferably concrete or a well-constructed pier system. Check the overall structural integrity, paying special attention to the walls and roof for any signs of water damage, rot, or pest infestation.\n\nSize matters significantly – your shed should be at least 120 square feet to accommodate a comfortable bedroom setup. The ceiling height is equally important, with most building codes requiring a minimum of 7 feet. Look at the existing frame construction; if it’s built with 2×4 studs (or larger) at standard 16-inch spacing, you’re off to a good start.\n\nConsider the shed’s location on your property. It should be easily accessible and maintain proper distance from property lines according to local zoning laws. Evaluate the terrain around the shed – proper drainage is essential to prevent future moisture issues. The structure should also receive adequate natural light, which might require adding windows if none exist.\n\nAssessment of utility access is another critical factor. Consider how you’ll connect electricity, and if needed, plumbing and heating/cooling systems. The distance from your main house utilities will impact the feasibility and cost of these connections.\n\nFinally, check your local building codes and HOA regulations. Some areas require specific permits for converting outbuildings into living spaces, while others might have restrictions on such conversions altogether. A professional inspection can help identify any potential deal-breakers and ensure your shed is a viable candidate for conversion.\n\n\n
Essential Structural Modifications
\n\n
Foundation and Flooring
\n\nBefore transforming your shed into a cozy bedroom, ensuring a solid foundation and proper flooring is crucial. Start with proper site preparation by checking the existing foundation. If your shed sits on concrete blocks or gravel, you’ll need to upgrade to a permanent concrete foundation that meets local building codes.\n\nFor existing concrete foundations, inspect thoroughly for cracks or damage. Fill any cracks with concrete patch compound and seal the surface to prevent moisture issues. Consider installing a vapor barrier between the foundation and flooring to protect against ground moisture.\n\nNext, level the floor using self-leveling compound if necessary. Install pressure-treated floor joists, typically 16 inches on center, to create a proper subfloor framework. Add insulation between the joists – rigid foam insulation works well and provides excellent R-value for temperature control.\n\nCover the joists with ¾-inch pressure-treated plywood subfloor, securing it firmly with deck screws. For the final flooring layer, choose materials suitable for bedroom use, such as laminate, vinyl plank, or carpet. These options are durable, moisture-resistant, and help create a comfortable living space. Remember to maintain a slight slope away from the structure for proper drainage and long-term protection against water damage.\n\n
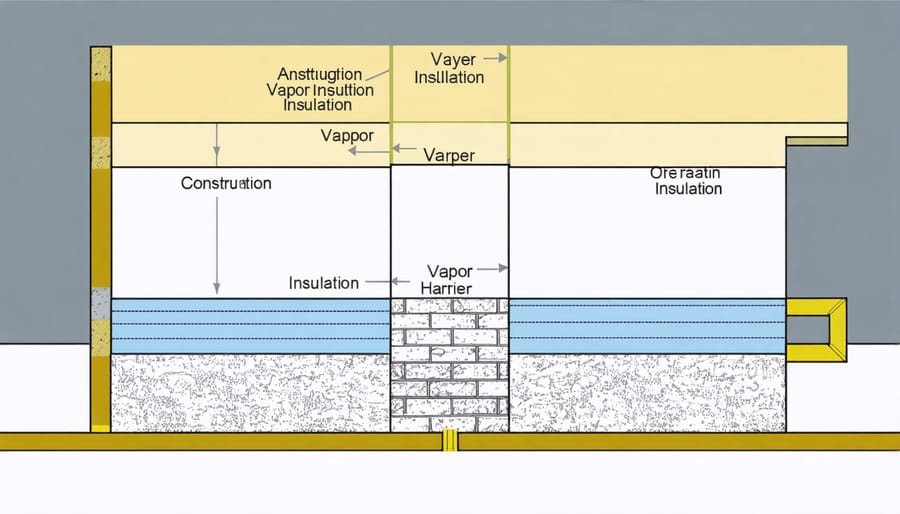
Insulation and Weatherproofing
\n\nProper insulation and weatherproofing are crucial steps in transforming your shed into a comfortable bedroom space. Start by thoroughly inspecting the structure for any gaps, cracks, or areas where moisture might enter. Seal these points using quality weather stripping and caulk around windows, doors, and any utility penetrations.\n\nFor wall insulation, consider eco-friendly insulation options like mineral wool or recycled denim batts, which offer excellent thermal and sound-dampening properties. Install a vapor barrier on the warm side of the insulation to prevent moisture buildup, and ensure proper ventilation to avoid condensation issues.\n\nThe roof requires special attention, as it’s your primary defense against the elements. Add rigid foam insulation boards between roof rafters, followed by a breathable membrane to protect against water infiltration while allowing excess moisture to escape. Don’t forget to insulate the floor – use pressure-treated lumber to create a raised platform, fill the cavity with insulation, and seal with a moisture barrier.\n\nConsider installing double-pane windows and a well-insulated exterior door to maintain comfortable temperatures year-round. Weather caps above doors and windows provide additional protection against rain and snow. Remember to properly flash all exterior openings and ensure your roofing material is in good condition to prevent any leaks.\n\n
 \n
\n\n\n
Windows and Ventilation
\n\nWindows and proper ventilation are crucial elements when converting your shed into a bedroom. Installing windows in your shed serves multiple purposes: it provides natural light, creates an open atmosphere, and offers emergency exits as required by building codes.\n\nFor optimal lighting and airflow, consider installing at least two windows on opposite walls. Double-hung or casement windows are excellent choices, as they maximize ventilation control and are easier to clean. When selecting window sizes, aim for units that collectively equal at least 8% of your floor space to meet most residential requirements.\n\nImplementing proper ventilation systems is equally important for maintaining healthy air quality. Consider installing both passive and active ventilation solutions. Passive options include soffit vents and ridge vents, while active solutions might involve installing a small bathroom-style exhaust fan or a mini-split system with built-in air circulation.\n\nRemember to weatherproof around all window installations using proper flashing and weatherstripping. This prevents water damage and ensures energy efficiency. For added comfort, consider installing window treatments that provide privacy and help regulate temperature. Cellular shades or insulated curtains work particularly well in converted spaces, offering both functionality and style while maintaining the cozy bedroom atmosphere you’re aiming to create.\n\n\n
Installing Essential Utilities
\n\n
Electrical Wiring
\n\nProper electrical wiring is crucial for your shed-to-bedroom conversion, ensuring both safety and functionality. Start by consulting a licensed electrician to assess your needs and create a wiring plan that meets local building codes. Most bedroom conversions require a dedicated 20-amp circuit from your main house panel to support lighting, outlets, and climate control systems.\n\nBegin by trenching a path from your house to the shed, laying appropriate conduit at the required depth (typically 18-24 inches). Your electrician will run proper gauge wiring through this conduit, installing a subpanel in the shed if necessary. Standard bedroom requirements include at least one switch-controlled light fixture, multiple outlets spaced according to code (typically every 12 feet), and GFCI protection for any outlets near potential water sources.\n\nConsider installing exterior lighting for safety and convenience. For the interior, plan outlet locations based on furniture placement and potential needs for electronics, charging stations, and climate control equipment. Include USB outlets for modern convenience, and don’t forget to install smoke and carbon monoxide detectors as required by local regulations.\n\nRemember to obtain necessary permits before starting any electrical work, and always have final connections made by a certified electrician. This ensures your conversion meets safety standards and will pass inspection, giving you peace of mind in your new bedroom space.\n\n
 \n
\n\n\n
Climate Control
\n\nMaintaining a comfortable temperature in your converted shed bedroom is crucial for year-round livability. Start by properly insulating the walls, floor, and ceiling to create an effective thermal barrier. Consider using a combination of rigid foam insulation and fiberglass batts for optimal results.\n\nFor heating options, electric baseboards offer a straightforward solution that’s easy to install and control. A ductless mini-split system provides both heating and cooling capabilities, making it an excellent all-in-one choice despite its higher upfront cost. If your shed is close to your main house, extending your existing HVAC system could be worth exploring.\n\nPortable space heaters can work for occasional use, but they’re not ideal as a primary heat source. For cooling, besides a mini-split system, consider installing a window air conditioning unit. Make sure to position it where it won’t interfere with natural light or ventilation when not in use.\n\nDon’t overlook the importance of proper ventilation. Install at least one operable window and consider adding a ceiling fan to help circulate air. This combination will help manage humidity levels and maintain fresh air flow throughout the space.\n\nFor enhanced temperature control, add thermal curtains or cellular shades to your windows. These will help keep the heat out during summer and retain warmth during winter, making your climate control systems more efficient.\n\n
Basic Plumbing Considerations
\n\nAdding water access to your converted shed bedroom requires careful planning and potentially professional assistance. If you’re considering a bathroom or sink installation, you’ll need to connect to your home’s existing water supply and drainage system. The most cost-effective approach is converting a shed that’s relatively close to your house’s main plumbing lines.\n\nStart by mapping out your plumbing needs. A basic setup might include a small sink or half bathroom, which requires both hot and cold water lines and a drain pipe. You’ll need to dig trenches for the water supply lines, ensuring they’re below the frost line to prevent freezing in winter. These trenches should have a slight slope for proper drainage.\n\nConsider installing shut-off valves for both hot and cold water lines, making future maintenance easier. PEX piping is often recommended for shed conversions due to its flexibility and resistance to freezing. For drainage, you’ll need to connect to your home’s main sewer line or install a separate septic system, depending on local regulations.\n\nDon’t forget about proper ventilation for plumbing fixtures. Install vent pipes according to local building codes to prevent sewer gases from backing up into your new space. It’s also wise to include water-detection sensors near plumbing fixtures to alert you of any leaks before they cause significant damage.\n\nRemember to insulate all water pipes thoroughly, especially in areas where temperatures drop below freezing. This extra step will help prevent costly repairs and maintenance issues down the line.\n\n\n
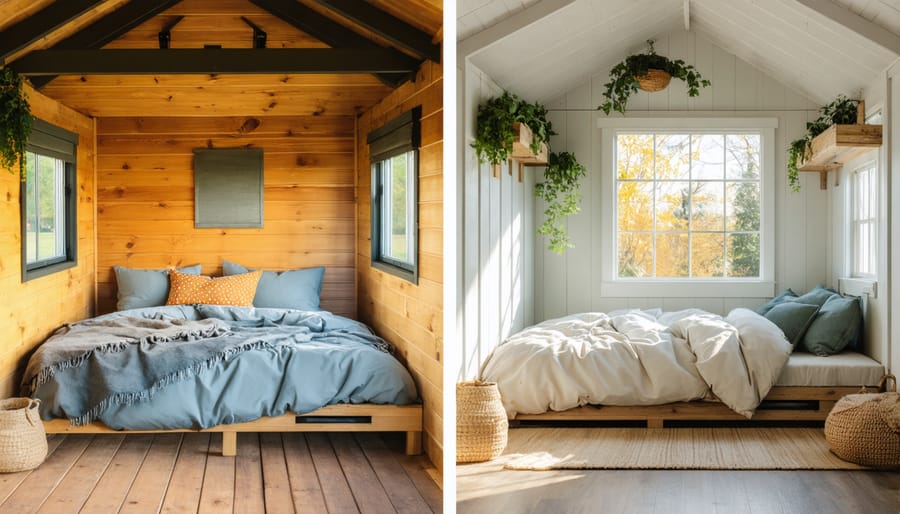
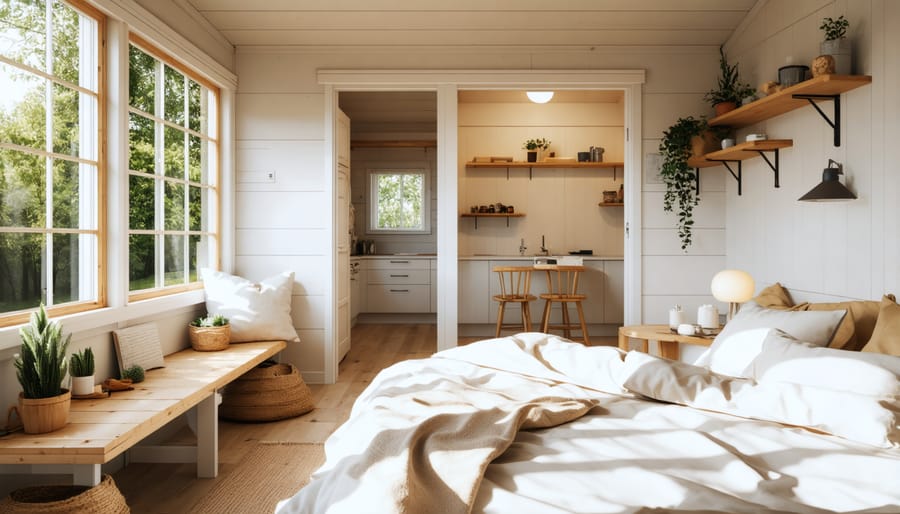
Interior Finishing Touches
\n\n
Wall and Ceiling Finishing
\n\nThe transformation from shed to bedroom takes shape as you focus on wall and ceiling finishes. Start by installing a vapor barrier against your insulated walls to prevent moisture buildup. Then, hang 1/2-inch drywall sheets horizontally along the walls, securing them with drywall screws every 8 inches. For the ceiling, consider using slightly lighter 3/8-inch panels to make overhead installation more manageable.\n\nWhen hanging drywall, work from the ceiling down, ensuring each piece fits snugly against adjacent panels. Cut holes for electrical boxes and fixtures before mounting each sheet. Apply mesh tape over the seams and cover with three thin coats of joint compound, allowing each layer to dry completely before adding the next. Sand between coats for a smooth finish.\n\nFor a professional look, prime the walls and ceiling before painting. Choose a light-colored paint for the ceiling to create the illusion of height and maximize natural light. Consider using eggshell or satin finish paint for the walls – it’s more durable than flat paint and easier to clean.\n\nTo add character to your space, consider installing crown molding where the walls meet the ceiling. Baseboards and window trim will complete the polished look. If you’re working with a pitched roof, you might want to create a feature wall with shiplap or beadboard on the angled section for visual interest.\n\nRemember to ventilate the room well during the finishing process, as drywall dust and paint fumes can be overwhelming in a small space. Take your time with this phase – the quality of your wall and ceiling finish will significantly impact the final appearance of your converted bedroom.\n\n
Storage and Space Optimization
\n\nWhen converting your shed into a bedroom, smart storage solutions are essential for creating a comfortable living space. Start by conducting a thorough assessment of your storage needs and available space. Built-in solutions work particularly well in converted sheds, as they maximize vertical space while maintaining a clean, uncluttered look.\n\nConsider installing floor-to-ceiling wardrobes along one wall, utilizing every inch of available height. Under-bed storage is another game-changer – opt for a bed frame with built-in drawers or enough clearance to accommodate storage boxes. Wall-mounted shelves and floating nightstands can provide additional storage without taking up valuable floor space.\n\nMulti-functional furniture is your best friend in a converted shed bedroom. Look for ottomans that double as storage boxes, murphy beds that fold up against the wall when not in use, or desks that can collapse when extra space is needed. Don’t forget about often-overlooked spaces like the areas behind doors or corners, which can be transformed into storage nooks with custom-built solutions.\n\nFor clothing storage, consider a capsule wardrobe system with seasonal rotation to minimize the space needed for clothes. Install hooks on the back of doors for robes, bags, or accessories. Use vacuum storage bags for out-of-season items that can be stored in less accessible areas.\n\nRemember to incorporate adequate lighting around storage areas – battery-operated LED strips in wardrobes or under-shelf lighting can make a significant difference in functionality. By carefully planning your storage solutions before the conversion, you’ll create a more organized and enjoyable living space that feels surprisingly spacious despite its modest dimensions.\n\n
 \n
\n\n\n\nConverting a shed into a bedroom is an exciting and rewarding project that can add valuable living space to your property when done correctly. Throughout this guide, we’ve covered the essential steps from initial planning and permits to the final decorative touches that make your converted space feel like home.\n\nRemember that success lies in thorough preparation and attention to detail. Start by securing proper permits and ensuring your shed meets local building codes. Focus on creating a solid foundation with proper insulation, weatherproofing, and electrical work before moving on to interior finishing. The investment in high-quality materials and professional help for specialized tasks like plumbing and electrical work will pay off in the long run.\n\nConsider your climate when planning insulation and heating/cooling solutions, and don’t underestimate the importance of proper ventilation. While DIY work can save money, some aspects of the conversion are best left to professionals to ensure safety and compliance with local regulations.\n\nBy following the steps outlined in this guide, you can transform your humble shed into a comfortable, legally compliant bedroom that adds both value and functionality to your property. Whether you’re creating a guest room, home office, or teenage retreat, a well-executed shed conversion can provide the extra space you need while potentially increasing your property’s value.\n\nTake your time with the project, double-check all measurements, and don’t hesitate to consult professionals when needed. The end result will be worth the effort and investment.