
Why J Vent Roof Systems Are the Secret to a Perfectly Cool Shed
Transform your shed’s performance with a J vent roof system – the smart solution for preventing moisture damage and maintaining ideal temperature control. This innovative roofing design delivers proper roof ventilation through a specialized J-shaped channel that runs along the roof’s ridge, creating a natural airflow that expels hot, humid air while protecting against weather elements. Unlike traditional ridge vents, J vents offer superior protection against wind-driven rain and snow while maintaining consistent airflow year-round. Perfect for both DIY enthusiasts and professional builders, this system combines straightforward installation with lasting durability, making it an excellent investment for any storage structure. Whether you’re building a new shed or upgrading an existing one, understanding J vent roof systems is crucial for maximizing your building’s longevity and functionality.
How J Vent Roof Systems Keep Your Shed Comfortable
The Science Behind J Vent Airflow
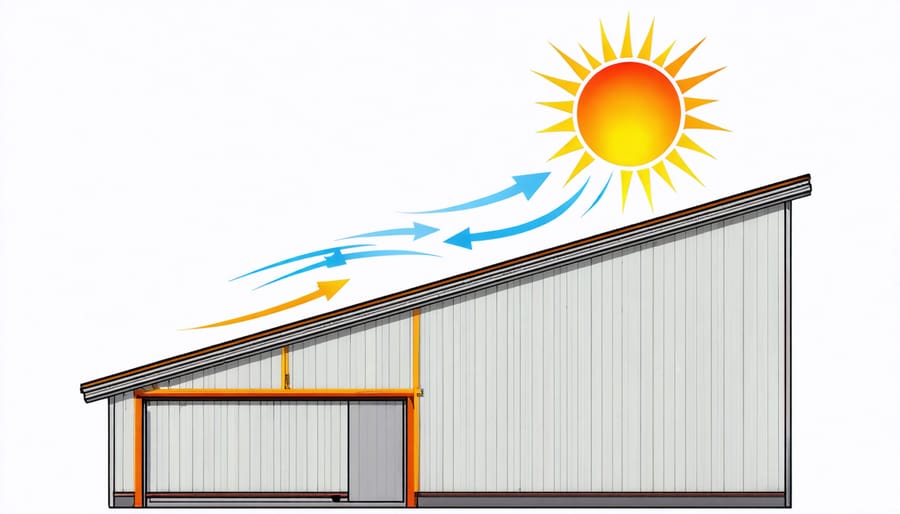
The science behind J vent airflow is surprisingly simple yet highly effective. As warm air naturally rises, it creates a continuous flow pattern in your shed. When the sun heats your roof, the warm air moves upward and exits through the J vent’s upper opening. This creates a vacuum effect that pulls cooler air in through the lower vents, establishing a natural circulation system.
This airflow pattern helps maintain a consistent temperature inside your shed while reducing moisture buildup. On hot days, the J vent helps prevent your shed from becoming a sauna by allowing heat to escape efficiently. During colder months, this same ventilation system helps prevent condensation from forming on your stored items by keeping air moving and reducing humidity levels.
The curved design of the J vent also plays a crucial role in preventing rain and snow from entering while still maintaining proper airflow. Think of it as a breathing system for your shed – constantly exchanging stale, warm air for fresh, cooler air without the need for powered ventilation.

Year-Round Benefits for Your Storage
J vent roofing provides exceptional protection for your stored belongings throughout every season. During hot summer months, these innovative vents help control your shed’s temperature by allowing warm air to escape naturally, preventing heat buildup that could damage sensitive items. In winter, proper ventilation prevents moisture accumulation that often leads to mold, mildew, and rust on tools and equipment.
Spring showers are no match for the j vent’s unique design, which keeps rain out while maintaining consistent airflow. This means your seasonal decorations, gardening supplies, and power tools stay dry and protected. During fall, when leaves and debris typically cause ventilation issues, the j vent’s strategic shape prevents clogging while continuing to provide essential airflow.
The system works tirelessly year-round to maintain optimal storage conditions, extending the life of both your shed and its contents. Whether you’re storing family heirlooms, workshop equipment, or everyday outdoor gear, j vent roofing ensures your items remain in the same condition as when you stored them, season after season.
Installing J Vent Roof Systems: What You Need to Know
Materials and Tools Checklist
To properly install a J vent roof system, gather these essential materials and tools before beginning:
Materials:
– J vent strips (calculate linear feet needed for roof edges)
– Roofing nails or screws (corrosion-resistant)
– Roofing underlayment
– Roof shingles
– Drip edge flashing
– Caulk or sealant (weather-resistant)
– Ridge vent material (if combining with ridge ventilation)
Tools:
– Measuring tape
– Pencil or marker
– Hammer or power drill
– Utility knife
– Tin snips
– Safety equipment:
• Safety glasses
• Work gloves
• Non-slip footwear
• Dust mask
– Ladder or scaffolding
– Level
– Chalk line
– Pry bar (for existing roof modifications)
– Caulk gun
Optional but recommended:
– Helper or assistant
– Clean rags
– Roofing square
– Circular saw with appropriate blade
– Waterproof covering (for materials protection)
Pro tip: Purchase about 10% extra materials to account for cuts, waste, and potential mistakes during installation.
Key Installation Steps
Installing a J vent roof system requires careful attention to detail and proper planning. Begin by measuring your roof’s dimensions and calculating the number of J vents needed, typically spacing them every 4 to 6 feet along the roof’s edge. You’ll want to start with a clean, dry surface before installation begins.
First, position the J vents along the roof’s edge, ensuring they align with your rafters. Mark their locations clearly with a pencil. Using a utility knife, carefully cut slots in your roofing material where the vents will be installed. These slots should be slightly smaller than the vent openings to ensure a snug fit.
Next, apply a generous bead of roofing sealant around the perimeter of each marked location. Place the J vents into position, making sure they’re level and properly aligned with your cut slots. Secure each vent using roofing nails, placing them approximately every 4 inches along the vent’s flange.
Cover the nail heads with roofing sealant to prevent water infiltration. If you’re installing multiple J vents, ensure they’re connected properly with end caps or connectors as needed. The final step involves checking that all vents are securely fastened and properly sealed.
Important considerations include:
– Always work on a dry, clear day
– Wear appropriate safety gear, including non-slip shoes
– Check local building codes for specific requirements
– Ensure proper overlap with existing roofing materials
– Test the installation by running water around the vents to check for leaks
Remember to inspect the installation after the first heavy rain to ensure everything is working as intended.
Maintenance and Optimization Tips
Seasonal Maintenance Schedule
To maintain your J vent roof system’s optimal performance, follow this seasonal maintenance schedule. In spring, inspect the vents for winter damage and clear any debris that may have accumulated. Check the vent seals and ensure all fasteners remain secure. This is also an ideal time to verify that your effective ventilation strategies are working as intended.
During summer months, monitor the vents monthly for signs of pest intrusion and remove any bird nests or insect hives. Clean the vent openings with a soft brush to prevent airflow obstruction. Fall maintenance is crucial – clear fallen leaves and prepare the system for winter by checking weatherstripping and replacing if necessary.
In winter, regularly remove snow buildup around the vents to prevent ice dams. After severe storms, perform a quick visual inspection to ensure the vents haven’t been damaged or dislodged. By following this simple maintenance routine, you’ll extend the life of your J vent system and maintain proper airflow throughout the year.
Troubleshooting Common Issues
Even the best-installed J vent roof systems can occasionally experience issues, but most are easily fixable. If you notice water leakage, first check for loose or damaged shingles near the vent. Sometimes, simply replacing a few shingles or resealing the area around the vent solves the problem. For clogged vents, regular cleaning with a soft brush can prevent debris buildup that affects airflow.
Ice damming during winter months can be addressed by ensuring proper insulation in your attic and maintaining consistent ventilation. If you hear rattling sounds during windy conditions, inspect the vent’s fasteners and tighten them if necessary. You might need to add rubber gaskets to reduce noise.
To prevent most issues, conduct seasonal inspections of your J vent system. Look for signs of rust, loose components, or damaged seals. Clean the vents in spring and fall, removing leaves, twigs, and other debris. If you notice signs of pest intrusion, install mesh screens while ensuring they don’t restrict airflow. For persistent problems, consult a roofing professional who specializes in ventilation systems.
Cost vs. Value: Making the Right Choice
When evaluating j vent roof systems for your shed, it’s essential to weigh the initial investment against long-term benefits. While these ventilation systems typically cost more upfront than basic roof vents, they offer substantial value through enhanced durability and performance.
The average installation cost for a j vent roof system ranges from $200 to $500, depending on your shed size and local labor rates. DIY installation can reduce these costs significantly, though proper installation is crucial for optimal performance. When comparing prices, consider that quality j vent materials usually come with extended warranties, often 10-15 years or more.
Looking at long-term benefits, j vent systems can extend your shed’s lifespan by preventing moisture damage and reducing heat buildup. This protection can save you thousands in potential repairs or replacement costs down the line. Many homeowners report a 15-20% reduction in summer cooling needs, which translates to better preservation of stored items.
Insurance companies often view proper ventilation systems favorably, potentially leading to reduced premiums. Additionally, a well-ventilated shed with j vents can increase your property’s resale value, making it an attractive feature for future buyers.
Consider the maintenance aspect as well. J vent systems require minimal upkeep compared to traditional vents, reducing long-term maintenance costs. While the initial price might be higher, the combination of durability, energy efficiency, and protection makes j vent roofing a cost-effective choice for most shed owners.
Remember to factor in your local climate conditions when making your decision. In areas with high humidity or extreme temperatures, the value proposition of j vent systems becomes even more compelling.
J vent roof systems offer an effective and affordable solution for maintaining proper airflow in your storage shed while protecting your belongings from moisture damage. By implementing this ventilation system, you’re making a smart investment in the longevity of both your shed and its contents. Remember to regularly inspect your j vents, keep them clear of debris, and ensure they’re properly sealed during installation. Whether you’re a DIY enthusiast or working with a professional, the benefits of j vent roofing make it worth considering for your storage needs. Take the first step toward better shed ventilation today – your belongings will thank you for years to come.