
Wire Your Shed Transfer Switch in One Afternoon (No Electrician Needed)
Assess whether your shed electrical system can handle the additional load by verifying your current panel’s amperage rating and available circuit slots. A 6-circuit transfer switch lets you keep essential shed equipment running during power outages by seamlessly switching between utility and generator power without dangerous backfeeding.\n\nPurchase a UL-listed 6-circuit transfer switch rated for your generator’s wattage, typically between 3,000 and 7,500 watts for most shed applications. Match the switch’s amperage to your generator output and ensure it includes built-in interlock features that prevent simultaneous connection to both power sources.\n\nMap out which six circuits matter most during outages, such as lighting, refrigeration, power tools, or climate control systems. Transfer switches work by physically isolating selected circuits from the main panel and routing them through the switch box, giving you manual control over what runs on backup power.\n\nPrepare for two to four hours of focused installation time, assuming you’re comfortable working with live electrical panels and understand basic wiring principles. You’ll need standard electrician tools, proper safety equipment including insulated gloves and voltage testers, and a clear understanding of your local electrical codes.\n\nThis installation involves working inside your main electrical panel where dangerous voltages exist. While many DIY homeowners successfully complete this project, honest self-assessment of your electrical knowledge is crucial. If terms like neutral bus bar, double-pole breaker, or load calculation feel unfamiliar, consulting a licensed electrician ensures both safety and code compliance.\n\n\n
Why Your Shed Needs a Transfer Switch
\n\nIf you’ve invested in setting up your shed as a functional workspace, storage area, or hobby retreat, the last thing you want is to lose power to essential equipment during an outage. A 6-circuit transfer switch offers a practical solution that keeps your shed operational when the unexpected happens.\n\nThink about what you’re powering in your shed. Maybe it’s a refrigerator storing beverages or garden supplies, security cameras protecting your property, or valuable workshop tools that need climate control. During a power outage, these systems go dark without a safe way to switch to generator power. That’s where a transfer switch becomes invaluable.\n\nA transfer switch acts as a smart traffic controller between your utility power and generator, ensuring electricity flows from only one source at a time. This prevents dangerous backfeeding that could harm utility workers or damage your equipment. It’s the safe, code-compliant way to provide backup power during outages without risky improvisation.\n\nThe beauty of a 6-circuit model is its flexibility. You’re not trying to power everything at once, which would require a massive generator. Instead, you’re selectively keeping six critical circuits running. This means your security system stays active, your freezer keeps contents frozen, and your essential tools remain protected from power surges when electricity returns.\n\nFor DIY enthusiasts, a transfer switch also provides peace of mind. Once properly installed, switching between power sources becomes a simple, safe process. You’re protecting your investment in shed equipment while maintaining functionality regardless of weather events or grid problems. It’s a practical upgrade that transforms your shed from a fair-weather workspace into a reliable, year-round facility.\n\n
 \n
\n\n\n\n
What You’ll Need Before You Start
\n\n
Tools and Materials Checklist
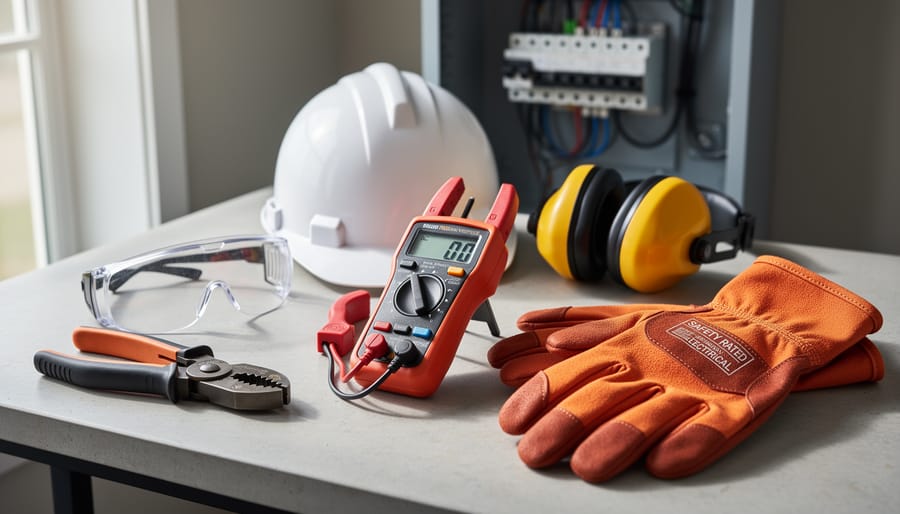
\n\nBefore you begin this project, gathering the right tools and materials will make your installation smoother and safer. Here’s everything you’ll need:\n\nYour main component is the 6-circuit transfer switch kit itself, which should include mounting hardware and installation instructions. For electrical work, you’ll need wire strippers for preparing cable connections, both flathead and Phillips screwdrivers for securing terminals, and a non-contact voltage tester to verify power is off before you start working.\n\nStock up on appropriately rated cable connectors and conduit fittings to match your local electrical codes. You’ll also need circuit breakers that match your transfer switch specifications and the electrical loads you’re protecting.\n\nSafety comes first, so don’t skip the protective gear. Heavy-duty work gloves protect your hands, safety glasses shield your eyes from debris, and rubber-soled shoes provide electrical insulation. Keep a flashlight handy for working in dim areas, and have a fire extinguisher nearby as a precaution.\n\nConsider having cable ties for organizing wires and electrical tape for marking circuits. A drill with appropriate bits may be needed for mounting the switch panel securely to your wall.\n\nRemember, if you’re missing any specialized tools or feel uncertain about any aspect of the work, there’s no shame in consulting a licensed electrician. Your safety and compliance with local codes matter most.\n\n
 \n
\n\n\n
Safety Equipment That Could Save Your Life
\n\nBefore you begin working with your 6-circuit transfer switch, let’s talk about the safety equipment that should be non-negotiable in your toolkit. Following proper electrical safety guidelines starts with having the right protective gear.\n\nInsulated gloves rated for electrical work are your first line of defense against shock. Look for gloves rated for at least 600 volts, which protect you from accidental contact with live wires. Regular work gloves simply won’t cut it here.\n\nSafety glasses protect your eyes from potential arc flash or debris. Electrical work can produce unexpected sparks, and your vision is too precious to risk.\n\nA non-contact voltage tester is perhaps your most important tool. This device lets you verify that power is truly off before you touch any wires. Many homeowners have been shocked because they assumed a circuit was dead. Test every wire, every time, even after you’ve flipped the breaker.\n\nConsider adding a fire extinguisher rated for electrical fires to your workspace. Having one nearby provides peace of mind and quick response capability if something goes wrong. These simple investments can literally save your life during installation.\n\n\n
Understanding Your Shed’s Current Electrical Setup
\n\nBefore you can install a transfer switch, you need to take stock of what you’re working with. Think of this as creating a roadmap for your project—knowing your starting point makes the journey so much smoother!\n\nStart by locating your shed’s main electrical panel. This is typically a gray metal box mounted on the wall where power enters your shed. Open the panel door carefully (don’t touch anything inside yet!) and take a moment to observe how it’s organized. You’ll see several circuit breakers, each controlling power to different areas or outlets in your shed.\n\nUnderstanding your existing shed electrical system means identifying what each circuit powers. Grab a notepad and have a helper flip breakers one at a time while you check what goes off. Label everything clearly—you’ll thank yourself later! Note the amperage rating on each breaker (usually 15 or 20 amps) to understand the load capacity.\n\nNow comes the important part: determining which six circuits deserve backup power priority. Consider what matters most during an outage. Most homeowners prioritize lighting circuits first, followed by outlets for refrigerators or freezers if you store perishables. Power tool circuits and heating or cooling systems often make the list too.\n\nCalculate your total load by adding up the wattages of devices on each circuit. This ensures your backup generator can handle the demand. A practical tip: if you’re using your shed as a workshop, prioritize circuits powering essential tools over convenience outlets.\n\nTake photos of your panel’s current setup and your circuit map. These become invaluable references during installation and troubleshooting. Understanding this foundation makes the actual transfer switch installation much less intimidating and helps ensure you’re protecting what matters most.\n\n\n
Step-by-Step Installation Process
\n\n
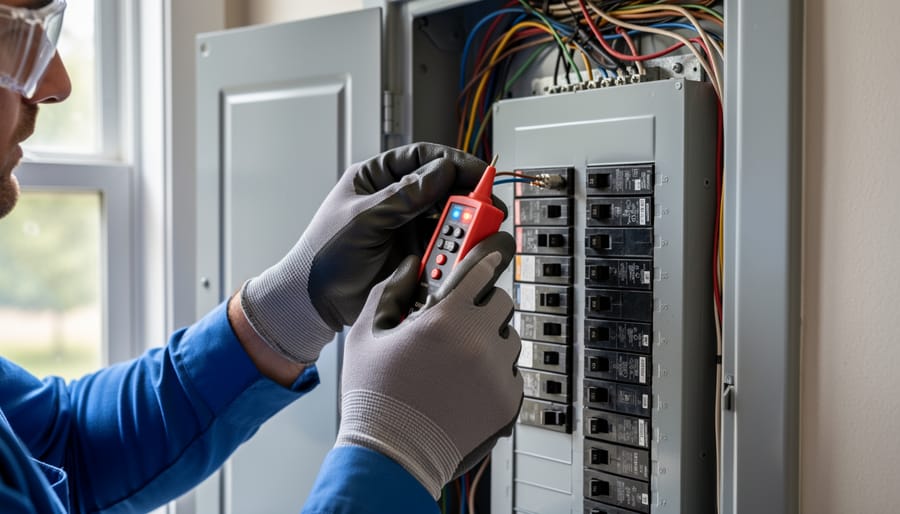
Step 1: Turn Off Power and Verify It’s Safe
\n\nSafety comes first when working with electricity, and that means completely shutting off power before you begin. Head to your main electrical panel and flip the main breaker to the OFF position. This cuts power to your entire home, creating a safe workspace for your installation.\n\nDon’t just trust the breaker position though. Grab a non-contact voltage tester and check the wires you’ll be working with. Simply hold the tester near the wires in your panel, and it will alert you if any voltage is present. Test multiple wires to be thorough. If the tester lights up or beeps, stop immediately and double-check that you’ve switched off the correct breaker.\n\nOnce you’ve confirmed zero voltage, place a piece of tape over the main breaker and add a note warning others not to turn it back on. This simple step prevents someone from accidentally restoring power while you’re mid-installation. Consider working during daylight hours so you have natural light, and keep a flashlight handy for inspecting connections inside the panel.\n\n
 \n
\n\n\n
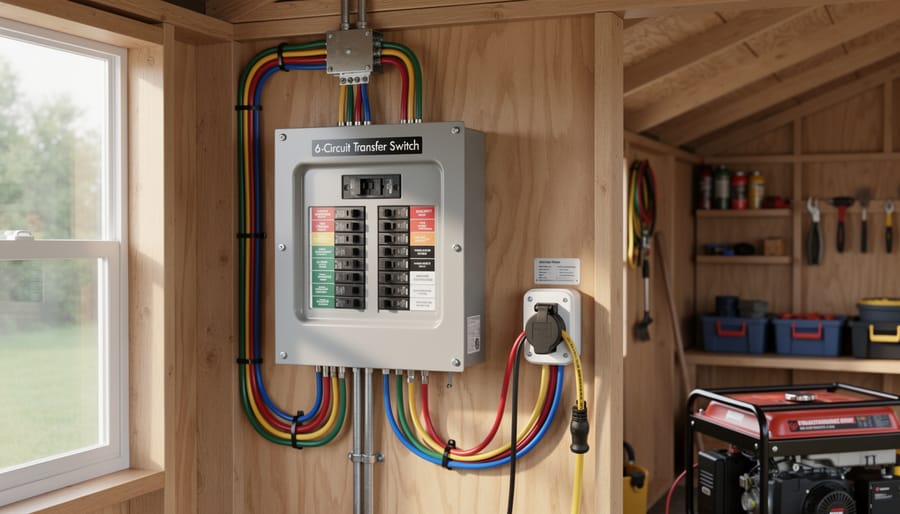
Step 2: Choose the Perfect Mounting Location
\n\nChoosing the right spot for your transfer switch makes all the difference in both safety and convenience. You’ll want to mount it on a wall near your main electrical panel, ideally within 10 feet to minimize wire runs and simplify the connection process. The National Electrical Code requires at least 30 inches of width and 36 inches of depth clearance in front of the switch, so you can operate it safely without obstacles in your way.\n\nPick a location at eye level, around 5 to 6 feet from the floor. This height makes it easy to flip switches during a power outage without reaching or bending awkwardly. Make sure the area stays dry and protected from the elements, especially important in shed installations where moisture can be a concern.\n\nBefore finalizing your spot, consider how you’ll route cables from the main panel and to your six circuits. Avoid areas with plumbing, excessive heat sources, or tight corners that make future maintenance tricky. A well-chosen location now saves frustration later and keeps everything accessible for routine checks or adjustments.\n\n
Step 3: Mount Your Transfer Switch Securely
\n\nNow it’s time to secure your transfer switch to the wall, and this step is crucial for both safety and long-term reliability. Start by holding the switch against your chosen location and marking the mounting holes with a pencil. Use a level to ensure the switch sits perfectly straight—a crooked installation can look unprofessional and potentially strain the electrical connections over time.\n\nFor most wall types, you’ll need appropriate anchors to handle the weight. Drywall requires heavy-duty toggle bolts or wall anchors rated for at least 50 pounds, while concrete or masonry walls need concrete anchors. Drill pilot holes at your marked spots, insert your anchors, then align the transfer switch and drive in the mounting screws. Don’t overtighten, as this can crack the switch housing.\n\nOnce mounted, give the switch a gentle tug to confirm it’s firmly attached. A properly secured transfer switch shouldn’t budge or wiggle. This solid foundation will serve you well during years of reliable backup power service.\n\n
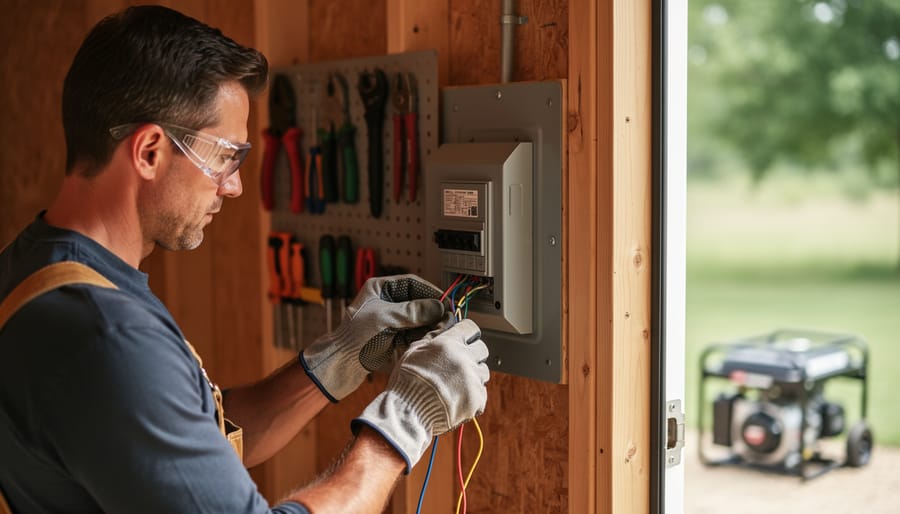
Step 4: Connect the Utility Power Lines
\n\nNow comes the crucial part – connecting your home’s utility power to the transfer switch. Before you begin, triple-check that your main circuit breaker is OFF. Seriously, this is where safety becomes non-negotiable.\n\nYou’ll be working with the utility line wires that currently feed your shed’s main panel. These typically consist of two hot wires (black and red), one neutral (white), and one ground (bare copper or green). The wire gauge should match your existing setup – commonly 10-gauge for 30-amp circuits or 8-gauge for 40-amp circuits.\n\nStart by carefully routing these utility wires into the transfer switch’s “Line” or “Utility” input terminals, usually located on the left side of the unit. Strip about half an inch of insulation from each wire using wire strippers. Insert each wire firmly into its corresponding terminal – hot wires to the brass terminals, neutral to the silver terminal, and ground to the green terminal. Tighten the terminal screws securely, then give each wire a gentle tug to confirm it’s locked in place.\n\nHere’s a pro tip from experienced DIYers: wrap electrical tape around the terminal connections for added security and insulation. This simple step provides peace of mind and an extra safety layer. If you’re uncertain about wire sizing or feel uncomfortable with this step, calling a licensed electrician is always the smart choice.\n\n
Step 5: Wire Your Generator Input
\n\nNow comes the critical connection between your generator and the transfer switch. Before starting, verify your generator’s voltage matches your transfer switch rating—most residential setups use 240 volts. Turn off the main breaker and double-check everything is de-energized.\n\nRoute the generator inlet cable through the appropriate knockout hole in your transfer switch. Strip the cable jacket carefully, leaving about six inches of wire to work with. You’ll typically find four wires: two hot wires (usually black and red), one neutral (white), and one ground (green or bare copper).\n\nConnect the hot wires to the designated terminals on the generator input side of your transfer switch—consult your switch’s wiring diagram for exact placement. Attach the neutral wire to the neutral bus bar and the ground wire to the grounding bar. These connections are your safety lifeline, so make them secure and tight.\n\nHere’s a homeowner tip that saved me headaches: take a photo of your connections before closing everything up. It’s incredibly helpful for future reference. Use a torque screwdriver if your switch specifies torque values—over-tightening can damage terminals just as easily as loose connections create fire hazards. When everything’s connected, give each wire a gentle tug to confirm it’s seated properly.\n\n
Step 6: Connect Your Six Critical Circuits
\n\nNow comes the crucial part: selecting and connecting your six most essential circuits. Think about which circuits matter most during a power outage. Most homeowners prioritize lighting, a refrigerator or freezer, essential power outlets, and perhaps a security system or communication devices.\n\nStart by identifying these six circuits in your shed’s main panel. Each circuit breaker should be labeled, but if yours aren’t, now’s the perfect time to test and label them properly. Turn off one breaker at a time and check what loses power. This detective work ensures you’re connecting the right circuits.\n\nOnce identified, turn off the main breaker and the six individual circuit breakers you’ve selected. Connect the wires from each circuit to the corresponding output terminals on your transfer switch. The switch will have clearly marked positions, typically numbered 1 through 6. Match each wire carefully: black to brass terminals, white to silver terminals, and ground wires to the ground bar.\n\nDouble-check every connection before proceeding. Loose connections can cause arcing or overheating, while crossed wires create serious hazards. When you’re confident everything is secure and properly connected, you’re ready to move forward with testing your installation.\n\n
Step 7: Test Everything Before Closing Up
\n\nBefore buttoning everything up, you’ll want to make absolutely sure your transfer switch works flawlessly. Think of this as your safety net—catching any issues now beats dealing with problems during an actual power outage!\n\nStart by visually inspecting every connection you made. Give each wire a gentle tug to confirm it’s secure in its terminal. Loose connections aren’t just inefficient; they’re fire hazards. Check that your wire nuts are tight and there’s no exposed copper anywhere.\n\nNow for the real test. With your main breaker still off, flip your transfer switch to the utility position. Restore power at the main panel and verify that electricity flows normally to your six circuits. Test outlets, lights, and any connected appliances. Everything working? Great! Now switch to the generator position—you should lose power completely.\n\nFire up your generator and connect it to the inlet box. Once the generator reaches full speed, switch back to generator mode. Your circuits should spring to life with backup power. Test each circuit individually to ensure they’re all receiving power.\n\nFinally, practice switching between sources a few times. The transition should be smooth and deliberate. If anything feels off—sparking, buzzing, or hesitation—stop immediately and troubleshoot before proceeding. When everything checks out perfectly, you’re ready to close up your installation with confidence.\n\n\n
Common Mistakes That Could Cost You (And How to Avoid Them)
\n\nEven experienced DIYers can stumble when installing a 6-circuit transfer switch, and these mistakes can be dangerous or expensive to fix. Let’s look at the most frequent errors so you can sidestep them entirely.\n\nOne of the biggest pitfalls is improper grounding. Some homeowners skip connecting the ground wire properly or fail to bond the neutral and ground at the main panel only. This seemingly small oversight can create serious shock hazards and equipment damage. Always verify your grounding connections match local electrical codes and manufacturer specifications.\n\nOverloading circuits is another classic mistake. Just because your transfer switch has six circuits doesn’t mean you should max them all out simultaneously. Your generator has limits too. Calculate the total wattage you’ll need during an outage and ensure it stays within your generator’s capacity. A good rule of thumb is to plan for 80 percent of your generator’s rated output to avoid tripping breakers constantly.\n\nWire sizing errors can sneak up on you. Using 14-gauge wire where 10-gauge is required might seem like a money-saver, but undersized wires overheat and create fire risks. Check the amperage requirements for each circuit and consult a wire gauge chart. When in doubt, going one size larger provides a safety margin.\n\nFinally, many people forget to label circuits clearly. Six months after installation, will you remember which breaker controls the refrigerator versus the well pump? Create a detailed circuit map and label both the transfer switch and your main panel. Use a label maker or weatherproof tags that won’t fade over time.\n\nThese common electrical mistakes are preventable with careful planning and attention to detail. Taking extra time during installation pays dividends in safety and reliability for years to come.\n\n\n
When to Call a Professional Instead
\n\nWhile DIY installation can save money, some situations absolutely warrant calling a licensed electrician. If your main electrical panel requires significant upgrades or modifications to accommodate the transfer switch, professional expertise becomes essential. Older homes with outdated wiring systems, aluminum wiring, or panels that don’t meet current code standards need expert assessment before proceeding.\n\nLocal building codes and permit requirements vary widely, and a licensed electrician understands these nuances intimately. They’ll ensure your installation passes inspection the first time, avoiding costly corrections later. If you’re unfamiliar with how circuit breakers work or feel uncertain about working inside an electrical panel, don’t risk it. One mistake with live electrical components can result in serious injury or property damage.\n\nInsurance considerations matter too. Some homeowner policies require licensed professionals for electrical work, and improper DIY installations might void coverage if problems arise. When your gut tells you a project feels beyond your skill level, listen to that instinct. Professional electricians complete in hours what might take you days, and they guarantee their work. Safety should always outweigh potential savings when electricity is involved.\n\n\n
Maintaining Your Transfer Switch for Years of Reliable Service
\n\nYour transfer switch is a hardworking piece of equipment that deserves regular attention to keep your shed’s backup power system running smoothly. Think of maintenance as a simple insurance policy that prevents inconvenient failures when you need power most.\n\nStart with monthly visual inspections that take just five minutes. Check for any signs of corrosion on terminals, loose wiring, or moisture inside the enclosure. Look for discoloration around connections, which often signals overheating. If your transfer switch is mounted in an unheated shed, temperature swings can loosen connections over time, so a quick visual check goes a long way.\n\nAnnual testing should be part of your spring or fall routine. Manually operate the switching mechanism several times to ensure smooth movement between positions. While doing this, listen for unusual sounds or feel for resistance that wasn’t there before. Test your backup power source by actually switching over and running your shed circuits on generator power for 15-20 minutes. This real-world test confirms everything works when an actual outage occurs.\n\nKeep an eye out for warning signs that indicate professional help is needed. Flickering lights during switching, burning smells, warm switch handles, or difficulty moving the switch lever all warrant immediate attention from a licensed electrician. Similarly, if you notice repeated tripping of circuit breakers or any visible sparking, don’t attempt DIY fixes on these issues.\n\nTighten terminal connections annually using the manufacturer’s specified torque settings, as thermal cycling naturally loosens electrical connections over time.\n\n\nInstalling a 6-circuit transfer switch in your shed is an investment that pays dividends every time the power goes out. You’ve now walked through the essential steps: planning your circuits, mounting the switch safely, making the proper electrical connections, and testing the system thoroughly. While the process requires careful attention to detail and respect for electrical safety, it’s absolutely achievable for homeowners who prepare properly and work methodically.\n\nThis upgrade does more than just keep the lights on during outages. It protects valuable tools, maintains climate control for sensitive equipment, and ensures your shed remains functional when you need it most. Many DIYers report that completing this project gave them tremendous satisfaction and confidence in their electrical skills.\n\nRemember to always turn off power at the main panel before beginning work, double-check every connection, and never hesitate to call a licensed electrician if you encounter something outside your comfort zone. There’s no shame in getting professional help for specific steps while handling the rest yourself. With proper preparation, the right materials, and a cautious approach, you’ll have reliable backup power that serves your shed for years to come.
Looking for a storage sheds?
Browse our full range of storage sheds from authorized dealer brands. Free shipping to the continental US.