
How Far Your Shed Must Be From Wells and Septic Systems (Before You Build)
Before you install that new storage shed, measure the distance from your property’s well to your planned building site. Most municipalities require structures to sit at least 10 to 50 feet away from wells, and violating these setback rules can result in fines up to $10,000, forced removal of your shed, or denied building permits that delay your project for months.
Check your local zoning office or county health department website first—they maintain the specific setback distances for your area. Request a property survey or utility map that shows your well’s exact location, along with septic systems, water lines, and electrical connections. These documents prevent you from building in restricted zones and help you position your shed legally from the start.
Understand that well setback requirements exist to protect your drinking water from contamination. Sheds with chemical storage, lawn equipment, or fuel cans pose contamination risks if placed too close to groundwater sources. Some areas enforce stricter setbacks for structures that house hazardous materials, sometimes requiring 100 feet or more.
Contact your homeowners association if applicable, since they often impose additional setback rules beyond local regulations. Call 811 before digging to mark underground utilities—this free service prevents you from accidentally damaging water lines during shed installation. Calculate setbacks from your well to all property boundaries, ensuring your shed meets every requirement before you purchase or pour a foundation. Taking these steps now saves you from expensive mistakes and ensures your storage solution enhances your property legally and safely.
What Are Well and Septic Setback Requirements?
If you’re planning to add a shed or other structure to your property, understanding setback requirements can save you from costly mistakes and legal headaches. Simply put, a setback is the minimum distance required between different features on your property—in this case, between your proposed shed and your well or septic system.
Think of setbacks as protective buffer zones. They exist primarily to keep your drinking water safe and ensure all your property systems work properly. Wells draw water from underground sources, and septic systems treat wastewater from your home. If structures are built too close to these systems, they can interfere with maintenance access, cause contamination risks, or damage underground components. For example, a shed positioned over septic drain fields could compact the soil and prevent proper wastewater treatment, leading to system failure and expensive repairs.
These requirements aren’t just suggestions—they’re enforceable regulations. Local health departments typically oversee well and septic setbacks because they’re primarily concerned with public health and water quality. However, you might also need to coordinate with your county planning department or building inspector when applying for shed permits. The specific agency depends on where you live, which is why checking with your local authorities before breaking ground is essential.
Understanding setbacks early in your planning process helps you choose the right shed location and size for your property. It’s much easier to adjust your plans on paper than to relocate a shed after it’s built or face compliance issues down the road. These requirements are designed to protect both your investment and your family’s health for years to come.
Why These Distances Matter for Your Property
Protecting Your Family’s Water Supply
Your family’s drinking water deserves protection, and that’s exactly why well setback requirements exist. When structures like sheds, septic systems, or chemical storage areas sit too close to your well, they create real risks that can affect your water quality for years to come.
Here’s what can go wrong: Rain and snowmelt can carry contaminants from nearby structures directly into the ground surrounding your well. Paint, pesticides, fertilizers, or even basic shed maintenance products stored too close can seep into groundwater. The same applies to runoff from roofs or drainage systems that concentrate water near your well head.
Many homeowners we’ve worked with didn’t realize their planned shed location could compromise their water supply until they checked local regulations. One family discovered during their permit application that their ideal shed spot was just 15 feet from their well, when local code required 50 feet minimum. Moving the structure during planning saved them from potential contamination issues and expensive relocation costs later.
The buffer zone created by setback requirements gives your soil time to naturally filter potential contaminants before they reach your water source. Think of it as an invisible safety shield that protects what matters most.
Maintaining Septic System Access and Function
Your septic system isn’t just buried and forgotten—it needs regular attention to keep working properly. Creating and maintaining clear access zones around your septic tank and drain field is essential for routine pumping, emergency repairs, and ensuring the system can breathe and drain effectively.
Think about it this way: septic tanks typically need pumping every three to five years. If you’ve built a shed directly over the access lid or too close to the tank, you’re facing a real headache. The pumping truck needs room to maneuver, and technicians need clear access to open the lid and run their equipment.
Sarah from Pennsylvania learned this the hard way. She placed a beautiful garden shed just four feet from her septic tank access point. When it came time for routine maintenance, the pumping company couldn’t get their hoses in position without damaging her shed’s foundation. She ended up paying an extra $800 for manual pumping with specialized equipment—money she could have saved with proper planning.
The drain field presents another challenge. These underground pipe systems need oxygen exchange and proper drainage to break down waste naturally. Placing heavy structures too close can compact the soil, restrict airflow, and potentially crush pipes. This leads to system failure, sewage backups, and repair bills that can easily reach $5,000 to $20,000.
Before finalizing your shed placement, map out your entire septic system including the tank, distribution box, and all drain field lines. Maintain at least 10 feet of clearance from these components, and keep access points completely unobstructed.
Standard Setback Distances You Need to Know
Well Setback Requirements for Sheds and Structures
When planning to install a shed or outdoor structure on your property, understanding well setback requirements is essential for staying compliant with local regulations. Most jurisdictions require structures to be positioned at least 10 to 50 feet away from water wells, though this distance varies significantly based on your location and specific circumstances.
Typically, residential properties see minimum setbacks of 10 to 15 feet for small storage sheds without plumbing or permanent foundations. However, larger structures or those with electrical installations often face stricter requirements, sometimes extending to 25 feet or more. In rural areas with septic systems, you might encounter even greater distance requirements, occasionally reaching 50 feet to protect groundwater quality.
The variation in these requirements stems from several factors. Local geology, water table depth, and the type of well all influence setback distances. States with strict environmental protection laws generally mandate larger buffer zones, while others take a more flexible approach based on individual property assessments.
Before purchasing your shed, contact your county’s planning department or building inspector to get exact measurements for your area. Sarah, a recent customer, shared how checking these requirements first saved her from a costly mistake: “I almost ordered a 12×16 shed, but discovering our 20-foot well setback helped me choose a better location and avoid expensive repositioning later.”
Septic System and Drain Field Clearances
Septic systems require some of the most generous setback distances from wells, and understanding why can save you from serious headaches down the road. Most local codes require wells to be at least 50 to 100 feet from septic tanks, but here’s where it gets interesting: drain fields typically need even larger clearances, often 100 to 150 feet from your well.
Why the extra distance for drain fields? Think of it this way: while your septic tank contains waste in a sealed environment, the drain field is designed to disperse wastewater into the soil. This absorption area spreads over a much larger footprint, creating a wider contamination risk zone. Bacteria, viruses, and chemicals can travel through soil toward your water source, so that extra buffer isn’t just a suggestion—it’s protecting your family’s drinking water.
When planning your shed location, remember that you’ll need to maintain clearances from both the septic tank and the entire drain field area. Many homeowners mistakenly measure only from the tank and forget about the drain lines spreading underground. Before you dig or pour a foundation, locate your entire septic system on your property map. Your local health department can provide records showing exactly where these components sit, helping you position your shed safely while keeping your well water clean and contaminant-free.
Utility Line Considerations
When planning your shed placement, it’s not just about well and septic setbacks—you’ll also need to consider underground utility lines. These hidden networks of electrical, gas, water, and sewer lines crisscross most properties, and disturbing them can be dangerous and expensive.
Most municipalities require at least 10 feet of clearance from underground utilities, though this varies by location and utility type. Electrical and gas lines typically demand the most cautious approach due to safety concerns. Water and sewer lines may have different requirements depending on whether they’re municipal or private systems.
Before you dig any foundation posts or anchors for your shed, always call 811—the national “Call Before You Dig” hotline. This free service will have utility companies mark the location of underground lines on your property within a few days. Sarah from Michigan learned this lesson the hard way: “I was so focused on the well setback that I completely forgot about the gas line. Luckily, the 811 service caught it before we started digging.”
Remember, these utility clearances work together with well and septic requirements, so map out everything before finalizing your shed location. It might seem like a lot to juggle, but taking time upfront prevents costly repairs and keeps everyone safe.
How to Find Your Local Requirements (Before You Buy Your Shed)
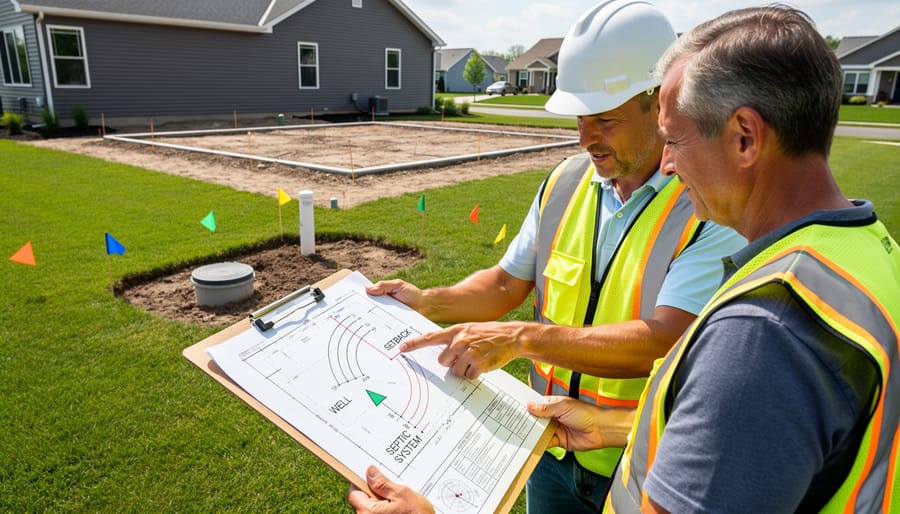
Checking With Your Local Building Department
Before you finalize your shed plans, reaching out to your local building department is the smartest step you can take. Start by visiting your city or county government website, where you’ll often find contact information for the building or planning department. A quick phone call typically works best for getting immediate answers.
When you contact them, be specific about what you’re planning. Explain that you’re installing a shed and need to know the exact setback requirements from your well. Ask if there are different rules for different shed sizes or if your property has any special zoning considerations. Don’t forget to inquire about whether you’ll need a building permit, as this varies widely by location.
Here’s a helpful tip: write down the name of the person you speak with and the date of your conversation. If possible, request the information in writing or ask which section of the local code addresses your question. This documentation can save you headaches later if any questions arise during inspection.
Many homeowners have found success by scheduling an in-person appointment at the building department. Bringing a simple property sketch showing where you plan to place your shed helps officials give you clearer guidance. Remember, these professionals are there to help you avoid costly mistakes, so don’t hesitate to ask follow-up questions until you fully understand the requirements.
Understanding Your Property Survey and Permits
Before you start planning your shed placement, it’s essential to understand what’s already on your property. Your property survey is your roadmap to success here. This document shows boundary lines, existing structures, and crucially, the locations of wells, septic systems, and utility easements.
Start by requesting a copy of your property survey from your local county clerk’s office or title company if you don’t already have one. Look for symbols or notations indicating water wells (often marked with a circle and “W”), septic tanks and drain fields (usually shown with dotted lines or rectangles), and easements (typically highlighted or shaded areas along property edges).
Pay special attention to utility easements, which are designated areas where utility companies have legal access for maintenance. Building within these zones can lead to forced removal of your structure later.
If your survey doesn’t show well locations or seems outdated, check your building permits or contact your local health department. Many counties maintain records of well permits that pinpoint exact coordinates. One homeowner shared that finding an unmarked well on their survey saved them from placing their shed directly over it, avoiding a $15,000 relocation headache. Taking time to read these documents carefully now prevents expensive mistakes down the road.
When HOA Rules Add Extra Restrictions
Here’s something many homeowners discover too late: your homeowner association might have its own setback rules that go beyond what your local building codes require. Even if your city allows structures 10 feet from a well, your HOA could mandate 15 or even 20 feet. These associations often impose stricter guidelines to maintain neighborhood aesthetics and property values.
Before you finalize your shed plans, grab a copy of your HOA’s covenants, conditions, and restrictions. Look specifically for sections about outbuildings, wells, and utilities. Some associations require pre-approval for any outdoor structure, giving them the chance to review your placement plans.
The good news? Checking with your HOA early prevents headaches later. One homeowner we spoke with avoided a costly mistake by discovering her HOA’s 25-foot well setback requirement before purchasing her shed. A quick phone call to your HOA board can clarify these requirements and help you position your storage solution perfectly from the start.
Real Homeowner Scenarios: Learning From Others’ Experiences
The Costly Mistake of Building First, Asking Later
Meet the Johnson family, who learned about setback requirements the hard way. Excited about their new 10×12 storage shed, they spent a weekend building it just eight feet from their property line—right where they thought it looked best. Three weeks later, a county inspector knocked on their door during a routine neighborhood survey. The verdict? Their shed violated the 15-foot setback requirement from the nearby well on their neighbor’s property.
The Johnsons faced two options: relocate the shed at a cost of $1,200, or remove it entirely and start over. They chose relocation, but the expense didn’t stop there. The moving process damaged their landscaping, requiring another $400 in repairs. What started as an exciting weekend project turned into a $1,600 lesson in the importance of research.
The frustrating part? A simple phone call to their local zoning office before breaking ground would have prevented the entire ordeal. The Johnsons now encourage everyone they meet to check setback requirements first—a five-minute call that could have saved them weeks of stress and significant expense.
Smart Planning That Saved Time and Money
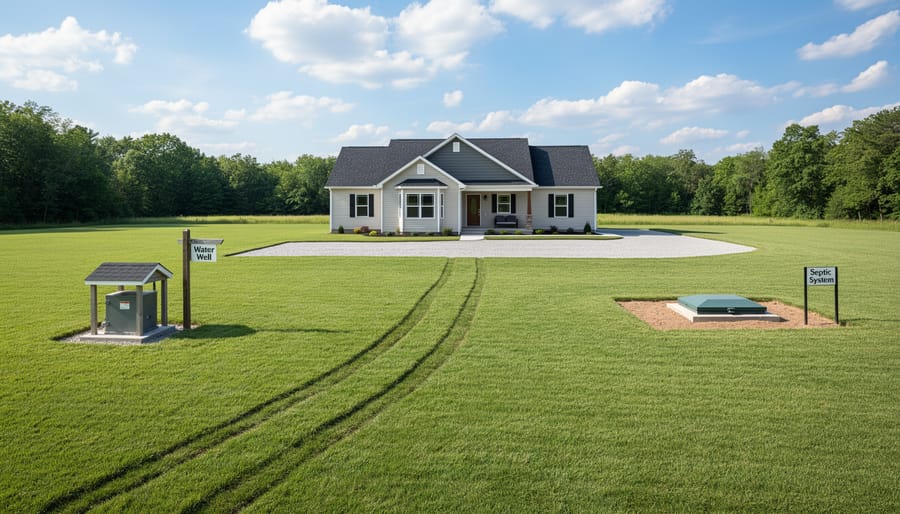
Meet Sarah from Pennsylvania, who saved herself weeks of headache and nearly $2,000 by doing her homework before ordering her dream garden shed. When she started planning her backyard storage solution, she noticed an old well cap about 30 feet from where she wanted to place her 10×12 shed.
Rather than assuming the distance was fine, Sarah called her township office and discovered her area required a 50-foot setback from any well. She also learned about a septic tank she didn’t even know existed on her property from the previous owners. Armed with this information, she worked with her family to identify a perfect spot that met all setback requirements and actually got better sunlight for the potted plants she planned to store.
The result? Her shed installation went smoothly without any delays, and she avoided the nightmare scenario of having to relocate or dismantle a brand-new structure. Sarah’s approach proves that spending just a few hours researching setback requirements upfront can save you from costly mistakes and give you peace of mind that your investment is built to last exactly where you want it.
Practical Tips for Placing Your Shed Correctly
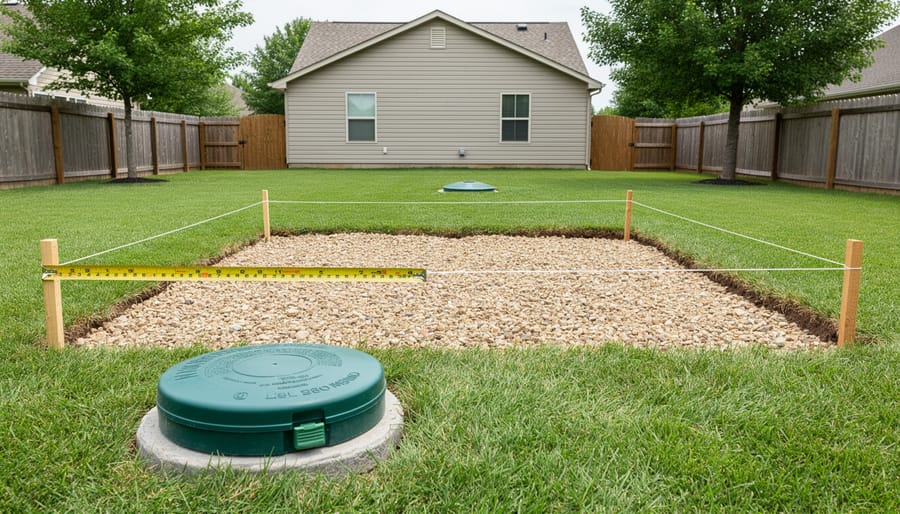
Mapping Your Property’s Restricted Zones
Once you know your setback distances, it’s time to create a visual map of your property’s restricted zones. This simple exercise can save you from costly mistakes and helps you identify the best placement for your shed.
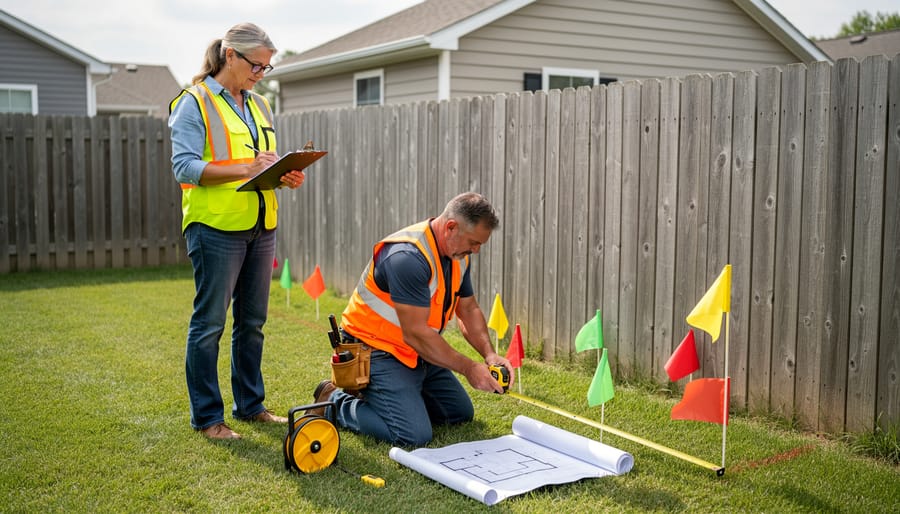
Start by sketching a basic outline of your property on graph paper, or use free online tools like Google Earth for a satellite view. Mark the location of your well with a clear symbol, then use a compass or measuring tape to create circles around it representing the required setback distance. For example, if your local code requires a 50-foot setback, draw a circle with that radius around your well. Any structure placement within this circle is off-limits.
Don’t forget to mark other restricted zones too, including septic systems, property lines, and utility easements. Use different colors for each restriction to see where zones overlap. This visual guide becomes your planning blueprint, showing you exactly where you can and cannot place your shed.
Many homeowners find it helpful to take this sketch outside and walk the actual boundaries with stakes and string. Seeing the restrictions in real space often reveals placement options you might have missed on paper, helping you find that perfect spot that’s both compliant and practical for your needs.
Choosing the Right Shed Size for Your Available Space
Here’s the smart approach: measure your available space first, then subtract the required setback distances from all sides to discover your actual buildable area. Let’s say you have a 20-foot-wide side yard and your local code requires a 10-foot setback from your well. That immediately tells you your shed can’t exceed 10 feet in width if positioned against the opposite property line—or less if additional setbacks apply to fences or property boundaries.
Start by creating a simple sketch of your property. Mark the well location, then draw circles or boxes representing the required setback zones around it. What remains is your compliant building zone. This visual exercise prevents heartbreak later when you realize that perfect 12×16 shed simply won’t fit within legal limits.
Remember that setbacks apply in all directions, so a 10-foot radius requirement means measuring 10 feet from every side of your well structure. Your shed’s footprint must stay completely outside this zone, including roof overhangs and any foundation extensions.
Sarah from Ohio learned this the hard way: “I fell in love with a gorgeous 10×12 shed online, but after mapping my well setbacks, I could only fit an 8×10. Measuring first would have saved me weeks of disappointment and re-planning.” Her experience highlights why choosing the right shed size starts with understanding your constraints, not your wishes. By working backward from setback requirements, you’ll identify the maximum dimensions that fit both your space and local regulations—ensuring your investment is protected from day one.
What Happens If You Ignore Setback Requirements
Let’s be straightforward: ignoring setback requirements isn’t worth the risk, even if it seems like your property and your choice. While enforcement varies by location, the consequences can be surprisingly costly and stressful.
The most common issue homeowners face is being required to move or remove their structure entirely. Imagine investing in a beautiful new shed, spending time and money on installation, only to receive a notice from your local building department demanding you relocate it. One homeowner in Ohio shared how they had to dismantle their entire shed and rebuild it eight feet away, essentially paying twice for the same project.
Property disputes with neighbors often arise when setbacks aren’t followed. Even if you have a friendly relationship now, structures too close to property lines can become contentious issues if neighbors change or disagreements occur. These disputes sometimes lead to formal complaints that trigger inspections.
If you’re planning to sell your home, non-compliant structures become serious obstacles. During the sale process, inspectors will likely flag violations, and you’ll need to either bring the structure into compliance or negotiate a reduced sale price. Some buyers simply walk away rather than inherit code violations.
Insurance complications present another practical concern. If a non-compliant shed causes damage or is damaged itself, your homeowner’s insurance may deny coverage based on the code violation.
Many municipalities impose daily fines for non-compliance, which accumulate quickly while you’re arranging to fix the problem. These fines typically continue until you achieve compliance or remove the structure.
The good news? Most of these headaches are completely avoidable with simple research before installation. Spending an hour checking your local requirements and measuring twice saves months of stress and potentially thousands of dollars in remediation costs.
Before you purchase that perfect shed or finalize your building plans, taking time to research well setback requirements can save you from significant headaches down the road. A quick call to your local building department or a visit to their website might seem like a minor task, but it’s one of the most important steps in your planning process. Understanding these clearance requirements upfront means you can confidently choose the right shed size and location without worrying about costly relocations or code violations later.
Think of checking setback requirements as an investment in peace of mind. Homeowners who’ve had to move sheds after installation will tell you it’s an expensive, frustrating experience that’s completely avoidable with a little advance research. By incorporating setback verification into your installation checklist, you’re setting yourself up for a smooth, stress-free project from start to finish.
The good news? Once you know your property’s specific requirements, the rest of your shed installation becomes straightforward. You’ll choose the perfect spot, enjoy your new storage space, and have the satisfaction of knowing everything was done right the first time. A small amount of planning today prevents major problems tomorrow, letting you focus on what really matters: creating the functional, beautiful outdoor space you’ve been dreaming about.