
Why Your Shed Floor Feels Like an Ice Rink (And How Foundation Insulation Fixes It)
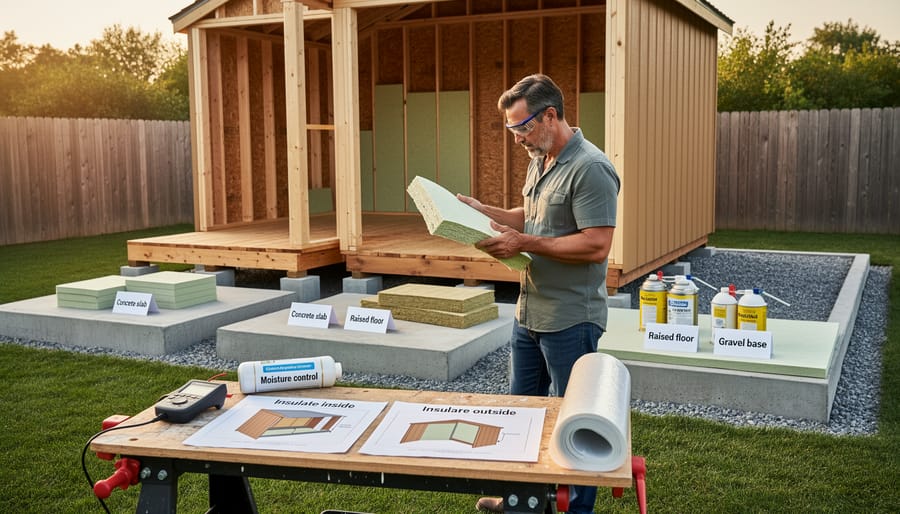
Foundation insulation for your shed protects your investment from moisture damage, prevents floor rot, and creates a thermal barrier that keeps your stored items safe from extreme temperatures. Whether you’re building a new shed or upgrading an existing one, understanding the two primary insulation approaches—exterior and interior foundation insulation—determines how effectively you’ll combat ground moisture, freeze-thaw cycles, and heat loss.
Exterior foundation insulation involves applying rigid foam boards directly to the outside of your foundation walls before backfilling soil. This method stops cold and moisture at the source, protecting the foundation material itself while creating a continuous insulation barrier. You’ll typically use extruded polystyrene or polyisocyanurate boards rated for below-grade applications, extending them from the footer to just above ground level.
Interior foundation insulation means installing insulation panels or spray foam on the inside foundation walls after construction. This approach works perfectly for existing sheds where exterior excavation isn’t practical. You’ll gain easier access for installation and lower material costs, though you’ll sacrifice some interior space and won’t protect the foundation structure itself from temperature swings.
The choice between these methods depends on your shed’s construction stage, budget, and local climate conditions. New construction favors exterior insulation for maximum protection, while retrofit projects benefit from interior solutions that avoid excavation costs. Understanding both approaches helps you make an informed decision that protects your shed and its contents for decades.
What Foundation Insulation Actually Does for Your Shed
Foundation insulation might not be the most exciting part of your shed, but it’s working hard behind the scenes to protect everything inside. Think of it as a thermal blanket that wraps around your shed’s base, creating a barrier between the cold ground and your storage space.
The most immediate benefit you’ll notice is temperature regulation. Without insulation, your shed floor acts like a giant heat sink in winter, pulling warmth right out of the structure. This matters whether you’re running a space heater or not. Even unheated sheds stay noticeably warmer with proper foundation insulation, which makes a huge difference when you’re working on weekend projects in chilly weather.
Moisture control is another game-changer. Cold foundations create condensation when warmer air hits them, leading to that damp, musty smell many shed owners know too well. Foundation insulation reduces these temperature differences, keeping moisture at bay. This protection extends the life of everything stored inside. Your metal tools won’t develop that frustrating surface rust, wooden handles stay solid instead of rotting, and cardboard boxes keep their contents safe rather than turning soggy.
If you’ve invested in heating your shed for a workshop or hobby space, foundation insulation dramatically improves energy efficiency. Heat naturally escapes through any uninsulated surface, and your foundation represents a significant area of potential loss. That’s why shed floor insulation matters so much for anyone serious about creating a comfortable year-round space.
For those storing temperature-sensitive items, foundation insulation provides crucial protection. Paint and stains won’t freeze and separate, batteries maintain better charge, and electronics face less risk from extreme temperature swings. One homeowner shared how foundation insulation finally stopped her canned goods from freezing in her potting shed each winter, saving both money and frustration.
The bottom line? Foundation insulation transforms your shed from a basic box into a stable, protective environment for everything you value.
The Two Main Types of Foundation Insulation
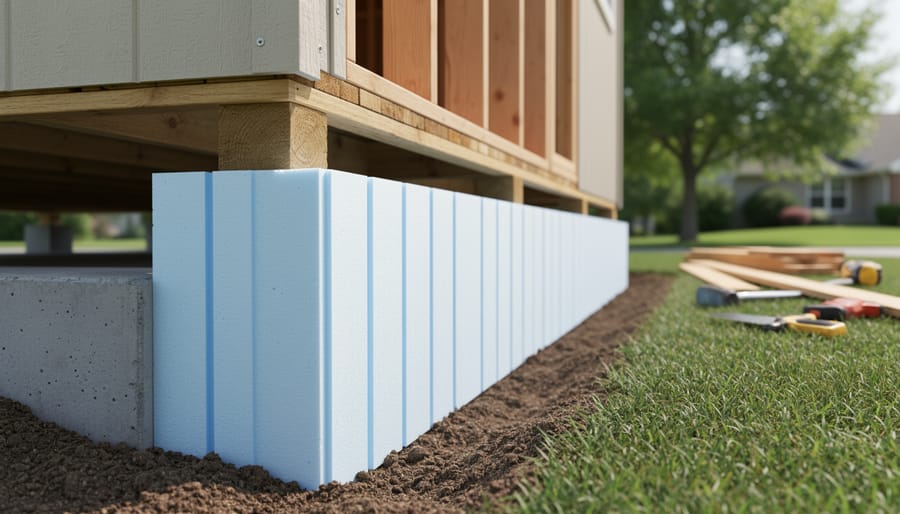
Exterior Perimeter Insulation
Exterior perimeter insulation involves installing insulation materials around the outside of your shed’s foundation, creating a protective thermal barrier between the ground and your structure. This approach works by wrapping the foundation’s exterior walls, effectively keeping cold temperatures from penetrating through to the interior space.
This method is particularly popular for new shed construction projects because it’s much easier to install insulation before backfilling soil around the foundation. If you’re planning a concrete slab foundation for your shed, exterior insulation is often your best bet since it protects the entire foundation from temperature fluctuations and frost heave.
The star performers for exterior foundation insulation are rigid foam boards, specifically Extruded Polystyrene (XPS) and Expanded Polystyrene (EPS). XPS boards, recognizable by their blue or pink color, offer excellent moisture resistance and typically provide an R-value of about 5 per inch. EPS boards are white and slightly less expensive, delivering around R-4 per inch. Both materials stand up well to soil contact and won’t degrade from moisture exposure.
When installing exterior insulation, you’ll attach the foam boards directly to the foundation walls using compatible adhesive or mechanical fasteners. The boards should extend from the footer to just above ground level. Many homeowners appreciate this method because it also provides a layer of waterproofing protection for the foundation itself.
One real-world advantage reported by shed owners is that exterior insulation eliminates thermal bridging, where cold transfers through structural elements. This means your stored tools, equipment, or workshop materials stay better protected from temperature extremes year-round.
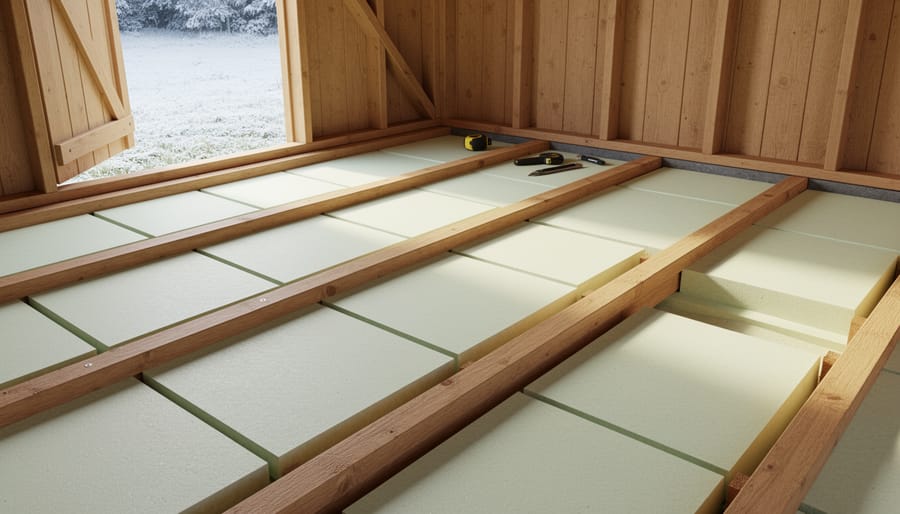
Interior Floor Insulation
Interior floor insulation is often the go-to choice for existing sheds or those built on pier and post foundations where accessing the underside is straightforward. This approach involves installing insulation between floor joists from below or underneath flooring panels during construction, making it particularly appealing for DIY enthusiasts who want to tackle insulation without major exterior work.
The most common material for this method is fiberglass batt insulation, typically available in R-13 to R-19 values. It fits snugly between joists and works well when your shed has open access underneath. One homeowner shared that adding batt insulation to her craft shed made winter projects much more comfortable, noting it took just an afternoon to complete. The key is ensuring the paper or foil facing points toward the heated space and adding a moisture barrier if your batts don’t include one.
Rigid foam boards offer another excellent option, especially for tighter spaces. Cut them to fit between joists and secure with construction adhesive or mechanical fasteners. Spray foam insulation provides superior coverage and air sealing, though it requires more investment and potentially professional application.
Interior floor insulation shines when you’re upgrading an existing shed without wanting to disturb exterior siding or landscaping. It’s also ideal when ground access beneath the structure is easy and weather conditions make outdoor work challenging. The downside is that pier foundations leave insulation exposed to critters, so proper screening becomes essential. Consider this method when you need a weekend project that delivers immediate comfort improvements without extensive renovation.
Best Materials for Shed Foundation Insulation
Choosing the right insulation material for your shed foundation can feel overwhelming at first, but understanding your options makes the decision much easier. Let’s break down the most popular materials and what makes each one work well in different situations.
Rigid foam boards are the go-to choice for many DIY enthusiasts, and for good reason. These sturdy panels, including extruded polystyrene (XPS) and expanded polystyrene (EPS), offer excellent moisture resistance and R-values ranging from R-5 to R-6.5 per inch. They’re incredibly easy to cut with a simple utility knife and stay in place without shifting. XPS boards, recognizable by their pink or blue color, stand up particularly well to ground moisture, making them ideal for exterior foundation applications. The insulation costs for rigid foam typically range from one to two dollars per square foot, which balances performance with affordability.
Spray foam insulation provides the highest R-value at around R-6 to R-7 per inch and creates an impressive air seal that rigid boards can’t match. It fills every crack and gap, preventing moisture infiltration and heat loss simultaneously. However, it requires more skill to apply correctly and costs roughly two to three times more than rigid foam boards. Many homeowners find spray foam perfect for interior foundation work where you can access tight spaces easily.
Fiberglass batts are budget-friendly but come with a significant warning for foundation use. While they work wonderfully in walls and attics, they absorb moisture like a sponge when placed against foundations. If you choose fiberglass, you absolutely need a robust vapor barrier and should only use it in interior applications where moisture won’t be an issue.
Speaking of vapor barriers, don’t skip this crucial step. A six-mil polyethylene sheet protects your insulation investment by preventing ground moisture from reaching your insulation material. Position it on the warm side of your insulation for interior applications.
For most shed owners tackling foundation insulation themselves, rigid foam boards offer the sweet spot of performance, moisture resistance, and DIY-friendliness. They forgive minor installation mistakes while delivering reliable thermal protection year after year.
Step-by-Step: Installing Foundation Insulation in Your Shed
Tools and Materials You’ll Need
Before you tackle your foundation insulation project, gather these essential items to make the job smoother and safer. You’ll need rigid foam insulation boards or spray foam, depending on your chosen method, plus construction adhesive or foam board adhesive for securing materials. Don’t forget a utility knife for cutting insulation, a tape measure, and protective equipment including work gloves, safety glasses, and a dust mask. For exterior applications, add waterproof membrane or sealant to your list. If you’re working with spray foam, consider renting professional equipment or hiring a contractor for best results. Interior projects typically require vapor barriers and finishing materials like drywall. Having caulk and weatherstripping on hand helps seal gaps and maximize energy efficiency. Most homeowners find these materials readily available at local hardware stores, making this a manageable weekend project with proper preparation.
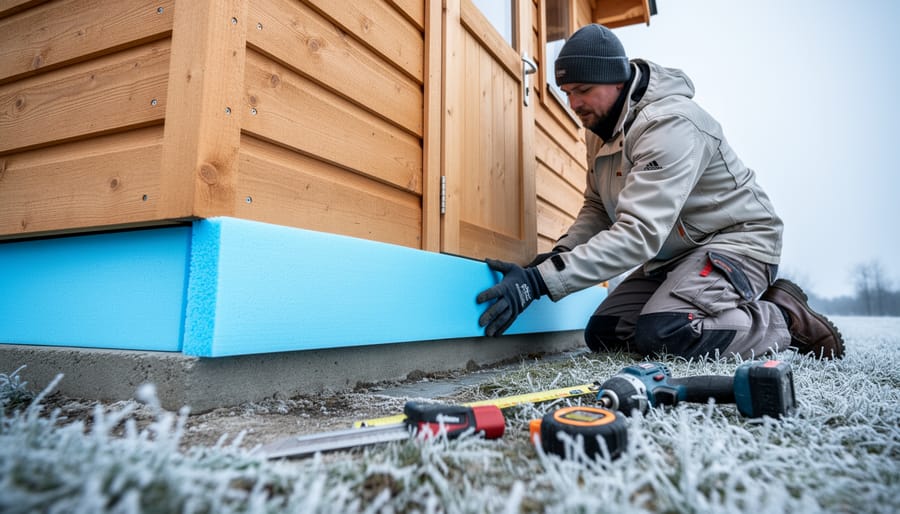
Installing Exterior Perimeter Insulation
Installing exterior perimeter insulation requires some elbow grease, but the process is straightforward when you break it down into manageable steps. Here’s how to tackle this project:
1. Excavate around the foundation. Dig a trench approximately 2-3 feet deep along the perimeter of your shed’s foundation. The width should accommodate the insulation board plus working space, typically 18-24 inches. Remove soil carefully and pile it nearby for backfilling later.
2. Clean and prepare the foundation surface. Remove any dirt, debris, or loose material from the foundation wall. The surface should be dry and smooth for proper adhesion. If you notice any cracks or damage, repair them before proceeding.
3. Apply the insulation boards. Starting at the bottom, position rigid foam insulation boards vertically against the foundation wall. Most DIYers find 2-inch thick extruded polystyrene or polyisocyanurate boards work best for shed foundations.
4. Secure the boards properly. Use foundation-rated adhesive or mechanical fasteners designed for below-grade applications. Stagger the seams between boards to prevent thermal bridging, much like laying bricks.
5. Protect above-grade portions. Any insulation extending above ground level needs protection from sunlight and physical damage. Apply a protective coating, stucco finish, or install a termination board.
6. Backfill carefully. Gradually refill the trench with soil, tamping it down in layers to prevent settling. Avoid dropping heavy rocks directly onto the insulation.
The entire process typically takes a weekend for an average-sized shed, and the energy savings make it well worth the effort.
Installing Interior Floor Insulation
Installing interior floor insulation is a practical DIY project that many homeowners tackle successfully with the right approach. Let’s walk through the process step by step so you can keep your shed comfortable year-round.
First, you’ll need to access the floor joists from underneath. If your shed is elevated on blocks or piers, this makes the job much easier. For those with limited clearance, you might need to remove a few floorboards temporarily to work from above, though working from below gives you better control.
Before handling any insulation material, install a vapor barrier facing the warm side of your space. This typically means the barrier faces upward toward the floor. Cut your vapor barrier slightly larger than needed, allowing for overlap at the edges. This prevents moisture from condensating inside your insulation, which can lead to mold and reduced effectiveness.
Next, measure the space between your floor joists carefully. Cut your insulation batts to fit snugly without compressing them, as compressed insulation loses its insulating power. Fiberglass batts are popular for this application because they’re cost-effective and easy to work with. Push the insulation up between the joists, ensuring it makes full contact with the subfloor above.
Pay special attention to sealing gaps around pipes, electrical lines, or irregular spaces. Use expanding foam or small pieces of insulation to fill these areas completely. Even small gaps can significantly reduce your insulation’s effectiveness.
Finally, secure everything with wire mesh or insulation supports to prevent sagging over time. Some homeowners add a protective layer of plywood underneath for extra durability, especially in high-traffic areas around the shed entrance.
Common Mistakes That Cost You Money (And How to Avoid Them)
Even experienced DIYers can make foundation insulation mistakes that lead to moisture problems, energy loss, and costly repairs down the road. Let’s walk through the most common pitfalls and how you can sidestep them.
Forgetting the vapor barrier is perhaps the biggest mistake we see. Without this protective layer, moisture from the ground can seep through your foundation walls and into the insulation, reducing its effectiveness by up to 50%. The fix is simple: always install a continuous vapor barrier on the warm side of your insulation, typically between the insulation and your shed’s interior wall. Use 6-mil polyethylene sheeting and overlap seams by at least 6 inches.
Air gaps might seem harmless, but they create thermal bridges that let heat escape. When installing rigid foam boards, ensure each panel fits snugly against the foundation and adjacent panels. Use expanding foam sealant to fill any gaps larger than a quarter-inch. This small step can improve your insulation’s performance by 20-30%.
Choosing the wrong insulation type for moisture-prone areas is another frequent issue. Standard fiberglass batts absorb water like a sponge and lose their insulating power. For foundation applications, stick with moisture-resistant options like closed-cell spray foam or extruded polystyrene (XPS) boards, which maintain their R-value even in damp conditions.
Improper sealing at joints and penetrations creates pathways for air and moisture infiltration. Take time to seal every seam, corner, and spot where pipes or wires pass through using appropriate caulk or foam sealant. Think of it as weatherproofing from the inside out.
Finally, don’t overlook pest protection. Exposed foam insulation invites rodents and insects to nest. Cover accessible insulation with cement board, metal flashing, or pressure-treated plywood. Adding a gravel barrier around your foundation’s perimeter also discourages unwanted guests while improving drainage. These preventive measures save you from headaches and repair bills later.
When Foundation Insulation Makes the Most Sense
Foundation insulation delivers the biggest payoff when your shed serves as more than basic storage. If you’ve converted your shed into a workshop where you spend hours crafting or working on projects, foundation insulation becomes essential for comfort and efficiency. The same applies to heated sheds used as home offices, studios, or hobby spaces—without proper foundation insulation, you’re essentially heating the ground beneath your feet while your energy bills climb.
Climate plays a major role in this decision. Homeowners in regions with harsh winters or significant temperature swings will see immediate benefits from insulating your shed foundation. Cold air rising through an uninsulated floor creates uncomfortable conditions and forces heating systems to work overtime. One Michigan shed owner shared that adding foundation insulation reduced their space heater runtime by nearly half during winter months.
Moisture-prone areas also warrant foundation insulation. If your property deals with high humidity, frequent rain, or groundwater issues, insulation acts as an additional barrier against moisture infiltration and helps prevent mold growth. Additionally, if you’re storing temperature-sensitive items like paint, electronics, wine, or woodworking materials, foundation insulation helps maintain stable conditions year-round.
However, foundation insulation might be overkill in certain situations. If you live in a consistently mild climate and use your shed purely for storing garden tools and lawn equipment a few times per month, the investment may not justify the cost. Similarly, unheated sheds in temperate zones used solely for basic storage rarely require foundation insulation. Assess your shed’s purpose, your climate, and how often you’ll use the space before committing to this upgrade.
Insulating your shed’s foundation isn’t just about staying warm in winter or cool in summer—it’s about transforming your space into a truly functional area you’ll want to use year-round. Whether you’ve chosen exterior or interior insulation, you’re investing in a more comfortable workspace, better protection for your stored items, and potentially significant energy savings if you heat or cool your shed.
The beauty of foundation insulation is that it’s absolutely manageable as a DIY project. With the right materials and a weekend or two of effort, you can dramatically improve your shed’s comfort level and usability. Many homeowners report that this simple upgrade made their shed feel like a completely different space—one they actually look forward to spending time in.
Take a moment to assess your shed’s current situation. Is moisture creeping in? Does the floor feel uncomfortably cold? These are signs that foundation insulation could make a real difference. Don’t let another season pass with an underperforming shed. Grab your materials, follow the steps we’ve outlined, and take that first step toward creating a shed space that works as hard as you do. Your future self will thank you for it.