
Build a Better Shed Ramp: Modern Composites Make Access Easy
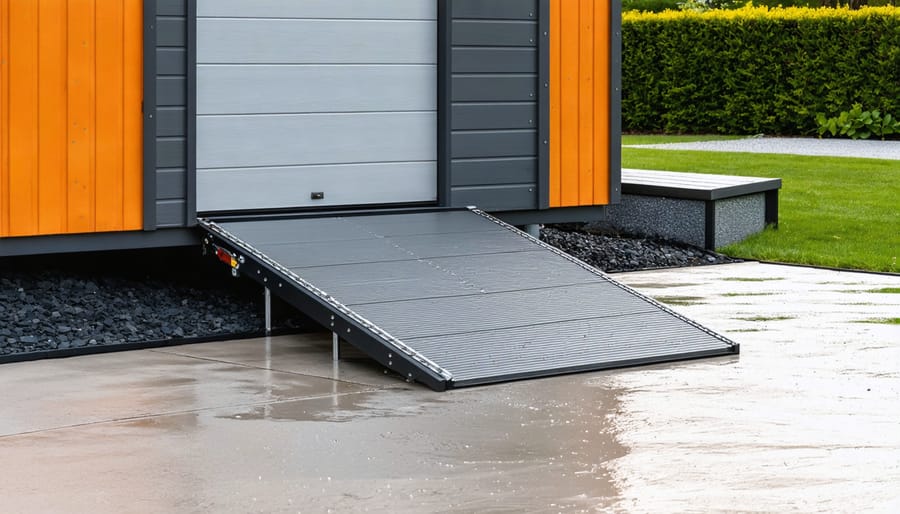
Transform your shed’s accessibility with a composite ramp that combines durability, safety, and modern aesthetics. Unlike traditional wooden ramps that rot and require constant maintenance, composite materials deliver weather-resistant performance for decades while providing superior slip resistance in all conditions. These innovative ramps withstand heavy equipment, seasonal temperature changes, and daily foot traffic without warping or splintering, making them the smart choice for homeowners seeking a long-term solution.
Designed to complement modern storage buildings, composite ramps offer clean lines and rich, fade-resistant colors that maintain their appeal year after year. Their engineered construction eliminates common problems like nail pops, board separation, and moisture damage that plague wooden alternatives. For DIY enthusiasts and property owners alike, composite ramps represent the perfect blend of practical functionality and lasting value, ensuring safe, reliable access to your storage space through every season.
Why Choose Composite Materials for Your Shed Ramp?
Weather-Resistant Properties
Composite shed ramps excel as weather-resistant storage solutions, offering superior protection against nature’s elements. Unlike traditional wood, composite materials won’t rot, warp, or splinter when exposed to rain and snow. They maintain their structural integrity even during freeze-thaw cycles and resist moisture absorption that typically leads to mold and mildew growth. The UV-resistant properties prevent fading and sun damage, ensuring your ramp maintains its appearance year after year. These materials also handle temperature fluctuations remarkably well, expanding and contracting minimally compared to traditional materials. Even in coastal areas with high salt content in the air, composite ramps remain steadfast and reliable. This exceptional weather resistance translates to fewer maintenance requirements and longer-lasting performance for your shed access.
Long-Term Cost Benefits
While the upfront cost of a composite shed ramp may be higher than traditional wood options, the long-term savings make it a smart investment. Most composite ramps last 25-30 years with minimal maintenance, compared to wooden ramps that typically need replacement every 7-10 years. This extended lifespan translates to significant cost savings over time.
Unlike wood, composite materials don’t require annual staining, sealing, or waterproofing treatments. These maintenance tasks can cost $100-200 per year for wooden ramps, not including your time and effort. Composite ramps also resist rot, insect damage, and warping, eliminating expensive repairs that wooden ramps often need.
Many homeowners report breaking even on their composite ramp investment within 5-7 years when factoring in maintenance savings. The material’s durability means you won’t face unexpected replacement costs, making it easier to budget for the long term. Plus, a well-maintained composite ramp can add value to your property, offering another financial benefit for forward-thinking homeowners.
Planning Your Composite Ramp Installation
Calculating the Perfect Slope
Calculating the right slope for your shed ramp is crucial for safe and easy access. The general rule of thumb is to aim for a 1:12 ratio, meaning for every inch of rise (height), you’ll need 12 inches of run (length). This gentle slope ensures safe access for wheelbarrows, lawn equipment, and people of all mobility levels.
To determine your ideal ramp length, measure the height from the ground to your shed’s entrance. For example, if your shed sits 24 inches off the ground, you’ll need a ramp that’s at least 24 feet long to maintain that 1:12 ratio. However, if space is limited, you can go up to a 1:8 ratio, though this steeper incline requires more caution when using.
For added safety, consider these quick tips:
– Keep the slope consistent throughout
– Factor in a small landing platform at the top
– Add non-slip strips every 12-18 inches
– Include handrails for slopes over 1:12
– Ensure the ramp width matches your shed door, plus 6-12 inches extra
Remember that local building codes may have specific requirements for ramp slopes, so check with your municipality before starting construction.

Required Materials and Tools
To build a safe and durable composite shed ramp, you’ll need the following materials and tools:
Materials:
– Composite decking boards (amount depends on ramp size)
– Pressure-treated lumber for frame:
• 2×6 boards for stringers
• 2×4 boards for cross supports
• 4×4 posts for ground contact
– Galvanized deck screws (2½” and 3″)
– Concrete mix for footings
– Gravel for base preparation
– Galvanized lag bolts and washers
– Exterior-grade wood cleats
– Non-slip grip tape (optional)
Tools:
– Circular saw
– Power drill and drill bits
– Post hole digger
– Level (2′ and 4′)
– Measuring tape
– Speed square
– Pencil
– Safety glasses
– Work gloves
– Wheelbarrow
– Shovel
– Hammer
– Socket wrench set
– Carpenter’s square
Remember to calculate material quantities based on your specific ramp dimensions and check local building codes for requirements before purchasing. It’s better to get slightly more materials than estimated to account for any adjustments during construction.
Step-by-Step Installation Process
Foundation Preparation
Before installing your composite shed ramp, proper foundation preparation is essential for long-term stability and safety. Start by clearing the ground area of vegetation, rocks, and debris. Level the soil using a rake and tamper, ensuring a slight slope away from your shed for proper drainage (approximately 1 inch per 8 feet).
Create a solid base by laying down 4-6 inches of crushed gravel or stone, compacting it thoroughly with a plate compactor. This foundation layer helps prevent settling and provides excellent drainage. For areas with poor soil conditions, consider installing concrete footers at key support points.
Mark your post locations using stakes and string lines, maintaining consistent spacing according to your ramp’s width. Dig holes for your support posts at least 2 feet deep or below the frost line for your region. Use post hole diggers or an auger for precise holes, and consider adding gravel at the bottom of each hole for additional drainage.
Set your posts in concrete, using a level to ensure they’re perfectly plumb. Allow the concrete to cure completely before proceeding with the next construction phase.
Decking Installation
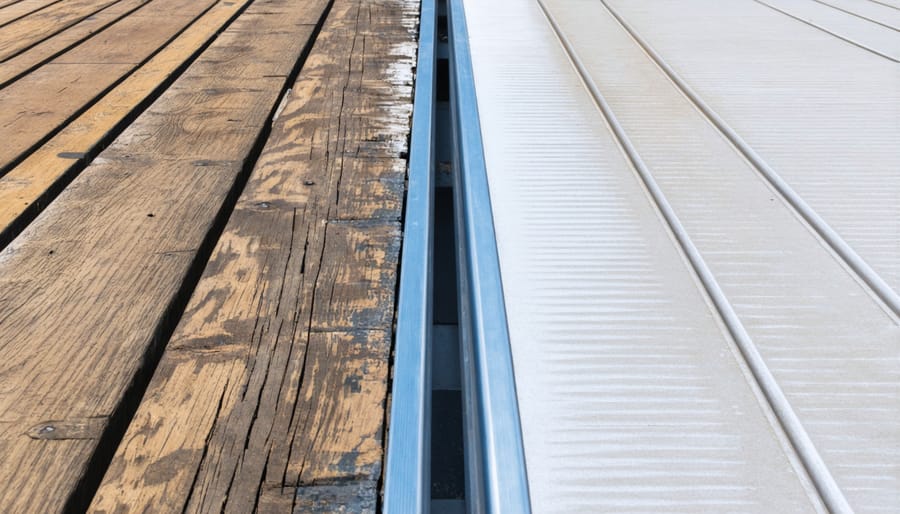
Start laying your composite decking boards at the bottom of the ramp frame, working your way up. Position the first board flush with the bottom edge, ensuring it overhangs equally on both sides. Secure each board with composite decking screws, placing two screws at every joist intersection. Maintain consistent 1/8-inch spacing between boards using spacers for proper water drainage and thermal expansion.
For a professional finish, stagger your board joints across different joists rather than aligning them. This not only creates a more appealing look but also adds structural stability. When cutting boards to fit, always use a fine-toothed saw to prevent splintering and achieve clean edges.
Pay special attention to the transition points where the ramp meets the ground and shed threshold. These areas should be particularly secure and smooth to prevent tripping hazards. Consider adding non-slip strips or texturing in these high-traffic zones for additional safety, especially if your area experiences frequent rain or snow.
Remember to clean away any debris between boards during installation to ensure proper drainage and prevent future maintenance issues. Once complete, give the entire surface a thorough cleaning to remove any construction dust or marks.

Adding Safety Features
Safety should be your top priority when building your composite shed ramp. Start by applying anti-slip strips or textured tape across the width of the ramp at regular intervals, typically every 12-18 inches. For maximum grip, consider using a composite decking material with built-in texture or adding a non-slip coating specifically designed for composite surfaces.
Installing side rails is essential, especially if your ramp rises more than a few inches off the ground. Use weather-resistant posts at least 36 inches high, securing them firmly to the ramp structure every 4 feet. Add horizontal rails between posts, ensuring they’re sturdy enough to support someone leaning on them. For extra safety, consider adding a middle rail at about 18 inches height.
Remember to regularly inspect these safety features and clean the non-slip surfaces to maintain their effectiveness, particularly after wet weather or heavy use.
A composite shed ramp represents a smart investment in your property’s functionality and value. By choosing composite materials for your ramp, you’re opting for a solution that combines durability, safety, and minimal maintenance requirements. The weather-resistant properties ensure your ramp will maintain its appearance and structural integrity for years to come, while the slip-resistant surface provides peace of mind during all seasons.
While the initial cost might be higher than traditional materials, the long-term benefits of composite ramps – including zero painting, no rotting, and minimal upkeep – make them an economically sound choice. The aesthetic appeal of composite materials also enhances your property’s overall appearance, creating a cohesive look between your shed and its access point.
Ready to enhance your shed’s accessibility? With proper planning and the right materials, you can create a safe, lasting ramp that serves your needs perfectly. Whether you choose to tackle this as a DIY project or work with a professional, investing in a composite ramp is a decision you’ll appreciate every time you use your shed. Start your project today and enjoy the convenience and reliability of a well-built composite ramp for years to come.