
Build a Rock-Solid 4×4 Shed Base That Won’t Let Water Win
Building a solid 4×4 shed base is crucial for protecting your storage investment from water damage and ground movement. A properly constructed foundation prevents moisture seepage, extends your shed’s lifespan, and ensures your belongings stay dry year-round. While a 4×4 footprint might seem small, this compact size demands precise planning and execution to create a stable, water-resistant platform that won’t shift or settle over time.
This comprehensive guide walks you through selecting the right materials, preparing the ground properly, and implementing proven waterproofing techniques specifically designed for 4×4 shed bases. Whether you’re tackling this as a DIY project or preparing to work with a contractor, understanding these fundamental aspects will help you create a durable foundation that stands up to challenging weather conditions and protects your investment for years to come.
Ready to start your project? Let’s dive into the essential steps for creating a weatherproof 4×4 shed base that keeps your storage space dry and secure.
Choosing the Perfect Location for Your 4×4 Shed Base
Ground Assessment and Drainage
Before laying your 4×4 shed base, it’s crucial to assess the ground conditions properly. Start by checking the soil type – clay soils require extra attention due to their tendency to retain water, while sandy soils generally offer better drainage. Remove any vegetation, roots, or debris from the area, and ensure the ground is as level as possible.
For optimal drainage, the site should have a slight slope (about 1 inch per 8 feet) away from where the shed will stand. This prevents water from pooling around your shed’s foundation. Consider installing a layer of landscape fabric beneath your base to prevent weed growth and improve drainage.
If your site has poor natural drainage, create a simple drainage system by laying a 4-inch layer of gravel before installing your base. This helps channel water away from the structure. In areas with severe drainage issues, you might need to install a French drain or add extra gravel layers to ensure proper water management.
Test the ground’s stability by walking over it after rain – if it feels spongy or waterlogged, additional drainage solutions will be necessary.
Legal Requirements and Planning
Before starting your 4×4 shed base project, it’s crucial to understand and comply with local building regulations. While a small 4×4 shed base might seem like a minor project, many jurisdictions require permits even for modest structures. Generally, you’ll need to check with your local planning department regarding setback requirements (distance from property lines), maximum height restrictions, and foundation specifications.
Most areas require sheds to be placed at least 5 feet from property lines and 10 feet from the main building. Height restrictions typically range from 8 to 12 feet, but these can vary significantly by location. Some neighborhoods also have homeowners’ association (HOA) guidelines that may affect your shed base placement and construction materials.
Even if permits aren’t required, it’s wise to document your plans and maintain records of any communications with local authorities. This can protect you from future issues and ensure your shed base meets all necessary safety standards.
Materials and Tools for a Waterproof 4×4 Base
Base Material Options
When choosing among the best foundation materials for your 4×4 shed, you have three primary options to consider. Concrete offers unmatched durability and stability, creating a permanent, level surface that won’t shift over time. While it’s the most expensive option, it provides excellent moisture protection and can last for decades with proper installation.
Gravel bases are cost-effective and provide superior drainage, making them ideal for areas prone to heavy rainfall. A properly laid gravel foundation consists of multiple layers, starting with larger stones at the bottom and finishing with finer gravel on top. This gradual sizing helps prevent sinking and maintains stability.
Paving slabs offer a middle-ground solution, combining the solid surface of concrete with easier installation and lower costs. They’re particularly suitable for 4×4 sheds due to their manageable size and simple layout options. When properly leveled and seated on a compacted sand base, paving slabs provide reliable support while allowing for future adjustments if needed.
Essential Waterproofing Materials
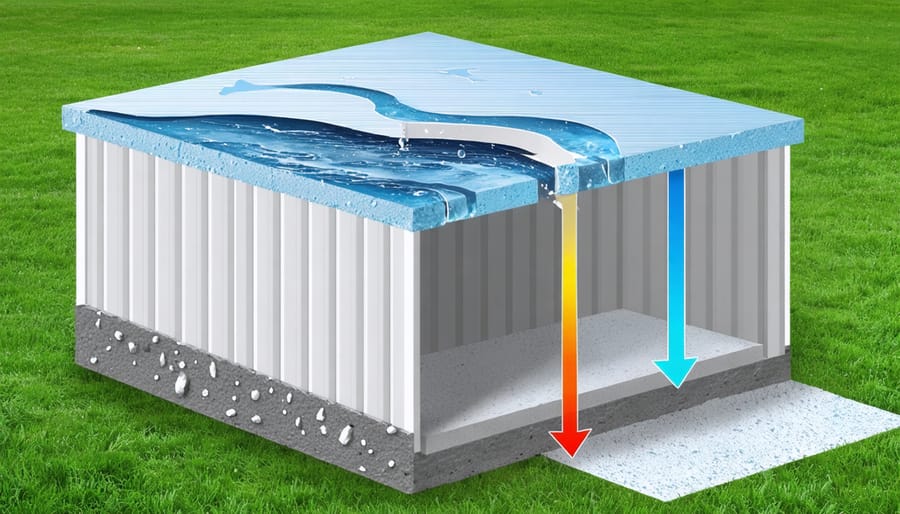
Protecting your 4×4 shed base from moisture is crucial for its longevity. Start with a high-quality Damp Proof Membrane (DPM) – a thick plastic sheet that creates a barrier between the ground and your shed base. Look for a DPM that’s at least 1000-gauge (250 microns) thick for optimal protection.
Gravel boards are another essential component, acting as a protective barrier between your shed’s walls and the ground. These pressure-treated timber boards should be at least 6 inches high and properly secured to prevent water from seeping up into your shed’s structure.
Consider adding a layer of hardcore or crushed stone beneath your base, creating natural drainage pathways for water. Top this with a layer of sharp sand for improved leveling and additional moisture protection.
Don’t forget about the edges of your base – installing proper guttering and ensuring a slight slope away from the shed (about 1-2 degrees) will help direct rainwater away from the foundation. Some DIY enthusiasts also add a waterproof sealant to the concrete surface for extra protection, though this isn’t always necessary with a properly installed DPM.
Step-by-Step Base Construction
Ground Preparation
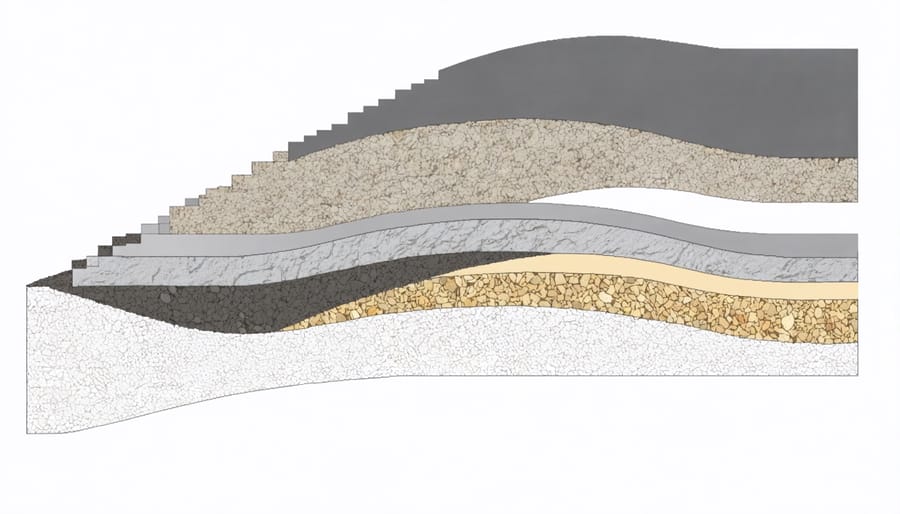
Before installing your 4×4 shed base, preparing your site properly is crucial for long-term stability and water resistance. Start by removing all vegetation, rocks, and debris from the area, extending about 6 inches beyond your intended 4×4 footprint. Use a spirit level and string lines to check the ground’s slope, marking any high spots that need leveling.
Dig down approximately 4 inches, ensuring the soil is firm and compacted. If you encounter soft spots, fill them with crushed stone and compact thoroughly. Create a slight gradient (about 1 inch per 8 feet) away from where the shed will stand to encourage water runoff.
For areas with poor drainage, consider laying a layer of landscape fabric before adding a 2-inch base of MOT Type 1 aggregate or similar hardcore material. Compact this layer thoroughly using a plate compactor, making several passes to achieve optimal density. This foundation work might take a few hours, but it’s essential for preventing future settling and water-related issues.
Installing the Base
Begin by laying a heavy-duty weed barrier across your leveled area, extending it about 6 inches beyond your marked perimeter. This crucial step prevents unwanted growth from disrupting your base over time. Next, create a wooden frame using pressure-treated 4×4 timbers, ensuring they’re perfectly square using the 3-4-5 triangle method.
Pour a 2-inch layer of sharp sand within the frame, rake it level, and compact it thoroughly with a plate compactor. This creates a stable foundation for your pavers or concrete blocks. For superior water protection, add a layer of heavy-duty damp-proof membrane over the sand, overlapping the edges by at least 4 inches.
Place your chosen base material – whether concrete blocks or paving slabs – starting from one corner and working outward. Use a rubber mallet to ensure each piece sits firmly and level. Check for levelness frequently using a spirit level, adjusting the sand beneath as needed. Finally, fill any gaps between blocks with dry sand to prevent weed growth and enhance stability.
Remember to create a slight slope (about 1 inch per 8 feet) away from your intended shed location to ensure proper water runoff.
Adding Drainage Solutions
Proper drainage around your 4×4 shed base is crucial for preventing water damage and extending its lifespan. Start by creating a slight slope away from the shed base, typically a 1-inch drop for every 8 feet of distance. Install a perimeter French drain by digging a shallow trench around the base, laying perforated pipe wrapped in landscape fabric, and filling with gravel. Add corner downspouts if your shed has gutters, directing water at least 3 feet away from the base. For added protection, consider placing a layer of crushed stone around the base’s perimeter, creating a 6-inch border that helps disperse rainwater. This simple drainage system will keep your shed base dry and stable throughout the seasons.
Maintenance and Long-Term Protection
Regular maintenance is crucial to ensure your 4×4 shed base continues to protect your shed from water damage and maintain its structural integrity for years to come. Start by establishing a seasonal inspection routine, checking for any signs of settling, cracking, or water pooling around the base.
Clear debris, leaves, and vegetation from around the base regularly, maintaining a clean perimeter of at least 12 inches. This prevents moisture retention and discourages pest intrusion. During rainy seasons, pay extra attention to water drainage patterns and address any areas where water might collect against the base.
Apply a fresh coat of waterproof sealant every 2-3 years, depending on your climate and wear conditions. For gravel bases, redistribute the stones periodically to maintain even coverage and proper drainage. If using concrete or paving slabs, fill any developing cracks promptly with appropriate outdoor sealant to prevent water infiltration.
Consider installing additional drainage solutions if you notice persistent moisture issues. French drains or simple drainage channels can be added after initial construction to improve water management. During winter months, ensure snow and ice don’t accumulate directly against the base, as freeze-thaw cycles can cause damage over time.
Keep gutters and downspouts clear and properly directed away from the base. If necessary, extend downspouts further from the shed to prevent water from saturating the ground around the base. These simple maintenance steps will significantly extend the life of your shed base and protect your investment for many years to come.
A properly waterproofed 4×4 shed base is essential for protecting your investment and ensuring your storage solution stands the test of time. Throughout this guide, we’ve explored the vital components of creating a durable foundation, from selecting the right materials to implementing effective drainage solutions. Remember that taking time to properly level your site, install adequate drainage, and apply appropriate waterproofing materials will save you countless hours of maintenance and repairs in the future.
The success of your shed project largely depends on the attention you give to waterproofing during the initial construction phase. By following the steps we’ve outlined, using quality materials, and ensuring proper elevation above ground level, you’ll create a solid foundation that keeps your belongings dry and protected year-round.
Don’t rush through the waterproofing process – it’s an investment that pays dividends through extended shed life and reduced maintenance costs. With these guidelines in hand, you’re well-equipped to create a lasting, water-resistant base for your 4×4 shed that will serve you reliably for years to come.