
Build Your Shed Without Sending a Single Scrap to the Landfill
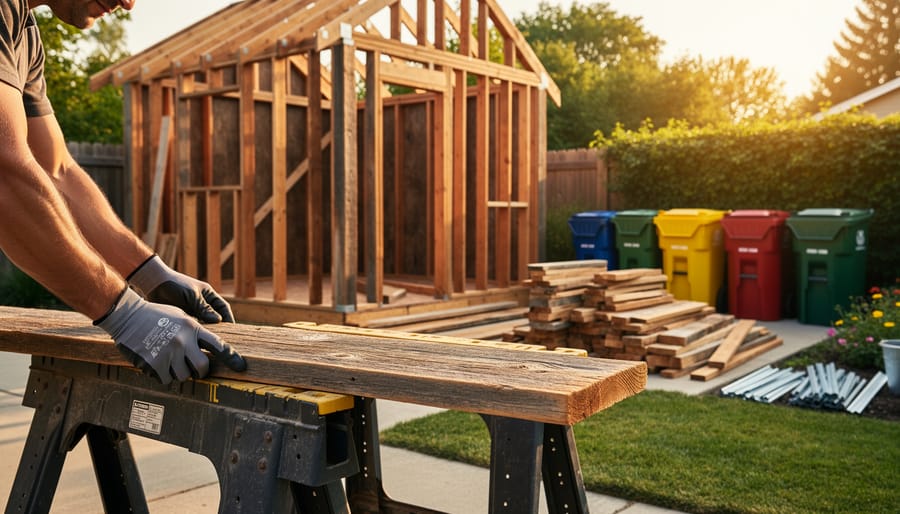
Building a shed doesn’t have to mean filling up dumpsters. Choose reclaimed lumber from demolition sites or architectural salvage yards for framing and siding, cutting new material costs while preventing usable wood from reaching landfills. Partner with local recycling centers before you start construction to understand exactly what materials they accept, from metal roofing scraps to cardboard packaging, so you can sort waste correctly from day one. Design your shed dimensions around standard material sizes—like 8-foot boards and 4×8 sheets—to eliminate cutting waste before you ever pick up a saw.\n\nMost shed builders never realize that up to 40% of construction waste comes from poor planning and oversized material orders. When Sarah Jenkins built her 10×12 garden shed in Portland last spring, she diverted every single pound from the landfill by donating leftover materials to Habitat for Humanity, composting untreated wood scraps, and returning unused hardware to the store. Her secret wasn’t complicated—just careful measurement, strategic material selection, and knowing where everything could go besides the trash.\n\nZero-waste-to-landfill isn’t about perfection or expensive eco-products. It’s about thinking ahead, measuring twice, and recognizing that every scrap has value somewhere. Whether you’re storing garden tools or creating a backyard workshop, your shed project can prove that responsible building and practical DIY goals work hand in hand. The strategies are simpler than you think, and the environmental impact is bigger than you’d imagine.\n\n\n
What Zero-Waste-to-Landfill Really Means for Your Shed Project
\n\nWhen you’re planning a shed project, you might wonder what “zero-waste-to-landfill” actually means in real-world terms. Here’s the good news: it doesn’t mean you won’t generate any waste at all during your build. Instead, it’s about making sure that waste doesn’t end up buried in a landfill.\n\nThink of it this way: zero-waste-to-landfill is a goal where everything leftover from your project finds a new purpose. Wood scraps get donated to community gardens for raised beds. Metal pieces go to recycling centers. Even that pile of cardboard packaging gets broken down and recycled instead of tossed in the trash bin.\n\nIt’s important to understand the distinctions here. True “zero waste” means producing virtually no waste at all, which is nearly impossible for most construction projects. “Minimal waste” simply means reducing what you throw away. But “zero-waste-to-landfill” sits comfortably in the middle as an achievable target for homeowners. You’ll still have offcuts, packaging, and debris, but you’re committing to divert these materials away from landfills through recycling, repurposing, or donation.\n\nThis approach helps reduce your carbon footprint while keeping your project moving forward smoothly. Sarah from Portland shared her experience: “I thought it would add weeks to my timeline, but sorting materials as I worked actually kept my site cleaner and more organized.”\n\nThe beauty of zero-waste-to-landfill construction is its flexibility. You’re not aiming for perfection; you’re making intentional choices about where your waste goes. Every piece diverted is a win for both your conscience and the environment.\n\n\n
Why This Matters Beyond Just Being Eco-Friendly
\n\nChoosing zero-waste-to-landfill for your shed project delivers benefits that extend far beyond environmental bragging rights. Let’s talk about what this approach means for your wallet and your community.\n\nFirst, you’ll likely see real savings on disposal costs. Traditional construction generates mountains of waste, and hauling that debris to the landfill isn’t cheap. Many homeowners report spending hundreds of dollars on dumpster rentals and disposal fees for even modest building projects. By planning to reuse, recycle, or donate materials instead, you keep that money in your pocket.\n\nMaterial costs can drop too. When you adopt greener storage solutions and zero-waste thinking, you become creative about sourcing. Reclaimed lumber, leftover materials from other projects, and community swap programs often provide quality supplies at fraction-of-retail prices. One DIY builder in Oregon saved nearly 40% on materials by networking with local contractors for their surplus inventory.\n\nYour community benefits as well. Donating usable materials to Habitat for Humanity ReStores or local nonprofits supports affordable housing initiatives and keeps valuable resources circulating. Plus, reduced landfill waste means less strain on local infrastructure and lower environmental impact in your own backyard.\n\nPerhaps most importantly, there’s genuine satisfaction in building responsibly. Knowing your shed project didn’t contribute to overflowing landfills creates a sense of pride that lasts long after construction wraps up. You’re not just building storage—you’re building a better approach to home improvement.\n\n\n
Planning Your Shed Build to Prevent Waste Before It Happens
\n\n
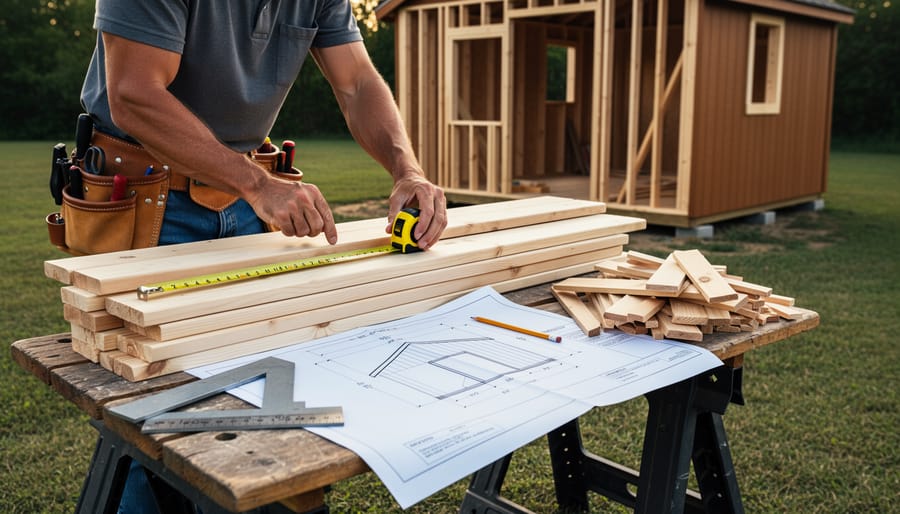
Precise Measurements and Material Calculations
\n\nGetting your material calculations right is one of the smartest ways to minimize waste before construction even begins. Over-ordering means excess materials that often end up unused and eventually discarded, while under-ordering leads to multiple trips and higher transportation emissions.\n\nStart by creating detailed measurements of your shed design. Measure twice, calculate once! Online material calculators are incredibly helpful here—many lumber yards and building supply websites offer free tools where you input your shed dimensions and receive precise quantities for framing, siding, and roofing materials. These calculators remove much of the guesswork and help you order exactly what you need.\n\nThat said, a small buffer is sensible. Plan for about 5-10% extra on materials prone to cutting errors or defects, like siding or roofing shingles. This modest cushion protects against miscalculations without creating significant waste. For lumber, count each board individually rather than ordering in bulk bundles, which often include pieces you won’t use.\n\nKeep your cut list organized and consider how material dimensions work together. For example, standard plywood sheets are 4×8 feet—plan your design to maximize full sheet usage. This thoughtful approach means less scrap and fewer leftover pieces. Many homeowners find that investing thirty minutes in careful calculation saves both money and multiple bags of construction waste heading to the landfill.\n\n
 \n
\n\n\n
Choosing Shed Materials That Minimize Waste
\n\nSelecting the right materials for your shed can dramatically reduce waste before you even start building. The key is thinking ahead about packaging, longevity, and what happens to materials at the end of their useful life.\n\nMetal sheds offer excellent waste reduction potential. They typically arrive with minimal packaging, last for decades, and the steel is highly recyclable. Look for manufacturers using recycled content in their panels. One homeowner in Oregon shared that her metal shed came flat-packed with just cardboard strapping, which she composted, eliminating packaging waste entirely.\n\nFor wood sheds, choose suppliers offering bulk deliveries with reusable strapping instead of excessive plastic wrap. Reclaimed wood is another fantastic option, giving new life to materials that might otherwise reach landfills. When selecting new lumber, ask about FSC-certified sources that prioritize sustainable harvesting.\n\nModular plastic sheds made from recycled materials represent a circular economy approach. These typically snap together without requiring additional fasteners, and some manufacturers offer take-back programs when you’re finished with them. Check if the plastic contains post-consumer recycled content.\n\nVinyl sheds often come with more packaging, but some brands are improving. Request information about packaging practices before purchasing.\n\nThe real waste-reduction magic happens when you select eco-friendly building materials that serve multiple purposes. For instance, tongue-and-groove panels eliminate gaps without requiring additional caulking materials. Screws instead of nails mean easier disassembly for future recycling. Every material choice either creates waste or prevents it, so choose wisely from the start.\n\n
Ordering Smart: Timing and Coordination
\n\nSmart coordination starts with creating a delivery timeline that matches your construction schedule. Order materials no more than a week before you’ll actually use them—this minimizes the risk of weather damage and prevents cluttered workspaces where materials might get damaged or lost. One homeowner shared how a surprise rainstorm ruined untreated lumber that arrived two weeks early, creating unnecessary waste.\n\nTalk directly with suppliers about their delivery windows and be honest about your project timeline. Many suppliers offer flexible scheduling and can stagger deliveries to match your building phases. If possible, arrange for materials to arrive on consecutive days rather than all at once, especially if you have limited covered storage.\n\nCheck the weather forecast religiously before confirming delivery dates. If rain or extreme temperatures are predicted, reschedule or prepare adequate protection. Have tarps, plastic sheeting, and covered areas ready as backup plans. Consider renting a small storage container for a month if your project spans several weeks—it’s cheaper than replacing damaged materials.\n\nCoordinate with helpers or family members to ensure someone’s available when materials arrive. Quick unloading and proper storage prevents exposure damage and keeps your zero-waste goals on track. Remember, preventing damage is always easier than managing waste.\n\n\n
Construction Techniques That Keep Waste Out of Landfills
\n\n
Cut Once, Use Twice: Maximizing Every Piece
\n\nBefore you make that first cut, take a moment to sketch out a cutting plan. Think of your lumber like a puzzle where every piece matters. Measure twice, cut once isn’t just about accuracy—it’s about maximizing your materials.\n\nStart by laying out your longest pieces first on your cutting diagram. If you need a 72-inch board and a 24-inch board, you can cut both from a single 8-foot piece with minimal waste. Group similar-length cuts together on the same boards to reduce the number of odd-sized offcuts.\n\nHere’s where it gets exciting: those offcuts aren’t scrap! Sarah from Portland shared how she saved every piece longer than 12 inches during her shed build. “I labeled a bin for blocking and bracing pieces,” she explains. “By the time I reached the roof framing, I had exactly what I needed without opening another bundle of lumber.”\n\nCreate a designated spot on your job site for these valuable remnants. Shorter pieces work perfectly for blocking between joists, diagonal bracing, shims, or even stakes for layout strings. Pieces under 12 inches can become spacers or template materials.\n\nThe real magic happens when you plan your cuts around standard lumber lengths. Since most lumber comes in 8, 10, 12, and 16-foot lengths, design your shed dimensions to align with these standards whenever possible. This simple adjustment can slash your waste dramatically.\n\n
 \n
\n\n\n
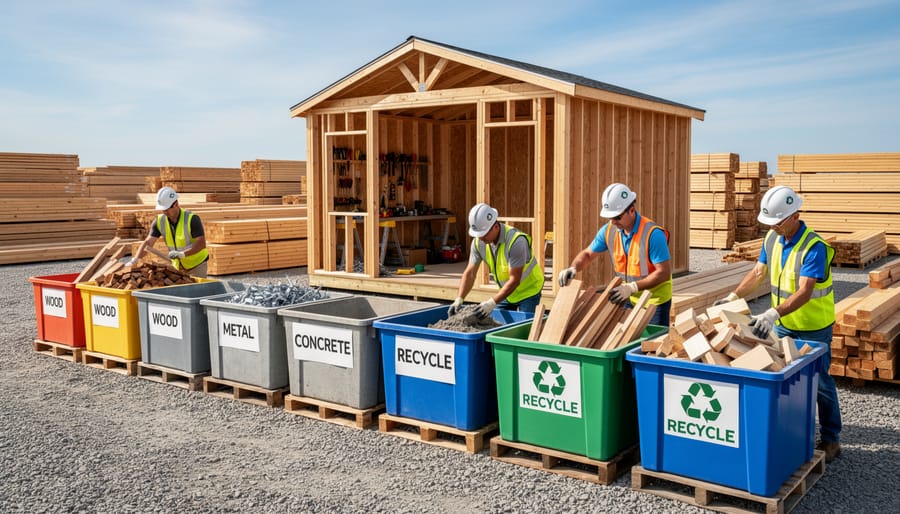
Setting Up a Job Site Sorting System
\n\nCreating an effective sorting system on your job site doesn’t need to be complicated. Start by designating clear zones for different materials before construction begins. Use simple plywood bins or even five-gallon buckets labeled clearly for wood scraps, metal pieces, cardboard, plastic packaging, and actual trash. Position these stations near where work happens so your crew doesn’t have to walk far to sort materials.\n\nThe real game-changer is making sorting effortless. When bins are accessible and clearly marked, everyone naturally participates. One homeowner we spoke with reduced their landfill waste by 80% simply by setting up four labeled containers near their shed build site. They discovered that clean wood scraps became garden edging, while metal offcuts went to a local scrap yard for cash.\n\nConsider color-coding your bins or adding picture labels showing what goes where. This visual system helps everyone, from professional contractors to weekend DIY helpers, quickly identify the right spot for each material. Keep bags or containers nearby for easy transport when bins fill up. Remember, the easier you make sorting, the more likely materials get diverted from the landfill and into their proper recycling or repurposing streams.\n\n
Creative Uses for Construction Scraps
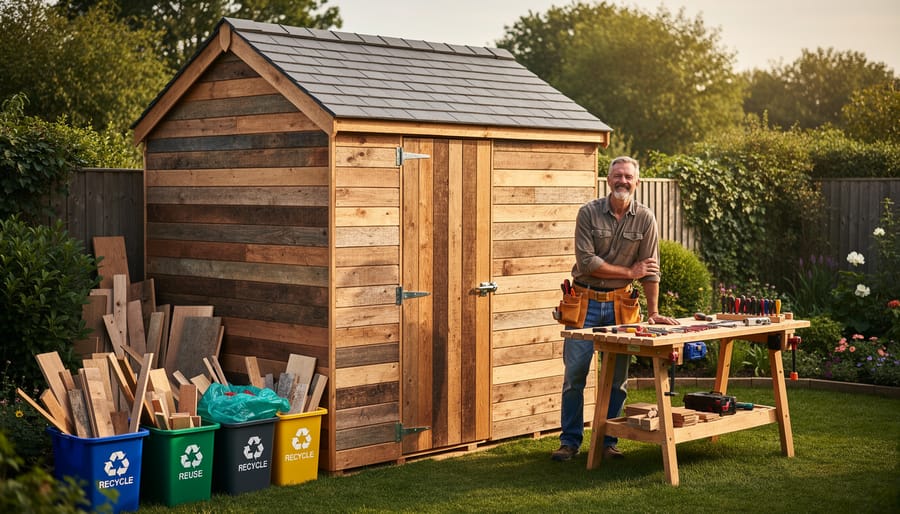
\n\nConstruction scraps from your shed project don’t have to end up in a dumpster. With a little creativity, those leftover materials can find new life right in your backyard or benefit your local community.\n\nLeftover wood pieces make excellent garden stakes for tomatoes, beans, and climbing plants. Those smaller 2×4 scraps? Perfect for organizing kindling storage near your fireplace or fire pit. One homeowner told us they transformed excess plywood into compact shelving units inside their new shed, creating the perfect spot for paint cans and gardening supplies without spending an extra dime.\n\nTrim pieces and decorative molding leftovers can add character to existing outdoor furniture or refresh your garden beds with attractive edging. Even small wood scraps can become picture frames, birdhouses, or tool organizers.\n\nConsider donating usable materials to community projects like Habitat for Humanity, local schools for art programs, or theater groups always seeking set-building supplies. Many communities have material reuse centers that welcome clean, safe construction remnants.\n\nFor more inspiration on transforming leftover materials, explore creative upcycling projects that turn scraps into functional treasures. The key is viewing leftovers not as waste, but as opportunities for practical problem-solving that saves money while protecting the environment.\n\n\n
Where to Send What: Your Zero-Waste Diversion Guide
\n\n
Wood and Lumber Recycling Options
\n\nDon’t let leftover wood from your shed project end up in the dump when there are great recycling options right in your community! Local lumber recycling facilities accept clean, untreated wood and often mill it into usable material for future projects. Many community gardens welcome untreated wood scraps for garden bed borders, compost bin construction, or pathway mulch. It’s a wonderful way to support local green spaces while keeping materials in circulation.\n\nFor smaller scraps and sawdust that can’t be reused, biomass facilities convert wood waste into renewable energy. Contact your municipal waste management office to find participating facilities in your area. One homeowner we spoke with donated pressure-treated wood scraps to a specialized recycling center and sent untreated pieces to a nearby urban farm, achieving zero wood waste from their entire build. Always separate treated from untreated wood, as they require different disposal methods to protect soil and water quality.\n\n
Metal, Fasteners, and Hardware Recovery
\n\nDon’t toss those leftover nails, brackets, or metal flashing! Scrap metal recycling centers accept nearly every type of metal from your shed project, and you might be surprised to learn that even small quantities have value. Separate ferrous metals like steel screws from non-ferrous materials like aluminum trim or copper wire, as recycling facilities often pay more for sorted materials. Many centers accept metal in any amount, making it easy to divert construction waste. Keep a dedicated container on-site during your build to collect metal scraps as you work. Some homeowners report earning enough from their scrap metal to cover their morning coffee runs during the project. Check with your local recycling center about their specific requirements and hours before making the trip.\n\n
Packaging Materials and Beyond
\n\nDon’t let packaging materials from your shed project end up in the landfill when simple recycling options exist right in your community. Cardboard boxes from lumber, hardware, and tool deliveries break down quickly at most curbside recycling programs, but flatten them first to save space and make collection easier. For plastic film and bubble wrap, many big-box home improvement stores and grocery retailers offer drop-off bins near their entrances where you can return clean, dry plastic packaging. One homeowner building a backyard workshop saved three large bags of plastic wrap and foam corner protectors, then dropped them off during her next hardware store visit. Foam packaging requires a bit more detective work, but specialized drop-off locations accept clean foam blocks and packing peanuts for reuse. Check with local shipping stores or search Earth911’s database to find the nearest foam recycling center. These small efforts add up, keeping bulky packaging out of landfills while supporting the circular economy that makes zero-waste construction genuinely achievable.\n\n
Donation Opportunities for Usable Materials
\n\nBefore you toss those leftover materials, consider donating them to organizations that gladly accept usable building supplies. Habitat for Humanity ReStores are nationwide treasure troves that welcome surplus lumber, hardware, windows, and doors—giving your materials new life while supporting affordable housing projects. Community tool libraries often accept hand tools and equipment, making them available to neighbors who need them. Local schools and theater groups frequently need scrap wood and materials for set building and shop classes. When recycling shed materials, a quick phone call confirms what each organization accepts. Many offer free pickup for larger donations, making it incredibly convenient to keep perfectly good materials out of landfills while benefiting your community.\n\n\n
Real Homeowners Who’ve Done It: Success Stories
\n\nMeeting real people who’ve successfully tackled zero-waste shed construction makes the whole concept feel wonderfully achievable. Let me share two inspiring stories that show it really can be done.\n\nSarah Martinez from Portland turned what could have been a waste headache into a rewarding challenge. When building her 10×12 garden shed last spring, she partnered with a local reclaimed lumber yard and tracked every scrap. “I was shocked at how much material we saved from the landfill,” she shares. “The trickiest part was finding someone to take our metal scraps, but a quick call to a local fabricator solved that problem.” Sarah estimates that over 95% of her construction waste found new purposes. Her leftover cedar siding became raised garden beds, and concrete fragments formed a charming pathway border. “The satisfaction of building something beautiful while barely filling a single trash bag was incredible,” she adds.\n\nMeanwhile, Tom and Linda Chen in Colorado Springs took things even further during their workshop shed build. They used a detailed waste tracking spreadsheet and established collection points for different materials before breaking ground. Their biggest surprise? How willing local businesses were to help. A nearby fence company took their scrap wire, a community theater grabbed trim pieces for set building, and their neighborhood buy-nothing group eagerly claimed usable leftovers. “We thought zero-waste would add weeks to our timeline, but with planning, it only added about three hours total,” Tom explains. “Plus, we saved nearly $400 in disposal fees and made connections with neighbors who’ve since helped with other projects.”\n\n
 \n
\n\n\n\n
Common Obstacles and How to Overcome Them
\n\nLet’s be honest—achieving zero-waste-to-landfill during your shed construction sounds fantastic in theory, but you’ll likely hit a few roadblocks along the way. The good news? Most challenges have straightforward solutions once you know what to look for.\n\nDamaged or contaminated materials pose a common dilemma. That pile of lumber left in the rain or those partially broken bricks might seem destined for the landfill. Instead, reach out to specialty recyclers who accept less-than-perfect materials, or consider creative repurposing. Weathered wood makes excellent garden borders, while broken concrete can become pathway fill or drainage material.\n\nFinding recycling facilities in rural areas can feel like searching for a needle in a haystack. Start by contacting your county waste management office—they often know about options not listed online. Many building supply stores offer take-back programs for specific materials, and agricultural communities sometimes have networks for sharing and repurposing building materials. Online community groups and local bulletin boards can connect you with neighbors doing similar projects.\n\nTime constraints are perhaps the biggest challenge. Sorting materials and researching disposal options does take extra effort. The solution? Build it into your project timeline from the start. Designate separate bins for different waste streams right from day one, saving sorting time later. Focus on the highest-volume waste first—usually wood and cardboard—which often have the easiest diversion routes. Even diverting 80-90% still makes a tremendous environmental difference while keeping your project manageable.\n\n\nBuilding a zero-waste-to-landfill shed isn’t reserved for environmental warriors or sustainability experts. It’s absolutely achievable for everyday homeowners willing to make thoughtful choices throughout their project. The beauty of this approach is that you don’t need to be perfect from day one. Start small—maybe you commit to donating leftover materials from your current shed project, or you choose just one reclaimed element like doors or windows. Each decision to divert waste from the landfill counts.\n\nWhat’s truly exciting is the ripple effect of these choices. When neighbors see your beautiful shed built with salvaged materials or ask about your material donation strategy, you’re inspiring others to think differently about construction waste. You’re proving that sustainable building doesn’t mean sacrificing quality or aesthetics.\n\nReady to get started? Before you break ground on your next shed project, spend an afternoon researching local salvage yards, donation centers, and recycling programs in your area. Sketch out a simple waste diversion plan alongside your building plan. Your shed project can be functional, beautiful, and kind to the planet—all at once.