
Cold Feet and Wasted Money: Why Your Shed Floor Needs Insulation Now

A cold, damp shed floor isn’t just uncomfortable—it’s a moisture magnet that ruins tools, rots stored items, and makes your workspace unbearable during winter months. Insulating your shed floor creates a thermal barrier that prevents ground moisture from seeping upward, stops heat loss through the foundation, and transforms a seasonal storage space into a year-round functional workshop.
The good news? Floor insulation is one of the most straightforward DIY shed upgrades you can tackle in a weekend. Whether you’re working with a raised floor built on joists or retrofitting an existing concrete slab, the right insulation materials combined with proper vapor barriers will protect your investment and extend your shed’s usability throughout every season.
This guide walks you through material options suited to different shed foundations, details the complete installation process with measurements and techniques that actually work, and addresses common mistakes that compromise insulation effectiveness. You’ll discover when vapor barriers are essential, how to handle awkward joist spacing, and practical solutions for insulating floors you thought were too far gone to fix.
Why Insulating Your Shed Floor Actually Matters
You might wonder if insulating your shed floor is really worth the effort, but the difference it makes is surprisingly significant. Without proper insulation, your shed becomes vulnerable to problems that can damage your belongings and limit how you use the space.
First, let’s talk about moisture protection. An uninsulated shed floor allows ground moisture to seep upward through concrete or directly from the earth beneath wooden floors. This creates the perfect environment for rust on tools, mildew on fabrics, and warping of wooden items. Sarah, a homeowner in Wisconsin, learned this the hard way when her grandfather’s antique workbench developed mold after just one damp spring season in her uninsulated shed.
Temperature control is another game-changer. If you’re using your shed as a workshop, an insulated floor keeps your feet comfortable during those winter projects. The benefits of shed insulation extend beyond comfort—paint freezes less readily, batteries maintain their charge better, and you’ll actually want to spend time in there during colder months.
Condensation becomes a non-issue when your floor is properly insulated. That dramatic temperature difference between cold ground and warm shed air creates dripping moisture on walls and stored items. Insulation acts as a barrier, stabilizing temperatures and keeping condensation at bay.
Finally, your shed simply lasts longer. By controlling moisture and temperature fluctuations, you’re protecting the structural integrity of your entire building. Floor joists stay dry, metal hardware resists rust, and the overall lifespan of your investment increases significantly. For the relatively small upfront cost and effort, floor insulation delivers returns you’ll appreciate every time you open that shed door.
When Floor Insulation Makes Sense (And When It Doesn’t)
Not every shed needs floor insulation, and understanding when it makes sense will save you time and money. Let’s look at the key factors to help you decide.
If you’re planning to heat your shed during colder months, floor insulation is almost always worthwhile. Without it, you’re essentially heating the ground beneath your shed, wasting energy and money. Workshop users who spend hours on projects will immediately notice the comfort difference, especially when standing on concrete or raised foundations.
Climate plays a significant role too. In regions with harsh winters or where ground temperatures drop significantly, insulated floors prevent that uncomfortable cold creep that makes storage sheds feel damp and workshops unbearable. One DIY enthusiast from Minnesota shared that adding floor insulation to his workshop shed reduced his heating costs by nearly 40 percent while making the space comfortable enough for year-round woodworking.
For unheated storage sheds in mild climates, floor insulation might be overkill. If you’re simply storing garden tools, seasonal decorations, or lawn equipment, the investment may not justify the benefits. However, if you’re storing temperature-sensitive items like paint, electronics, or valuable furniture, insulation helps maintain more stable conditions and reduces moisture problems.
Seasonal shed users face a middle ground. If you only use your shed during warmer months, skip the floor insulation and focus your budget elsewhere. But if you find yourself extending usage into shoulder seasons, even basic insulation makes those spring and fall days much more pleasant.
Choosing the Right Insulation Material for Your Shed Floor
Rigid Foam Board (The Popular Choice)
Rigid foam boards have become the go-to choice for DIYers tackling shed floor insulation, and it’s easy to see why. These lightweight panels offer excellent performance without the hassle of dealing with loose fill materials or complicated installations.
You’ll typically choose between two types: XPS (extruded polystyrene) with its recognizable pink or blue color, and polyiso boards with their reflective foil facing. XPS boards deliver around R-5 per inch of thickness, while polyiso boards can reach R-6 to R-6.5 per inch, making them slightly more efficient. Both options provide outstanding moisture resistance, which is crucial for ground-level applications where dampness can creep in.
Installation couldn’t be simpler. You cut the boards to fit between your floor joists using a standard utility knife, press them snugly into place, and seal any gaps with expanding foam. Many homeowners complete this project in a weekend without any special tools or skills.
When considering insulation costs, rigid foam sits in the middle range. XPS typically runs slightly cheaper than polyiso, but both offer excellent long-term value. A standard 8×10 shed floor might require six to eight boards, keeping your total material investment reasonable while delivering professional-grade results.
Spray Foam Insulation
Spray foam insulation excels in sheds with irregular floor spaces, odd joist spacing, or hard-to-reach areas. It expands to fill every gap and crevice, creating an airtight seal that prevents drafts and moisture infiltration better than most alternatives. The R-value typically ranges from R-3.5 to R-6.5 per inch, making it highly efficient even in thin applications.
Here’s the reality: professional application usually costs $1.50 to $3 per square foot, which adds up quickly for larger sheds. The investment pays off with superior insulation and vapor barrier properties in one step. DIY spray foam kits exist but require careful handling and protective equipment. Many homeowners find the learning curve steep, and mistakes can be costly to fix.
One shed owner shared that professional spray foam transformed her drafty garden office into a comfortable year-round workspace. If your budget allows and your shed has complex spaces, professional installation delivers excellent long-term value and peace of mind.
Fiberglass Batts and Mineral Wool
Fiberglass batts and mineral wool are budget-friendly insulation options that work well for shed floors when moisture isn’t a major concern. These materials are ideal if you’re building on a concrete slab or in a climate with low humidity. Both offer decent R-values and are readily available at most hardware stores, making them convenient for weekend DIY projects.
The biggest challenge with these traditional options is moisture vulnerability. Fiberglass batts can absorb water like a sponge, losing their insulating properties and potentially growing mold. Mineral wool handles moisture slightly better but still needs protection. If you’re working with a wood frame floor system, always install a vapor barrier on the ground side before adding your insulation between joists.
Installation is straightforward: measure your joist spacing carefully, cut the batts to fit snugly without compressing them, and secure with wire supports or staples. Many DIYers find success with these materials when paired with proper ventilation underneath the shed. Just remember that compression reduces effectiveness, so gentle handling makes all the difference in long-term performance.
Reflective Insulation and Other Alternatives
Reflective insulation, like bubble foil, offers a lightweight alternative that’s particularly useful in tight spaces or when you’re working with a limited budget. This material consists of layers of bubble wrap sandwiched between reflective aluminum foil, and it works by reflecting radiant heat rather than absorbing it. It’s incredibly easy to handle and cuts with ordinary scissors, making it a favorite among weekend DIYers.
That said, bubble foil works best when there’s an air gap on at least one side, so it may not be ideal for every shed floor situation. If your shed primarily stores garden tools or equipment that isn’t temperature-sensitive, you might find that simpler solutions work perfectly well. A quality vapor barrier combined with plywood flooring could be adequate for basic weather protection. Consider your actual needs before investing time and money—sometimes a straightforward approach saves you both without sacrificing functionality.
Step-by-Step: Insulating Your Shed Floor the Right Way
What You’ll Need
Before you begin, gather these essential materials and tools to make your insulation project smooth and efficient. You’ll need insulation material such as rigid foam boards, fiberglass batts, or spray foam, depending on your budget and shed design. A vapor barrier or damp-proof membrane is crucial to prevent moisture from damaging your insulation and causing rot. Grab a utility knife for cutting insulation to size, along with a tape measure for accurate measurements. You’ll also need construction adhesive or screws to secure insulation panels, and expanding foam to seal any gaps around edges. Don’t forget safety gear including gloves, safety glasses, and a dust mask, especially when handling fiberglass. If you’re working with an existing floor, a pry bar and hammer will help remove old flooring. Finally, keep some weatherproof tape handy for sealing vapor barrier seams.
Preparing the Floor Surface
Proper floor preparation is the foundation of successful shed insulation—skipping this step can lead to sagging floors, trapped moisture, and wasted materials down the road. Start by thoroughly sweeping or vacuuming the floor to remove dirt, debris, and dust that could interfere with insulation placement. If you’re working with a wooden floor, inspect for any damaged boards and replace them before continuing.
Next, check that your floor is level. Use a long straight edge or level to identify any dips or high spots. Minor irregularities won’t cause major problems, but significant unevenness should be corrected with shims or additional support to prevent future settling.
The most critical preparation step is moisture barrier installation. Moisture rising from the ground can destroy insulation effectiveness and promote mold growth. For ground-level sheds, lay a heavy-duty vapor barrier directly on the soil before installing floor joists. For existing wooden floors, consider adding a layer between the ground and joists if accessible, or apply vapor-retardant paint to the underside.
Taking time with these preparation steps ensures your insulation performs optimally for years, protecting both your investment and whatever you store inside.
Installing the Insulation
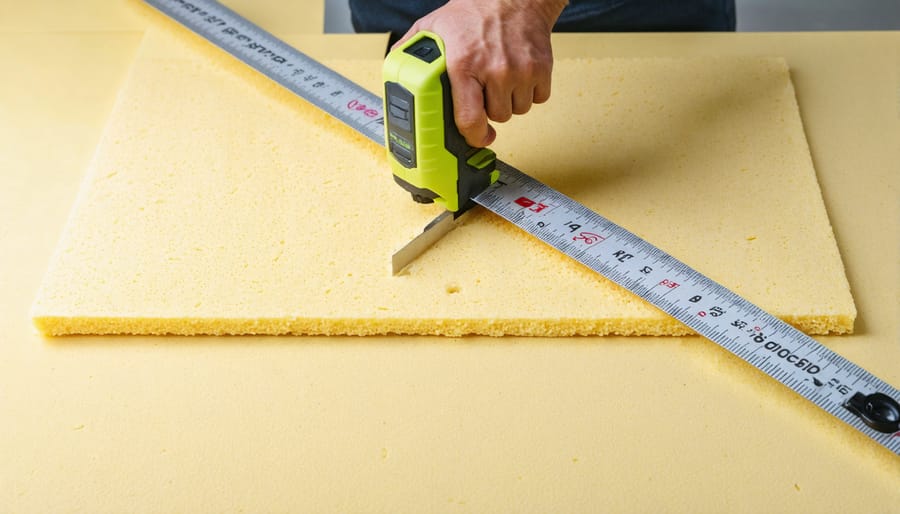
Now comes the hands-on part! Start by measuring your joist spaces carefully. Every gap is slightly different, so measure each one individually rather than assuming they’re all identical. This simple step prevents frustrating gaps later.
Cut your insulation boards about 6mm smaller than your measurements to make fitting easier. Use a sharp utility knife and a straight edge for clean cuts. If you’re working with rigid foam boards, score one side deeply, then snap the board along the line. For fibreglass batts, compress them slightly as you push them into place.
Fit the insulation snugly between the joists, ensuring it sits flush against the subfloor or ground barrier beneath. The boards should feel secure without being forced. If you encounter awkward spaces around pipes or cables, cut carefully around these obstacles using a small saw or sharp knife.
Don’t worry about small gaps of 5-10mm. You can fill these with expanding foam, but use it sparingly as it expands significantly. For larger gaps, cut thin strips of insulation to wedge into place.
Secure rigid foam boards using adhesive foam board fixings or by friction-fitting them tightly between joists. If your insulation tends to drop, add a few dabs of construction adhesive to hold it in position. Fibreglass batts usually stay put through friction alone, but you can add wire supports if needed.
Finally, work systematically across the floor rather than jumping around. This methodical approach ensures you don’t miss any spots and helps you maintain consistent quality throughout the installation.
Adding Your Floor Covering
Once your insulation is snugly in place, it’s time to cap it off with a durable floor covering that’ll transform your shed into a truly functional space. The two most popular choices are oriented strand board (OSB) and plywood, both offering excellent performance at reasonable prices.
Plywood edges slightly ahead in moisture resistance and longevity, making it ideal if your shed sees high humidity or temperature swings. OSB works beautifully for budget-conscious projects and provides a solid, stable surface when properly installed. For either option, aim for at least 5/8-inch thickness to prevent flexing and squeaking underfoot.
Here’s a practical tip from experienced DIYers: start laying your boards perpendicular to your floor joists, leaving about a 1/8-inch gap between sheets to allow for natural expansion. This small detail prevents buckling down the road, especially during seasonal changes.
Fasten your flooring using 2-inch deck screws or ring-shank nails spaced every 8 inches along the joists and 12 inches in the field (the middle area of each sheet). Screws offer better holding power and won’t pop up over time like nails sometimes do.
If you’re planning to use your shed as a workshop or hobby space, consider adding a layer of tongue-and-groove flooring over your OSB or plywood base. It creates a finished look and provides extra durability where you’ll be moving equipment or spending significant time. Whatever you choose, your insulated, properly floored shed will serve you reliably for years to come.
Common Mistakes That Waste Your Time and Money
Even well-intentioned DIYers can stumble when insulating their shed floors. Let’s look at the most common mistakes so you can avoid them from the start.
The biggest error? Skipping the vapor barrier entirely. Many people assume insulation alone will do the job, but without proper moisture protection, you’ll end up with damp, compressed insulation that loses its effectiveness fast. Always install a vapor barrier on the warm side of your insulation, and consider preventing moisture problems with a ground-level barrier too if your shed sits close to soil.
Leaving air gaps around insulation is another time-waster. Those spaces let cold air circulate freely, essentially creating thermal bridges that undo your hard work. Take time to cut insulation precisely and fill every nook with spray foam or caulk.
Choosing the wrong R-value for your climate means you’re either overspending or under-protecting. A shed in Florida needs different insulation than one in Minnesota. Check your local climate zone and match your R-value accordingly. Most moderate climates do well with R-13 to R-19 for floors.
Finally, many folks seal everything so tightly they create condensation issues. Your shed still needs some ventilation to let moisture escape. Install small vents near the roofline while keeping the floor insulation snug. This balance keeps your shed dry, comfortable, and energy-efficient year-round.
What About Existing Sheds? Your Retrofit Options
Good news—you absolutely can insulate an existing shed floor! The approach depends on your foundation type and how much effort you’re willing to invest.
For sheds on wooden joists, insulating from below is ideal if you have access underneath. Simply fit rigid foam boards or fiberglass batts between the joists, securing them with wire mesh or wooden straps. If crawling underneath sounds miserable (we understand!), you can insulate from above by laying rigid foam insulation directly on your existing floor, then adding a new plywood layer on top. You’ll lose a few inches of headroom, but it’s far easier.
Concrete slab foundations require a top-down approach. Lay a vapor barrier over the concrete, add rigid foam insulation boards, then install a subfloor of plywood before your final flooring. This method works beautifully for temperature control.
Gravel or dirt floors benefit from a moisture barrier first, followed by pressure-treated sleepers, insulation between them, and plywood decking. Think of it as building a proper floor from scratch.
The key is addressing moisture before anything else—proper ventilation and vapor barriers prevent future headaches. For comprehensive guidance on DIY shed insulation projects, start with manageable sections and work your way up to larger retrofits.
Insulating your shed floor is one of the smartest improvements you can make, transforming your space into a comfortable, year-round workspace or storage area. Whether you’ve chosen rigid foam for maximum R-value, reflective insulation for moisture control, or spray foam for those tricky gaps, you’re investing in protection that pays dividends through reduced condensation, warmer floors, and better overall climate control. The beauty of floor insulation is how it works hand-in-hand with other shed enhancements like proper ventilation, quality doors, and weatherproofing to create a truly functional space. Don’t let an uninsulated floor undermine all your hard work. Take stock of your shed’s specific needs, your budget, and your DIY comfort level, then choose the approach that fits best. Remember, even a basic insulation upgrade beats leaving your floor bare. At Storage Sheds Outlet, we understand that a great shed starts with the foundation up, and we’re here to help you create a space that truly works for your lifestyle.