
How to Build Rock-Solid Shed Foundations on Sloped Ground (That Won’t Sink)
Building a shed on a slope demands careful foundation planning to ensure long-term stability and durability. Selecting the right best foundation options becomes even more critical when dealing with uneven terrain. A properly engineered foundation not only prevents structural issues but also manages water runoff effectively, protecting your investment for years to come.
Level severely sloped ground using cut-and-fill techniques, retaining walls, or terracing before attempting any foundation work. On gentle slopes, pier blocks with adjustable post supports offer a cost-effective solution while maintaining proper drainage. For steeper inclines, concrete footings or a full concrete slab with integrated drainage systems provide maximum stability.
Consider your specific site conditions: soil type, slope percentage, and local building codes all play crucial roles in foundation selection. While gravel pad foundations work well for moderate slopes under 4%, anything steeper typically requires engineered solutions to prevent shifting and settling. Professional assessment of your site’s unique challenges ensures a foundation that stands the test of time.
Understanding Your Slope
Measuring Slope Grade
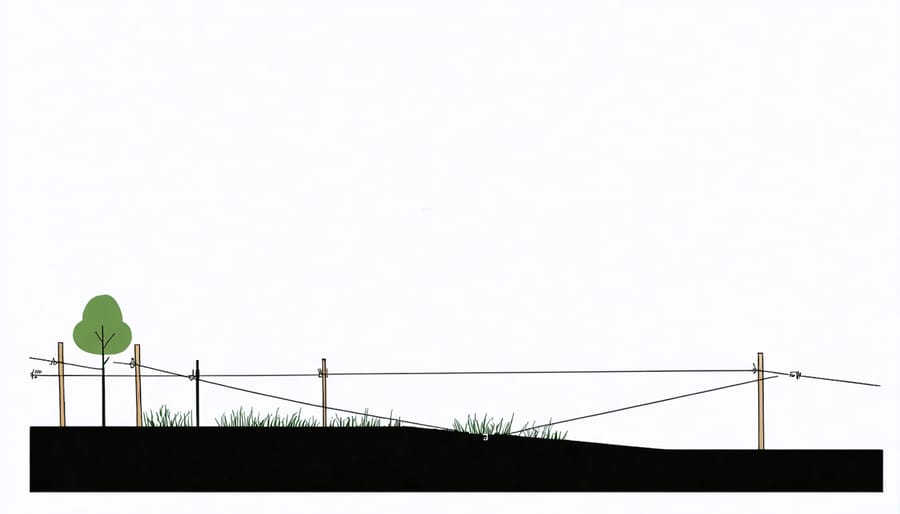
Before starting your shed foundation project, you’ll need to accurately measure your slope’s grade. The simplest method uses two stakes, a string level, and a tape measure. Place one stake at the highest point of your planned shed location and another at the lowest point. Tie a string between them and use the level to ensure it’s perfectly horizontal.
Measure the vertical distance from the string to the ground at the lower stake – this is your rise. Then measure the horizontal distance between stakes – this is your run. To calculate the slope percentage, divide the rise by the run and multiply by 100. For example, if your rise is 2 feet and your run is 20 feet, your slope grade is 10%.
For quick assessments, you can also use a slope finder app on your smartphone, though these should be double-checked with manual measurements for accuracy. If your slope exceeds 15%, consider consulting a professional, as steeper grades require more complex foundation solutions and may need additional reinforcement or terracing.
Remember that proper slope measurement is crucial for planning your drainage system and choosing the right foundation type for your shed.
Soil Assessment
Before laying any foundation, it’s crucial to understand what you’re building on. Start by digging a few test holes around your planned shed location to examine the soil composition. Good soil should be firm and well-draining – if it feels loose or sandy, you might need additional reinforcement.
Look for signs of erosion or water damage in the surrounding area. If you spot channels where water regularly flows or areas where soil has washed away, these indicate drainage issues that need addressing. Clay-heavy soil can be particularly challenging as it expands when wet and contracts when dry, potentially destabilizing your foundation over time.
Consider conducting a simple percolation test: dig a 12-inch hole, fill it with water, and see how quickly it drains. If water sits for more than 24 hours, you’ll need to incorporate additional drainage solutions into your foundation plan. For slopes with questionable soil stability, it’s worth consulting a local contractor or soil expert – they can provide specific recommendations based on your property’s unique conditions.
Remember, investing time in proper soil assessment can save you from costly foundation repairs down the road.
Best Foundation Options for Sloped Ground
Concrete Pier Foundation
Concrete pier foundations offer an excellent solution for building sheds on sloped terrain, combining stability with adaptability. These adjustable supports consist of concrete footings with metal post brackets that can be set at different heights to create a level surface across uneven ground.
The beauty of pier foundations lies in their versatility. Each pier can be adjusted independently, allowing you to compensate for varying ground heights without extensive excavation or terracing. You’ll typically want to place piers at each corner of your shed and at regular intervals along the perimeter and center, usually every 4-6 feet depending on your shed’s size and weight.
Installation begins with marking your pier locations and digging holes below the frost line. Pour concrete into tube forms, insert J-bolts for the post brackets, and ensure everything is perfectly plumb. Once the concrete cures, attach the adjustable post brackets and supports. The brackets typically allow for several inches of height adjustment, making it easy to achieve a perfectly level foundation even on significantly sloped ground.
One significant advantage of pier foundations is their excellent drainage capabilities. The open space beneath your shed allows water to flow naturally downhill, preventing moisture buildup that could damage your structure. Additionally, this design makes it easier to inspect for pest activity and perform any necessary maintenance underneath your shed.
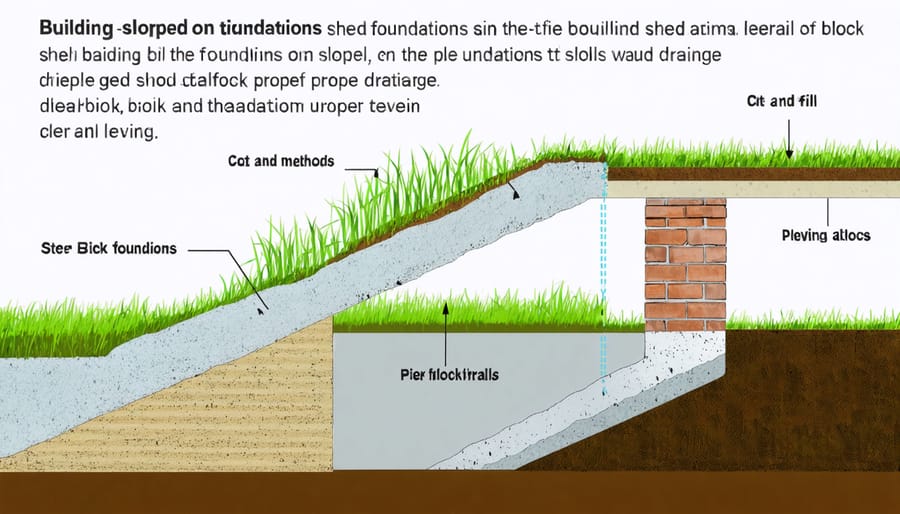
On-Grade Block Foundation
For moderate slopes, an on-grade block foundation offers a sturdy and cost-effective solution for your shed. This method uses concrete blocks to create a level surface while accommodating the natural slope of your terrain. Start by excavating the high side of your slope and creating a level trench that follows the ground’s natural descent. Place solid concrete blocks along this path, ensuring each one is perfectly level both horizontally and vertically.
As you work down the slope, you’ll need to stack additional blocks to maintain a level surface. Each course should be carefully aligned and checked with a level. For added stability, fill the blocks’ hollow cores with concrete and rebar, especially for steeper grades or larger sheds. Don’t forget to add gravel beneath the blocks for proper drainage and frost protection.
The spaces between block columns should be filled with gravel up to the final grade level. This helps prevent erosion and ensures proper water drainage away from your shed. For extra security, consider using construction adhesive between block layers and installing metal tie-downs to anchor your shed to the foundation.
Remember to check local building codes, as some areas may require specific block sizes or installation methods. While this foundation type requires more initial work than simple ground-level options, it provides excellent stability and can last for decades when properly installed.
Gravel Pad with Retaining Wall
A gravel pad with retaining wall offers an excellent foundation solution for sloped terrain, combining stability with effective water management. This approach starts with excavating the slope to create a level surface, followed by installing a sturdy retaining wall on the downhill side to hold back the soil.
Begin by marking your shed’s footprint, adding an extra 12 inches on all sides for proper drainage. The retaining wall should be constructed using pressure-treated lumber, concrete blocks, or natural stone, depending on your aesthetic preference and local building codes. For slopes greater than 2 feet, consider consulting a professional to ensure proper wall engineering.
Once the retaining wall is in place, lay a commercial-grade weed barrier and add a 4-inch layer of crushed stone or gravel. Use angular gravel rather than round stones, as it compacts better and provides superior stability. Grade the gravel pad with a slight slope (about 1 inch per 8 feet) away from where the shed will sit to ensure proper drainage.
For added stability, consider installing drain tiles behind the retaining wall and along the uphill side of the pad. This helps channel water away from your shed’s foundation, preventing potential water damage and soil erosion. Remember to compact each layer of gravel thoroughly using a plate compactor for optimal results.
Regular maintenance of both the gravel pad and retaining wall will ensure your shed stays level and secure for years to come.
Post and Beam Foundation
For steeper slopes, a post and beam foundation offers an excellent solution that combines stability with practicality. This elevated design uses vertical posts anchored into concrete footings, supporting horizontal beams that create a level platform for your shed. When selecting foundation materials for stability, pressure-treated lumber is essential for both posts and beams to prevent rot and insect damage.
Start by marking your post locations and digging holes below the frost line, typically 2-3 feet deep. Install concrete footings in each hole, making sure they’re level despite the slope. The posts should be secured using post anchors or by setting them directly in concrete. Remember to add gravel at the bottom of each hole for drainage.
The horizontal beams connect these posts, creating a framework that will support your shed floor. Use proper joist hangers and hardware rated for outdoor use to ensure lasting durability. The beauty of this system is that it allows you to create a perfectly level surface regardless of the slope’s severity, while also providing excellent airflow underneath the structure.
For slopes greater than 15 degrees, consider adding diagonal bracing between posts for additional stability. This extra reinforcement helps your shed withstand strong winds and prevents any potential shifting over time. Always check local building codes, as some areas have specific requirements for elevated structures.
Essential Construction Tips
Drainage Solutions
When building a shed on a slope, implementing proper drainage solutions is crucial for maintaining your structure’s integrity and preventing water damage. Start by installing a French drain system around the uphill side of your shed to intercept and redirect water flow. This involves digging a trench filled with gravel and perforated pipe that guides water away from your foundation.
Consider adding gutters and downspouts to your shed’s roof to manage rainwater effectively. Direct these downspouts away from the foundation, ideally extending them at least 4-6 feet downslope. For added protection, create a slight grade around your shed that slopes away from the foundation at a rate of about 1 inch per foot.
Installing a layer of crushed stone or gravel around the perimeter of your shed creates a buffer zone that helps prevent soil erosion and allows water to drain more efficiently. This material should extend about 12 inches beyond your shed’s drip line.
For particularly challenging slopes, consider incorporating drainage swales – shallow, sloped channels that direct water around your shed. These can be attractively landscaped with water-loving plants to create a natural-looking solution that’s both functional and appealing.
Remember to regularly maintain your drainage system by clearing debris from gutters, checking for proper water flow, and ensuring drain pipes remain unclogged. This ongoing maintenance will help protect your investment and keep your shed stable for years to come.

Leveling Techniques
Achieving a perfectly level foundation on sloped ground requires careful planning and precise execution. Start by using a laser level or traditional bubble level to determine the slope’s grade and identify the highest point of your building area. This becomes your reference point for the entire project.
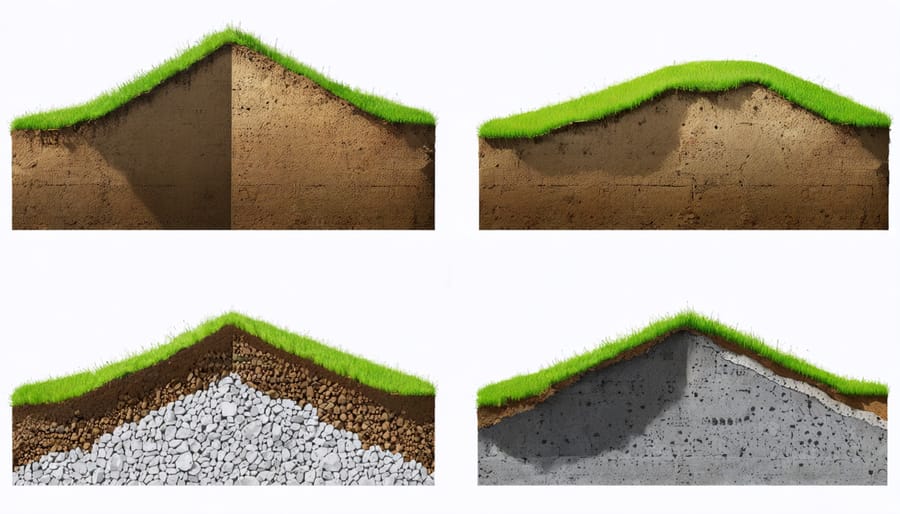
For gentle slopes, cut-and-fill grading can create a level surface. Remove soil from the higher end and use it to build up the lower end, but always compact the filled area thoroughly to prevent settling. On steeper inclines, terracing the ground in steps offers a stable solution, with each level properly compacted before moving forward.
When working with concrete blocks or piers, adjust their heights to compensate for the slope. Use pressure-treated lumber shims between the blocks and beam to achieve perfect level, but never exceed 2 inches of shimming to maintain stability. For gravel pad foundations, create a retaining border on the lower end to prevent material from washing away over time.
Consider using adjustable post bases or foundation blocks with built-in leveling mechanisms. These modern solutions allow for fine-tuning even after installation and can accommodate ground movement over time. Whatever method you choose, always verify your measurements with a level in multiple directions and diagonal spans.
For optimal results, work in smaller sections rather than trying to level the entire area at once. This approach allows for more precise adjustments and helps ensure consistency across the foundation. Remember to check your work frequently during the leveling process, as small errors can compound into larger issues as you progress.
Building a shed on a slope doesn’t have to be an overwhelming challenge. With the right foundation choice and proper preparation, you can create a stable, long-lasting structure that serves your storage needs while complementing your property. Remember that successful installation starts with a thorough site assessment, including slope measurement and soil testing. Whether you choose concrete piers, post foundations, or a gravel pad, ensuring proper drainage and leveling is crucial for your shed’s longevity.
Take time to consider your specific needs, budget, and local building regulations before starting your project. While some foundation options might seem more cost-effective initially, investing in quality materials and proper installation techniques will save you money and headaches in the long run. Don’t hesitate to consult with local professionals if you’re unsure about any aspect of the foundation installation.
For the best results, focus on creating a level surface, implementing proper drainage solutions, and using appropriate materials for your climate. Regular maintenance checks will help identify and address any potential issues before they become major problems. By following the guidelines and tips we’ve discussed, you’ll be well-equipped to build a secure foundation for your shed, even on challenging sloped terrain.
Remember, a well-built foundation is an investment in your property’s value and your shed’s functionality for years to come.