
Keep Your Epoxy Shed Looking New: Simple UV Protection That Actually Works

Apply a UV-resistant topcoat over your epoxy resin surfaces to prevent yellowing, cracking, and deterioration caused by sun exposure. Just like you need to protect your shed from weather damage, your epoxy surfaces require a reliable shield against harmful ultraviolet rays. Modern UV-protective solutions offer up to 10 years of protection while maintaining the crystal-clear finish that makes epoxy so appealing. Whether you’re protecting an outdoor table, garage floor, or decorative coating, proper UV protection transforms your epoxy project from a temporary solution into a lasting investment. Choosing the right UV protection doesn’t just preserve appearance—it prevents structural breakdown, maintains surface integrity, and extends the life of your epoxy application by years. Understanding your UV protection options and applying them correctly makes the difference between a surface that deteriorates within months and one that stays beautiful for a decade.\n\n\n
Why UV Rays Are Your Shed’s Worst Enemy
\n\n
Signs of UV Damage on Epoxy Surfaces
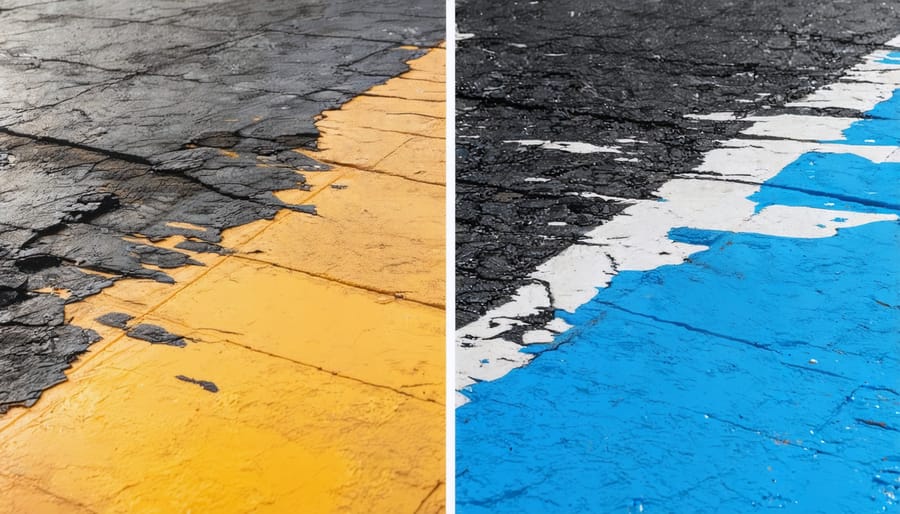
\n\nRecognizing UV damage on your epoxy surfaces early can help you take action before the problems become severe. The most common and noticeable sign is yellowing, where your once-clear or vibrantly colored epoxy coating takes on a distinctly amber or yellow tint. This discoloration is particularly visible on lighter surfaces and can significantly impact the aesthetic appeal of your space.\n\nAnother telltale indicator is chalking, where the surface becomes powdery to the touch. This happens when UV rays break down the epoxy’s chemical bonds, causing the surface to deteriorate. You might notice this chalky residue coming off on your hands or clothes when you touch the affected area.\n\nSurface degradation can also manifest as small cracks, peeling, or a loss of glossiness. These issues not only affect appearance but can compromise the protective qualities of your epoxy coating. If you’re concerned about maintaining your surfaces, consider exploring options for UV protection for shed floors and other epoxy-coated areas to prevent these common problems from developing.\n\n
 \n
\n\n\n\n
Effective UV Protection Methods for Epoxy Resin
\n\n
 \n
\n\n\n
UV-Resistant Top Coats
\n\nAdding a UV-resistant top coat is one of the most effective weather-resistant coating solutions for protecting your epoxy resin projects. Clear polyurethane coatings offer excellent UV protection while maintaining the beautiful clarity of your epoxy finish. These coatings create a protective barrier that prevents yellowing and degradation from sun exposure.\n\nTwo-component polyurethane coatings provide superior durability and are ideal for outdoor applications. They form a hard, crystal-clear layer that resists scratches while blocking harmful UV rays. For indoor projects that occasionally receive sunlight through windows, single-component polyurethane offers adequate protection and easier application.\n\nAcrylic-based UV coatings are another popular option, especially for DIY enthusiasts. They’re more affordable and easier to apply than polyurethane, though they may need more frequent reapplication. Some newer water-based formulations offer excellent UV protection while being eco-friendly and low in VOCs.\n\nRemember to apply thin, even coats and allow proper curing time between layers for the best results. Most top coats require 2-3 layers for optimal protection.\n\n
UV Inhibitor Additives
\n\nUV inhibitor additives are your first line of defense against sun damage in epoxy projects. These special additives work by absorbing harmful UV rays before they can break down your epoxy’s chemical structure. The most common UV stabilizers include HALS (Hindered Amine Light Stabilizers) and UV absorbers, which can be mixed directly into your epoxy before application.\n\nTo incorporate these additives effectively, start by carefully measuring the recommended amount – typically 1-3% of your total epoxy mixture. Mix the stabilizer thoroughly into your resin component before adding the hardener to ensure even distribution. Some manufacturers offer pre-mixed UV-resistant epoxy systems, which can save you the extra mixing step while providing reliable protection.\n\nRemember that different brands and types of UV inhibitors may have specific mixing ratios and compatibility requirements. Always check the manufacturer’s guidelines and perform a small test patch before treating your entire project. While these additives may slightly increase your project’s cost, they’re a worthwhile investment that can extend your epoxy’s lifespan by several years while maintaining its clarity and preventing yellowing.\n\n\n
DIY Application Tips
\n\n
Surface Preparation
\n\nBefore applying UV protection, ensure your epoxy surface is clean and free from any dust, dirt, or debris. Start by wiping down the surface with a microfiber cloth and mild soap solution. For stubborn stains or residue, use a gentle, non-abrasive cleaner specifically designed for epoxy surfaces. Once clean, let the surface dry completely.\n\nIf your epoxy surface has any scratches or minor imperfections, lightly sand these areas with fine-grit sandpaper (220-grit or higher). After sanding, remove all dust with a tack cloth. For optimal results, maintain a room temperature between 65-75°F (18-24°C) with moderate humidity levels during preparation and coating application.\n\nInspect the surface carefully for any signs of previous UV damage, such as yellowing or cloudiness, as these areas may need special attention or repair before applying protection.\n\n
 \n
\n\n\n\nProtecting your epoxy resin projects from UV damage doesn’t have to be complicated, but it is essential for maintaining their beauty and durability over time. By implementing the protective measures we’ve discussed, you can significantly extend the life of your epoxy surfaces and prevent yellowing, cracking, and degradation. Remember to regularly inspect your epoxy-coated items for early signs of UV damage, and don’t hesitate to apply additional protection if needed.\n\nWhether you choose UV-resistant epoxy formulations, protective coatings, or physical barriers, the key is to act proactively rather than waiting for damage to occur. For outdoor projects especially, combining multiple protection methods often yields the best results. Consider your specific environment and exposure levels when selecting your protection strategy.\n\nTake action today to protect your epoxy investments. Start by assessing your current projects and implementing appropriate UV protection measures. With proper care and protection, your epoxy resin creations can maintain their stunning appearance and structural integrity for years to come.