
Plan Your Perfect 6×10 Shed Before You Build (Digital Tools That Save Time and Money)
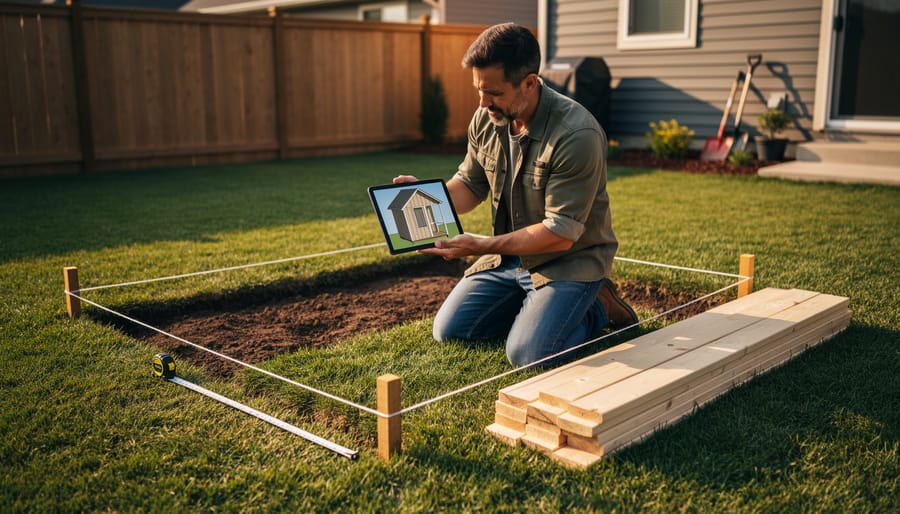
Start by measuring your available yard space and confirming local zoning requirements, as many municipalities allow sheds under 120 square feet without permits—making a 60-square-foot 6×10 shed an ideal choice for homeowners wanting to avoid red tape. Download free digital plans from reputable shed builders or home improvement sites to visualize exactly how much storage capacity you’ll gain: typically enough room for lawn equipment, seasonal decorations, and garden tools with comfortable walking space down the center.
Calculate your material costs upfront using your chosen plans, knowing that a basic 6×10 shed typically requires 8-12 sheets of plywood, 20-25 2×4 studs, and roofing materials running between $800-1,500 for DIY builds. Sketch your interior layout before construction begins, designating specific zones for different items—this planning step prevents the common mistake of building a shed only to realize your mower won’t fit alongside your workbench.
Consider whether building from scratch matches your skill level and available time. Many homeowners discover that 40-60 hours of labor, plus the learning curve for proper foundation work and roofing, makes pre-built or professional installation surprisingly cost-effective. Whether you’re a confident DIYer ready to tackle weekend construction or someone who’d rather have experts handle the heavy lifting, understanding what a 6×10 footprint truly offers helps you make the smartest investment for your property and budget.
Why Digital Planning Beats Paper Sketches Every Time
Planning your 6×10 shed on paper might feel traditional, but switching to digital tools can save you time, money, and plenty of headaches. Here’s why going digital makes all the difference.
When you sketch on paper, you’re constantly erasing, redrawing, and second-guessing your measurements. Digital planning software gives you instant, precise dimensions with just a few clicks. No more worrying whether that door will actually fit or if you’ve left enough clearance for your lawnmower. The measurements are right there, accurate and adjustable in real-time.
One of the biggest game-changers is 3D visualization. Instead of staring at flat drawings and trying to imagine how everything will look, you can actually see your shed from every angle. Walk through it virtually, check sight lines, and get a real sense of the space before you cut a single board. Sarah from Minnesota told us she redesigned her entire shed layout after seeing it in 3D and realizing her original door placement would block her workbench access.
Testing different configurations becomes effortless with digital tools. Want to see if shelving works better on the left wall or the right? Curious whether double doors make more sense than a single entry? You can experiment with dozens of layouts in an afternoon, something that would take weeks with paper sketches.
The cost savings alone justify the switch. Every mistake caught digitally is money saved on materials, cuts, and do-overs. When you can spot problems before they happen, you’re protecting your budget and your sanity.
Most digital planning tools are either free or very affordable, and many come with tutorials that make them accessible even if you’re not tech-savvy. The learning curve is gentle, and the payoff is huge. You’ll approach your project with confidence, knowing exactly what you’re building and how it all fits together before you ever pick up a hammer.
Understanding Your 6×10 Space: What Actually Fits
When you hear “6×10 shed,” it’s easy to picture 60 square feet and assume you’ll have tons of room. The reality? Your actual usable space is a bit different once you account for wall thickness, door swing, and movement space. Think of it more like a walk-in closet rather than a spare room.
Here’s what genuinely fits: A typical riding lawn mower takes up about 6 feet of length, leaving you 4 feet behind it for garden tools, gas cans, and seasonal items. If you’re wondering what size shed works best for larger equipment, a 6×10 can accommodate one major piece plus supporting gear.
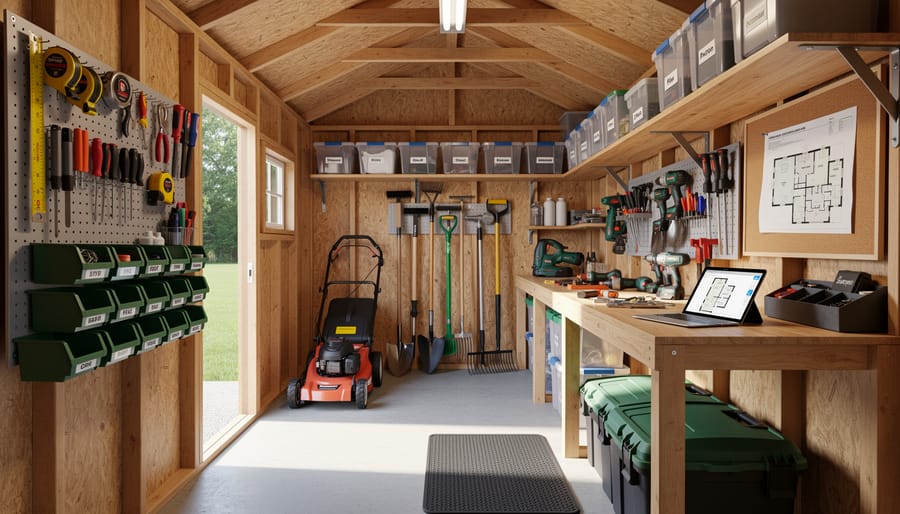
Many homeowners successfully store two to three bicycles hung vertically on one wall, a workbench along another (about 2 feet deep), and still have floor space for a push mower and wheelbarrow. One customer shared that her 6×10 comfortably holds all her gardening supplies, pool chemicals, outdoor cushions during winter, and a small potting station.
For those focused on workshop space rather than equipment storage, you can fit a compact workbench, pegboard tool organization, and a small shelving unit while maintaining comfortable workspace. The key is thinking vertically and keeping pathways clear.
The 6×10 footprint won’t replace your garage, but it solves specific problems beautifully. It’s perfect for decluttering your garage enough to actually park inside, housing all your lawn care essentials in one spot, or creating a dedicated hobby space. Learning how to organize a shed efficiently makes this modest footprint surprisingly capable for most homeowners’ needs.
Free and Paid Digital Tools for Shed Layout Planning
Mobile Apps That Work on Your Phone
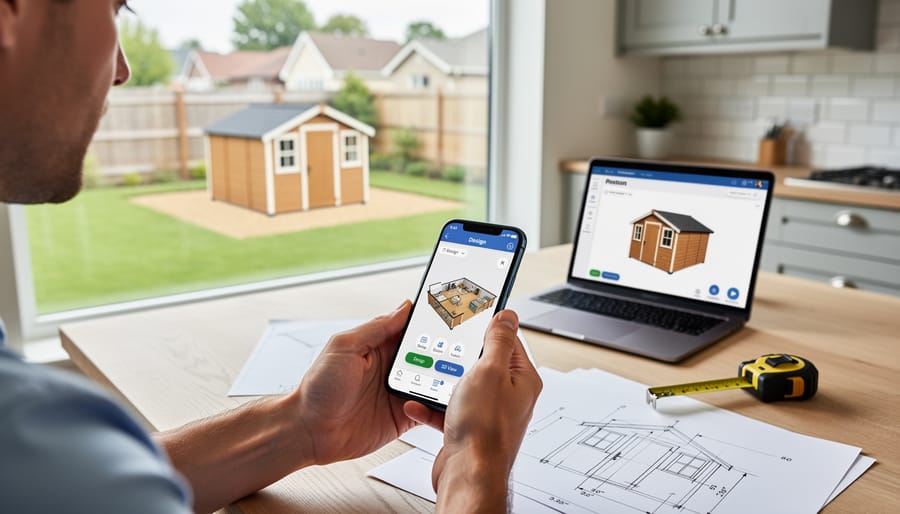
If you prefer sketching ideas right on your phone while standing in your backyard, several user-friendly apps make planning your 6×10 shed incredibly simple. MagicPlan is perfect for beginners who want to measure their space accurately—just point your phone camera at the ground, and it creates a floor plan automatically. No tape measure fumbling required! For actually designing your shed layout, SketchUp for iPad offers an intuitive interface where you can drag and drop walls, doors, and windows to see exactly how your 6×10 space will look.
Home Outside is another great choice that lets you visualize how your shed will appear in your actual yard using augmented reality. Simply point your camera at your property, place a virtual shed, and walk around it to check sightlines and placement. One homeowner shared that using this app helped her realize her planned location would block her garden view—saving her from a costly mistake!
For organizing your actual building materials and cut lists, Shed Builder Calculator does the math for you, calculating lumber needs based on your 6×10 dimensions. These apps work together beautifully, taking you from initial concept through to your shopping list, all from the convenience of your smartphone.
Online Planning Software (No Download Required)
If you prefer not to clutter your device with downloads, browser-based planning tools are your best bet. These online platforms let you design your 6×10 shed right from your web browser, offering impressive features without taking up storage space on your computer.
Tools like SketchUp Free and Floorplanner provide intuitive drag-and-drop interfaces where you can map out your shed’s interior layout, experiment with shelving configurations, and even visualize how your storage items will fit. Many homeowners love these tools because they’re accessible from any device—start planning on your laptop at home, then review on your tablet while shopping for materials.
Jessica from Portland shared her experience: “I used a free online planner to figure out exactly where my gardening tools and lawn equipment would go in my 6×10 shed. Being able to see everything laid out digitally saved me from buying the wrong shelving units.”
Most browser-based tools offer measurement features, 3D views, and the ability to save multiple design versions. This is particularly helpful when you’re trying to decide between different door placements or window locations. The best part? You can easily share your plans with family members or contractors by simply sending them a link.
When to Consider Professional CAD Software
For most backyard shed projects, free or basic design tools work wonderfully. But there are situations where investing time to learn professional CAD software—or hiring someone who knows it—makes practical sense.
If you’re planning extensive electrical work, professional software helps you map out precise wiring paths, outlet placements, and circuit loads safely. One homeowner shared that using CAD prevented a costly mistake when converting their 6×10 shed into a workshop-office combo, catching a ventilation issue before construction began.
Complex multi-purpose designs also benefit from advanced tools. Maybe you’re dividing your shed into a potting station plus tool storage, or adding a loft area. Professional software lets you visualize how each zone functions together and ensures adequate headroom and accessibility.
Similarly, if you’re incorporating custom features like built-in workbenches, fold-down tables, or specialized storage systems, CAD’s precision helps avoid the “measure twice, cut once” problem by letting you measure digitally first.
The learning curve exists, but free trials of programs like SketchUp Pro or AutoCAD LT let you test before committing. For complicated projects, the upfront investment often saves money by preventing construction errors and material waste down the road.
The Five-Step Digital Planning Process That Works
Step 1: Measure and Map Your Property
Before diving into digital planning tools, grab a measuring tape and spend 20 minutes getting to know your yard. Start by measuring the total dimensions of your property, then locate any existing structures like fences, gardens, or utility boxes. This step prevents the common mistake of finding the perfect spot online, only to discover it conflicts with your sprinkler system or property line.
Next, check your local setback requirements. Most municipalities require sheds to sit at least 3-5 feet from property lines, but regulations vary. A quick call to your building department or visit to their website can save you headaches later. As homeowner Maria from Ohio shared, “I almost planned my 6×10 shed too close to my fence. One phone call changed my entire layout!”
Once you have these measurements, input them into free tools like SketchUp or even graph paper. Mark obstacles, sun exposure patterns, and access points. This visual map becomes your planning foundation, helping you identify practical placement options before committing to your 6×10 shed project.
Step 2: Design Your Shed’s External Structure
Your shed’s exterior choices make a big difference in how well it serves you. Start by selecting a roof style—gable roofs are popular for their classic look and excellent drainage, while gambrel roofs maximize interior headroom if you plan to store taller items. Next, think strategically about door placement. Positioning doors on the longer 10-foot side provides easier access for larger equipment like mowers or bikes, while a 6-foot side door works great for quick grab-and-go storage.
Window placement isn’t just aesthetic. A well-positioned window reduces the need for electricity during daytime use and helps with ventilation, preventing that musty storage smell many homeowners struggle with. Before finalizing your design, check local building codes regarding setback requirements, door swing direction, and window specifications. Many DIY builders skip this step and end up redoing work later. One homeowner shared that moving her door location before construction saved her from backing into tight corners daily—small planning decisions create lasting convenience.
Step 3: Plan Your Interior Layout Digitally
Before you hammer a single nail, take advantage of free digital planning tools to maximize your 6×10 space. Online shed planners and simple grid paper apps let you experiment with different configurations without the commitment. Start by mapping out essential zones: will you need a potting bench along one wall, vertical shelving on another, or floor space for lawn equipment?
Many homeowners find success using smartphone apps like MagicPlan or SketchUp Free to visualize their layout in 3D. Drop in digital versions of shelving units, workbenches, and storage bins to see what actually fits. This prevents the common mistake of buying furniture that crowds your space. Consider traffic flow too—you’ll want at least two feet of clearance to move comfortably.
Pro tip: Screenshot your favorite layouts and share them with family members who’ll use the shed. Sarah, a weekend gardener from Ohio, says digital planning helped her create an organized storage system that accommodates both her tools and her husband’s fishing gear without daily negotiations.
Step 4: Test Different Storage Scenarios
Here’s where digital planning really shines! Before committing to a final design, experiment with different storage configurations in your 6×10 space. Try placing shelving units along one wall versus both sides. Test how different workbench sizes impact floor space. Move your virtual lawnmower and garden tools around to see what arrangement feels most efficient.
Many homeowners discover surprising solutions during this phase. For instance, you might find that corner shelving opens up more central floor space than traditional wall units. Or perhaps vertical bike hooks free up room for bulkier items below. The beauty of digital planning is the freedom to test countless scenarios without lifting a single board.
Sarah from Ohio shared how she tested five different layouts before finding the perfect setup: “I realized I could maximize storage space by switching from horizontal to vertical storage, which completely changed my shed’s functionality.”
Take your time with this step. The more configurations you explore now, the more confident you’ll feel when building begins.
Step 5: Generate Your Final Plans and Shopping List
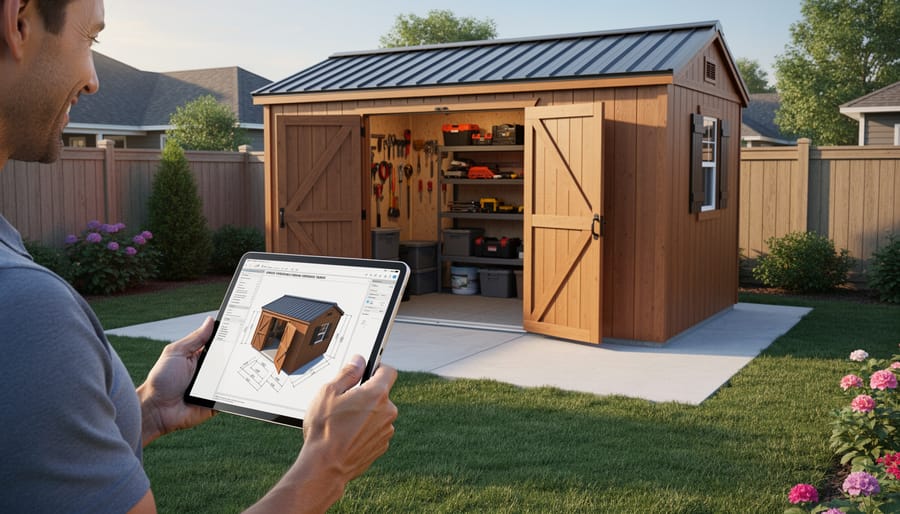
Once you’ve finalized your 6×10 shed design, it’s time to turn your digital plan into actionable next steps. Export your measurements and floor plan from your design software, whether it’s a screenshot or a PDF, so you can reference them easily at the hardware store or when consulting with contractors.
Next, create a detailed materials list based on your plan. Include lumber dimensions, roofing materials, fasteners, and any specialty items like windows or shelving brackets. Don’t forget the foundation materials, whether you’re using concrete blocks, gravel, or a wooden base. Most planning apps can generate this list automatically, but double-check quantities and add 10 percent extra for waste and mistakes.
If you’re building from scratch, organize your list by project phase: foundation first, then framing, then exterior and finishing touches. This helps you budget effectively and purchase materials in stages. For those who’d rather skip the construction hassle, use your measurements and wish list to compare ready-made options that match your vision. Having clear plans makes conversations with suppliers or shed companies much more productive and ensures you get exactly what you need.
Real Homeowners Share Their 6×10 Shed Planning Wins
Sarah from Portland thought she could eyeball her 6×10 shed placement, but after using a free online planning tool, she discovered her initial spot would violate the setback requirements by two feet. “I almost started digging without checking our city’s regulations,” she shares. “The digital planner let me measure from our property line and showed me exactly where the shed could legally go. That five-minute planning session saved me from having to relocate an entire foundation or face fines from the city.”
Mike and Jennifer in Austin had a different challenge: maximizing every inch of their compact 6×10 space for lawn equipment and holiday decorations. Using a simple sketch app on their tablet, they mapped out exactly where their riding mower, trimmer, and storage bins would fit before construction began. “We realized we needed to install shelving on the left wall only and keep the right side open for the mower,” Jennifer explains. “Without that visual plan, we probably would have added shelves everywhere and then struggled to get our equipment in and out.”
Tom from Michigan credits his digital planning with catching a drainage issue before it became expensive. While using satellite imagery to plan his shed location, he noticed his yard’s natural slope would direct rainwater right under his proposed shed floor. “I moved the location 12 feet south and added a small drainage channel,” he says. “My neighbor who didn’t plan ahead ended up with a constantly damp shed floor and had to install a French drain after the fact, which cost him three times what my prevention did.”
These homeowners prove that spending time with planning tools upfront pays off in avoided headaches, saved money, and sheds that actually work for their needs.
Common Planning Mistakes to Avoid (Even With Digital Tools)
Even with the best digital planning tools at your fingertips, it’s surprisingly easy to overlook critical details that can haunt your shed project later. One of the most common mistakes? Forgetting about door swing clearance. Many homeowners design the perfect interior layout only to realize their door opens right into their workbench or storage shelves. Always plan for at least 3 feet of clearance in your door’s swing path.
Another frequent oversight is ignoring local building codes and HOA regulations. Your gorgeous 6×10 shed plan might require a permit, specific setback distances from property lines, or height restrictions. Check with your local building department before finalizing any plans – it’s much easier to adjust digital plans than to relocate a finished shed.
Don’t fall into the trap of planning only for today’s needs. Sarah, a homeowner from Michigan, shared her experience: “I planned my shed perfectly for gardening tools, but six months later, I wanted space for lawn equipment too. Now it’s cramped.” Build in extra space or flexible storage solutions from the start.
Underestimating lighting needs is another planning pitfall. That well-organized tool wall won’t help much if you can’t see what you’re reaching for. Plan for adequate natural light through windows or skylights, plus electrical outlets for task lighting. This becomes especially important if you’re storing items that need proper ventilation to keep tools from rusting.
Finally, many people forget to plan pathways around the shed for maintenance access. Leave enough room to reach all sides for cleaning gutters, repainting, or inspecting the foundation.
Taking the time to plan your 6×10 shed digitally before breaking ground or making a purchase is one of the smartest investments you can make in your project. You’ll avoid costly mistakes, ensure the space truly fits your needs, and feel confident moving forward with your vision. Whether you’re using free online tools, sketching layouts on paper, or experimenting with 3D planning software, these preparation steps save both time and money down the road.
The beauty of a 6×10 shed is its versatility. As we’ve explored, this compact footprint can transform into a garden tool haven, a backyard workshop, a hobby studio, or even a cozy retreat space. By planning ahead, you’re ensuring every square foot works hard for you and your family.
Ready to get started? Grab a notebook or open your favorite planning app and begin listing what you’ll store or do in your shed. Measure your items, sketch some layouts, and play around with different configurations. The planning process itself often sparks creative solutions you hadn’t considered before.
Once you’ve completed your planning and have a clear picture of what you need, Storage Sheds Outlet is here to help bring your vision to life. We offer quality sheds in various sizes and styles, plus expert guidance to ensure you choose the perfect match for your carefully planned project. Your dream shed is closer than you think, so start planning today!