
Secure Your Shed Like a Pro: The Power of 3-Point Locking Systems
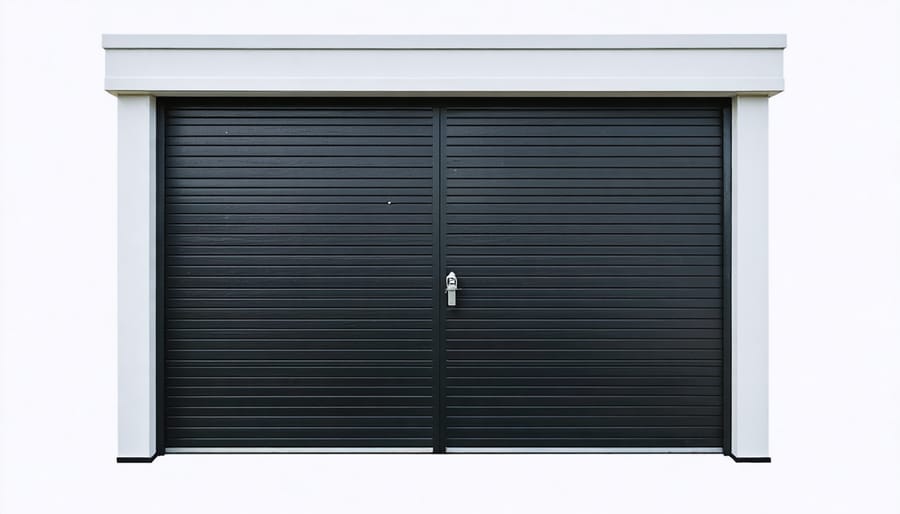
Transform your shed’s security with a 3-point locking system, the gold standard in protecting valuable tools and equipment. Unlike traditional single-point locks, these sophisticated mechanisms secure your door at three critical locations – top, middle, and bottom – creating an virtually impenetrable barrier against break-ins. When paired with secure shed door framing, these systems distribute locking pressure evenly across the entire door frame, preventing warping and ensuring smooth operation for years to come. Whether you’re storing expensive power tools or precious family heirlooms, a 3-point locking system offers peace of mind through professional-grade security that’s surprisingly simple to install and maintain.
What is a 3-Point Locking System?
Components and Mechanics
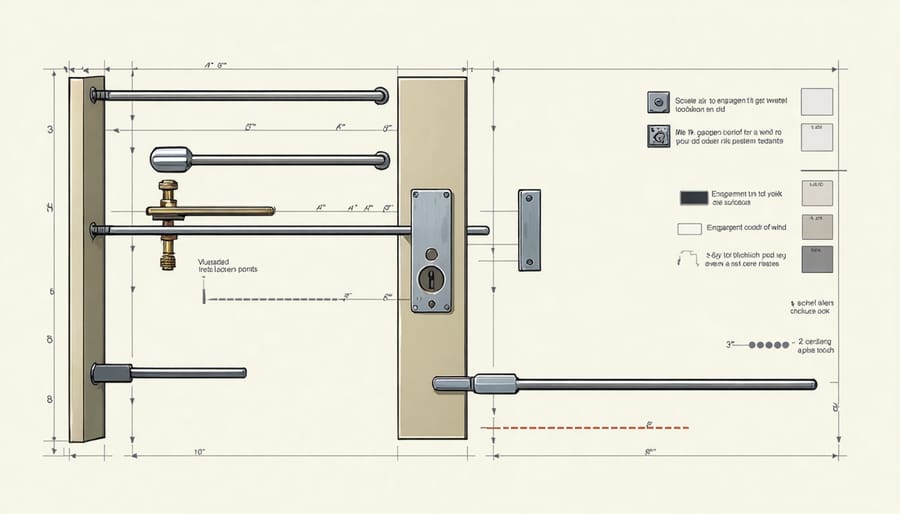
A 3-point shed door locking system consists of three main components working together to create a secure closure. The central locking mechanism, typically positioned at handle height, connects to two additional locking points at the top and bottom of the door through a series of steel rods or cables. When you turn the handle, these rods extend simultaneously, engaging with striker plates installed in the door frame.
The heart of the system is the main lock body, which houses the handle mechanism and lock cylinder. This central unit controls the movement of the connecting rods, which are usually made from durable steel and protected by guide channels. The top and bottom locking points feature sturdy hooks or bolts that catch securely in their respective striker plates.
What makes this system particularly effective is how the components work in unison. When you turn the handle, all three points engage or disengage at once, creating a tight, weather-resistant seal while providing superior security. The system’s design also helps prevent door warping and ensures smooth operation even with seasonal wood movement.
Security Benefits
A 3-point locking system provides exceptional security by engaging the door at multiple locations simultaneously. Unlike traditional single-point locks, this system secures the top, middle, and bottom of your door, making it virtually impossible for intruders to pry open any section. When combined with sturdy shed construction, these locks create a fortress-like barrier against theft and tampering. The multi-point engagement also prevents door warping and ensures consistent pressure distribution, which helps maintain the door’s structural integrity over time. This added layer of protection gives you peace of mind, knowing your valuable tools, equipment, and belongings are secure, whether you’re at home or away. The visible presence of a 3-point locking system often serves as a deterrent, making potential thieves think twice before attempting a break-in.
Installation Guide
Tools and Materials Needed
To install a 3-point shed door locking system, you’ll need both basic and specialized tools. Essential hand tools include a drill with various drill bits, a screwdriver set (both Phillips and flathead), measuring tape, pencil, and level. You’ll also need a utility knife, hammer, and adjustable wrench.
For precise installation, gather these materials:
– The complete 3-point locking system kit
– Mounting screws (typically included in kit)
– Door reinforcement plates
– Weather stripping
– Wood shims
– Safety equipment (work gloves, safety glasses)
– Marking gauge or ruler
– Center punch tool
– Wood putty (for filling old holes if replacing an existing system)
Having these tools and materials ready before starting will ensure a smooth installation process and help you achieve professional-looking results.
Installation Steps
Before starting the installation, ensure you have a level door frame and proper door hinge installation. This will make the locking system installation much smoother.
Begin by measuring and marking the center point of your door’s edge where the main lock will be installed. Position the lock body template and mark the spots for drilling. Using a drill with the appropriate bit size, carefully create holes for the lock mechanism and handle.
Next, install the central locking mechanism by inserting it through the pre-drilled holes. Secure it with the provided screws, making sure it’s perfectly aligned with your marks. Test the handle’s movement to ensure smooth operation before proceeding.
For the vertical rods, measure equal distances from the central lock to the top and bottom of the door. Mark these points and attach the rod guides using the included hardware. The rods should move freely within these guides when the handle is turned.
Install the strike plates at the top and bottom of the door frame where the rods will engage. These need to be perfectly aligned with the rod positions when the door is closed. Use a level to ensure accuracy, and pre-drill holes to prevent wood splitting.
Connect the vertical rods to the central mechanism, adjusting their length if necessary. When properly installed, turning the handle should smoothly engage all three locking points simultaneously. Make any needed adjustments to ensure the rods move freely and engage securely with their strike plates.
Finally, test the complete system several times, checking that the door closes and locks smoothly. If you encounter any resistance, double-check your measurements and alignments, making minor adjustments as needed. Remember to lubricate all moving parts before final assembly for optimal performance.
Maintenance and Troubleshooting
Regular Maintenance Tips
Regular maintenance is key to keeping your 3-point locking system operating smoothly for years to come. Start by lubricating all moving parts every three months using a silicone-based lubricant or dry graphite powder – avoid using WD-40 as it can attract dirt and cause buildup over time. Pay special attention to the locking points, handles, and cylinder mechanism.
Check and tighten all mounting screws and strike plates quarterly, as normal use can cause them to loosen gradually. Clean the locking points and strike plates with a soft cloth to remove any dirt or debris that might affect operation. If you notice any resistance when operating the handle, address it immediately rather than forcing the mechanism.
During winter months, consider applying a thin layer of petroleum jelly around the weather stripping to prevent freezing. Test the lock mechanism monthly to ensure smooth operation and listen for any unusual sounds that might indicate wear. If you notice any signs of rust, treat affected areas promptly with appropriate rust inhibitors.
Keep a spare key in a secure location and maintain a record of your lock’s model number for future reference or replacement parts.

Common Issues and Solutions
Even the best 3 point locking systems can occasionally present challenges. If your door isn’t closing smoothly, check the alignment of your striker plates and adjust them if needed. When locks feel stiff, a quick application of graphite lubricant often resolves the issue – avoid using oil-based products as they can attract dirt. For doors that sag and affect the lock’s performance, tighten the hinges and ensure the frame remains square. If you notice excessive play in the handles, inspect the mounting screws and tighten them. In cases where the key turns but doesn’t engage all points, verify that the connecting rods are properly attached and adjusted. Remember that seasonal changes can affect wood doors, so occasional adjustments may be necessary to maintain optimal performance.
A 3-point shed door locking system offers unparalleled security and peace of mind for your valuable storage space. By securing your door at multiple points, you’ll enjoy enhanced protection against break-ins, improved weather resistance, and a more professional appearance for your shed. The system’s durability and ease of use make it a worthwhile investment that will serve you well for years to come. Whether you’re storing expensive tools, garden equipment, or precious belongings, this reliable locking solution provides the security you need. Consider upgrading your shed with a 3-point locking system today – it’s a smart choice that combines functionality with superior protection, ensuring your shed remains secure and your belongings safe. The investment in better security today will save you worry and potential losses tomorrow.