
Stop Moisture From Ruining Your Shed: Smart Thermal Protection That Works
Protect your shed from costly moisture damage with a comprehensive thermal moisture protection system that combines proper ventilation, insulation, and vapor barriers. Moisture infiltration silently destroys storage spaces, causing mold growth, wood rot, and damaged belongings—but implementing the right protective measures can extend your shed’s lifespan by decades. A well-designed thermal moisture barrier creates a controlled environment that maintains consistent temperature levels while preventing condensation from forming on walls, ceilings, and stored items.
Modern thermal moisture protection solutions leverage advanced materials like reflective foil insulation, closed-cell foam boards, and breathable membranes to create an effective defense against both external weather conditions and internal humidity buildup. This systematic approach not only preserves the structural integrity of your shed but also creates a more comfortable and useful storage space year-round. Whether you’re protecting valuable tools, seasonal decorations, or outdoor equipment, proper thermal moisture protection represents a smart investment in your property’s long-term value and functionality.
Why Your Shed Needs Thermal Moisture Protection
Common Moisture Problems in Sheds
Moisture problems in sheds can quickly turn your storage space into a maintenance nightmare if left unchecked. The most common issue is condensation, which occurs when warm air meets cool surfaces, creating water droplets that can damage your belongings. While proper benefits of shed insulation can help prevent this, it’s essential to recognize the warning signs early.
Look out for musty odors, which often indicate the presence of mold or mildew, particularly in corners and behind stored items. Rust spots on metal tools or hardware are another red flag, suggesting excessive humidity levels. You might also notice warped wood, peeling paint, or dark stains on walls and ceilings. These issues typically worsen during seasonal changes when temperature fluctuations are more dramatic.
Floor dampness is another frequent problem, especially in sheds without proper foundation drainage or vapor barriers. This can lead to rotting floorboards and create an ideal environment for pests seeking shelter.

The Science of Thermal Bridging
Thermal bridging occurs when temperature differences between the inside and outside of your shed create paths for heat to escape and moisture to accumulate. Think of it like a bridge that allows both heat and moisture to travel through your shed’s walls, floor, or roof. When warm air inside your shed meets a cold surface, it cools down and releases its moisture, leading to condensation.
This process is particularly common around metal fasteners, joints, and areas where different building materials meet. For example, when metal screws penetrate insulation, they create a direct path for heat transfer. In winter, these thermal bridges can cause cold spots where moisture collects, potentially leading to mold growth and wood rot.
Understanding thermal bridging is crucial because it helps you identify vulnerable areas in your shed that need extra attention during insulation and moisture protection planning. By addressing these weak points, you can significantly improve your shed’s thermal performance and protect your stored items from moisture damage.
Effective Thermal Moisture Barriers
Choosing the Right Insulation
Selecting the right insulation for your shed is crucial for maintaining a comfortable and protected storage space. When exploring different insulation materials and costs, it’s important to consider factors like R-value, moisture resistance, and durability.
Fiberglass batts remain a popular choice due to their affordability and ease of installation. They work well between wall studs and ceiling joists, offering good thermal protection. However, they must be paired with a proper vapor barrier to prevent moisture issues.
Rigid foam boards are excellent for shed walls and roofs, providing superior insulation with less thickness. They’re naturally moisture-resistant and can create an effective air barrier. While slightly more expensive than fiberglass, their durability and performance often justify the cost.
Spray foam insulation offers the best air-sealing properties and highest R-value per inch. It creates a seamless barrier against both heat and moisture, making it ideal for challenging spaces. Though it’s the most expensive option, it’s also the most effective for complete protection.
For eco-conscious homeowners, natural options like sheep’s wool or recycled denim provide good insulation while being environmentally friendly. These materials are naturally moisture-wicking and pest-resistant, though they may be harder to source.
Remember to choose insulation that matches your climate conditions and shed usage. A well-insulated shed not only protects your belongings but also extends the structure’s lifespan.
Vapor Barrier Basics
A vapor barrier is your shed’s first line of defense against moisture damage, and choosing the right moisture barrier solutions can make all the difference. These protective layers come in two main types: polyethylene sheets and kraft-faced insulation. Polyethylene sheets are clear or white plastic barriers that offer excellent moisture protection, while kraft-faced insulation combines insulating material with a paper barrier backing.
For effective installation, always position the vapor barrier on the warm side of your shed’s walls. In most climates, this means placing it between the interior wall surface and the insulation. Be sure to overlap seams by at least 6 inches and seal them with vapor barrier tape for complete protection.
Common mistakes to avoid include creating holes or tears during installation, leaving gaps at joints, and incorrectly positioning the barrier. Remember to carefully work around electrical outlets and other wall penetrations, using appropriate sealing methods to maintain the barrier’s integrity.
When installing a vapor barrier, think of it as creating an envelope around your shed’s interior. Pay special attention to corners and edges, where moisture is most likely to accumulate. For best results, combine your vapor barrier with proper ventilation to create a balanced moisture-control system that keeps your belongings safe and dry year-round.

Installation Best Practices

Wall and Ceiling Protection
Proper wall and ceiling protection is crucial for maintaining a dry, well-insulated shed environment. Start by examining your walls and ceiling for any existing gaps or cracks, sealing them with appropriate weatherstripping or caulk before proceeding with insulation.
For walls, install a vapor barrier directly against the interior wall surface. Use 6-mil polyethylene sheeting, overlapping seams by at least 12 inches and securing it with staples. Next, install fiberglass batts or rigid foam boards between the wall studs. Choose insulation with an R-value appropriate for your climate zone – typically R-13 to R-21 for walls.
When protecting your ceiling, begin with proper ventilation. Ensure your shed has adequate roof vents to prevent moisture buildup in the attic space. Install a vapor barrier on the ceiling’s underside, similar to the walls. For ceiling insulation, opt for either fiberglass batts or blown-in insulation, aiming for an R-value between R-30 and R-49, depending on your location.
Cover all insulated surfaces with moisture-resistant drywall or plywood to create a finished look and additional protection. Remember to leave a small gap at the bottom of wall panels to allow for air circulation. Paint all surfaces with moisture-resistant primer and paint to add an extra layer of protection against humidity and condensation.
Don’t forget to periodically inspect your walls and ceiling for signs of moisture damage, addressing any issues promptly to maintain the effectiveness of your thermal moisture protection system.
Floor and Foundation Solutions
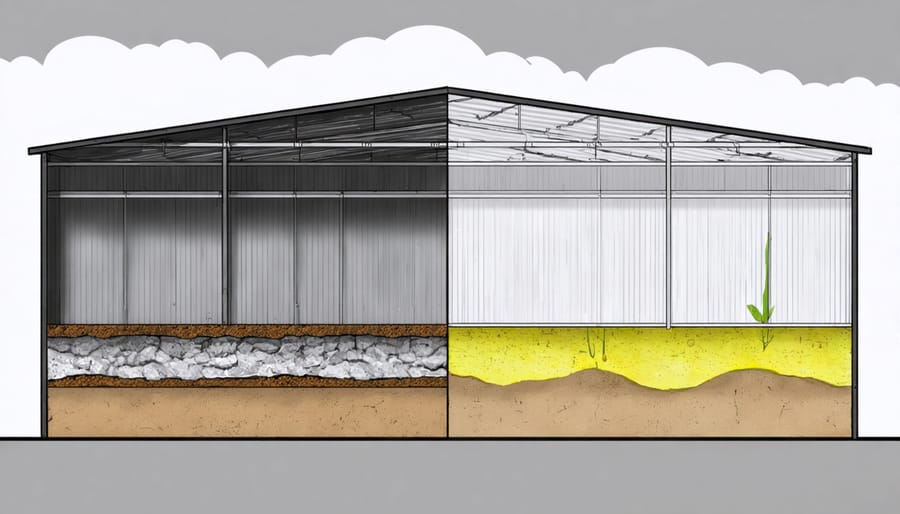
Protecting your shed from ground moisture is crucial for long-term durability and content preservation. A well-designed floor and foundation system creates a reliable barrier against dampness rising from the ground, ensuring your belongings stay dry and protected.
Start by elevating your shed at least 4 inches above ground level using concrete blocks or pressure-treated lumber. This creates essential airflow underneath and prevents direct contact with soil moisture. Install a vapor barrier – a heavy-duty polyethylene sheet with a minimum thickness of 6 mil – across the entire foundation area, extending it up the sides by several inches.
For concrete foundations, apply a waterproof sealant to prevent moisture seepage. If you’re using a wooden floor system, opt for pressure-treated joists and plywood rated for ground contact. Space your floor joists 16 inches on center for optimal support and moisture resistance.
Consider adding a layer of gravel or crushed stone beneath your shed, creating a natural drainage system that directs water away from the foundation. This simple addition significantly reduces moisture accumulation underneath your structure.
For extra protection, install proper drainage around your shed’s perimeter. Ensure the ground slopes away from the building at a rate of one inch per foot for at least six feet. This prevents water pooling near the foundation during heavy rains, further safeguarding your shed from moisture damage.
Maintenance and Monitoring
Regular maintenance and monitoring of your thermal moisture protection system are crucial for long-term effectiveness. Start by conducting monthly visual inspections of your shed’s interior and exterior surfaces. Look for telltale signs of moisture problems, such as water stains, mold growth, or a musty odor. Pay special attention to corners, joints, and areas around windows and doors where moisture tends to accumulate.
Check your ventilation systems regularly to ensure they’re working properly. Clean vents and fans every three months, and make sure air can flow freely through all openings. During these inspections, verify that your vapor barriers remain intact without tears or gaps.
Keep an eye on your temperature and humidity levels using an inexpensive hygrometer. Ideal relative humidity should stay between 30-50%. If you notice consistently high readings, consider adding a dehumidifier to your space.
Watch for early warning signs like condensation on windows, peeling paint, or warped wood. These indicators suggest your moisture protection might need attention. After heavy rains, inspect your shed’s interior for any signs of water infiltration.
Maintain proper drainage around your shed by keeping gutters clean and ensuring the ground slopes away from the foundation. Regular trimming of nearby vegetation helps prevent moisture from being trapped against the walls. Address any issues promptly to prevent minor problems from becoming major headaches.
Protecting your shed from moisture damage is a crucial investment that pays off in the long run. By implementing proper thermal moisture protection, you’ll extend your shed’s lifespan, protect valuable belongings, and maintain a comfortable storage environment year-round. Remember to start with a solid foundation, choose appropriate insulation materials, install proper ventilation, and maintain regular inspections. Don’t wait for moisture problems to appear before taking action – prevention is always easier and more cost-effective than repairs. Take the first step today by assessing your shed’s current condition and planning your moisture protection strategy. With the right approach and materials, you can create a dry, secure space that serves your storage needs for years to come.