
Stop Water Damage Before It Starts: J Drain Installation for Your Shed Roof
Dig a trench 12-18 inches deep along your shed’s perimeter, sloping it away from the foundation at a minimum grade of 1 inch per 8 feet to ensure water flows away naturally. Line the trench with landscape fabric before adding 2-3 inches of gravel, then position your perforated drainpipe with holes facing downward to channel water effectively. Cover the pipe with another 6-8 inches of gravel and wrap the fabric over the top before backfilling with soil to create a protective barrier against water damage.
Installing a J drain around your shed protects your investment from the silent destroyer that ruins thousands of outdoor structures each year: water infiltration. Without proper drainage, moisture seeps into foundations, rots wooden floors, and creates an environment where mold thrives and stored items deteriorate. The good news? This weekend project requires minimal tools and materials, yet delivers years of protection. Whether you’re dealing with clay soil that holds water like a sponge or a shed positioned in a natural low spot, a properly installed J drain redirects groundwater before it reaches your structure. This guide walks you through each step with clear instructions that transform a potentially intimidating project into a manageable DIY victory, giving you confidence that your shed and everything inside stays dry season after season.
What is a J Drain and Why Your Shed Needs One
The Problem J Drains Solve
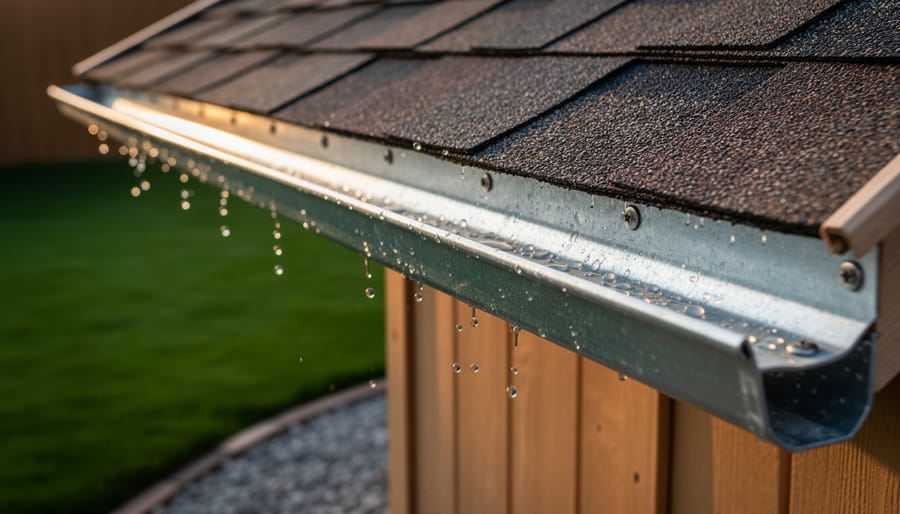
Water runoff from your shed might seem harmless at first, but left unmanaged, it creates a cascade of problems that can damage both your structure and surrounding property. When rain pours off your shed’s roof, it concentrates into streams that pound the same spots repeatedly, causing serious issues over time.
The most common problem is foundation erosion. Without proper drainage, water pools around your shed’s base, washing away soil and gravel. This creates uneven settling that can crack concrete pads, shift wooden skids, and compromise your shed’s structural integrity. Protecting your shed’s foundation becomes increasingly difficult once erosion patterns establish themselves.
Siding damage follows closely behind. Constant splashback from pooling water deteriorates paint, rots wood panels, and rusts metal siding from the bottom up. This moisture also finds its way inside, creating musty odors, damaging stored items, and promoting mold growth.
Your landscaping suffers too. Heavy runoff carves trenches through flower beds, drowns plants near your shed, and creates muddy patches that never seem to dry. These issues compound over seasons, turning what should be a simple storage solution into an ongoing maintenance headache that J drains effectively prevent.
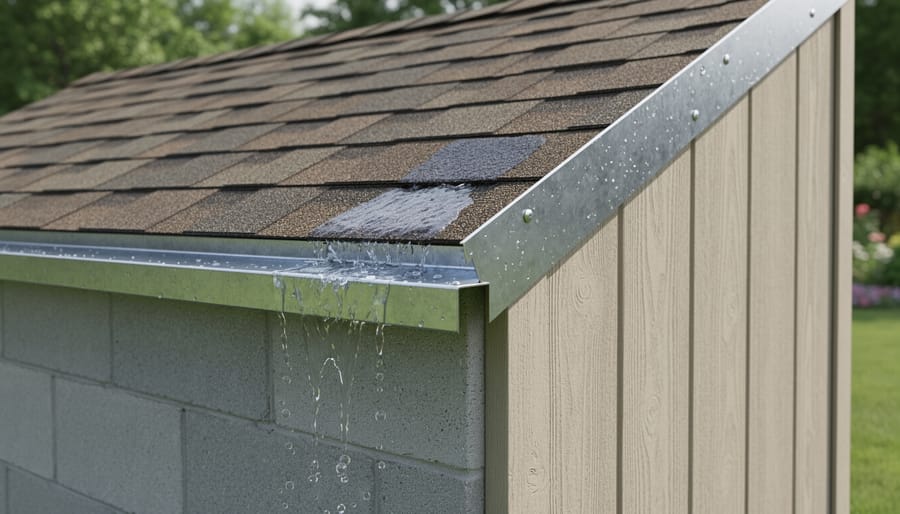
J Drains vs. Traditional Gutters for Sheds
When protecting your shed from water damage, you’ll encounter two main options: J drains and traditional gutter systems. Both have their place, but understanding the differences helps you make the right choice.
Traditional gutters work wonderfully for larger structures and offer superior water collection capacity. However, they require more maintenance, can clog with debris, and demand regular cleaning. They’re also more expensive to install and may overwhelm the simple aesthetics of a charming garden shed.
J drains shine for smaller structures like sheds because they’re incredibly simple to install, require minimal maintenance, and cost significantly less. Their low profile won’t distract from your shed’s appearance, and there’s no worry about leaves or debris clogging the system. Plus, many DIY enthusiasts find J drain installation manageable in just an afternoon.
Choose J drains when you have a small to medium shed, prefer minimal maintenance, and want cost-effective protection. Traditional gutters make sense for larger sheds or when you need to direct water into rain barrels. For most backyard sheds, J drains offer the perfect balance of protection and practicality.
Tools and Materials You’ll Need
Before you begin your J drain installation, gathering the right materials and tools will make your project run smoothly and help you achieve professional-looking results. Don’t worry—you won’t need a contractor’s supply truck for this job!
For materials, you’ll need J-channel or drip edge appropriate for your shed size. Most homeowners find that aluminum J-channel in 0.019 to 0.024 gauge thickness works perfectly for standard sheds up to 12×16 feet. It’s rust-resistant, affordable, and easy to cut. For larger sheds or areas with heavy rainfall, consider upgrading to 0.032 gauge or vinyl-coated steel for extra durability. You’ll also need exterior-grade sealant (silicone or polyurethane works great), galvanized or stainless steel fasteners (typically 1-inch roofing nails or screws), and potentially some flashing tape for extra water protection at joints.
Your tool list is straightforward: tin snips or aviation shears for cutting the J-channel, a measuring tape, pencil for marking, hammer or drill with appropriate bits, caulking gun, level to ensure proper water flow, and safety gloves and glasses. A miter box or angle grinder helps create clean corner cuts if you’re feeling ambitious.
Here’s a practical tip from experienced DIYers: buy 10-15 percent more J-channel than your measurements suggest. Those corner cuts and overlaps add up quickly, and making an extra trip mid-project is frustrating. One homeowner shared that having extra material on hand saved her weekend when she discovered rot that needed addressing before installation—a common discovery that’s easier to handle when you’re prepared.
Step-by-Step J Drain Installation Process
Preparing Your Shed Roof
Before you grab your J drain and ladder, let’s take a few minutes to properly assess your shed roof. Trust me, this prep work will save you headaches down the road!
Start by measuring the perimeter of your roof edge where you’ll install the J drain. Add about 10% extra to your measurement to account for overlaps and corner pieces. While you’re up there with your tape measure, take a close look at the current condition of your fascia board and roof edge. Any rot, warping, or loose sections? Now’s the time to address those issues before covering them up.
Next, give that roof edge a thorough cleaning. Remove leaves, dirt, and any old caulking or sealant that might interfere with proper adhesion. A stiff brush and mild detergent work wonders here.
Here’s a crucial step many DIYers overlook: observe where water naturally flows off your roof during the next rain. You’ll want to plan your J drain installation to guide this water away from your shed’s foundation and entrance. Make note of any low spots or areas where water tends to pool. Sarah from Minnesota learned this the hard way when she installed her J drain without checking drainage patterns first, only to discover water redirecting straight onto her garden beds!
Installing the J Channel
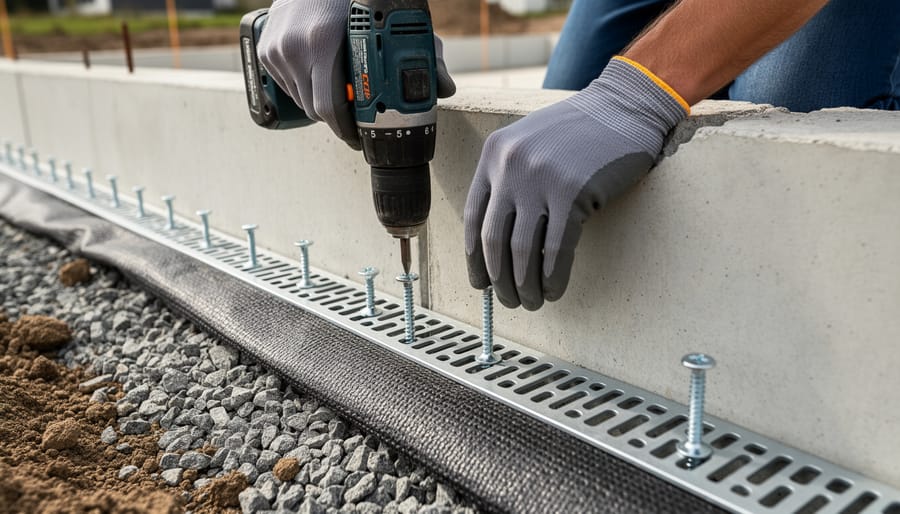
Now comes the moment where careful positioning really pays off. Start at a corner of your shed and work your way along the foundation, placing the J channel with the curved opening facing away from the building. This positioning is crucial because it creates the pathway for water to flow away from your shed’s foundation.
The magic happens with the slope. You’ll want to ensure the channel tilts slightly downward as it moves away from problem areas, typically aiming for about a quarter-inch drop per foot of distance. This gentle gradient keeps water moving steadily without creating erosion issues. Think of it like a tiny water slide directing moisture where you want it to go rather than pooling near your shed’s base.
When securing the J channel, use landscape fabric stakes every 18 to 24 inches along the length. Push them through the fabric backing and into the soil firmly, but don’t go overboard. Too much pressure can distort the channel’s shape and affect water flow. One homeowner shared that marking her stake positions with chalk before installing helped her maintain even spacing and avoid that wobbly, uneven look.
Corner connections require special attention. Rather than forcing a sharp 90-degree bend, cut the channel at a 45-degree angle and overlap the pieces by about six inches. This creates a smooth transition that won’t catch debris or slow water movement. For seams along straight runs, overlap sections by four to six inches in the direction of water flow, much like overlapping roof shingles.
Before covering everything with soil, pour a bucket of water along the channel to test your slope and check for any low spots where water might collect. This simple test catches problems before they’re buried under backfill.
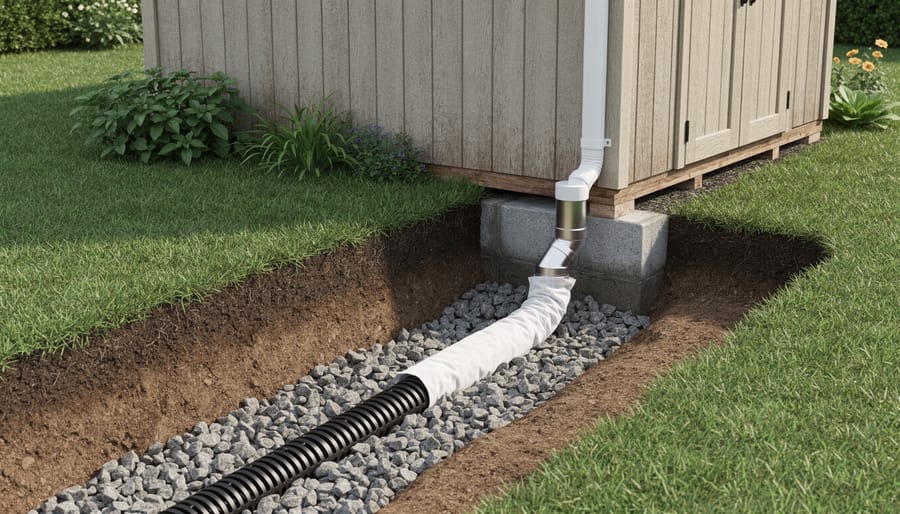
Connecting to Your Drainage System
Once your J drain is installed and collecting water, you’ll need to direct that water safely away from your shed foundation. The simplest solution is connecting a downspout directly to the drainage pipe if you have gutters installed. This creates a complete system that channels water from your roof through the J drain to a safe disposal point at least 10 feet from your shed.
If downspouts aren’t an option, consider using splash blocks at the J drain outlet. These angled concrete or plastic blocks disperse water over a wider area, preventing erosion and pooling. Position them so water flows away from your foundation rather than back toward it.
For properties with persistent water issues, connecting your J drain to a French drain system offers the most comprehensive solution. The French drain, filled with gravel and perforated pipe, carries water even further from your shed to a drainage ditch, dry well, or lower area of your property. This combination works beautifully for homeowners dealing with heavy rainfall or high water tables. One DIY enthusiast shared that connecting her J drain to an existing French drain completely eliminated the pooling that had damaged her previous shed’s floor, giving her peace of mind during storm season.
Sealing and Weatherproofing
Once your J drain is properly positioned and backfilled, it’s time to complete the installation with careful sealing and weatherproofing. Start by inspecting all connection points where the drain meets your shed’s foundation or where multiple sections join together. Apply a high-quality exterior silicone caulk to seal any gaps or joints, ensuring water flows through the system rather than around it.
For maximum protection, consider how your J drain installation complements other moisture barriers. This system works hand-in-hand with waterproofing your shed roof to create comprehensive water management around your structure.
Test your installation during the next rainfall or by running water from a garden hose along your shed’s perimeter for 15-20 minutes. Watch for proper drainage flow and any pooling water that might indicate low spots needing adjustment. Finally, add a finishing layer of mulch, gravel, or decorative stone over the drain area to protect it from debris while maintaining an attractive appearance. Many homeowners report peace of mind knowing their shed foundation stays dry season after season with this simple yet effective drainage solution.
Common Installation Mistakes to Avoid
Even experienced DIYers can stumble with J drain installation, but knowing these common mistakes helps you avoid costly do-overs around your shed.
The most frequent error? Installing without proper slope. Your J drain needs to run downhill at least 1/8 inch per foot for water to flow naturally away from your shed. Many folks eyeball it and end up with flat spots where water pools, defeating the whole purpose. Always use a level and string line to check your grade before backfilling.
Inadequate fastening is another pitfall that shows up months later. Simply laying J drain against your foundation without securing it means it’ll shift when you backfill, creating gaps where water can seep through. Use galvanized screws or foundation-rated adhesive every 16 inches to keep everything snug and stable.
Poor sealing at joints causes headaches too. When connecting sections, overlap them by at least 6 inches and seal with waterproof membrane tape or mastic. One homeowner shared how skipping this step led to water infiltrating right at the corners, exactly where protection mattered most.
Finally, ignoring your local weather patterns can undermine your efforts. If you live in an area with freeze-thaw cycles, you’ll need to install below the frost line to prevent heaving. Heavy rainfall regions require larger diameter drains or secondary drainage paths.
The good news? These mistakes are easily preventable with proper planning. Take your time during installation, double-check your slope, and don’t skip the weatherproofing steps. Your shed will thank you for decades to come.
Maintaining Your J Drain System
Good news—J drain systems are refreshingly low-maintenance once installed! A little preventive care goes a long way in keeping your shed protected year-round.
Start with seasonal checkups, especially after heavy storms or during spring thaw. Walk around your shed perimeter and look for standing water or soggy spots, which might indicate a clog or settling issue. Inspect the exposed outlet where your drain exits to ensure water flows freely and nothing’s blocking it.
Twice a year, flush your system with a garden hose to clear any sediment buildup. This simple five-minute task prevents clogs before they start. While you’re at it, check that your landscape fabric hasn’t shifted and that gravel remains evenly distributed.
Watch for warning signs like water pooling near your foundation, musty odors inside your shed, or visible moisture on interior walls. These red flags suggest your drainage system needs attention. Sometimes the fix is as simple as clearing debris from the outlet or adding more gravel to maintain proper slope.
One homeowner shared that setting a calendar reminder for spring and fall inspections helped her catch a minor clog early, saving hundreds in potential foundation repairs. That proactive approach makes all the difference! With these easy habits, your J drain will protect your storage investment for decades to come.
Proper J drain installation is one of the smartest investments you can make to protect your shed from water damage. By directing moisture away from your foundation, you’re preventing rot, mold, and structural issues that could cost hundreds or even thousands to repair down the road. The few hours you spend installing a J drain system today will pay dividends for years to come, keeping your stored belongings safe and dry.
Remember, effective drainage is just one piece of the puzzle when it comes to protecting your outdoor storage space. Combining J drains with comprehensive weatherproofing strategies ensures your shed remains a reliable, long-lasting storage solution.
Ready to get started? Gather your materials, follow the steps we’ve outlined, and tackle this weekend project with confidence. Your shed and everything you store inside will thank you.