
Stop Water Damage Before It Starts: Smart Gutter Solutions for Your Shed
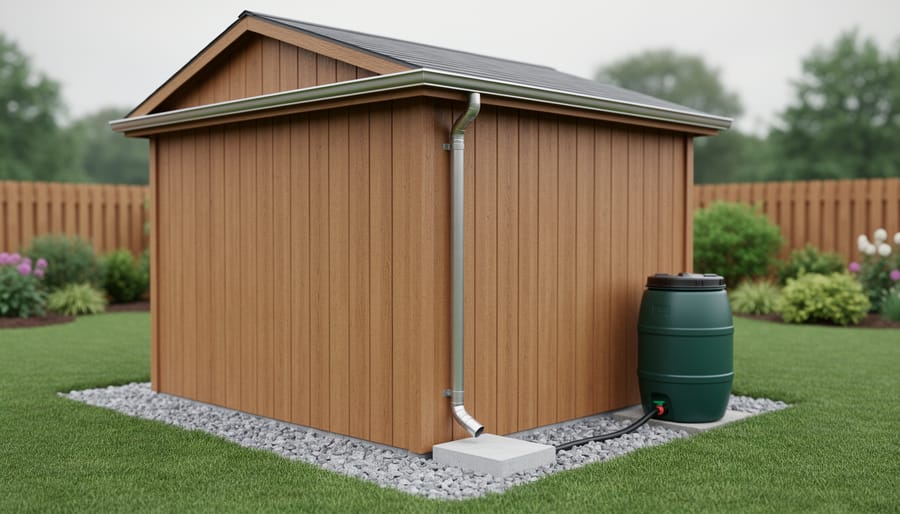
Install a basic vinyl or aluminum gutter system along your shed’s lower roofline to channel rainwater away from the foundation and prevent wood rot, soil erosion, and interior moisture damage. Position downspouts to direct water at least three feet from the structure, using splash blocks or extension pipes to guide runoff toward drainage areas or rain barrels.
Choose materials that match your maintenance willingness and climate conditions—vinyl gutters offer budget-friendly installation and rust resistance, while aluminum provides durability without significant weight, and copper delivers premium aesthetics that age beautifully despite higher costs. For small garden sheds under eight feet wide, consider half-round gutters that provide adequate drainage without overwhelming the structure’s visual proportions.
Create effective drainage by combining gutters with comprehensive weatherproofing strategies including proper grading around the shed perimeter and French drains for persistent water issues. Even simple solutions like attaching rain chains to gutter outlets can transform functional drainage into attractive landscape features while protecting your investment.
The right gutter system extends your shed’s lifespan by decades, prevents foundation damage that costs hundreds to repair, and keeps stored items dry and accessible year-round.
Why Your Shed Needs a Gutter System (Even If You Think It Doesn’t)
You might think your shed is just fine without gutters, but here’s what’s really happening during every rainstorm: water cascades off your roof, creating a moat around your shed’s base. This constant water exposure leads to foundation erosion, rotted siding, and premature deterioration of your investment.
Without proper drainage, rainwater pools around your shed’s perimeter, seeping into the foundation and weakening the structure over time. The splashback from heavy rain also damages your shed’s lower siding, causing wood rot, paint peeling, and even mold growth. Plus, that muddy mess makes accessing your shed unpleasant and tracks dirt everywhere.
Sarah from Minnesota learned this lesson the hard way: “After just two years without gutters, my shed’s bottom boards were completely rotted. I had to replace the entire lower section, which cost me three times what a simple gutter system would have. Now I make sure every structure on my property has proper drainage.”
The good news? protecting your shed’s foundation with gutters is straightforward and affordable. Even basic gutter systems effectively channel water away from your shed, preventing thousands of dollars in potential repairs. Whether you have a small tool shed or a large workshop, proper water management extends your shed’s lifespan by years and keeps the surrounding area clean and accessible year-round.
Choosing the Right Gutter Material for Your Shed
Vinyl Gutters: Budget-Friendly and DIY-Ready
Vinyl gutters are the go-to choice for budget-conscious homeowners who want reliable drainage without breaking the bank. These lightweight systems typically cost 40-60% less than aluminum or steel alternatives, making them perfect for shed projects where you’re watching expenses.
The real advantage? Vinyl gutters are incredibly DIY-friendly. They snap together easily, require no special tools beyond a hacksaw and drill, and won’t rust or dent if you drop a section during installation. Many homeowners complete their shed gutter installation in just an afternoon.
However, vinyl does have limitations. It can become brittle in extreme cold and may crack under heavy snow loads. Direct sunlight can also cause fading and warping over time, particularly with darker colors.
Vinyl works best for sheds in moderate climates, smaller structures under 200 square feet, or temporary storage buildings. If you’re protecting a basic garden shed in a suburban backyard, vinyl delivers solid performance at an unbeatable price point. Just ensure you choose UV-resistant varieties and install proper support brackets every 24 inches to prevent sagging.
Aluminum Gutters: The Durable Middle Ground
Aluminum gutters strike that perfect balance between affordability and longevity, which explains why they’re the go-to choice for many shed owners. These gutters typically last 20-25 years with minimal maintenance, resisting rust far better than steel while costing less than copper alternatives.
What makes aluminum especially popular is its lightweight nature and easy workability. You can cut and install sections yourself without specialized tools, making it ideal for DIY enthusiasts tackling weekend projects. The material handles temperature fluctuations beautifully without becoming brittle in cold weather or sagging in summer heat.
When it comes to style, aluminum gutters come in various colors and finishes to complement your shed’s exterior. Whether you have a modern metal shed or a classic wooden structure, you’ll find options that blend seamlessly. Many homeowners appreciate that painted aluminum maintains its appearance for years without the chipping issues you might encounter with other materials.
One shed owner shared that her aluminum gutters survived a decade of harsh northeastern winters without a single leak, protecting her garden tool collection perfectly. That durability combined with reasonable pricing makes aluminum an excellent middle-ground solution for most shed applications.
Steel Gutters: Heavy-Duty Protection
Steel gutters are your best bet when your shed sits in harsh weather zones or beneath heavy tree coverage. They handle extreme conditions—from scorching summers to icy winters—without cracking or warping like plastic alternatives might.
The trade-off? Steel requires more attention to prevent rust. A homeowner in Oregon shared how applying rust-resistant paint every few years keeps his steel gutters looking great after a decade. If your region experiences heavy snowfall or frequent hail, the investment pays off through superior durability.
Expect to pay $8-15 per linear foot for galvanized steel, which is pricier than vinyl but considerably more robust. Stainless steel costs even more but eliminates rust concerns entirely. Consider steel if you’re protecting valuable equipment or stored items, as failed gutters can lead to costly water damage. The upfront expense often proves worthwhile when you factor in longevity—steel gutters easily last 20+ years with proper care.
Copper Gutters: Premium Aesthetics
If you’re looking to make a real statement with your shed, copper gutters deliver unmatched elegance and character. While they represent a premium investment, copper develops a beautiful patina over time, transforming from bright metallic to rich brown and eventually to that iconic blue-green verdigris. This natural aging process means your shed actually becomes more distinctive with each passing year.
Copper gutters work beautifully on high-end garden sheds, studio spaces, or anywhere you want your outbuilding to complement upscale home architecture. They’re particularly stunning on wooden sheds with natural finishes or structures featuring architectural details. Beyond aesthetics, copper offers excellent durability and requires minimal maintenance. Many homeowners find that copper gutters on their shed create a cohesive look when their main house features similar premium materials. Yes, the upfront cost is higher than aluminum or vinyl, but copper can last 50 years or more, making it a worthwhile consideration if you’re creating a truly special outdoor space.
Simple Gutter Styles That Work Best for Sheds
K-Style Gutters
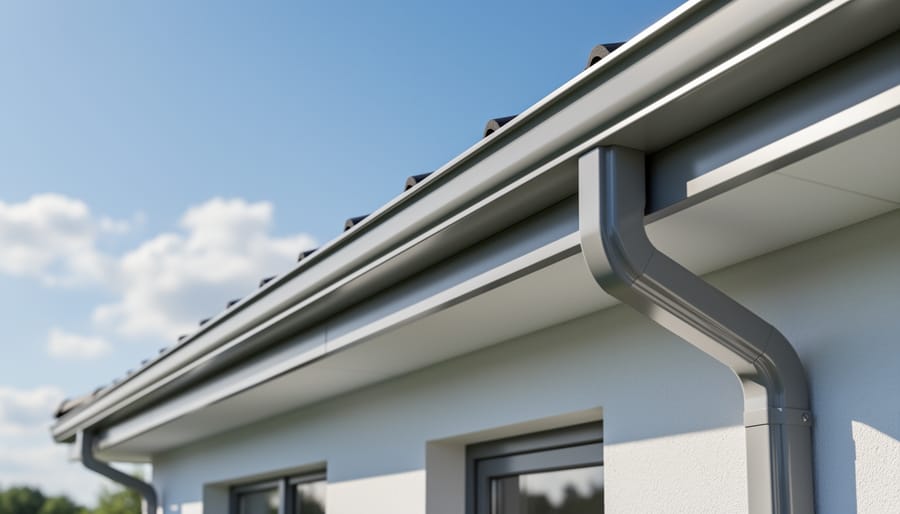
K-style gutters are the most popular choice for sheds, and for good reason. Named for their decorative profile that resembles crown molding, these gutters blend seamlessly with most shed styles while providing excellent water management. They typically come in 5-inch and 6-inch widths, with the larger size handling heavier rainfall without overflow. Homeowners appreciate that K-style gutters hold more water than traditional rounded gutters thanks to their flat backs and bottoms. They’re also easy to mount directly against your shed’s fascia board, making DIY installation straightforward. Many find that matching their shed gutters to their home’s existing K-style system creates a cohesive look across the property. Available in aluminum, vinyl, and steel, these gutters resist rust and require minimal maintenance, making them a practical investment for protecting your shed’s foundation and surrounding landscaping.
Half-Round Gutters
Half-round gutters bring timeless curb appeal to your shed with their distinctive curved profile. These traditional-style gutters work particularly well if you’re matching your shed to a home that already features half-round gutters, creating a cohesive look across your property. They’re an excellent choice for decorative sheds, garden offices, or any outbuilding where aesthetics matter as much as function.
One standout advantage is their self-cleaning nature. The rounded shape helps debris slide through more easily than squared corners, meaning less frequent maintenance for you. However, they typically require mounting brackets that show on the exterior, which actually adds to their classic charm. Half-round gutters work best on sheds with overhangs of at least 6 inches, as they need proper support spacing.
Many homeowners report that switching from basic gutters to half-rounds elevated their entire backyard’s appearance. They’re readily available at most home improvement stores in aluminum, copper, and vinyl options, making them accessible for various budgets and DIY skill levels.
Box Gutters
Box gutters offer a sleek, hidden drainage solution that’s perfect if you’re designing a custom shed or want a modern, minimalist look. Unlike traditional gutters that hang visibly from the roofline, box gutters are built into the roof structure itself, creating a seamless appearance that blends beautifully with contemporary architecture.
These gutters work exceptionally well for flat or low-slope shed roofs where conventional systems might look out of place. The concealed design protects the drainage channel from debris and weather damage, potentially reducing maintenance needs over time.
However, box gutters do require careful planning and professional installation to ensure proper waterproofing and adequate drainage capacity. One homeowner shared that their box gutter system transformed their workshop shed from an eyesore into a polished extension of their home’s modern design.
If you’re building from scratch or undertaking a major shed renovation, box gutters deserve consideration for their clean aesthetic and effective water management. Just make sure to work with experienced professionals who understand the precise measurements and waterproofing techniques needed for long-term success.
Creative Downspout Solutions for Limited Space
Rain Barrels and Water Collection
Rain barrels offer an eco-friendly way to manage shed runoff while reducing your water bills. Position your barrel on a stable platform directly beneath the downspout, ensuring it sits level to prevent tipping when full. Most homeowners find a single 50-gallon barrel sufficient for average-sized sheds, though larger structures may need two barrels connected in series.
The key to success lies in proper overflow management. Install an overflow valve near the top of your barrel that directs excess water away from your shed’s foundation through a garden hose or secondary drainage pipe. This prevents flooding during heavy rainfall while capturing water for watering gardens, washing tools, or rinsing outdoor equipment.
Consider adding a spigot near the bottom for easy access and a fine mesh screen at the inlet to keep debris and mosquitoes out. During winter months in freezing climates, remember to drain your barrel completely to prevent cracking. This simple addition transforms your gutter system into a practical resource that pays dividends throughout the growing season.
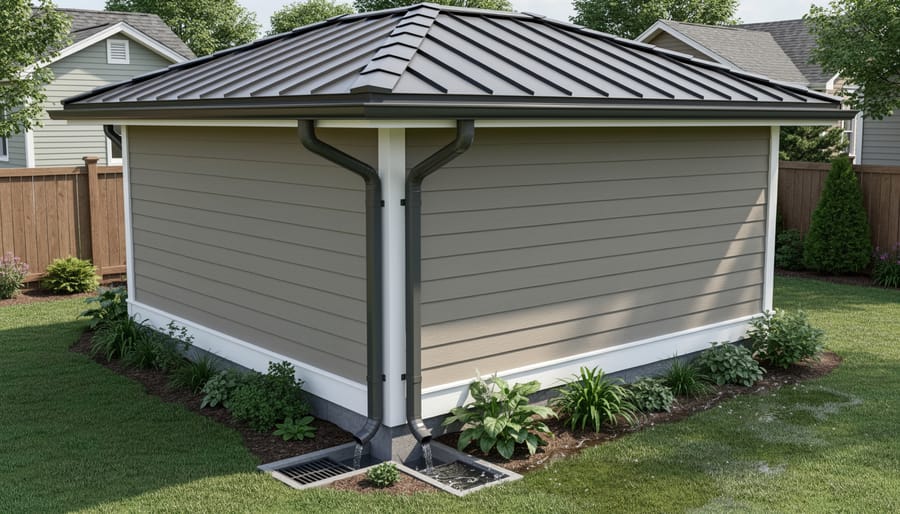
Underground Drainage Systems
When downspouts alone aren’t enough, burying them underground creates one of the most effective proper drainage solutions for your shed. This approach channels water away from your foundation through buried PVC pipes, keeping it far from your structure.
Installation is surprisingly straightforward for DIYers. Dig a shallow trench sloping away from your shed, lay perforated drainage pipe, and connect it to your downspout with a simple elbow fitting. The water travels underground and disperses safely in your yard or connects to an existing drainage system.
Many homeowners love this option because it eliminates visible downspout extensions that can be tripping hazards or eyesores. One shed owner shared that after installing underground drainage, her yard looked cleaner and she stopped worrying about water damage during heavy storms. The system works silently in the background, protecting your investment year-round.
Splash Blocks and Extensions
Splash blocks and extensions offer one of the simplest solutions for directing water away from your shed’s foundation. These plastic or concrete blocks sit beneath downspouts, creating a sloped channel that guides water several feet away. Most homeowners appreciate their affordability—typically under $15 each—and no-tools-required installation. Simply position them under each downspout and adjust the angle as needed. For extra reach, flexible downspout extensions attach directly to your gutters and can curve around obstacles or garden beds. They’re perfect if you’re working with a tight budget or renting and need a non-permanent option. Many users find these work beautifully for smaller sheds or areas with good natural drainage, though they’re less effective on sloped terrain.
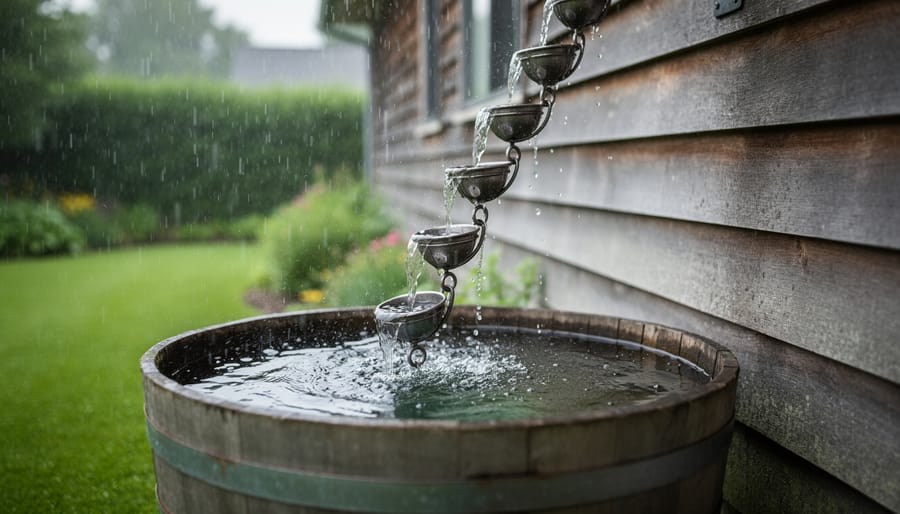
Decorative Chain Systems
Rain chains offer a beautiful, eye-catching alternative to standard downspouts that transforms water drainage into a visual feature. These decorative chains guide rainwater from your shed gutter to the ground in a cascading effect that’s both functional and mesmerizing to watch during rainstorms. Available in copper, aluminum, or stainless steel, rain chains complement various shed styles while adding character to your outdoor space. They work best in moderate climates and pair wonderfully with decorative catchment basins or rain barrels positioned below. Installation is straightforward—simply remove the downspout and hang the chain from the gutter outlet. One homeowner shared that their copper rain chain became an unexpected focal point, developing a lovely patina over time that enhanced their garden’s cottage aesthetic.
DIY Installation Tips That Actually Work
Measuring and Planning Your System
Getting your measurements right from the start saves you headaches later. Begin by measuring each side of your shed’s roofline where you’ll install gutters. Don’t forget to add a few extra inches for overlapping sections and end caps.
For proper drainage, plan a slope of about one-quarter inch for every 10 feet of gutter. This gentle angle keeps water flowing toward downspouts without being noticeable to the eye. A simple trick: snap a chalk line from your starting point to mark this slope before installation.
Place downspouts at corners or low points where water naturally wants to flow. For sheds longer than 35 feet, consider two downspouts to prevent overflow during heavy rain. Think about where the water will go once it leaves the downspout too. Position them away from your shed’s foundation and direct runoff toward flower beds, rain barrels, or drainage areas. One homeowner I know positioned his downspout to water his vegetable garden, turning a drainage necessity into a practical watering solution.
Essential Tools and Materials
Good news: installing shed gutters doesn’t require a professional toolkit or a hefty budget. Most homeowners can tackle this project with items they already have or can easily pick up at their local hardware store.
You’ll need gutters themselves (vinyl or aluminum work great for most sheds), downspouts to direct water away from your foundation, and end caps to seal everything up. Grab some gutter hangers or brackets to secure everything in place, and don’t forget sealant or caulk to prevent leaks at the joints.
For installation, a basic drill with screws, a hacksaw or tin snips for cutting gutters to size, a measuring tape, and a level will get the job done. A ladder tall enough to comfortably reach your shed roofline is essential for safety.
Many DIYers report that the trickiest part isn’t the installation itself, but simply measuring twice and cutting once. Start with these basics, and you’ll have functional drainage without overcomplicating things or overspending on unnecessary specialty tools.
Common Installation Mistakes to Avoid
Even the best gutter system can fail if installation goes wrong, so let’s look at the mistakes that trip up many DIYers. The most common error is improper slope—gutters need to pitch about 1/4 inch for every 10 feet toward the downspout. Without this angle, water pools and creates stagnant breeding grounds for mosquitoes or overflows during heavy rain.
Another frequent problem is spacing support brackets too far apart. Most gutters need brackets every 24-36 inches to prevent sagging, especially when filled with water or debris. Homeowners often underestimate this, leading to warped gutters within months.
Don’t forget to position downspouts away from your shed’s foundation. I’ve seen folks install beautiful gutter systems only to dump water right at the base, defeating the entire purpose. Always extend downspouts at least 3-4 feet away or use splash blocks. Finally, skipping sealant at seams and end caps is asking for leaks. A small tube of gutter sealant costs a few dollars but prevents major headaches down the road.
Keeping Your Shed Gutters Working Year-Round
Seasonal Cleaning Schedule
Keeping your shed gutters clean doesn’t have to feel like a chore when you build it into your seasonal routine. Plan to inspect and clean your gutters at least twice yearly—once in late spring after trees finish dropping seeds and blooms, and again in late fall after leaves have dropped. If your shed sits under heavy tree coverage, you might need quarterly cleanings to stay ahead of debris buildup.
During each cleaning session, scoop out leaves, twigs, and sediment by hand or with a small garden trowel. Flush the gutters with a garden hose to check for proper water flow and identify any clogs in the downspouts. While you’re up there, take a moment to inspect the gutter brackets for looseness, look for rust spots or cracks, and ensure downspouts direct water at least three feet away from your shed’s foundation. Homeowner Lisa from Minnesota shares, “I set phone reminders for April and October—fifteen minutes twice a year prevents major water damage headaches.” This simple preventive approach keeps your drainage system working efficiently year-round.
Gutter Guards: Worth It or Waste of Money?
For most sheds, gutter guards are a smart investment that’ll save you time and hassle. Here’s the honest truth: if your shed sits near trees or collects leaves and debris, guards pay for themselves by reducing cleaning frequency from monthly to once or twice yearly.
Mesh screens (around $2-4 per foot) offer excellent protection against leaves while staying budget-friendly. Foam inserts are even cheaper but may need replacement every few years. One homeowner shared that after installing basic mesh guards on her garden shed, she went from cleaning gutters six times per season to just once in spring.
However, guards aren’t essential for every situation. If your shed is in an open area with minimal tree coverage, you might skip them and simply commit to seasonal cleaning. Pine needles can slip through most guards, so nearby evergreens mean you’ll still need occasional maintenance.
The bottom line? Gutter guards are worth it for most shed owners, especially when they prevent clogs that could damage your foundation or landscaping.
Matching Your Gutters to Your Shed Style
Your gutters don’t need to hide—they can actually enhance your shed’s appearance when chosen thoughtfully. The key is coordinating colors and materials with your existing shed style for a polished, intentional look.
For traditional wooden sheds, consider matching gutter colors to your trim or roof for a cohesive appearance. Dark bronze or forest green gutters complement rustic aesthetics beautifully, while white or cream options work wonderfully with cottage-style sheds. Modern metal sheds often look sharp with aluminum gutters in matching metallic finishes.
Don’t overlook the impact of downspout placement on curb appeal. Position them where they’re least visible from your main viewing angle, or embrace them as design elements by painting them an accent color that ties into your landscaping.
One homeowner shared how switching from mismatched plastic gutters to copper half-rounds transformed her garden shed from an eyesore into a charming focal point. The warm metallic tones complemented her brick pathway perfectly.
Remember, aesthetics shouldn’t compromise function. Choose colors that won’t show dirt easily if your shed sits under trees, and ensure your style choices still deliver proper water management. A beautiful gutter system that doesn’t work well serves nobody.
Installing gutters on your shed is one of those projects that delivers benefits far beyond the effort required. By directing rainwater away from your foundation, protecting your siding, and preventing erosion around your structure, you’re adding years to your shed’s lifespan while avoiding costly repairs down the road. The best part? This is absolutely a manageable weekend project, even if you’ve never tackled anything like it before.
Don’t wait until the next heavy storm reveals problems with standing water or foundation damage. Whether you choose traditional K-style gutters for a polished look, simple DIY rain chains for charm and functionality, or creative alternatives like drip edges paired with gravel trenches, you’re making a smart investment in protecting your storage space. Combined with other protective measures like making your shed watertight, proper drainage keeps everything inside safe and dry.
Gather your materials, set aside a few hours, and give your shed the protection it deserves. Your future self will thank you when the next rainstorm rolls through and everything stays high and dry.