
Transform Your Cluttered Shed into an Organized Dream Space
Transform a chaotic shed into an organized powerhouse by installing adjustable wall-mounted shelving systems that maximize vertical space while keeping frequently-used items at eye level. Mount pegboards with labeled tool outlines to create designated homes for each implement, ensuring quick access and easy returns. Sort items into clear, stackable bins with weather-resistant labels, grouping similar tools and seasonal equipment together for intuitive organization. Learn how to transform your cluttered space into a functional workshop by implementing mobile storage solutions—rolling tool carts and fold-down workbenches that adapt to your changing needs while maintaining pristine organization. Strategic shed organization doesn’t just save time; it extends tool life, prevents accidents, and turns every square inch into productive storage space.
Smart Storage Solutions That Maximize Vertical Space
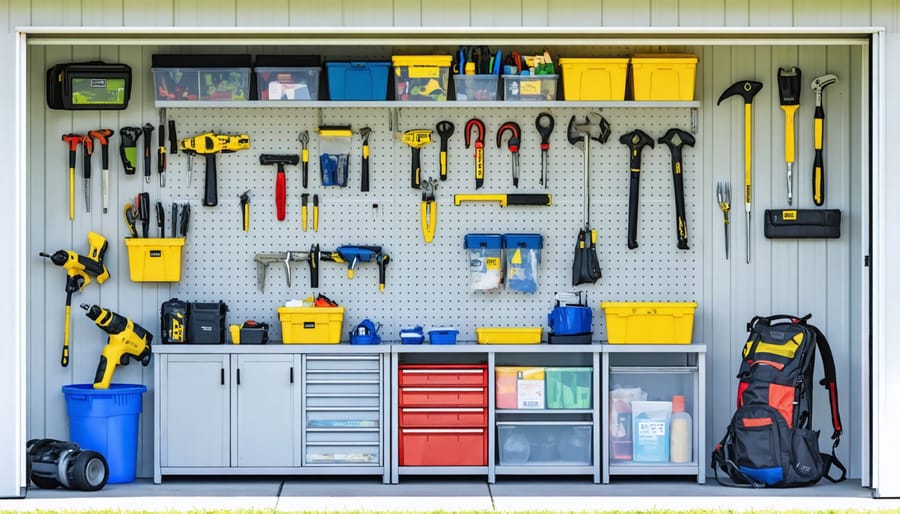
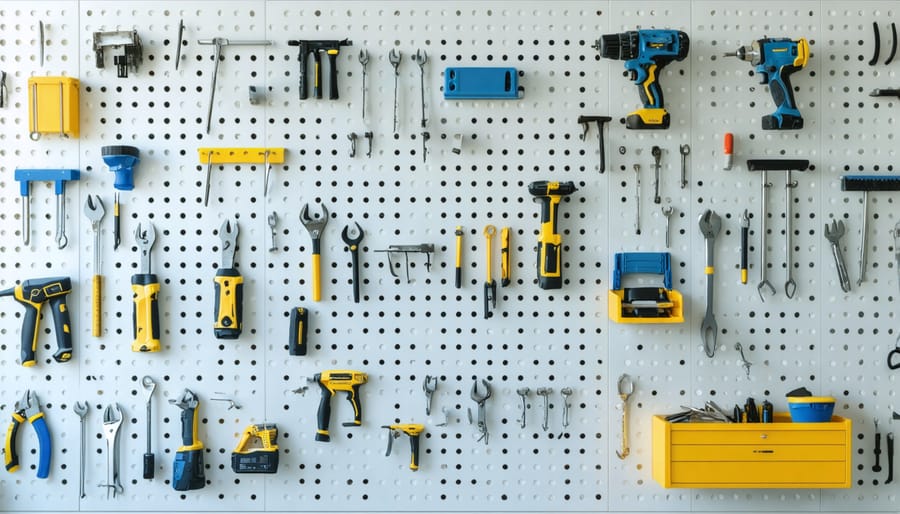
Wall-Mounted Organization Systems
Transforming your shed’s walls into efficient storage spaces is a game-changer for organization. Pegboards offer incredible versatility, allowing you to customize your tool layout and adjust it as your needs change. Installing a pegboard is straightforward – mount it securely to your shed’s wall studs, and you’ll instantly gain a flexible storage canvas for hanging everything from garden tools to power equipment.
Slatwall systems take wall organization to the next level with their sturdy, modern design. These systems can handle heavier items than pegboards and offer a cleaner look. The horizontal grooves accept various accessories, including hooks, baskets, and shelves, making it easy to create specialized storage zones for different categories of items.
Strategic hook arrangements are essential for maximizing vertical space. Consider using heavy-duty utility hooks for larger tools like rakes and shovels, while smaller J-hooks work perfectly for hand tools and garden supplies. Pro tip: arrange your hooks in a way that allows tools to nest together, saving precious wall space.
For frequently used items, create designated “zones” on your wall system. Keep gardening tools in one area, power tools in another, and safety equipment in an easily accessible spot. Adding simple labels above each zone helps maintain organization and makes it easier for family members to return items to their proper places.
Overhead Storage Solutions
When it comes to maximizing shed space, don’t forget to look up! Overhead storage solutions can effectively double your storage capacity by utilizing that often-overlooked ceiling space. Installing ceiling-mounted racks is a game-changer for storing seasonal items, sports equipment, and long-handled tools that you don’t need to access daily.
Consider heavy-duty overhead storage racks that bolt directly into your shed’s ceiling joists. These systems typically hold between 250-600 pounds, making them perfect for storing plastic bins, holiday decorations, or camping gear. For best results, install multiple racks with at least 24 inches of clearance between them to ensure easy access.
Pulley systems offer another brilliant overhead solution, especially for items you need to access more frequently. These systems make it easy to raise and lower kayaks, bicycles, or ladder storage without straining your back. Many DIY enthusiasts have found success with simple rope-and-pulley configurations, while others prefer pre-made systems with safety locks.
Pro tip: Before installing any overhead storage, ensure your shed’s structure can support the additional weight. Mark the locations of joists clearly, and always use appropriate mounting hardware. Consider installing LED strip lighting beneath your overhead storage to maintain visibility of items stored below.
Remember to keep your most frequently used items at ground level and reserve overhead storage for seasonal or occasional-use items. This strategy helps maintain an efficient workflow while maximizing your storage capacity.
Strategic Zoning for Easy Access
Seasonal Equipment Zones
Create dedicated zones in your shed based on seasonal usage to maximize efficiency and minimize clutter. Store summer gardening tools, lawn care equipment, and outdoor furniture cushions in an easily accessible area during warm months. When winter approaches, rotate these items to the back and bring snow shovels, ice melt, and winter equipment to the front.
Consider using clearly labeled bins or shelving units for each season, making it simple to locate and swap items as needed. Install hooks or pegboards at different heights to accommodate varying equipment sizes, and use overhead storage for off-season items that won’t be needed for several months.
A practical tip is to create a transition zone near the entrance where you can temporarily place items during seasonal changeovers. This prevents chaos during the switch and helps maintain organization throughout the year. Keep frequently used items at eye level, regardless of season, and consider using color-coded labels or zones to make identification even easier.
Remember to inspect and clean equipment before storing it away for the off-season, ensuring everything remains in good condition for next year’s use.
Tool Organization Stations
Transform your workspace into an efficiency hub with well-planned tool organization stations. Start by installing a pegboard wall system, which keeps frequently used tools visible and within arm’s reach. Customize it with various hooks and holders to accommodate different tool sizes and shapes.
Create designated zones for different tool categories – one area for power tools, another for hand tools, and a separate space for gardening implements. Install magnetic strips for metal tools and accessories, making them easy to grab and replace. A workbench with built-in storage drawers serves as both a work surface and organization solution.
Consider adding a mobile tool cart that can be wheeled where needed, perfect for projects in different areas of your shed. Label everything clearly using either printed tags or a label maker to maintain organization long-term. Don’t forget to include small parts organizers for nuts, bolts, and other hardware – clear containers work best for visibility.
For frequently used tool sets, create ready-to-go kits in portable toolboxes. This approach keeps related items together and makes starting projects quicker and more efficient.
Garden Supply Management
Keeping your gardening supplies organized is crucial for maintaining an efficient and enjoyable gardening experience. Start by implementing smart garden storage solutions that make the most of your available space. Use clear, labeled containers for storing seeds, organizing them by planting season or plant type. Consider installing a pegboard wall for hanging frequently used tools, making them easily accessible while keeping the floor space clear.
For fertilizers and soil amendments, designate a specific shelf with proper ventilation, and always store them in their original containers or clearly labeled alternatives. Use sturdy plastic bins with tight-fitting lids to protect these materials from moisture and pests. Create a simple inventory system using a whiteboard or clipboard to track quantities and expiration dates.
Small tools like trowels, pruners, and garden gloves can be organized in wall-mounted holders or repurposed kitchen utensil organizers. For long-handled tools like rakes and shovels, install vertical storage solutions such as tool hangers or a DIY PVC pipe organizer. Remember to position frequently used items at eye level and heavier items closer to the ground for safety and convenience.
Creative Storage Containers and Labels
Container Selection Guide
Selecting the right containers is crucial for creating versatile storage solutions in your shed. For gardening tools and supplies, opt for heavy-duty plastic bins with secure lids to protect against moisture and pests. Clear containers are ideal for frequently used items, making it easy to spot what you need at a glance.
Consider stackable containers with flat tops for maximizing vertical space. These work particularly well for seasonal decorations, sporting equipment, and smaller power tools. For chemicals, fertilizers, and potentially hazardous materials, choose containers with childproof locks and clearly labeled contents.
Metal containers are perfect for storing sharp tools and hardware, while mesh baskets allow air circulation for items that need to breathe, like garden gloves and rags. Don’t overlook the convenience of rolling containers for heavier items – they make accessing and moving supplies much easier.
For smaller items like nails, screws, and garden seeds, use compartmentalized organizers or mason jars. Label everything clearly and consider a color-coding system – perhaps blue for winter items, green for gardening supplies, and red for emergency equipment. This simple visual system makes finding items quick and intuitive.
Effective Labeling Systems
An effective labeling system transforms your shed from a cluttered space into an organized haven. Start by investing in a quality label maker or creating weather-resistant labels using clear tape over printed paper. Color-coding your labels can add an extra layer of organization – try using different colors for seasonal items, gardening tools, or DIY supplies.
For bins and containers, place labels on both the front and top for easy identification from any angle. Consider using large, bold text that’s readable from a distance, and include both pictures and words for items that multiple family members need to access. Clear plastic pouches that stick to bins allow you to swap out labels as your storage needs change.
Create a master inventory list that matches your labeling system and keep it posted near the shed entrance. This simple step saves time when searching for specific items and helps maintain organization long-term. For frequently used items, add location markers on shelves or wall sections that correspond to your labeling system.
Remember to use waterproof labels for outdoor storage and update your system seasonally to reflect changing storage needs. A well-maintained labeling system not only keeps your shed organized but also makes it easier for everyone in the household to find and return items to their proper places.
Mobile Storage Solutions
Rolling Tool Carts
Rolling tool carts are game-changers when it comes to shed organization, offering the perfect blend of storage and mobility. These versatile units allow you to keep your most-used tools within easy reach while maintaining the flexibility to move them wherever needed. Think of them as your personal mobile workstation that adapts to your current project.
When selecting a rolling tool cart, look for models with multiple drawers of varying depths to accommodate different tool sizes. The top surface can serve as a temporary workbench, while heavy-duty wheels make movement smooth, even on uneven shed floors. Many homeowners find that organizing tools by project type or frequency of use in different drawers helps streamline their workflow.
Pro tip: Choose a cart with locking wheels to prevent unwanted movement while you work. Consider adding drawer liners to prevent tools from sliding around, and use drawer organizers to create designated spaces for smaller items like screwdrivers and wrenches.
For maximum efficiency, keep your most frequently used tools in the top drawers and heavier items in the bottom drawers for better stability. Some DIY enthusiasts even customize their carts with magnetic strips on the sides for holding metal tools or adding hooks for hanging frequently used items.
Remember to regularly clean and maintain your rolling cart’s wheels and drawer slides to ensure smooth operation throughout the years.
Portable Storage Bins
Portable storage bins are game-changers when it comes to creating a flexible and efficient shed organization system. These versatile containers allow you to adapt your storage setup as your needs change throughout the year. Choose clear plastic bins to easily identify contents, or opt for sturdy, stackable containers with secure lids to protect items from dust and moisture.
Consider investing in bins with wheels for heavier items like garden tools or automotive supplies. These rolling solutions make it simple to access items stored at the back of your shed without having to shuffle everything around. For smaller items, use varying bin sizes to create modular storage systems that can be rearranged as needed.
Label each container clearly and consider creating a simple inventory system. Many homeowners find success with color-coding their bins based on seasons or usage categories. For instance, use green bins for gardening supplies, red for holiday decorations, and blue for pool accessories.
To maximize your portable storage system, place frequently used items in easily accessible bins near the front of your shed. Less-used seasonal items can go in bins stored higher up or toward the back. Remember to leave clear pathways between your storage zones to maintain easy access to all your bins.
A tip from experienced shed organizers: Keep a few empty bins on hand for temporary storage during project work or seasonal transitions. This provides flexibility when you need to quickly reorganize or temporarily store items during shed cleanouts.
Creating an organized shed is more than just a one-time project – it’s an investment in your home’s functionality and your peace of mind. By implementing the strategies we’ve discussed, from vertical storage solutions to clever categorization systems, you can transform your cluttered shed into an efficient, accessible space that truly works for you. The key to success lies in choosing the right combination of storage solutions that match your specific needs and available space.
Remember that organizing outdoor storage spaces is an ongoing process that may require occasional adjustments as your storage needs evolve. Start with the basics: clear everything out, group similar items together, and invest in appropriate storage solutions. Then, maintain your organization system by regularly reviewing and reorganizing items as needed.
Don’t feel overwhelmed by thinking you need to implement every suggestion at once. Begin with one area or strategy that will make the biggest impact on your daily routine, then gradually incorporate additional organizing solutions as time and budget allow. The most important step is simply getting started – even small improvements in your shed’s organization can lead to significant benefits in accessibility and efficiency.
Take action today by choosing just one idea from this guide and implementing it in your shed. You’ll be amazed at how quickly these practical solutions can transform your storage space into a well-organized, functional area that makes finding and accessing your items a breeze.